Programming your Liftmaster garage door opener with a purple learn button doesn’t have to be a headache. At LEARNS.EDU.VN, we provide simple, step-by-step instructions to get your remote working smoothly, ensuring convenience and security. Discover the ease of garage door opener programming and gain control over your home access with confidence, leveraging key insights into remote control setup and garage door technology for modern homeowners.
1. Understanding the Liftmaster Garage Door Opener System
Before diving into the programming process, let’s understand the core components of a Liftmaster garage door opener system. This includes the garage door opener unit itself, the remote control, and the safety sensors. Understanding these components is crucial for successful programming and troubleshooting.
1.1. Garage Door Opener Unit
The garage door opener unit is the main component that controls the opening and closing of your garage door. It typically includes a motor, a chain or belt drive system, and a control panel with a learn button. The learn button is used to program the remote control to the opener unit. LiftMaster units are known for their durability and advanced features, readily available and come with a competitive product warranty.
1.2. Remote Control
The remote control is a handheld device that allows you to operate your garage door from a distance. It transmits a signal to the opener unit, which then activates the motor to open or close the door. Different models of Liftmaster remotes are available, each with its own programming procedure.
Here are a few common LiftMaster remote models:
- LiftMaster 891LM
- LiftMaster 893LM
- LiftMaster 890MAX
- LiftMaster 893MAX
- LiftMaster 375UT
1.3. Safety Sensors
Safety sensors are located near the bottom of the garage door opening. They use an infrared beam to detect obstructions in the door’s path. If an obstruction is detected, the door will automatically stop and reverse, preventing accidents and injuries. These sensors are a crucial safety feature of modern garage door opener systems.
2. Identifying the “Learn” Button on Your Liftmaster Opener
The “Learn” button is a critical component for programming your Liftmaster remote. This button allows the remote to sync with the garage door opener, enabling seamless operation. Locating and identifying this button correctly is the first step in the programming process.
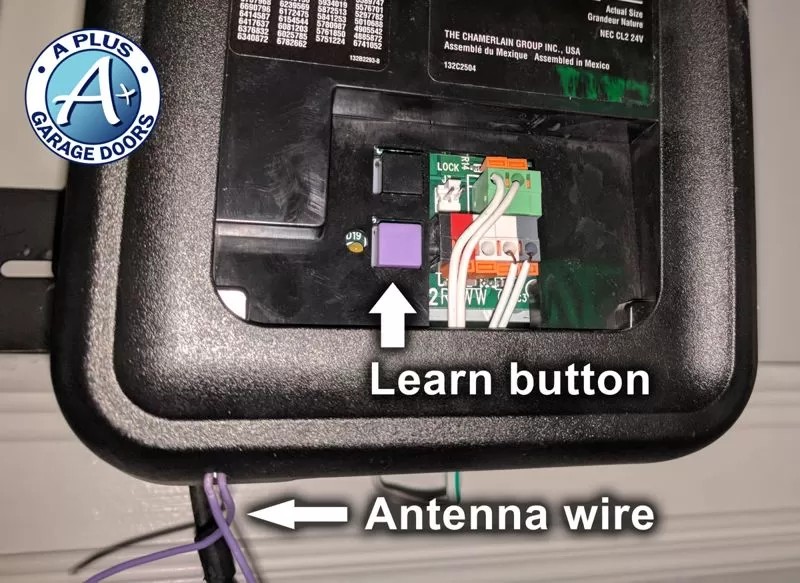
2.1. Location of the “Learn” Button
The “Learn” button is typically located on the back or side of the garage door opener motor unit. You may need a ladder to reach it. Look for a small, colored button, usually near the antenna wire. The color of the button indicates the type of security system your opener uses.
2.2. Identifying the Purple “Learn” Button
The purple “Learn” button indicates that your Liftmaster opener uses Security+ 315 MHz rolling code technology. This technology provides enhanced security by changing the access code each time the remote is used, preventing unauthorized access. If your opener has a purple “Learn” button, ensure you follow the specific programming steps for this type of system.
2.3. Other “Learn” Button Colors
While this article focuses on the purple “Learn” button, it’s helpful to know about other colors and what they signify:
- Yellow: Security+ 2.0 technology
- Red/Orange: Older Liftmaster models, often using a DIP switch system
- Green: Older models, typically using a 390 MHz frequency
3. Essential Tools and Preparations
Before you begin programming your Liftmaster remote, gathering the necessary tools and making essential preparations will ensure a smooth and efficient process.
3.1. Gathering Necessary Tools
Here are the tools you’ll need:
- Ladder: To reach the “Learn” button on the garage door opener unit.
- Remote Control: The Liftmaster remote you want to program.
- New Batteries: Ensure the remote has fresh batteries for optimal performance.
- Paper Clip or Pin: For some remote models, you may need a small tool to press the programming button.
3.2. Checking Remote Compatibility
Ensure that your Liftmaster remote is compatible with your garage door opener. Refer to the opener’s manual or the Liftmaster website to verify compatibility. Using an incompatible remote can lead to programming issues and frustration.
3.3. Safety Precautions
Follow these safety precautions:
- Disconnect Power: Before working on the garage door opener, disconnect the power to prevent accidental electrical shock.
- Clear the Area: Ensure the area around the garage door is clear of obstructions and people.
- Use a Stable Ladder: When using a ladder, make sure it is stable and properly positioned.
4. Step-by-Step Guide: Programming Liftmaster Remote with Purple “Learn” Button
Programming your Liftmaster remote with a purple “Learn” button involves a few simple steps. Follow this guide to successfully sync your remote with the garage door opener.
4.1. Accessing the “Learn” Button
- Locate the Opener Unit: Find the garage door opener unit in your garage.
- Use a Ladder: Position a ladder safely beneath the opener unit.
- Locate the “Learn” Button: Look for the purple “Learn” button on the back or side of the unit, near the antenna wire.
4.2. Activating Programming Mode
- Press the “Learn” Button: Press the purple “Learn” button once. A small LED light next to the button will illuminate, indicating that the opener is in programming mode. Note that programming mode typically lasts for only 30 seconds.
- Prepare the Remote: Have your Liftmaster remote ready for programming.
4.3. Syncing the Remote
- Press the Remote Button: Within 30 seconds of pressing the “Learn” button, press and hold the button on the remote that you want to use to control the garage door.
- Hold and Release: Continue holding the remote button until the garage door opener lights flash or you hear two clicks. This indicates that the remote has been successfully programmed.
- Release the Button: Release the remote button.
4.4. Testing the Remote
- Wait: Allow a few seconds for the system to finalize the programming.
- Test the Remote: Press the programmed button on the remote to test if it opens and closes the garage door.
- Troubleshooting: If the remote doesn’t work, repeat the programming steps or consult the troubleshooting section below.
5. Programming Different LiftMaster Remote Models
While the basic steps remain the same, programming may vary slightly depending on the LiftMaster remote model. Here are specific instructions for some common models.
5.1. LiftMaster 891LM and 893LM Remotes
- Press the Learn button to enter programming mode.
- Press the Learn button again; the LED will flash once.
- Press and hold the button on the remote you want to use with your opener.
- Release the button when the opener’s lights blink or two clicks are heard.
- Test the remote.
5.2. LiftMaster 890MAX and 893MAX Remotes
- Press and hold the program button until the LED turns on. Slide off the clip to reveal the button on the 893MAX remote, which can be pressed using the long end of the clip. For the mini keychain 893MAX remote, the button can be reached using a paper clip or pin through a hole in the side. See the above images for reference.
- Press and release the button you want to use with your opener based on the color of the Learn button:
- Yellow: 1 press
- Purple: 2 presses
- Red/orange: 3 presses
- Green: 4 presses
- Exit programming mode by pressing any button other than the one from the previous step.
- Press the Learn button on the opener or control panel.
- Press the programmed button from step 2 until the opener lights flash or you hear two clicks.
- Test the remote.
5.3. LiftMaster 375UT Remote
- Make sure your garage door is closed.
- Slide open the battery cover. Hold the program button until the LED lights up, about two seconds.
- Press and release the Learn button on your opener or control panel.
- Press and release the button you want to use with your opener. Make sure you wait for the LED to stop blinking after each press. The number of presses needed is based on the color of the Learn button on your unit:
- Yellow: 8 presses
- Purple: 3 presses
- Red/orange: 2 presses
- Green: 4 presses
- Press the program button to exit programming mode.
- Test the remote.
6. Troubleshooting Common Programming Issues
Even with careful preparation, you may encounter issues while programming your Liftmaster remote. Here are some common problems and how to resolve them.
6.1. Remote Not Responding
- Check Batteries: Ensure the remote has fresh batteries. Low batteries are a common cause of remote failure.
- Verify Compatibility: Make sure the remote is compatible with your garage door opener model.
- Reprogram: Repeat the programming steps carefully. Ensure you are within range of the opener unit.
6.2. Opener Not Entering Programming Mode
- “Learn” Button Issues: Ensure the “Learn” button is functioning correctly. Press it firmly and check if the LED light illuminates.
- Power Cycle: Disconnect the power to the opener unit for a few minutes, then reconnect and try again.
- Check Wiring: Inspect the wiring connections to the opener unit to ensure they are secure.
6.3. Interference Issues
- Other Devices: Other electronic devices can sometimes interfere with the remote signal. Try moving other devices away from the opener unit.
- Antenna: Check the antenna wire on the opener unit. Make sure it is hanging freely and not obstructed.
- Range: Ensure you are within the effective range of the remote.
7. Advanced Features and Settings
Liftmaster garage door openers come with several advanced features and settings that can enhance your experience. Here are some notable features.
7.1. MyQ Technology
MyQ technology allows you to control and monitor your garage door from your smartphone or tablet. With the MyQ app, you can open and close your garage door remotely, receive alerts when the door is opened or closed, and even grant access to family members or service providers.
7.2. Security+ 2.0
Security+ 2.0 is an advanced security feature that uses rolling code technology to prevent unauthorized access. Each time the remote is used, a new access code is generated, making it virtually impossible for someone to steal the code and gain entry.
7.3. Timer-to-Close
The timer-to-close feature automatically closes the garage door after a set period. This can be useful if you often forget to close the door. You can set the timer for a specific duration, such as 5, 10, or 15 minutes.
8. Maintaining Your Liftmaster Garage Door Opener
Proper maintenance is essential for ensuring the longevity and reliability of your Liftmaster garage door opener. Here are some maintenance tips.
8.1. Regular Inspections
- Monthly Checks: Inspect the garage door opener system monthly. Look for any signs of wear and tear, such as frayed cables, loose bolts, or damaged components.
- Safety Sensor Alignment: Ensure the safety sensors are properly aligned. Clean the lenses with a soft cloth to remove dirt and debris.
- Lubrication: Lubricate the moving parts of the opener system, such as the chain or belt drive, rollers, and hinges. Use a silicone-based lubricant.
8.2. Battery Replacement
- Remote Batteries: Replace the batteries in your remote control regularly. Low batteries can cause the remote to malfunction.
- Backup Battery: If your opener has a backup battery, check it periodically to ensure it is functioning correctly. Replace the battery as needed.
8.3. Professional Servicing
- Annual Checkup: Schedule an annual checkup with a qualified garage door technician. They can inspect the system, perform necessary maintenance, and identify potential problems before they become major issues.
- Repairs: If you notice any problems with your garage door opener, such as unusual noises, erratic movements, or safety sensor issues, contact a professional for repairs.
9. Security Tips for Your Garage Door
Your garage door is a significant entry point to your home. Implementing security measures can protect your property and loved ones.
9.1. Rolling Code Technology
- Enable Security+ 2.0: Ensure that your Liftmaster opener is using Security+ 2.0 rolling code technology. This feature provides enhanced security by changing the access code each time the remote is used.
- Regular Updates: Keep your garage door opener software updated to the latest version. Manufacturers often release updates that include security enhancements.
9.2. Remote Control Security
- Keep Remotes Secure: Store your remote controls in a safe place, such as your car’s glove compartment or on a key chain. Avoid leaving them in plain sight.
- Clear Memory: If you lose a remote, clear the memory of your garage door opener to prevent unauthorized access.
To erase all codes from memory, press and hold the Learn button on the opener until the Learn LED goes out, usually about 6 seconds. This will wipe all previous codes from memory. - Smartphone Control: Use a smartphone app with password protection for added security.
9.3. Physical Security Measures
- Reinforce the Door: Reinforce your garage door with a steel brace to prevent it from being forced open.
- Secure the Emergency Release: Secure the emergency release handle to prevent intruders from using it to open the door manually.
- Install a Garage Door Monitor: A garage door monitor alerts you if the door is left open. Some monitors can even close the door remotely.
10. The Future of Garage Door Technology
The future of garage door technology is evolving rapidly, with advancements aimed at enhancing convenience, security, and connectivity.
10.1. Smart Home Integration
- Connectivity: Expect to see more garage door openers that seamlessly integrate with smart home systems like Amazon Alexa, Google Assistant, and Apple HomeKit.
- Voice Control: Voice control will become more prevalent, allowing you to open and close your garage door using voice commands.
- IFTTT Integration: Integration with IFTTT (If This Then That) will enable you to create custom automations, such as automatically turning on the lights when the garage door opens.
10.2. Enhanced Security Features
- Biometric Access: Biometric access, such as fingerprint scanning and facial recognition, may become more common for garage door entry.
- AI-Powered Security: AI-powered security systems will analyze patterns and detect anomalies to prevent unauthorized access.
- Real-Time Monitoring: Real-time monitoring with video surveillance will provide added security and peace of mind.
10.3. Sustainable Solutions
- Energy Efficiency: Garage door openers will become more energy-efficient, reducing energy consumption and lowering utility bills.
- Solar Power: Solar-powered garage door openers will become more popular, offering a sustainable and eco-friendly solution.
- Recycled Materials: Manufacturers will increasingly use recycled materials in the production of garage door openers and components.
FAQ: Programming Liftmaster Garage Door Opener with Purple Learn Button
Q1: What does the purple “Learn” button mean on my Liftmaster garage door opener?
The purple “Learn” button indicates that your Liftmaster opener uses Security+ 315 MHz rolling code technology, providing enhanced security.
Q2: How do I know if my Liftmaster remote is compatible with my garage door opener?
Refer to the opener’s manual or the Liftmaster website to verify compatibility. You can also check the remote’s model number against the list of compatible models provided by Liftmaster.
Q3: What do I do if my Liftmaster remote is not responding after programming?
Check the batteries, verify compatibility, and repeat the programming steps carefully. Ensure you are within range of the opener unit.
Q4: How do I clear the memory of my Liftmaster garage door opener?
To erase all codes from memory, press and hold the “Learn” button on the opener until the “Learn” LED goes out, usually about 6 seconds. This will wipe all previous codes from memory.
Q5: Can I use my smartphone to control my Liftmaster garage door opener?
Yes, with MyQ technology, you can control and monitor your garage door from your smartphone or tablet.
Q6: How often should I replace the batteries in my Liftmaster remote?
Replace the batteries in your remote control regularly, typically every 1-2 years, depending on usage.
Q7: What are the safety precautions I should take when programming my Liftmaster remote?
Disconnect power, clear the area, and use a stable ladder.
Q8: What is Security+ 2.0 technology?
Security+ 2.0 is an advanced security feature that uses rolling code technology to prevent unauthorized access.
Q9: How can I secure my garage door to prevent break-ins?
Reinforce the door, secure the emergency release, and install a garage door monitor.
Q10: Where can I find the manual for my Liftmaster garage door opener or remote?
Most LiftMaster products have manuals available online. Start by using the Chamberlain/LiftMaster search page and search for your model number of your remote and/or opener for more information.
Conclusion
Programming your Liftmaster garage door opener with a purple “Learn” button is a straightforward process that enhances your home’s convenience and security. By following the steps outlined in this guide, you can successfully sync your remote and enjoy seamless operation. Remember to maintain your system regularly and implement security measures to protect your property and loved ones.
Ready to expand your knowledge and skills? Explore LEARNS.EDU.VN for a wealth of educational content and courses designed to empower you. Whether you’re looking to master new technologies, enhance your professional skills, or simply learn something new, LEARNS.EDU.VN is your go-to resource. Visit us today at LEARNS.EDU.VN and start your learning journey. Contact us at 123 Education Way, Learnville, CA 90210, United States, or via Whatsapp at +1 555-555-1212 for more information.
By optimizing your understanding of Liftmaster garage door openers, remote programming, and garage door technology, you gain control over your home access and enhance your overall quality of life. At learns.edu.vn, we’re here to support you every step of the way with expert guidance and valuable resources. Embrace the power of knowledge and unlock your potential today.