Learning ISO photography is vital because it empowers you to control image brightness, especially in challenging lighting conditions, and LEARNS.EDU.VN is here to guide you. Mastering ISO, along with aperture and shutter speed, unlocks creative possibilities and improves your photographic skills, reducing noise and maximizing image quality. You’ll discover how ISO affects exposure, dynamic range, and the overall aesthetic of your photos, enhancing your photography skills with LEARNS.EDU.VN.
1. What is ISO in Photography?
ISO in photography refers to the sensitivity of your camera’s sensor to light. Essentially, it’s a setting that brightens or darkens your photo. As you increase the ISO number, your images become brighter. Understanding ISO is crucial because it allows you to capture images in various lighting conditions, giving you more flexibility with aperture and shutter speed, as detailed in courses available at LEARNS.EDU.VN.
ISO, which stands for “International Organization for Standardization”, measures the sensitivity of the image sensor. However, it’s worth noting that camera ISO does not directly pertain to the organization that establishes various technology and product standards. This system was created by combining two film standards known as ASA and DIN into ISO standards back in 1974, which were then revised for film and digital photography. From that point onward, they were simply referred to as “ISO.” Initially, ISO was used to define film sensitivity, but digital camera manufacturers later adopted it to maintain brightness levels similar to those of film. The ISO setting is essential for achieving proper exposure, especially when shooting in manual mode, which you can learn more about through resources at LEARNS.EDU.VN.
2. What Are Common ISO Values in Photography?
Common ISO values range from low to high, each affecting image brightness. A typical set includes:
| ISO Value | Brightness Level | Usage Scenario |
|---|---|---|
| ISO 100 | Low | Bright daylight, well-lit studios |
| ISO 200 | Slightly Brighter | Sunny outdoor conditions |
| ISO 400 | Moderate | Overcast days, indoor with good lighting |
| ISO 800 | Bright | Indoor sports, evening outdoor shots |
| ISO 1600 | Very Bright | Low-light environments, night photography |
| ISO 3200 | Extremely Bright | Very dark conditions, concerts, astrophotography |
| ISO 6400+ | Exceptionally Bright | Extremely low-light, surveillance, specialized uses |
Doubling the ISO speed doubles the brightness of the photo. For example, ISO 400 is twice as bright as ISO 200. Understanding these values helps photographers adjust to different lighting scenarios effectively, enhancing their ability to capture well-exposed images. This knowledge is vital for photographers of all levels and can be further developed through resources like those offered at LEARNS.EDU.VN.
3. What is Base ISO and Why is it Important?
Base ISO is the lowest native ISO on your camera, typically ISO 100 or 200. This setting provides the highest image quality with minimal noise. Sticking to the base ISO is ideal for optimal image clarity and detail, and it should be used whenever lighting conditions allow, as taught in detail at LEARNS.EDU.VN.
Base ISO is crucial because it maximizes image quality by minimizing noise. It’s the sweet spot where your camera’s sensor operates most efficiently. When there’s ample light, using base ISO ensures the cleanest, most detailed images possible.
Some cameras offer extended ISO ranges with “HI” and “LO” settings that go beyond the native range. However, these settings are simulated and reduce image quality. Avoiding them is recommended to maintain the integrity of your photos. Trust in the base ISO for the best possible results, and let LEARNS.EDU.VN guide you through the nuances of ISO settings.
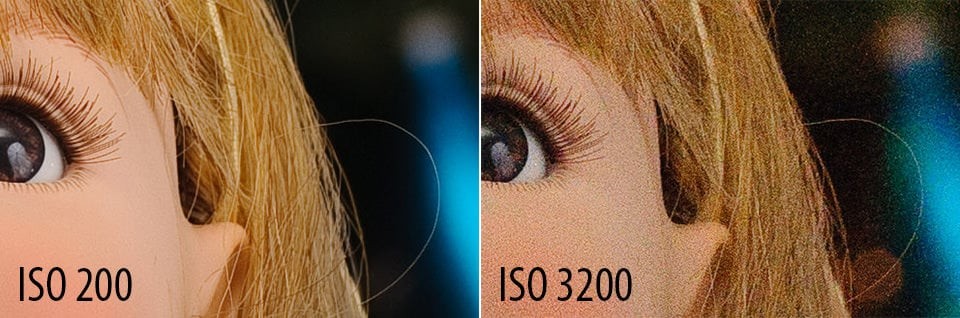
4. How Does Low vs. High ISO Affect Noise Visibility?
Low ISO settings (e.g., ISO 100-200) produce images with minimal noise, while high ISO settings (e.g., ISO 3200+) introduce noticeable graininess. The trade-off is that high ISO allows for shooting in low-light conditions but at the cost of image quality. Knowing when to use each setting is essential for achieving the desired result, a skill honed through practice and resources like those available at LEARNS.EDU.VN.
For example, an image taken at ISO 200 will have significantly less noise than one taken at ISO 3200. The difference is clear: higher ISO values result in more graininess and blotchy colors. Therefore, avoid high ISOs whenever possible unless necessary. The courses at LEARNS.EDU.VN can provide additional insights and hands-on practice to master ISO settings and noise reduction techniques.
5. How Can You Change the ISO Setting on Your Camera?
Changing ISO settings varies by camera model, but here are common methods:
- Manual Modes: Exit Auto mode and switch to Manual, Shutter Priority, Aperture Priority, or Program mode.
- Menu Access: On entry-level DSLRs and mirrorless cameras, open the menu (or quick menu) to find the ISO section.
- Dedicated Button: Higher-end cameras often have a dedicated “ISO” button. Press it while spinning a wheel to change the setting.
- Dedicated Wheel: Some cameras have a wheel specifically for ISO settings, making adjustments easier.
Consult your camera’s manual for specific instructions. Being familiar with changing ISO quickly is valuable, especially in dynamic shooting situations, a skill that LEARNS.EDU.VN can help you develop.
6. What Camera ISO Should You Use in Different Scenarios?
Different situations call for different ISO settings. Here are some common scenarios:
- Low ISO: Use the lowest ISO (base ISO) in well-lit conditions to minimize noise.
- High ISO: Increase ISO in low-light situations to maintain a fast shutter speed and avoid motion blur.
For example, if you’re shooting handheld indoors without a flash, a higher ISO will help capture the moment without blur. When photographing fast action, such as birds in flight, raising the ISO is often necessary. LEARNS.EDU.VN offers detailed tutorials on adapting ISO settings to various photographic challenges.
7. When Should You Use Low ISO Settings?
You should use low ISO settings (typically ISO 100 or 200) whenever there is plenty of light. This minimizes noise and maximizes image quality. Even in dim environments, you can use a low ISO if your camera is mounted on a tripod, allowing for longer shutter speeds without introducing camera shake. However, be mindful that moving subjects may appear as a blur in these conditions.
Example Scenario:
Imagine you’re photographing a landscape during the day. Because there’s ample sunlight, you can set your ISO to 100 to ensure the crispest, most detailed image. You’ll avoid unnecessary noise, and the resulting photo will have vibrant colors and sharp textures.
Understanding when to leverage low ISO settings is crucial for photographers aiming for pristine image quality. LEARNS.EDU.VN offers comprehensive guidance on optimizing ISO in various shooting scenarios.
8. When is it Appropriate to Use High ISO Settings?
High ISO settings become essential when shooting in low-light conditions or when you need a fast shutter speed to freeze motion. The trade-off is increased noise, but it’s often necessary to capture a usable image. Knowing when and how to use high ISO is critical for versatile photography skills, as taught extensively at LEARNS.EDU.VN.
Example Scenarios:
- Indoor Sports Events: When photographing basketball games indoors, a high ISO allows you to use a fast shutter speed to freeze the action.
- Night Photography: Capturing the stars or cityscapes at night requires a high ISO to gather enough light.
- Concerts and Performances: In dimly lit venues, a high ISO helps capture sharp images of performers without significant motion blur.
Using a high ISO allows photographers to capture images that would otherwise be impossible. LEARNS.EDU.VN provides detailed tutorials on managing noise and optimizing image quality at high ISO settings.
9. What is Auto ISO and How Does it Work?
Auto ISO is a camera setting that automatically adjusts the ISO based on the lighting conditions. You can set a maximum ISO limit to prevent excessive noise. This mode is particularly useful in dynamic lighting situations, allowing the camera to adapt quickly while maintaining acceptable image quality. Mastering Auto ISO is a key skill covered in LEARNS.EDU.VN courses.
Auto ISO works by automatically increasing the ISO until the image is properly exposed. You can typically set a minimum shutter speed to avoid blur and a maximum ISO to control noise.
Benefits of Auto ISO:
- Quick Adaptation: Easily adjusts to changing light.
- Convenience: Simplifies shooting in variable conditions.
- Noise Control: Allows setting a maximum ISO to limit noise.
Using Auto ISO can greatly improve your shooting efficiency, especially when combined with the knowledge and skills gained from LEARNS.EDU.VN.
10. How Can You Minimize Noise and Maximize Image Quality When Using ISO?
To minimize noise and maximize image quality, follow these steps:
- Aperture: Select the appropriate aperture for your desired depth of field.
- Base ISO: Set ISO to its base value for optimal image quality.
- Shutter Speed: Adjust shutter speed for proper exposure.
- Motion Blur: If the subject is blurry, increase ISO and use a faster shutter speed.
- Wider Aperture: If ISO is too high, use a wider aperture to lower it.
Balancing these elements is crucial for achieving the best possible image. LEARNS.EDU.VN provides in-depth guidance on mastering these techniques to optimize image quality in any situation.
By following these steps, you can strike the right balance between noise, motion blur, and depth of field, ensuring high-quality images every time.
11. What Are Some Common Myths and Misconceptions About ISO?
There are several myths about ISO that can mislead photographers:
- ISO as Sensor Sensitivity: ISO doesn’t directly change the sensor’s sensitivity; it adjusts the amplification of the signal.
- ISO as Part of Exposure: ISO doesn’t capture more light; it brightens the existing image.
- Raising ISO Equals Computer Brightening: Adjusting ISO in-camera generally provides better image quality than brightening in post-processing.
Understanding the reality behind these myths can improve your photography. LEARNS.EDU.VN offers courses that debunk these misconceptions and provide accurate, practical knowledge.
Let’s clarify some of these myths:
Myth 1: ISO is Sensor Sensitivity.
While it’s a common way to think about ISO, it’s not technically correct. Digital sensors have a fixed sensitivity. ISO settings adjust the amplification of the signal from the sensor, not the sensor’s inherent sensitivity.
Myth 2: ISO is Part of Exposure.
Exposure consists of aperture, shutter speed, and ISO working together. However, ISO doesn’t capture more light like aperture and shutter speed do. Instead, it brightens the existing image by amplifying the signal.
Myth 3: Raising ISO is Just Like Brightening Your Photo on a Computer.
Although both methods brighten the image and may reveal more noise, adjusting ISO in-camera typically yields better results than brightening in post-processing. In-camera adjustments optimize the signal before recording the image, preserving more detail.
12. What is the Best ISO Setting for Low-Light Conditions?
In low-light conditions, the best ISO setting is one that allows you to achieve a proper exposure without introducing excessive motion blur or camera shake. Start with a higher ISO, such as 1600 or 3200, and adjust as needed to balance brightness and image quality. Experimentation is key, and LEARNS.EDU.VN provides resources to help you find the optimal settings for any situation.
When shooting in low-light, you often need to increase the ISO to compensate for the lack of light. However, raising the ISO too much can result in significant noise. Here are some general guidelines:
- ISO 800-1600: Suitable for moderately low-light situations, such as indoors with some ambient light.
- ISO 3200-6400: Necessary for very low-light conditions, such as concerts or dimly lit streets at night.
- ISO 6400 and Above: Use when there is almost no light available, but be prepared for noticeable noise.
Remember to check your images as you shoot and adjust the ISO as needed to achieve the desired balance between brightness and noise.
13. What is the Ideal ISO Setting for Landscape Photography?
For landscape photography, the ideal ISO setting is typically the base ISO of your camera, usually ISO 100. This ensures the highest image quality with the least amount of noise. Using a tripod is recommended to allow for longer shutter speeds without causing blur, maximizing detail and clarity in your landscapes. Explore advanced techniques at LEARNS.EDU.VN to further refine your landscape photography skills.
When photographing landscapes, you want to capture as much detail and dynamic range as possible. Here are some tips for setting the ISO:
- Use Base ISO: Set your camera to its base ISO (usually ISO 100) to minimize noise and maximize image quality.
- Use a Tripod: A tripod allows you to use longer shutter speeds without introducing camera shake.
- Check the Light Meter: Ensure that your image is properly exposed by checking the light meter.
By using these techniques, you can capture stunning landscapes with exceptional clarity and detail.
14. Should You Use ISO Automatically or Manually?
The decision to use ISO automatically or manually depends on the shooting situation. For landscapes and controlled environments, manual ISO allows for precise control over image quality. For dynamic situations, Auto ISO can quickly adapt to changing light while maintaining acceptable image quality. Understanding when to use each mode is a valuable skill, and LEARNS.EDU.VN offers guidance on making the right choice.
Here’s a breakdown to help you decide:
- Manual ISO:
- Pros: Full control over image quality, consistent results.
- Cons: Requires constant adjustment, may miss fleeting moments.
- Best for: Landscape, studio, and controlled lighting.
- Auto ISO:
- Pros: Quickly adapts to changing light, ensures proper exposure.
- Cons: May produce higher noise levels, less control over image quality.
- Best for: Street, sports, and unpredictable lighting.
Ultimately, the best approach depends on your shooting style and the demands of the situation.
15. How Does ISO Affect Dynamic Range?
ISO can indirectly affect dynamic range, which is the range of light to dark tones a camera can capture. Higher ISO settings can reduce dynamic range by increasing noise, which obscures subtle tonal variations. Using lower ISO settings when possible will help preserve the full dynamic range of your scene. LEARNS.EDU.VN provides detailed explanations and techniques for maximizing dynamic range in your photographs.
Dynamic range is the range of tones from the darkest to the brightest that your camera can capture. Here’s how ISO affects it:
- Low ISO: Low ISO settings (like ISO 100) maximize dynamic range by minimizing noise. This allows you to capture more details in both highlights and shadows.
- High ISO: High ISO settings reduce dynamic range by increasing noise. The increased noise can obscure subtle tonal variations and reduce overall image quality.
To maximize dynamic range, always use the lowest ISO possible for the given shooting conditions.
16. How Does ISO Relate to Shutter Speed and Aperture?
ISO, shutter speed, and aperture form the exposure triangle. ISO affects the sensitivity to light, shutter speed controls the duration of light exposure, and aperture regulates the amount of light entering the lens. Balancing these three elements is essential for achieving a well-exposed image, and LEARNS.EDU.VN offers comprehensive courses on mastering this balance.
Here’s a breakdown of how they interact:
- ISO: Determines the sensitivity to light. Higher ISOs are used in low-light conditions but can introduce noise.
- Shutter Speed: Controls the duration of light exposure. Faster shutter speeds freeze motion, while slower speeds allow more light in but can cause blur.
- Aperture: Regulates the amount of light entering the lens. Wider apertures (lower f-numbers) allow more light and create shallow depth of field, while narrower apertures (higher f-numbers) allow less light and create greater depth of field.
Balancing these three elements is the key to achieving a well-exposed and visually appealing photograph.
17. What Advanced Techniques Can Improve Your ISO Photography?
Advanced techniques for improving ISO photography include:
- Exposure Compensation: Adjusting brightness without changing ISO in certain modes.
- Noise Reduction: Using software to minimize noise in high-ISO images.
- Shooting in RAW: Capturing more data for better post-processing and noise reduction.
Mastering these techniques will enhance your ability to create stunning images in any condition. LEARNS.EDU.VN provides in-depth tutorials and courses on these and other advanced photography skills.
Let’s explore some of these techniques further:
- Exposure Compensation:
- What it is: Adjusting the overall brightness of an image without changing the ISO, aperture, or shutter speed directly.
- How it helps: Fine-tunes exposure in automatic modes to achieve the desired brightness.
- Noise Reduction:
- What it is: Using software tools to reduce the appearance of noise in high-ISO images.
- How it helps: Cleans up images and improves overall image quality.
- Shooting in RAW:
- What it is: Capturing images in RAW format, which preserves more data than JPEG.
- How it helps: Provides greater flexibility for post-processing and noise reduction.
By using these advanced techniques, you can overcome the challenges of high-ISO photography and create stunning images in any situation.
18. How Does Camera Technology Affect ISO Performance?
Advancements in camera technology, such as improved sensors and processing algorithms, have significantly enhanced ISO performance. Modern cameras can produce cleaner images at higher ISO settings compared to older models. Staying updated with the latest technology can greatly improve your photography, and LEARNS.EDU.VN offers reviews and insights into new equipment.
Here’s how camera technology impacts ISO performance:
- Improved Sensors: Modern sensors are more sensitive to light and produce less noise at high ISO settings.
- Advanced Processing Algorithms: Sophisticated algorithms reduce noise and improve image quality in-camera.
- Better Dynamic Range: Newer cameras capture a wider range of tones, preserving more detail in both highlights and shadows.
By staying informed about the latest advancements, you can leverage new camera technology to its fullest potential and capture stunning images in any lighting condition.
19. What Role Does Post-Processing Play in Managing ISO Noise?
Post-processing plays a crucial role in managing ISO noise. Software like Adobe Lightroom and Capture One offers powerful tools to reduce noise while preserving detail. Learning to effectively use these tools is essential for maximizing the quality of high-ISO images. LEARNS.EDU.VN provides tutorials and courses on post-processing techniques for noise reduction.
Here are some key post-processing techniques for managing ISO noise:
- Noise Reduction Sliders: Adjust luminance and color noise reduction sliders to reduce noise without sacrificing detail.
- Detail Masking: Use detail masking to protect fine details while reducing noise in other areas.
- Selective Adjustments: Apply noise reduction selectively to specific areas of the image.
By mastering these post-processing techniques, you can significantly improve the quality of your high-ISO images and achieve professional-looking results.
20. How Can Understanding ISO Improve Your Photography Overall?
Understanding ISO is fundamental to improving your photography because it provides greater control over exposure, especially in challenging lighting conditions. Mastering ISO allows you to capture sharper, brighter images while minimizing noise. This knowledge empowers you to make informed decisions and express your creative vision more effectively. Enhance your photographic skills with the comprehensive resources available at LEARNS.EDU.VN.
A strong understanding of ISO can transform your photography by:
- Improving Exposure: Achieve properly exposed images in any lighting condition.
- Reducing Noise: Minimize graininess and maintain image quality.
- Enhancing Creativity: Gain the freedom to experiment with different settings and techniques.
By mastering ISO, you can elevate your photography to the next level and capture stunning images that reflect your unique vision.
| Aspect of Photography | How ISO Knowledge Improves It |
|---|---|
| Exposure | Achieve balanced and well-lit images in varied conditions. |
| Image Quality | Minimize noise and graininess, maximizing clarity. |
| Creative Control | Freedom to experiment with aperture and shutter speed without compromising brightness. |
| Low-Light Performance | Capture usable images in dimly lit environments without motion blur. |
| Dynamic Range | Preserve tonal details by optimizing ISO for different scenes. |
| Post-Processing | Informed adjustments for noise reduction and detail enhancement. |
FAQ Section
1. What does ISO stand for in photography?
ISO stands for International Organization for Standardization. It refers to the sensitivity of your camera’s sensor to light.
2. What is the base ISO setting?
The base ISO is the lowest native ISO on your camera, typically ISO 100 or 200, which provides the highest image quality.
3. How does high ISO affect image quality?
High ISO settings increase image brightness but also introduce noise or graininess.
4. When should I use a high ISO setting?
Use a high ISO when shooting in low-light conditions or when you need a fast shutter speed to freeze motion.
5. What is Auto ISO and how does it work?
Auto ISO is a camera setting that automatically adjusts the ISO based on lighting conditions, often with a maximum limit set by the user.
6. How can I minimize noise when using high ISO?
Use noise reduction software in post-processing, shoot in RAW format, and ensure proper exposure.
7. Does ISO affect dynamic range?
Yes, higher ISO settings can reduce dynamic range by increasing noise, which obscures subtle tonal variations.
8. How does ISO relate to aperture and shutter speed?
ISO, aperture, and shutter speed form the exposure triangle, and balancing these elements is crucial for achieving a well-exposed image.
9. What is the best ISO setting for landscape photography?
The best ISO setting for landscape photography is typically the base ISO of your camera, usually ISO 100, used with a tripod.
10. Is it better to raise ISO or brighten a photo in post-processing?
Raising ISO in-camera generally provides better image quality than brightening in post-processing because it optimizes the signal before recording the image.
Mastering ISO is an essential skill that unlocks creative potential and enhances the quality of your photography. Whether you’re shooting landscapes, portraits, or action shots, understanding ISO will empower you to capture stunning images in any situation. Visit LEARNS.EDU.VN to explore our comprehensive photography courses and take your skills to the next level. For additional information, contact us at 123 Education Way, Learnville, CA 90210, United States, Whatsapp: +1 555-555-1212.
 ISO 200 and ISO 3200 Comparison
Learning ISO photography offers invaluable benefits, empowering photographers to skillfully manage image brightness, minimize noise, and optimize image quality, which are all comprehensively covered at LEARNS.EDU.VN. With a firm grasp of ISO, shutter speed, and aperture, you’ll be equipped to capture stunning, well-exposed photos in diverse lighting scenarios. Seize the opportunity to hone your photography prowess and unlock your creative potential with learns.edu.vn today.]