Learning how to draw can feel daunting, but it’s achievable with the right approach. At LEARNS.EDU.VN, we believe anyone can learn to draw by mastering fundamental techniques and practicing consistently, irrespective of skill level. This guide offers actionable steps and resources to unlock your drawing potential, focusing on SEO keywords like drawing tutorials, drawing techniques, and online drawing courses to enhance visibility and engagement.
1. Why Learn How to Draw?
Learning to draw is more than just a fun hobby; it’s a skill that enhances creativity, improves visual perception, and boosts cognitive functions. Whether you’re 10 or 65+, the benefits of drawing extend across all age groups and professions.
1.1. Benefits of Drawing
Drawing offers numerous benefits:
- Enhances Creativity: Drawing encourages you to think outside the box and explore new ideas.
- Improves Visual Perception: Regular drawing practice sharpens your ability to observe details and understand spatial relationships.
- Boosts Cognitive Functions: Drawing engages multiple parts of the brain, improving memory, focus, and problem-solving skills.
- Reduces Stress: The act of drawing can be therapeutic, helping to reduce stress and anxiety.
- Increases Self-Esteem: As you improve your drawing skills, you’ll gain confidence in your abilities and a sense of accomplishment.
1.2. Who Can Benefit from Learning to Draw?
- Students (10-18 years): Enhances creativity, improves focus, and provides a fun way to express themselves.
- University Students (18-24 years): Develops artistic skills, aids in visual communication for various fields, and offers a creative outlet.
- Working Professionals (24-65+ years): Provides a new hobby, improves attention to detail, and fosters creative problem-solving.
- Educators: Offers new methods for teaching and engaging students, provides a creative outlet, and aids in visual communication.
1.3. Scientific Studies on the Benefits of Art Education
Research supports the cognitive and emotional benefits of art education.
According to a study by the University of California, Los Angeles (UCLA), engaging in art activities enhances critical thinking and problem-solving skills. The study, published in the Journal of Educational Psychology in 2019, found that students who participated in regular art classes showed significant improvements in cognitive abilities compared to those who did not.
Similarly, a report by the National Art Education Association (NAEA) in 2020 highlighted the positive impact of art education on students’ emotional well-being. The report indicated that art programs help students manage stress, express emotions, and build self-esteem.
These findings underscore the importance of incorporating art, including drawing, into educational curricula to support holistic development.
2. Understanding Your Learning Style
Before diving into drawing, it’s essential to understand your learning style. Recognizing how you learn best will help you tailor your approach and maximize your progress.
2.1. Different Learning Styles
- Visual Learners: Learn best through seeing. They benefit from diagrams, videos, and visual aids.
- Auditory Learners: Learn best through listening. They benefit from lectures, podcasts, and discussions.
- Kinesthetic Learners: Learn best through hands-on activities. They benefit from drawing exercises, physical practice, and interactive workshops.
2.2. Identifying Your Learning Style
- Take a Learning Style Quiz: Numerous online quizzes can help you identify your dominant learning style.
- Reflect on Past Learning Experiences: Think about subjects you’ve excelled in and how you approached learning them.
- Experiment with Different Methods: Try various drawing techniques and resources to see what resonates with you.
2.3. Tailoring Your Learning Approach
Once you know your learning style, you can customize your learning approach:
- Visual Learners: Use online drawing tutorials, reference images, and visual aids.
- Auditory Learners: Listen to drawing podcasts, attend online workshops, and discuss techniques with others.
- Kinesthetic Learners: Practice drawing regularly, attend hands-on workshops, and experiment with different drawing tools.
3. Essential Tools and Materials
Having the right tools can significantly impact your drawing journey. Here’s a list of essential tools and materials for beginners:
3.1. Basic Drawing Supplies
- Pencils:
- Graphite Pencils: Range from hard (H) to soft (B). Use H pencils for light sketches and B pencils for darker lines and shading.
- Mechanical Pencils: Provide consistent line thickness and are great for detailed work.
- Erasers:
- Kneaded Eraser: Malleable and ideal for lifting graphite without damaging the paper.
- Plastic Eraser: Good for erasing larger areas and creating clean lines.
- Pencil Eraser: Useful for precise erasing in tight spaces.
- Paper:
- Sketchbook: Choose a sketchbook with smooth, acid-free paper for general drawing and sketching.
- Drawing Paper: Heavier weight paper suitable for finished drawings and more detailed work.
- Sharpener: Keep your pencils sharp for clean and precise lines.
- Ruler: Useful for drawing straight lines and geometric shapes.
3.2. Advanced Tools (Optional)
- Drawing Pens:
- Fineliner Pens: Great for creating detailed line work and adding definition to your drawings.
- Brush Pens: Allow for varied line widths and are ideal for expressive sketches and ink washes.
- Shading Tools:
- Blending Stumps: Use to blend graphite and create smooth tonal transitions.
- Tortillons: Similar to blending stumps but made of tightly rolled paper, useful for blending small areas.
- Colored Pencils:
- Wax-Based Colored Pencils: Soft and blendable, ideal for creating vibrant and layered colors.
- Water-Soluble Colored Pencils: Can be used dry or with water to create watercolor effects.
- Drawing Board: Provides a stable and comfortable surface for drawing, especially when working on larger pieces.
3.3. Digital Drawing Tools
- Drawing Tablet: Wacom, iPad Pro, and Huion are popular brands. These tablets allow you to draw directly onto a digital surface.
- Stylus: A pen-like device used with drawing tablets for precise and controlled drawing.
- Drawing Software:
- Adobe Photoshop: Industry-standard software for digital painting and drawing.
- Procreate: A user-friendly app for iPad, ideal for sketching, drawing, and painting on the go.
- Autodesk Sketchbook: A free and versatile drawing app for various devices.
3.4. Where to Find Tools and Materials
- Art Supply Stores: Local art supply stores offer a wide range of tools and materials with expert advice.
- Online Retailers: Websites like Amazon, Blick Art Materials, and Jerry’s Artarama provide a vast selection of drawing supplies.
- Craft Stores: Stores like Michaels and Hobby Lobby also carry a variety of drawing tools and materials.
4. Mastering the Fundamentals of Drawing
To learn how to draw effectively, it’s crucial to master the fundamental techniques. These techniques form the foundation for more advanced drawing skills.
4.1. Basic Shapes
The ability to break down complex objects into basic shapes is a foundational skill in drawing. These shapes include circles, squares, triangles, and rectangles.
- Practice: Draw these shapes repeatedly until you can create them accurately and consistently.
- Application: Use these shapes as the building blocks for more complex objects. For example, a human figure can be broken down into circles, rectangles, and cylinders.
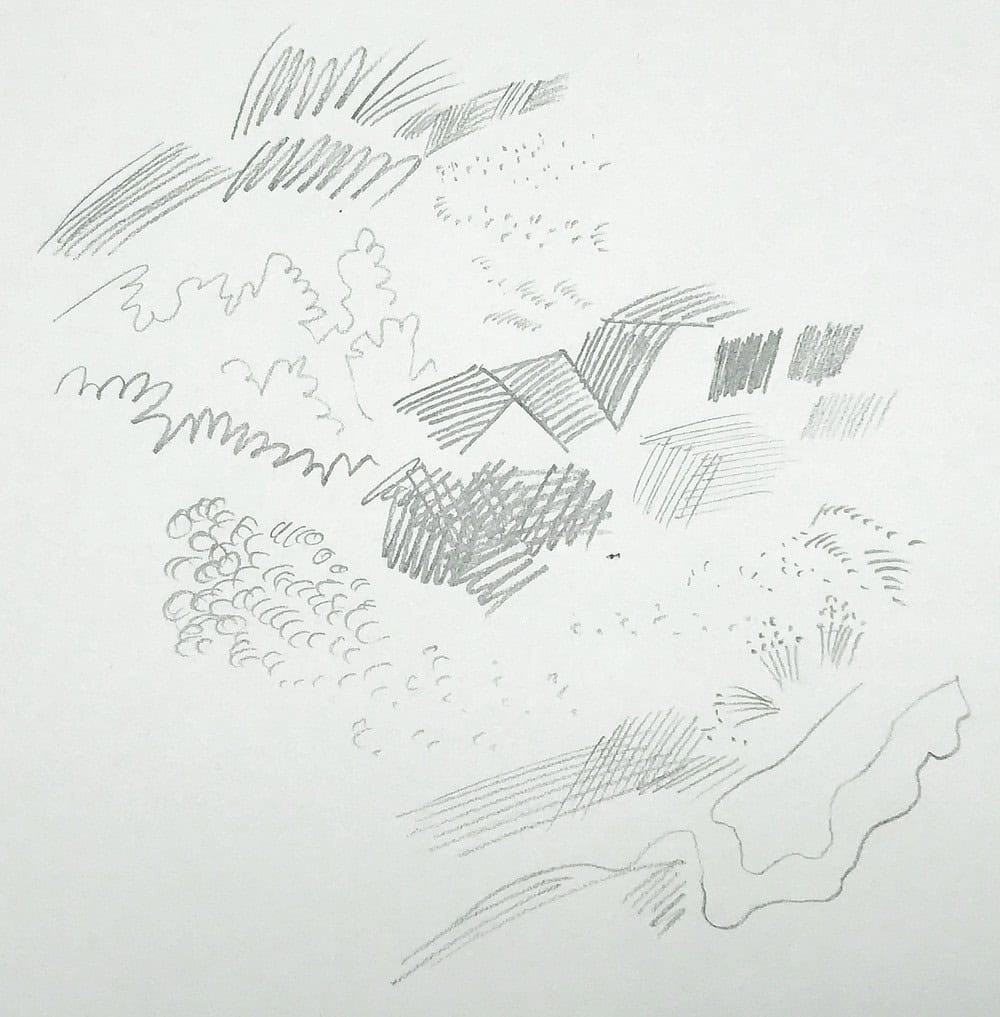
4.2. Lines and Strokes
Mastering line control is essential for creating clean, precise drawings. Different types of lines can convey different effects and textures.
- Types of Lines:
- Straight Lines: Use a ruler or practice drawing freehand to create straight lines of varying lengths.
- Curved Lines: Practice drawing smooth, flowing curves.
- Hatched Lines: Use parallel lines to create shading and texture.
- Cross-Hatched Lines: Overlapping hatched lines to create darker tones and more complex textures.
- Practice: Fill pages with different types of lines to improve your control and consistency.
4.3. Perspective
Perspective is the technique used to create the illusion of depth on a flat surface. Understanding perspective is crucial for drawing realistic scenes and objects.
- Types of Perspective:
- One-Point Perspective: All lines converge at a single vanishing point on the horizon line.
- Two-Point Perspective: Lines converge at two vanishing points on the horizon line.
- Three-Point Perspective: Lines converge at three vanishing points, adding vertical depth.
- Exercises: Draw simple objects like boxes and buildings in one-point, two-point, and three-point perspective to understand the concepts.
4.4. Shading and Value
Shading and value refer to the lightness or darkness of a color. Understanding how to use shading effectively can add depth and realism to your drawings.
- Shading Techniques:
- Hatching: Creating shadows with parallel lines.
- Cross-Hatching: Overlapping lines to create darker values.
- Stippling: Using dots to create tonal variations.
- Blending: Smoothing out values with a blending stump or tortillon.
- Value Scale: Practice creating a value scale ranging from white to black to understand tonal relationships.
4.5. Composition
Composition refers to the arrangement of elements within a drawing. A well-composed drawing is visually appealing and effectively conveys the artist’s intent.
- Compositional Guidelines:
- Rule of Thirds: Divide the drawing into thirds both horizontally and vertically, and place key elements at the intersections.
- Leading Lines: Use lines to guide the viewer’s eye through the drawing.
- Balance: Distribute elements evenly to create a sense of equilibrium.
- Focal Point: Create a clear focal point to draw the viewer’s attention.
- Examples: Study the composition of famous artworks and try to apply similar principles to your own drawings.
5. Step-by-Step Drawing Exercises
To put these fundamentals into practice, here are some step-by-step drawing exercises suitable for beginners:
5.1. Drawing Basic Shapes
- Objective: To develop accuracy and consistency in drawing basic shapes.
- Materials: Pencil, eraser, paper.
- Steps:
- Draw a series of circles, squares, triangles, and rectangles.
- Focus on creating smooth, even lines.
- Repeat the exercise daily, gradually increasing speed and accuracy.
5.2. Line and Stroke Practice
- Objective: To improve line control and explore different line types.
- Materials: Pencil, eraser, paper.
- Steps:
- Fill a page with straight lines, curved lines, hatched lines, and cross-hatched lines.
- Vary the pressure and spacing of the lines to create different effects.
- Practice drawing lines of varying thicknesses and lengths.
5.3. Perspective Drawing
- Objective: To understand and apply perspective principles.
- Materials: Pencil, eraser, ruler, paper.
- Steps:
- Draw a horizon line on your paper.
- Choose a vanishing point on the horizon line.
- Draw a series of lines converging at the vanishing point to create a one-point perspective drawing of a road or hallway.
- Repeat the exercise with two-point and three-point perspective, drawing boxes and buildings.
5.4. Shading Practice
- Objective: To learn how to create depth and volume through shading.
- Materials: Pencil, eraser, blending stump, paper.
- Steps:
- Draw a sphere on your paper.
- Identify the light source and determine where the shadows will fall.
- Use hatching, cross-hatching, stippling, or blending to create a smooth transition from light to dark.
- Practice shading different objects, such as cubes, cylinders, and cones.
5.5. Still Life Drawing
- Objective: To combine all fundamental techniques in a single drawing.
- Materials: Pencil, eraser, paper, a simple still life arrangement (e.g., fruit, a vase, a book).
- Steps:
- Arrange your still life objects in a well-lit area.
- Sketch the basic shapes and composition of the arrangement.
- Refine the lines and add details.
- Use shading to create depth and volume.
- Pay attention to the overall composition and adjust as needed.
6. Advanced Drawing Techniques
Once you’ve mastered the fundamentals, you can explore more advanced drawing techniques to enhance your skills further.
6.1. Figure Drawing
Figure drawing involves drawing the human form. It requires a strong understanding of anatomy, proportion, and gesture.
- Anatomy: Study basic human anatomy to understand the underlying structure of the body.
- Proportion: Learn the standard proportions of the human figure.
- Gesture Drawing: Practice quick, loose sketches to capture the movement and pose of the figure.
- Resources: Use reference photos, life drawing classes, and online tutorials to improve your figure drawing skills.
6.2. Portrait Drawing
Portrait drawing focuses on capturing the likeness and character of a person. It requires attention to detail and a strong understanding of facial anatomy.
- Facial Anatomy: Study the anatomy of the face, including the bones and muscles.
- Proportion: Learn the standard proportions of the face.
- Details: Pay attention to the subtle details of the face, such as the shape of the eyes, nose, and mouth.
- Shading: Use shading to create depth and volume in the face.
- Resources: Use reference photos, portrait drawing classes, and online tutorials to improve your portrait drawing skills.
6.3. Landscape Drawing
Landscape drawing involves drawing outdoor scenes. It requires an understanding of perspective, composition, and atmospheric effects.
- Perspective: Use perspective to create depth and distance in your landscapes.
- Composition: Arrange the elements of your landscape to create a visually appealing composition.
- Atmospheric Perspective: Use shading and value to create the illusion of depth and atmosphere.
- Details: Add details such as trees, rocks, and water to create a realistic landscape.
- Resources: Draw from life, use reference photos, and study the work of landscape artists to improve your landscape drawing skills.
6.4. Still Life Drawing
Still life drawing involves drawing arrangements of inanimate objects. It’s a great way to practice your drawing skills and experiment with different techniques.
- Arrangement: Create a visually interesting arrangement of objects.
- Composition: Pay attention to the composition and arrangement of the objects.
- Lighting: Use lighting to create depth and volume in your drawing.
- Details: Add details to make your drawing more realistic.
- Resources: Draw from life, use reference photos, and study the work of still life artists to improve your still life drawing skills.
7. Practice and Consistency
The key to improving your drawing skills is consistent practice. Regular practice will help you develop muscle memory, refine your techniques, and build confidence.
7.1. Setting a Practice Schedule
- Daily Practice: Aim to draw for at least 30 minutes each day.
- Weekly Goals: Set weekly goals to focus on specific techniques or subjects.
- Consistency: Stick to your schedule as much as possible to build a consistent practice habit.
7.2. Finding Inspiration and Motivation
- Study Other Artists: Look at the work of artists you admire and try to learn from their techniques.
- Join a Drawing Group: Connect with other artists to share your work, get feedback, and stay motivated.
- Set Goals: Set achievable goals to keep yourself on track and motivated.
- Reward Yourself: Celebrate your progress and reward yourself for reaching your goals.
7.3. Overcoming Challenges
- Perfectionism: Don’t be afraid to make mistakes. Mistakes are a natural part of the learning process.
- Frustration: Take breaks when you feel frustrated and come back to your drawing later.
- Lack of Time: Find small pockets of time to practice, even if it’s just for 15 minutes.
- Comparison: Avoid comparing yourself to other artists. Focus on your own progress and celebrate your achievements.
8. Resources for Learning How to Draw
Numerous resources are available to help you learn how to draw, including books, online courses, and communities.
8.1. Books
- “Drawing on the Right Side of the Brain” by Betty Edwards: A classic guide to drawing that teaches you how to see like an artist.
- “Keys to Drawing” by Bert Dodson: A comprehensive guide to drawing techniques and concepts.
- “The Natural Way to Draw” by Kimon Nicolaïdes: A classic drawing manual that emphasizes direct observation and practice.
- “Figure Drawing: For All It’s Worth” by Andrew Loomis: A comprehensive guide to drawing the human figure.
8.2. Online Courses
- LEARNS.EDU.VN: Offers a wide range of drawing courses for beginners to advanced learners.
- Coursera: Provides drawing courses from top universities and institutions.
- Udemy: Offers a variety of drawing courses taught by experienced artists.
- Skillshare: Provides drawing classes on various topics and techniques.
8.3. Online Communities
- DeviantArt: A large online community for artists to share their work and connect with others.
- ArtStation: A platform for professional artists to showcase their work and network with industry professionals.
- Reddit: Subreddits like r/drawing and r/sketchdaily offer feedback, inspiration, and community support.
- Facebook Groups: Numerous Facebook groups are dedicated to drawing and sketching, providing a space for artists to connect and share their work.
8.4. YouTube Channels
- Proko: Features anatomy lessons, figure drawing tutorials, and other drawing tips.
- Draw with Jazza: Provides fun and engaging drawing tutorials for all skill levels.
- Sycra: Offers in-depth tutorials on drawing fundamentals, character design, and digital art.
- Mark Crilley: Provides tutorials on drawing manga, comics, and other styles of art.
9. Common Mistakes to Avoid
Avoiding common mistakes can help you progress more quickly and efficiently in your drawing journey.
9.1. Not Practicing Regularly
- Solution: Set a consistent practice schedule and stick to it as much as possible.
9.2. Skipping the Fundamentals
- Solution: Master the fundamentals of drawing before moving on to more advanced techniques.
9.3. Not Using References
- Solution: Use reference photos, life drawing classes, and other resources to improve your drawing skills.
9.4. Being Too Hard on Yourself
- Solution: Be patient with yourself and celebrate your progress.
9.5. Not Seeking Feedback
- Solution: Share your work with other artists and ask for feedback.
10. Staying Motivated and Inspired
Maintaining motivation and inspiration is crucial for long-term success in drawing.
10.1. Set Realistic Goals
- Tips: Break down large goals into smaller, achievable steps.
10.2. Celebrate Your Progress
- Tips: Acknowledge and reward yourself for each milestone you reach.
10.3. Surround Yourself with Inspiration
- Tips: Visit art museums, browse art books, and follow artists you admire on social media.
10.4. Join a Community
- Tips: Connect with other artists to share your work, get feedback, and stay motivated.
10.5. Experiment with Different Mediums and Styles
- Tips: Try new drawing tools, techniques, and subjects to keep your practice fresh and exciting.
FAQ: Learn How to Draw
- Is it possible for anyone to learn how to draw?
Yes, anyone can learn how to draw with practice and the right techniques. - How long does it take to become good at drawing?
It varies, but consistent practice leads to improvement over time. - What are the most important fundamentals to learn?
Basic shapes, lines, perspective, shading, and composition. - Do I need expensive materials to start drawing?
No, you can start with basic pencils, erasers, and paper. - How can I improve my shading techniques?
Practice creating a value scale and experiment with different shading methods. - What’s the best way to learn perspective?
Draw simple objects in one-point, two-point, and three-point perspective. - How can I stay motivated to practice drawing?
Set realistic goals, join a community, and celebrate your progress. - What are some common mistakes to avoid when learning to draw?
Not practicing regularly, skipping fundamentals, and being too hard on yourself. - Are online drawing courses worth it?
Yes, they can provide structured learning and expert guidance. - Where can I find inspiration for drawing?
Art museums, art books, and online art communities are great sources.
Learning to draw is a rewarding journey that can enhance your creativity, improve your visual perception, and boost your cognitive functions. By mastering the fundamentals, practicing consistently, and utilizing available resources, you can unlock your drawing potential and achieve your artistic goals. Remember to stay motivated, celebrate your progress, and enjoy the process of learning how to draw.
Ready to embark on your drawing adventure? Explore the wealth of resources and courses available at LEARNS.EDU.VN to take your skills to the next level. Whether you’re a beginner or an experienced artist, LEARNS.EDU.VN has something to offer to help you achieve your artistic aspirations.
Address: 123 Education Way, Learnville, CA 90210, United States
WhatsApp: +1 555-555-1212
Website: LEARNS.EDU.VN
Start your drawing journey today with learns.edu.vn and discover the artist within you!