Have you ever been fascinated by the simple yet incredible transformations that happen in the kitchen? Learning to make butter from scratch is one of those truly cool things that can connect you to the basics of cooking and impress your friends and family. It’s easier than you might think, and the taste of fresh, homemade butter is simply unmatched.
The Accidental Discovery of Homemade Butter
Many of us have had a kitchen mishap that turned into a delightful discovery. Imagine you’re whipping heavy cream, aiming for a fluffy cloud of whipped cream to top your favorite dessert. Then, life happens – the phone rings, or a pot boils over on the stove. You step away, and when you return, you notice something unexpected: the cream looks… curdled?
This isn’t a kitchen disaster; it’s actually the beginning of a fantastic process – the transformation of cream into butter! In fact, if you catch whipped cream just as it starts to curdle, you can often revive it by adding a splash more liquid heavy cream. But what if you let it go a little further?
One day, curiosity (and perhaps a bit of distraction) led to an experiment. What would happen if you just kept whipping that “over-whipped” cream? The result, after about ten minutes of beating, was nothing short of kitchen magic. Clumps of rich, golden butter appeared, nestled in a pool of watery liquid – fresh buttermilk!
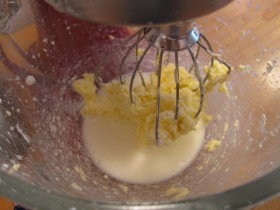 Transforming Cream into Butter: A Cool Culinary Skill to Learn – See how whipping cream changes into butter and buttermilk in a kitchen mixer.
Simple Steps to Delicious Homemade Butter
Making your own butter requires just one ingredient and a little patience. Here’s how you can experience this cool kitchen transformation yourself:
What you’ll need:
- Heavy Cream: Start with the best quality heavy cream you can find. Pasteurized cream (not ultra-pasteurized) from the supermarket will work, but for the most flavorful butter, seek out cream from a farmer’s market if possible.
The Butter Making Process:
- Whip the Cream: Pour the heavy cream into a stand mixer or a large bowl if using a hand mixer. Begin whipping on medium speed.
- Observe the Changes: Initially, the cream will thicken into whipped cream. Continue whipping, and you’ll notice it becoming grainy and curdled. Don’t stop!
- Butter Separation: Keep whipping. The mixture will separate further, and you’ll see solid butterfat clumping together and a milky liquid (buttermilk) separating out. This is the goal!
- Drain the Buttermilk: Once the butter and buttermilk have clearly separated, drain off the buttermilk. You can save this for baking or drinking – it’s a byproduct of butter making!
- Rinse the Butter (Important!): This step is crucial for better flavor and shelf life. Add fresh, cold water to the bowl with the butter. Mix on low speed. The water will become milky as it washes away residual buttermilk. Drain the milky water.
- Repeat Rinsing: Repeat the rinsing process several times with fresh water until the water remains clear after mixing. This ensures you’ve removed most of the buttermilk, which can make the butter spoil faster.
- Shape and Store: Gently squeeze the butter to remove excess water. You can use a clean kitchen towel to help with this. Shape the butter into a log or ball.
- Enjoy Freshness: Your homemade butter is ready to enjoy immediately! Sprinkle with coarse sea salt for enhanced flavor.
Tips for Amazing Homemade Butter
- Cream Quality Matters: Starting with high-quality, fresh cream significantly impacts the taste of your butter.
- Rinsing is Key for Longevity: Don’t skip the rinsing process. Thorough rinsing removes buttermilk solids, which contribute to spoilage and a funky flavor over time.
- Flavor It Up: Once you’ve mastered plain butter, experiment with flavors! Mix in minced garlic, Dijon mustard, chopped fresh herbs (like chives or parsley), or even a touch of honey for sweet butter.
- Storage: If you’re not using all the butter right away, wrap it tightly in plastic wrap and then foil. Homemade butter freezes beautifully and will be ready to elevate your meals whenever you need it.
Learning to make homemade butter is more than just a recipe; it’s a cool and rewarding kitchen skill that connects you to the process of transforming simple ingredients into something truly special. Give it a try and experience the fresh, delicious taste of butter you made yourself!