Want to learn How Can I Learn To Make Jewelry? Creating your own jewelry is an enriching hobby and a potential career path. At LEARNS.EDU.VN, we provide the resources and guidance you need to embark on this creative journey. Discover the techniques, tools, and inspiration to craft beautiful, personalized pieces. Unleash your inner artist with metalwork, beading, and jewelry design!
Table of Contents
- Understanding Jewelry Making Basics
- Exploring Different Jewelry Making Techniques
- Essential Tools and Materials for Jewelry Making
- Setting Up Your Jewelry Making Workspace
- Step-by-Step Guide to Starting Your First Jewelry Project
- Finding Inspiration and Designing Your Jewelry
- Taking Jewelry Making Classes and Workshops
- Learning Jewelry Making Online
- Turning Your Jewelry Making Hobby into a Business
- Maintaining and Caring for Your Handmade Jewelry
- Advanced Jewelry Making Techniques to Explore
- The History and Cultural Significance of Jewelry
- Ethical Considerations in Jewelry Making
- The Future of Jewelry Making: Trends and Innovations
- Common Mistakes to Avoid When Starting Out
- Resources and Communities for Jewelry Makers
- Safety Tips for Jewelry Making
- FAQs About Learning to Make Jewelry
- Call to Action: Discover More at LEARNS.EDU.VN
1. Understanding Jewelry Making Basics
Jewelry making is an art form that combines creativity, technical skills, and an eye for design. Whether you are interested in crafting simple beaded bracelets or intricate metalwork necklaces, understanding the fundamental principles is crucial. Jewelry making involves various techniques, materials, and tools, each offering unique possibilities for creating stunning pieces. This section introduces you to the core concepts of jewelry making, setting a solid foundation for your journey.
1.1 What is Jewelry Making?
Jewelry making is the process of designing, creating, and assembling decorative items worn as personal adornments. These items can include necklaces, bracelets, earrings, rings, brooches, and more. Jewelry can be made from a wide range of materials, including metals (such as gold, silver, copper, and brass), gemstones, beads, glass, wood, and even recycled materials.
1.2 Why Learn to Make Jewelry?
There are numerous reasons why people choose to learn jewelry making. Here are a few compelling motivations:
- Creativity and Self-Expression: Jewelry making allows you to express your unique style and creativity. You can design pieces that reflect your personality, interests, and inspirations.
- Relaxation and Mindfulness: The repetitive and focused nature of jewelry making can be incredibly relaxing and meditative. It provides a creative outlet to de-stress and unwind.
- Personalized Gifts: Handmade jewelry makes thoughtful and personalized gifts for friends and family. It shows that you put time and effort into creating something special.
- Potential Income: If you develop your skills and create high-quality pieces, you can sell your jewelry at craft fairs, online marketplaces, or even open your own jewelry business.
- Sense of Accomplishment: Completing a jewelry project and seeing the finished product can be incredibly rewarding. It boosts your confidence and encourages you to take on new challenges.
- Sustainability: Using recycled materials or ethically sourced gemstones allows you to create beautiful jewelry while minimizing your environmental impact.
1.3 Types of Jewelry You Can Make
The possibilities are endless when it comes to jewelry making. Here are some popular types of jewelry you can create:
- Necklaces: From simple beaded strands to elaborate pendants and chokers, necklaces offer a wide range of design options.
- Bracelets: Whether you prefer delicate chain bracelets or chunky beaded cuffs, bracelets are a fun and versatile accessory.
- Earrings: Earrings can range from simple studs to dangling chandelier earrings, allowing for endless creativity.
- Rings: Making rings involves more advanced techniques, such as soldering and stone setting, but the results are stunning.
- Brooches and Pins: Brooches and pins can add a touch of elegance to any outfit and can be customized with various materials and embellishments.
- Anklets: These are perfect for the summer season and can be made with beads, chains, or a combination of both.
- Hair Accessories: Hairpins, headbands, and barrettes can be adorned with beads, wirework, or other decorative elements.
Understanding these basics will help you appreciate the art of jewelry making and inspire you to explore the various techniques and materials available. At LEARNS.EDU.VN, you can find detailed guides and courses to help you master these fundamentals and start creating your own unique jewelry pieces.
2. Exploring Different Jewelry Making Techniques
Jewelry making encompasses a diverse range of techniques, each offering its own unique aesthetic and skill set. Whether you prefer the intricate detail of wire wrapping or the classic elegance of metalworking, understanding these techniques is essential for expanding your creative possibilities. This section delves into some of the most popular and versatile jewelry making techniques, providing a glimpse into the artistry behind each method.
2.1 Beading
Beading is one of the most accessible and versatile jewelry making techniques, perfect for beginners and experienced crafters alike. It involves stringing beads together using various materials, such as thread, wire, or elastic cord.
- Stringing: This basic technique involves threading beads onto a string or cord. It’s ideal for creating simple necklaces, bracelets, and anklets.
- Weaving: Bead weaving involves interlacing beads together to create intricate patterns and designs. Techniques like peyote stitch, brick stitch, and right-angle weave offer endless possibilities.
- Embroidery: Bead embroidery involves sewing beads onto fabric or felt to create decorative embellishments. It’s commonly used for making brooches, pendants, and earrings.
2.2 Wire Wrapping
Wire wrapping is a technique that involves using wire to create intricate designs and secure gemstones or beads. It doesn’t require soldering or heat, making it a great option for beginners.
- Basic Wraps: Simple wire wraps can be used to create loops, coils, and spirals, which can be combined to form various jewelry components.
- Framing: Wire can be used to create frames around gemstones or beads, adding structure and visual interest to your designs.
- Weaving: Wire weaving involves interlacing wires together to create intricate patterns and textures.
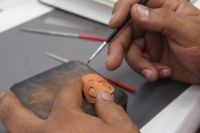
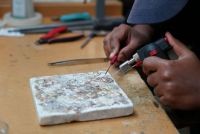
2.3 Metalworking
Metalworking involves shaping and joining metal to create jewelry. It requires more specialized tools and skills but offers a wide range of creative possibilities.
- Soldering: Soldering involves using heat and solder to join metal pieces together. It’s essential for creating strong and durable jewelry.
- Sawing: Metal can be cut using a jeweler’s saw to create precise shapes and designs.
- Filing and Sanding: Filing and sanding are used to smooth rough edges and refine the shape of metal pieces.
- Polishing: Polishing brings out the shine and luster of metal, giving your jewelry a professional finish.
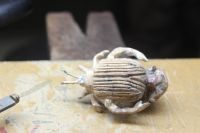
2.4 Metal Clay
Metal clay is a moldable material made from tiny metal particles mixed with a binder. It can be shaped and fired in a kiln to create solid metal jewelry.
- Shaping: Metal clay can be shaped by hand or using molds to create various jewelry components.
- Firing: Firing burns away the binder, leaving behind solid metal.
- Finishing: After firing, metal clay jewelry can be finished with polishing, patinating, or other techniques.
2.5 Resin Jewelry
Resin jewelry involves casting or coating items in clear or colored resin to create unique and durable pieces.
- Casting: Resin can be poured into molds to create pendants, earrings, and other jewelry components.
- Embedding: Items like dried flowers, glitter, or charms can be embedded in resin to create unique and personalized designs.
- Coating: Resin can be used to coat the surface of jewelry, adding shine and protection.
2.6 Glass Fusing
Glass fusing involves heating pieces of glass in a kiln until they melt and fuse together. It’s used to create colorful and unique jewelry components.
- Layering: Pieces of glass can be layered together to create patterns and designs.
- Slumping: Fused glass can be slumped into molds to create curved or shaped pieces.
- Dichroic Glass: Dichroic glass is a type of glass that reflects different colors depending on the viewing angle. It’s often used in fused glass jewelry to create dazzling effects.
By exploring these different jewelry making techniques, you can find the methods that best suit your interests and skill level. Each technique offers unique challenges and rewards, allowing you to create beautiful and personalized jewelry pieces. At LEARNS.EDU.VN, we offer detailed tutorials and courses to help you master these techniques and unleash your creativity.
3. Essential Tools and Materials for Jewelry Making
To embark on your jewelry making journey, having the right tools and materials is essential. The specific tools and materials you’ll need will depend on the techniques you plan to use, but there are some basic items that every jewelry maker should have. This section provides a comprehensive overview of the essential tools and materials for jewelry making, helping you assemble your starter kit.
3.1 Basic Tools
- Pliers: Pliers are essential for gripping, bending, and shaping wire and other jewelry components.
- Round Nose Pliers: Used for creating loops and curves in wire.
- Flat Nose Pliers: Used for gripping and flattening wire.
- Chain Nose Pliers: Used for reaching into tight spaces and manipulating small components.
- Cutters: Cutters are used for trimming wire, thread, and other materials.
- Flush Cutters: Create a clean, flat cut on wire.
- Side Cutters: Used for general cutting purposes.
- Jeweler’s Saw: A jeweler’s saw is used for cutting metal.
- Files: Files are used for smoothing and shaping metal edges.
- Hammers: Hammers are used for shaping and texturing metal.
- Anvil or Steel Block: Provides a solid surface for hammering and shaping metal.
- Ruler or Measuring Tape: Essential for accurate measurements.
- Bead Board: A bead board is used for laying out and designing beaded jewelry.
- Magnifying Glass or Headset: Helps with detailed work and seeing small components clearly.
3.2 Essential Materials
- Wire: Wire is a fundamental material for many jewelry making techniques.
- Copper Wire: An inexpensive option for practicing techniques.
- Silver Wire: A popular choice for creating high-quality jewelry.
- Gold Wire: A luxurious option for special pieces.
- Beads: Beads come in a wide variety of shapes, sizes, and materials.
- Glass Beads: Offer a wide range of colors and finishes.
- Gemstone Beads: Add natural beauty and value to your jewelry.
- Seed Beads: Small beads used for intricate beadwork.
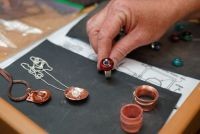
- Findings: Findings are pre-made components used to assemble jewelry.
- Clasps: Used to fasten necklaces and bracelets.
- Jump Rings: Used to connect components.
- Headpins and Eyepins: Used for creating dangles and connectors.
- Ear Wires: Used for making earrings.
- Stringing Materials: Used for stringing beads and creating necklaces and bracelets.
- Thread: A versatile option for beadwork.
- Elastic Cord: Used for creating stretchy bracelets.
- Beading Wire: A strong and flexible option for stringing beads.
- Solder: Used for joining metal pieces together.
- Flux: Used to clean metal surfaces before soldering.
- Resin: Used for casting and coating jewelry.
- Glass: Used for glass fusing and creating colorful jewelry components.
3.3 Optional Tools and Materials
- Kiln: Required for metal clay and glass fusing techniques.
- Torch: Used for soldering metal.
- Polishing Machine: Used for polishing metal jewelry.
- Tumbler: Used for polishing and hardening metal jewelry.
- Molds: Used for casting resin and metal clay jewelry.
- Stamps: Used for adding texture and designs to metal.
Having these essential tools and materials will set you up for success in your jewelry making endeavors. As you gain experience and explore different techniques, you can expand your collection to include more specialized tools and materials. Remember to invest in high-quality tools that will last and provide the best results. At LEARNS.EDU.VN, we offer guides and resources to help you choose the right tools and materials for your specific needs.
4. Setting Up Your Jewelry Making Workspace
Creating a dedicated and well-organized workspace is crucial for enjoying your jewelry making hobby and maximizing your productivity. A comfortable and efficient workspace will not only make the process more enjoyable but also help you stay focused and avoid unnecessary clutter. This section provides tips and guidelines for setting up your jewelry making workspace, ensuring a creative and productive environment.
4.1 Choosing the Right Space
- Dedicated Area: Ideally, you should have a dedicated area for jewelry making, whether it’s a corner of a room, a spare bedroom, or a studio.
- Good Lighting: Proper lighting is essential for seeing small details and working accurately. Natural light is best, but if that’s not available, use a combination of overhead and task lighting.
- Ventilation: If you plan to use techniques that involve fumes, such as soldering or resin casting, make sure your workspace is well-ventilated.
- Comfortable Seating: Choose a comfortable and ergonomic chair that supports your back and allows you to sit for extended periods.
- Solid Work Surface: You’ll need a sturdy table or workbench that won’t wobble or shake when you’re working.
4.2 Organizing Your Tools and Materials
- Storage Solutions: Use a variety of storage solutions to keep your tools and materials organized.
- Tool Organizers: Keep your pliers, cutters, and other hand tools within easy reach.
- Bead Organizers: Sort your beads by color, size, or type in small containers or organizers.
- Drawer Units: Use drawer units to store larger items and materials.
- Pegboards: Hang tools and supplies on a pegboard for easy access.
- Labeling: Label all your containers and drawers so you can easily find what you need.
- Keep it Clean: Regularly clean your workspace to prevent clutter and ensure a safe working environment.
4.3 Essential Workspace Features
- Work Surface Protection: Use a cutting mat or workbench protector to prevent damage to your work surface.
- Magnification: A magnifying glass or headset can be invaluable for detailed work.
- Task Lighting: A flexible task light allows you to direct light where you need it most.
- First Aid Kit: Keep a basic first aid kit on hand for minor cuts and burns.
- Fire Extinguisher: If you’re using a torch or other heat sources, have a fire extinguisher nearby.
4.4 Creating an Inspiring Environment
- Personalize Your Space: Add personal touches to your workspace to make it feel like your own.
- Inspirational Materials: Display inspirational images, sketches, or finished jewelry pieces to keep you motivated.
- Music or Audiobooks: Listen to music or audiobooks while you work to create a relaxing and enjoyable atmosphere.
- Plants: Add plants to your workspace to bring a touch of nature indoors.
By setting up a well-organized and inspiring workspace, you’ll create an environment that fosters creativity and productivity. Take the time to customize your workspace to suit your specific needs and preferences. At LEARNS.EDU.VN, we offer tips and advice on creating the perfect jewelry making workspace for you.
5. Step-by-Step Guide to Starting Your First Jewelry Project
Embarking on your first jewelry project can be both exciting and a bit daunting. To help you get started on the right foot, this section provides a step-by-step guide to creating a simple beaded bracelet. This project is perfect for beginners and will introduce you to basic jewelry making techniques and tools.
5.1 Choosing Your Design and Materials
- Simple Design: Start with a simple design that involves stringing beads onto a cord or wire.
- Beads: Choose beads that appeal to you in terms of color, size, and material. Glass beads, gemstone beads, or seed beads are all great options.
- Stringing Material: Select a stringing material that is appropriate for the size of your beads. Elastic cord, thread, or beading wire are all suitable options.
- Clasp: Choose a clasp that is easy to use and complements your design. Lobster clasps, toggle clasps, and magnetic clasps are popular choices.
- Findings: You may also need jump rings and crimp beads, depending on the type of clasp you choose.
5.2 Gathering Your Tools
- Pliers: You’ll need flat nose pliers for opening and closing jump rings and crimping crimp beads.
- Cutters: You’ll need cutters for trimming the stringing material.
- Bead Board: A bead board will help you lay out your design and keep your beads organized.
- Ruler or Measuring Tape: You’ll need a ruler or measuring tape for measuring the length of your bracelet.
5.3 Step-by-Step Instructions
- Measure Your Wrist: Use a ruler or measuring tape to measure your wrist. Add about 1 inch to this measurement to allow for comfortable movement.
- Lay Out Your Design: Use a bead board to lay out your design. Experiment with different arrangements of beads until you find one that you like.
- String Your Beads: String your beads onto the stringing material, following your design.
- Attach the Clasp: Attach the clasp to one end of the bracelet using jump rings and crimp beads, if necessary.
- Secure the Other End: Secure the other end of the bracelet in the same way.
- Trim the Excess Stringing Material: Use cutters to trim any excess stringing material.
- Check the Fit: Try on your bracelet to make sure it fits comfortably.
5.4 Tips for Success
- Take Your Time: Don’t rush the process. Take your time and enjoy the creative experience.
- Double-Check Your Work: Make sure all your connections are secure before finishing your bracelet.
- Be Patient: If you make a mistake, don’t get discouraged. Simply undo your work and try again.
- Have Fun: Jewelry making should be a fun and relaxing activity. Don’t be afraid to experiment and try new things.
By following this step-by-step guide, you’ll be able to create your first beaded bracelet with confidence. As you gain experience, you can explore more complex designs and techniques. At LEARNS.EDU.VN, we offer a variety of beginner-friendly jewelry projects to help you develop your skills and unleash your creativity.
6. Finding Inspiration and Designing Your Jewelry
One of the most exciting aspects of jewelry making is the opportunity to design your own unique pieces. Finding inspiration and developing your design skills is crucial for creating jewelry that reflects your personal style and creativity. This section provides tips and techniques for finding inspiration and designing your jewelry, helping you bring your visions to life.
6.1 Sources of Inspiration
- Nature: Nature is a rich source of inspiration for jewelry designers. Look to flowers, leaves, animals, and landscapes for ideas.
- Art and Architecture: Visit museums, art galleries, and architectural sites to find inspiration in colors, shapes, and patterns.
- Fashion: Stay up-to-date on the latest fashion trends to incorporate current styles into your jewelry designs.
- Travel: Explore different cultures and traditions to discover unique jewelry designs and techniques.
- Everyday Objects: Look around you and find inspiration in everyday objects, such as furniture, textiles, and household items.
- Online Resources: Explore websites, blogs, and social media platforms dedicated to jewelry making and design.
6.2 Developing Your Design Skills
- Sketching: Practice sketching your design ideas on paper. Don’t worry about perfection; the goal is to capture your ideas and explore different possibilities.
- Color Theory: Learn the basics of color theory to create harmonious and visually appealing color combinations.
- Composition: Study the principles of composition to create balanced and visually interesting designs.
- Experimentation: Don’t be afraid to experiment with different materials, techniques, and styles.
- Feedback: Ask for feedback from friends, family, or other jewelry makers to get new perspectives on your designs.
6.3 Designing for Functionality
- Comfort: Make sure your jewelry is comfortable to wear. Consider the weight, size, and shape of your pieces.
- Durability: Choose materials and techniques that will ensure your jewelry is durable and long-lasting.
- Practicality: Design jewelry that is practical and easy to wear. Avoid designs that are too delicate or difficult to fasten.
- Safety: Make sure your jewelry is safe to wear. Avoid sharp edges, loose components, and materials that could cause allergic reactions.
6.4 Using Design Software
- CAD Software: Computer-aided design (CAD) software can be used to create precise and detailed jewelry designs.
- Graphic Design Software: Graphic design software can be used to create sketches, illustrations, and mockups of your jewelry designs.
- 3D Modeling Software: 3D modeling software can be used to create 3D models of your jewelry designs for prototyping and manufacturing.
By finding inspiration and developing your design skills, you can create jewelry that is both beautiful and meaningful. Remember to stay open to new ideas and experiment with different approaches. At LEARNS.EDU.VN, we offer resources and courses to help you develop your design skills and bring your jewelry visions to life.
7. Taking Jewelry Making Classes and Workshops
One of the most effective ways to learn jewelry making is by taking classes and workshops. These structured learning environments provide hands-on instruction, expert guidance, and the opportunity to learn from other students. This section explores the benefits of taking jewelry making classes and workshops and provides tips for finding the right learning environment for you.
7.1 Benefits of Taking Classes and Workshops
- Hands-On Instruction: Classes and workshops provide hands-on instruction from experienced instructors.
- Expert Guidance: Instructors can provide expert guidance and feedback on your techniques and designs.
- Structured Learning: Classes and workshops follow a structured curriculum, ensuring you learn the fundamentals and progress at a steady pace.
- Access to Tools and Equipment: Many classes and workshops provide access to specialized tools and equipment that you may not have at home.
- Community: Classes and workshops provide a supportive community of fellow jewelry makers.
- Networking: You can network with other students and instructors, potentially leading to new opportunities and collaborations.
7.2 Types of Classes and Workshops
- Beginner Classes: These classes introduce you to the basics of jewelry making, such as beading, wire wrapping, and basic metalworking.
- Technique-Specific Workshops: These workshops focus on specific jewelry making techniques, such as soldering, stone setting, and metal clay.
- Project-Based Workshops: These workshops guide you through the creation of a specific jewelry project, such as a necklace, bracelet, or earrings.
- Master Classes: These classes are taught by renowned jewelry artists and offer advanced instruction in specialized techniques.
7.3 Finding Classes and Workshops
- Local Craft Stores: Check local craft stores for jewelry making classes and workshops.
- Community Centers: Many community centers offer affordable jewelry making classes for adults and children.
- Art Schools: Art schools and colleges often offer jewelry making courses as part of their curriculum.
- Online Platforms: Online platforms like Coursera, Udemy, and Skillshare offer a wide range of online jewelry making classes.
- Jewelry Making Guilds: Jewelry making guilds and associations often host workshops and events for members.
7.4 Choosing the Right Class or Workshop
- Instructor’s Experience: Look for classes and workshops taught by experienced and qualified instructors.
- Curriculum: Review the curriculum to make sure it covers the topics and techniques you’re interested in learning.
- Class Size: Consider the class size. Smaller classes offer more individualized attention.
- Cost: Compare the cost of different classes and workshops to find one that fits your budget.
- Reviews: Read reviews from other students to get an idea of the quality of the class or workshop.
By taking jewelry making classes and workshops, you can accelerate your learning and develop your skills in a supportive and structured environment. Remember to research your options and choose a class or workshop that aligns with your goals and interests. At LEARNS.EDU.VN, we provide listings and reviews of jewelry making classes and workshops in your area.
8. Learning Jewelry Making Online
In today’s digital age, learning jewelry making online has become increasingly popular and accessible. Online courses, tutorials, and resources offer a flexible and convenient way to learn new techniques, improve your skills, and connect with a global community of jewelry makers. This section explores the benefits of learning jewelry making online and provides tips for finding the best online resources for your needs.
8.1 Benefits of Learning Online
- Flexibility: Online courses allow you to learn at your own pace and on your own schedule.
- Convenience: You can access online courses from anywhere in the world, as long as you have an internet connection.
- Affordability: Online courses are often more affordable than traditional classes and workshops.
- Variety: There is a vast variety of online jewelry making courses available, covering a wide range of techniques and topics.
- Access to Experts: You can learn from renowned jewelry artists and instructors from around the world.
- Community: Many online courses offer a community forum or group where you can connect with other students and share your work.
8.2 Types of Online Resources
- Online Courses: Structured courses that provide comprehensive instruction in specific jewelry making techniques.
- Video Tutorials: Short, focused videos that demonstrate specific techniques or projects.
- Blogs and Websites: Websites and blogs that offer tips, tutorials, and inspiration for jewelry makers.
- Online Forums: Online forums where you can ask questions, share your work, and connect with other jewelry makers.
- Social Media: Social media platforms like Instagram, Pinterest, and Facebook offer a wealth of visual inspiration and tutorials.
- Ebooks and Online Guides: Comprehensive guides that provide detailed information on various jewelry making techniques and materials.
8.3 Finding the Best Online Resources
- Reputable Platforms: Look for courses and tutorials on reputable platforms like Coursera, Udemy, Skillshare, and Creativebug.
- Instructor’s Credentials: Check the instructor’s credentials and experience to make sure they are qualified to teach the subject matter.
- Course Reviews: Read reviews from other students to get an idea of the quality of the course.
- Free Trials: Many online platforms offer free trials, allowing you to try out a course before committing to a purchase.
- Community Features: Look for courses that offer community features, such as a forum or group, where you can connect with other students.
- Cost: Consider the cost of the course and whether it fits within your budget.
8.4 Tips for Successful Online Learning
- Set Goals: Set specific goals for your online learning and track your progress.
- Create a Schedule: Create a schedule for your online learning and stick to it as much as possible.
- Eliminate Distractions: Find a quiet place to work and eliminate distractions, such as social media and email.
- Take Notes: Take notes while you watch videos and read articles to help you retain the information.
- Practice Regularly: Practice the techniques you learn regularly to improve your skills.
- Ask Questions: Don’t be afraid to ask questions if you don’t understand something.
By leveraging the power of online learning, you can expand your jewelry making skills and knowledge from the comfort of your own home. Remember to research your options and choose resources that align with your goals and learning style. At LEARNS.EDU.VN, we provide curated lists and reviews of the best online jewelry making resources to help you find the perfect learning opportunities.
9. Turning Your Jewelry Making Hobby into a Business
For many jewelry makers, a passion for creating beautiful pieces can evolve into a rewarding business venture. Turning your jewelry making hobby into a business requires careful planning, dedication, and a solid understanding of the market. This section provides a step-by-step guide to help you turn your jewelry making hobby into a successful business.
9.1 Assessing Your Skills and Passion
- Evaluate Your Skills: Assess your jewelry making skills and identify your strengths and weaknesses.
- Identify Your Niche: Determine what type of jewelry you want to specialize in. Consider your skills, interests, and the market demand.
- Passion: Make sure you are passionate about jewelry making and willing to dedicate the time and effort required to run a business.
9.2 Developing a Business Plan
- Executive Summary: Write a brief overview of your business, including your mission, goals, and target market.
- Company Description: Describe your business in detail, including the type of jewelry you will sell, your target market, and your competitive advantages.
- Market Analysis: Research your target market and identify your competitors.
- Marketing and Sales Strategy: Develop a plan for marketing and selling your jewelry, including online and offline channels.
- Financial Projections: Create financial projections for your business, including startup costs, revenue forecasts, and profit margins.
- Management Team: Describe your management team and their qualifications.
9.3 Setting Up Your Business
- Business Name: Choose a catchy and memorable business name.
- Legal Structure: Decide on the legal structure of your business, such as sole proprietorship, partnership, or LLC.
- Business License and Permits: Obtain the necessary business licenses and permits.
- Business Bank Account: Open a business bank account to keep your personal and business finances separate.
- Accounting System: Set up an accounting system to track your income and expenses.
9.4 Creating Your Jewelry Collection
- Design a Cohesive Collection: Design a cohesive collection of jewelry that reflects your brand and style.
- Quality Materials: Use high-quality materials to create durable and long-lasting jewelry.
- Pricing Strategy: Develop a pricing strategy that covers your costs and allows you to make a profit.
- Inventory Management: Implement an inventory management system to track your stock levels.
9.5 Marketing and Selling Your Jewelry
- Online Store: Create an online store using platforms like Etsy, Shopify, or Squarespace.
- Social Media Marketing: Use social media platforms like Instagram, Pinterest, and Facebook to promote your jewelry.
- Craft Fairs and Markets: Participate in craft fairs and markets to sell your jewelry in person.
- Wholesale: Consider selling your jewelry to retailers on a wholesale basis.
- Networking: Network with other jewelry makers, retailers, and industry professionals.
9.6 Managing Your Business
- Time Management: Manage your time effectively to balance your jewelry making, marketing, and administrative tasks.
- Customer Service: Provide excellent customer service to build a loyal customer base.
- Financial Management: Manage your finances carefully and track your income and expenses.
- Continuous Learning: Stay up-to-date on the latest jewelry making techniques and business trends.
Turning your jewelry making hobby into a business can be a challenging but rewarding experience. Remember to start small, be patient, and continuously improve your skills and business practices. At learns.edu.vn, we offer resources and courses to help you develop your business skills and launch your jewelry making business.
10. Maintaining and Caring for Your Handmade Jewelry
Handmade jewelry is often crafted with meticulous care and attention to detail, making it essential to maintain and care for your pieces properly. Proper care will not only preserve the beauty of your jewelry but also extend its lifespan. This section provides practical tips and guidelines for maintaining and caring for your handmade jewelry, ensuring that your creations remain stunning for years to come.
10.1 General Care Tips
- Storage: Store your jewelry in a clean, dry place, away from direct sunlight and extreme temperatures.
- Separate Storage: Store your jewelry pieces separately to prevent scratches and tangling.
- Soft Pouches or Boxes: Use soft pouches or jewelry boxes with compartments to store your jewelry.
- Avoid Chemicals: Avoid exposing your jewelry to harsh chemicals, such as chlorine, perfumes, and cleaning agents.
- Remove Before Activities: Remove your jewelry before engaging in activities that could damage it, such as swimming, exercising, or cleaning.
- Regular Cleaning: Clean your jewelry regularly to remove dirt, oil, and tarnish.
10.2 Cleaning Different Types of Jewelry
- Metal Jewelry: Clean metal jewelry with a soft cloth and a mild soap and water solution.
- Gemstone Jewelry: Clean gemstone jewelry with a soft brush and a mild soap and water solution.
- Beaded Jewelry: Clean beaded jewelry with a soft cloth and avoid soaking it in water.
- Resin Jewelry: Clean resin jewelry with a soft cloth and avoid using harsh chemicals.
- Pearl Jewelry: Clean pearl jewelry with a soft, damp cloth and avoid using soap or chemicals.
10.3 Preventing Tarnish
- Tarnish-Resistant Materials: Use tarnish-resistant materials, such as sterling silver or gold-filled wire.
- Tarnish-Resistant Coatings: Apply a tarnish-resistant coating to your jewelry.
- Anti-Tarnish Strips: Store your jewelry with anti-tarnish strips to absorb moisture and prevent tarnish.
- Regular Cleaning: Clean your jewelry regularly to remove tarnish before it becomes severe.
10.4 Repairing Damaged Jewelry
- Minor Repairs: Learn basic jewelry repair techniques, such as replacing clasps, jump rings, and ear wires.
- Professional Repairs: Take damaged jewelry to a professional jeweler for more complex repairs.
- Insurance: Consider insuring valuable jewelry against loss or damage.
10.5 Specific Care for Different Materials
| Material | Care Instructions |
|---|---|
| Sterling Silver | Polish regularly with a silver polishing cloth. |
| Gold |