How Do I Learn To Cut Hair? Discover essential skills and techniques with this ultimate guide from learns.edu.vn. This comprehensive guide provides a step-by-step roadmap for aspiring hairstylists, covering foundational knowledge, advanced methods, and practical tips to master the art of haircutting. Elevate your skills and unlock your creative potential with haircutting education.
1. Understanding the Foundations of Hair Cutting
Mastering the fundamentals is the first step in learning how to cut hair. These basics provide the framework for more advanced techniques. Let’s explore the crucial elements that form the basis of hair cutting.
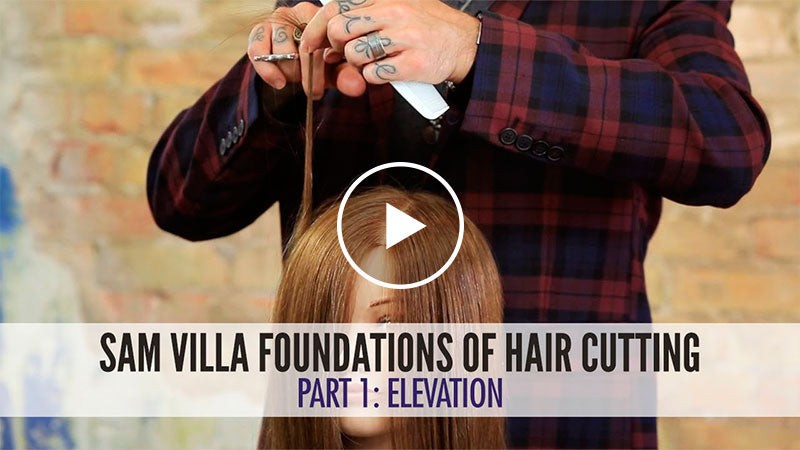
1.1 Grasping Elevation: Vertical Hair Movement Control
Elevation controls the vertical movement of hair, influencing the silhouette of the haircut.
- Definition: Elevation refers to lifting hair sections away from the head, creating layers and removing weight.
- Practical Application: Moving hair up and down, not side to side, achieves elevation. Collapsing the shape at the bottom while maintaining weight at the top is made possible through elevation.
- Impact: Elevating hair beyond 90 degrees results in more length dropping toward the perimeter, removing length from the upper surface.
1.2 Over-Direction: Horizontal Hair Movement Mastery
Over-direction manages horizontal hair movement, essential for controlling the silhouette’s side-to-side aspects.
- Definition: Over-direction involves directing hair sections away from their natural fall, impacting weight and length distribution.
- Techniques:
- Over-directing hair forward adds length and density to the back.
- Over-directing hair back creates movement and weight in the front.
- Cutting at the natural fall ensures no directional movement.
- Guides: Different cutting guides (stationary, traveling, visual) yield varied results, from maximum over-direction to softer weight buildup.
1.3 Finger Angle: Depth Creation Within Haircuts
Finger angle influences the haircut outcome by adding depth within each section.
- Definition: Finger angle refers to the angle at which fingers hold the hair during cutting, impacting the depth and shape of the cut.
- Effects:
- In vertical sections, finger angle affects the silhouette up and down.
- In horizontal sections, it controls movement towards or away from the face.
- Applications: Using a finger angle diagonally away from the head shape adds fullness to the perimeter. A diagonal finger angle with shorter lengths towards the face adds depth towards the back.
1.4 Sectioning: Precision and Accuracy Techniques
Precision and accuracy in sectioning are vital for achieving consistent and clean haircuts.
- Importance: Accurate sectioning ensures uniform cuts and balanced layering.
- Tips for Precision:
- Finger Connection: Use the parting tooth on the comb, connect the pointer finger to the desired point, and connect the two points.
- Combing Direction: Comb hair in the intended parting direction.
- Two-Hand Technique: Use both hands for longer partings, resting palms against the head for stability.
1.5 Tension: Consistent Application for Precise Results
Maintaining even tension while cutting is essential for precise results.
- Definition: Tension is the amount of pressure applied to a hair section while cutting, affecting the cut’s uniformity.
- Guidelines:
- Ensure even tension from top to bottom of the section.
- Avoid cutting past the first knuckle if possible.
- Be mindful of section rolling, maintaining a flat surface to prevent unintended elevation.
1.6 Layering Hair: Horizontal vs. Vertical Differences
Understanding the distinction between horizontal and vertical layering is essential for weight distribution and visual impact.
- Horizontal Layering: Creates more weight at the perimeter, increasing visual impact.
- Vertical Layering: Results in a softer edge with less weight.
- Techniques:
- For softer edges, elevate a vertical section to 90 degrees and cut straight across.
- For more texture, use shears to create deep peaks and valleys.
1.7 Haircut Guides: Safety Above the Ears
Establishing a safety guide when layering hair above the ears helps avoid unwanted holes.
- Key Point: Start the guide at the top of the ear, ensuring no hair is shorter than the piece at the ear’s high point.
- Benefit: Preserves density and length, preventing the dreaded hole above the ear.
- Process: Locate the safe point to initiate layers, maintaining density and length in this area.
1.8 One-Length Haircut: Consistent Line Creation
Creating a consistent line in a one-length haircut requires precise techniques.
- Challenges: Fingers tend to create a slightly diagonal line.
- Solutions: Use a comb to guide the bottom of the fingers for a horizontal line. Prevent elbow drag by using a comb to ensure perfect line creation.
- Additional Tips: Achieve consistency on both sides of the haircut.
1.9 Precision Haircut: Accurate Bottom Edge
Creating a precise bottom edge in a haircut involves careful attention to detail.
- Best Practices: Cut hair as close to its natural fall as possible to avoid inconsistencies. Avoid lifting hair up and away, which introduces elevation.
- Techniques:
- Use a comb to keep the hair in its natural fall position, reducing tension.
- Cut at the guideline’s bottom edge, ensuring the next section isn’t above the previous one.
1.10 Layering Hair: Weight Balance Consistency
Maintaining consistent weight balance within layered haircuts is a common challenge.
- Solutions: Examine elevation to control layer shape.
- Key Steps:
- Take smaller sections to improve elevation control.
- Consider body position – elbow-down side will be heavier, elbow-up side lighter.
1.11 Cross-Checking: Hair Examination Importance
Cross-checking is crucial for saving time and improving haircut results.
- Importance: Prevents mistakes and ensures balance within the haircut.
- Process:
- Take clean sections and elevate hair back to its original cutting position.
- Examine the line for balance in both vertical and horizontal sections.
1.12 Layering Hair: Facial Framing Without Bulk
Layering around the face requires extra care to avoid bulk or holes.
- Considerations: Hair around the face is finer due to recession areas.
- Techniques:
- Detach hair over the recession area from the layering length.
- Use blending shears to gently reduce weight without overdoing it.
1.13 V-Shaped Layers: Longer Hair Creation
Creating V-shaped layers on longer hair requires attention to length and blending.
- Process:
- Start at the head’s high point and connect to the weak point behind the ear.
- Over-direct hair forward with 90-degree elevation, cutting a V-shape.
- Connect the top V-shape’s longest point to the perimeter lengths.
1.14 Cutting-in-Motion – Shear Entry Angle and Timing/Speed
When cutting-in-motion, the shear entry angle is crucial for desired end results. These techniques allow quick removal of bulk and addition of movement to the hair.
-
Cutting-in-motion techniques:
- Slide cutting
- Slicing
- Channel cutting
- Slithering
- Pinching
-
Other Factors to Improve Cutting-In-Motion:
- Timing: Timing is critical for a great forward motion haircut. The speed at which the shear moves through the hair and the speed at which the shear closes affect the final result.
- Shear Choice: Choose the right shear to make motion cutting easier by pushing hair out as the blades close, creating beautiful soft edges that blend seamlessly.
1.15 Foundations of Layering Hair – 3 Different Elevations and How They Effect Weight Balance
To create better-layered haircuts, start with understanding the foundations of layering hair, such as levels of elevation and weight balance.
-
3 Different Elevations When Layering:
- High Elevation: Also called 90 degrees vertical, involves elevating a section straight up towards the ceiling.
Delivers beautiful blended layers that have less weight on top and more density at the perimeter. - Balanced Layers: For balanced layers and a round shape that follows the head, elevate the hair at 90 degrees to the head shape.
- High Elevation: Also called 90 degrees vertical, involves elevating a section straight up towards the ceiling.
1.16 4 Ways to Add Texture to Blunt Haircuts
Texture and layered hairstyles are continually trending. It is critical to be intentional about the entry angle of your shear relative to the grain of the hair is key to creating beautiful textured blunt cuts.
-
How To Add Texture To A Blunt Cut:
- Point cutting: Is a great way to create a blunt cut with textured ends.
- Sam Villa Signature Series Invisiblend Shear: The weight removal is super-delicate so you never need to worry about removing too much hair.
- Slide cutting: Working from the interior of the hair allows you to control where you want to take out weight.
1.17 How To Point Cut Like a Pro
Point cutting is a wonderful technique for adding softness to haircuts, but it can cause injury to your hands and fingers when done incorrectly.
- Tips for Point Cutting:
- Pull the shears away from your hand as you close them.
- Consider the depth of the cut and the shear angle.
1.18 How to Create Hairstyles According to Face Shape – Working With Features
Instead of following the “face shape rules”, try zooming out to consider the overall dimensions and lines of the haircut. A great hairstyle should balance the overall face shape, accentuate your guest’s favorite facial features, and de-emphasize less preferred features.
-
Tips For Cutting According to Face Shape:
- If your guest wants to highlight her eyes, cheekbones, or jawline, plan out bangs or layers that point to those features.
- For a wider face or round cheeks, think long vertical lines and sweeping layers that draw the eye down and away from the roundest part of the face.
1.19 In Depth Undercut Bob Tutorial
An undercut bob is a great technique for clients with thick or dense hair who want a bob. This allows you to take weight and volume out without impacting the weight line.
- Tips Featured In This Video:
- This in depth undercut bob tutorial takes you from initial sectioning to wet cutting, blow drying, flat ironing and even into the detailing and texturizing of a bob that falls beautifully on almost any head of hair!
1.20 Undercut Pixie Haircut Tutorial – Tips for a Better Blend with the Top
Similar to the undercut bob, an undercut pixie is a great way to remove weight and enhance the weight lines of a haircut.
- Blending Techniques For A Pixie Cut:
- To avoid too strong of a disconnection of a mohawk kind of effect there are various blending techniques discussed in this video that deliver a polished finish.
- Work with various techniques like dry cutting and learn how to use tools like blending shears or dry cutting shears to improve your cut.
1.21 “The Jana” In-depth Bowl Cut Tutorial
A modern take on a classic, this bowl cut is a bold way to make a big statement.
- The Bowl Cut – What You’ll Learn:
- This in-depth haircutting tutorial walks step-by-step from sectioning breakdown to the foundational cut, through the blow-dry and refinement of this precise bowl cut, The Janna.
- Explore the joy of sectioning and haircutting with a swivel shear to create this edgy shape with a modern approach.
1.22 3 Quick Tips for Texturizing Short Hair
Every cut really counts with short hair, which is why it’s so important to have a plan when texturizing this length hair.
-
A Few Things You’ll Learn In This Video:
- Where to adjust density, based on thick or thin areas to help balance the cut.
- Cutting density with contrast to adjust thinness or wispiness.
1.23 HOT TIP: Shear and Hand Position
Comfort begins with the shear in your hand. The proper relationship of the shear to your hand position.
- What You’ll Learn:
- Adjusting your hand position to alleviate discomfort when cutting, focusing on ergonomically correct posture
1.24 3 Ways To Cut a One Length Bob
The bob is one of the most iconic cuts that continues to stand the test of time. While it takes on new iterations every season, learning the basics of what you need to create the cut can help you build from there to customize a look your client will love.
- A Few Things You’ll Learn In This Video:
- Detailing the top 3 ways to cut a one length bob, you’ll learn how to perfect the perimeter.
- It will also discuss the difference how to hold the hair against the skin. Detailing one or two fingers of the palm to hold sections of hair.
2. Mastering Layering Techniques
Layering is the most common haircutting technique, adding movement and life to various styles. This section will explore techniques for controlling layers and creative solutions for challenges faced behind the chair.
2.1 Stick-Straight Hair: Layering Techniques
For clients with stick-straight hair, layers are essential to enhance movement, requiring precise fanning and point-cutting.
- Enhancement Steps: Overlap fingers, fan the section, and chunk out layers. Readjust and go deep into the section. Maintain the blade parallel to the hair shaft while the fan moves.
- Objective: Create flawless layers for enhanced texture and movement.
2.2 Long Hair: Adding Visual Interest and Dimension
Adding dimension to long, thick hair while maintaining length requires specific methods.
- Key Technique: Use vertical, pie-shaped sections on the upper surface to create a detached overcut.
- Process: Place the pie shape’s wide part on top to avoid removing density from the perimeter. Cut an inverted line from short to long using professional dry cutting shears.
- Aim: Achieve fresh dimension while keeping lengths full.
2.3 Crown Layers: Twist Cutting Technique
Twist cutting creates layers and texture through the crown area.
- How-to: Twist a section to increase elevation and over-direction. Elevate hair diagonally off the crown, over-directing into the section’s center. Remove length by cutting on a diagonal finger angle.
- Results: Adds soft texture and movement to the crown.
2.4 Ombre Layers: Technique for Longer Hair
Ombre layers create a soft blend, ideal for clients seeking movement and volume.
- Method: Use shears to “paint” hair outside triangular sections for softness and diffusion.
- Concept: Density at the base leading into lightness on the ends.
- Target: Clients with solid, one-length hair needing volume and movement.
2.5 Long Layers: Easy Cutting Method
Long layers create movement without sacrificing length or volume, suitable for various clients.
- Cutting Steps: Take a diagonal forward section and start in front. Bring parallel sections to the same guideline, over-directing and elevating each time. Divide the back and lift the last length to bring everything forward.
- Outcome: Achieves movement without compromising length or volume.
2.6 Perimeter Retention: Adding Layers
Maintaining perimeter length while adding layers suits clients wanting a ponytail option.
- Technique: Use a comb to take zigzag sections in the back, preserving perimeter weight. For tapered layers, soften vertically with shears.
- Focus: Protect the front and maintain length for versatile styling.
2.7 Crown Volume: Soft Layers for Longer Hair
Adding volume in the crown with soft layers involves strategic sectioning.
- Diamond Section: Use a diamond section to create variations in weight, especially over the ear.
- Cutting Process: Create four triangles in the crown to form the diamond. Elevate hair across the head parallel to the floor, with the finger angle parallel to the triangle’s base.
- Benefit: Adds movement without excessive crown shortness.
2.8 Smooth Layers: Avoiding Choppiness
Point-cutting techniques are crucial for creating layers that avoid a choppy appearance.
- Technique: Stay parallel with the hair’s grain when point-cutting to reduce weight. Lift the section, fan the hair, and point-cut.
- Objective: Achieve smooth, well-blended layers without a choppy finish.
2.9 Even Layers: Side Parts and Sweeping Fringes
Cutting even layers with side parts or sweeping fringes requires addressing potential length discrepancies.
- Solution: Isolate a section in front and use zigzag parting. Square off layers and demonstrate evenness. Use blending shears to encourage movement.
- Explanation: The head shape creates the illusion of uneven layers with side parts.
2.10 Balanced Layers: Techniques for Thicker Hair
Keeping layers balanced, especially with thicker hair, involves specific decisions based on the side part.
- Options: Allow a shorter layer on the heavy side or detach longer hair on one side for evenness.
- Considerations: Detaching on thicker hair adds weight to one side. Cutting balanced across the top results in varying layer lengths.
- Goal: Maintain visual balance and movement.
2.11 Short Crown Layers: Diamond Section for Movement
Creating shorter layers with crown movement involves using a diamond section.
- Diamond Section: Ideal for creating a square shape on top.
- Process: Section hair, number the diamond corners, and distribute weight and length in the corners. Cut past the head’s round on a diagonal line. Diffuse the edge with blending shears.
- Result: Shorter layers in the crown for enhanced movement.
2.12 Disconnected Layers: Bulk Reduction
Disconnected layers reduce bulk without sacrificing length, speeding up blow-drying time.
- Technique: Create an under-layer by slicing out a zigzag section above the ear and isolating it. Cut on a horizontal line to remove weight.
- Objective: Release weight while maintaining overall length.
2.13 Invisible Layers: Crown Volume Enhancement
Diamond-shaped sections create volume at the crown without visible layering.
- Key Point: Allows hair to tilt away from the face, creating volume.
- Method: Size the diamond based on hair density. Elevate and chunk out sections, using blending shears to create a frothy crown.
- Benefit: Adds volume without overt layering.
2.14 Dry or Coarse Hair: Cutting Layers
Cutting layers on dry or coarse hair requires careful consideration to texture and line visibility.
- Challenge: Visible lines after blow-drying.
- Solution: Cut with horizontal zigzag sections, using the hair’s grain. Fan and point-cut deep into each section.
- Goal: Achieve smooth layers that complement the hair’s natural texture.
2.15 Triangle Sections: Hidden Volume Creation
Triangle sections create texture with length and movement.
- Technique: Make triangles of large zigzag sections instead of horseshoes. Point-cut into each triangle, standing on either the narrow or wide side based on desired weight.
- Outcome: Hidden volume and texture that enhance the overall style.
2.16 How to Create Internal Graduation on a Blunt Bob to Collapse the Perimeter
To create a graduated bob haircut with a sleek, tucked shape and no visible layers on the top surface, you need to place graduation on the inside of the hairstyle with texturizing. This gives the appearance of a blunt bob with no “short pieces sticking out” but creates a leaner shape that gives a sense of volume.
- Internal Graduation on a Blunt Bob
- Starting at the center back of the head, take a vertical section of hair and elevate it to 45 degrees, pointing your fingers down towards the nape of the neck.
- Point cut into the elevated section, staying nearly parallel to the grain of the hair. When you finish point-cutting this section, clip it out of the way and repeat with the rest of the hair.
2.17 How to Create Seamless Layers on a One Length Bob
A one length bob haircut adds tons of fullness and natural movement. To enhance volume and movement to a one-length haircut, an invisible layering technique is essential.
- How To Create Layers on a One-Length Bob:
- Start by creating a center part in dry hair, then sectioning the hair behind the ears on each side.
- Create a vertical line from the high point or “peak” of the head down to the center back section on each side.
- Elevate one triangle vertically, with your fingers pointing toward the front of the head, and cut the hair shorter in the front and longer towards the back.
2.18 How to Create Invisible Layers or Internal Layers
How to cut “ghost” layers or invisible layers in thick, medium, or fine hair. An ideal technique that adds fullness, movement, and body to a haircut without creating visible layers.
- How To Create Invisible Layers
- Create a horizontal section of hair at the nape of the neck, and isolate the hair on top with another clip.
- Working with vertical 1” pieces, “blouse” the hair to discover its natural bend.
- Elevate the hair at a 90 degree angle (parallel to the floor) and cut the hair from short to long, beginning at the natural bend point.