Embarking on the journey of learning to draw can feel daunting, but it’s more accessible than you might think. Forget the myth of innate talent; drawing is a skill cultivated through practice and the understanding of fundamental techniques. This guide breaks down the process into manageable steps, proving that anyone with dedication can learn how to draw.
1. Warm-Up and Hand-Eye Coordination Exercises
Before diving into complex drawings, warming up is essential. Think of it as stretching before exercise – it prepares your “drawing muscles” and familiarizes you with your tools. A warm-up also helps to quiet the mental chatter and focus your mind on the creative task ahead.
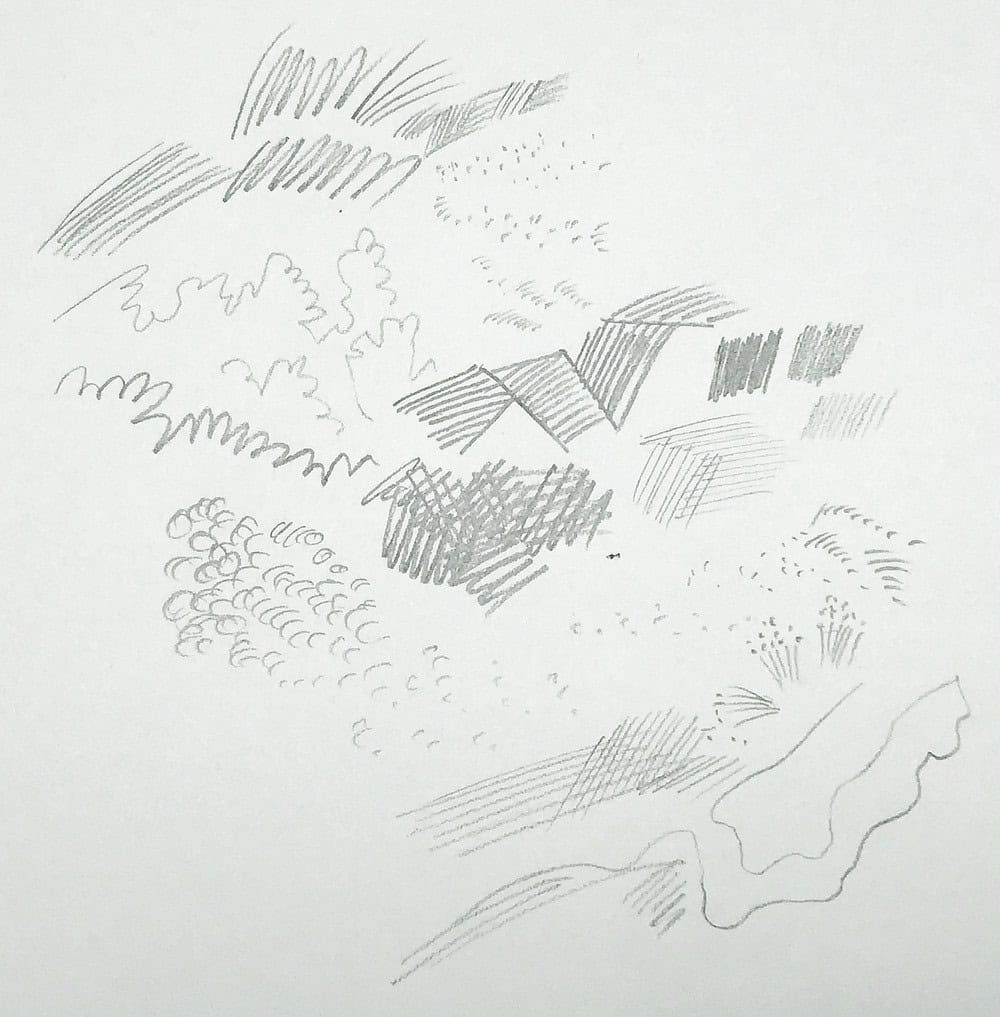
Grab your pencil or pen and experiment with various marks on your paper. Explore the versatility of line work. Create scribbles, playful doodles, precise dots, textured stipples, rhythmic hatching, and dynamic zig-zag lines. Vary the pressure you apply to your tool to see how it changes the marks. This playful exploration is key – keeping your practice enjoyable ensures you’ll stick with it.
To further refine your control, dedicate some time to hand-eye coordination practice. Using your pencil, draw straight and curved lines of varying lengths. Don’t strive for perfection; this is merely a warm-up. Next, draw round shapes like circles and ellipses, and try loose, flowing figures-of-eight. Experiment with different sizes and pressure levels. Pay attention to how your arm movement affects your lines. Try drawing from your shoulder, keeping your elbow and wrist relatively still. Does this create smoother curves? Fill a page with these exercises. The goal is to relax and observe how your hand feels more comfortable with the pencil, setting the stage for more controlled drawing. Integrating warm-ups at the start of each drawing session can significantly improve your line work and pencil control, especially for beginners learning how to learn to draw.
2. Begin with Basic Shapes and Light Outlines
With your hand warmed up, it’s time to start drawing more intentionally. The foundation of all drawing, regardless of complexity, lies in basic shapes. Think of circles (which you’ve already practiced), rectangles, and triangles. Mastering these fundamental shapes unlocks the ability to draw virtually anything.
How does this work in practice? When you observe an object, your task is to visually simplify it into these basic shapes. Whether you’re looking at a rose, a house, or a bird, try to identify the underlying circles, rectangles, and triangles. It’s far easier to begin with a simple circle and a connecting line, and then refine those, than to immediately tackle the intricate details of a complex subject.
Use these basic shapes to create a light underdrawing. Start with very light lines and approximate shapes. This initial sketch serves as a framework that you’ll refine in subsequent steps. The focus at this stage is on capturing correct proportions and establishing a solid base to build upon. Don’t worry about perfect lines, shading, or details just yet; those elements come later. These initial gestural drawings are often loose and spontaneous, ideal for warming up and capturing the essence of your subject on paper, a crucial step when learning how to learn to draw.
3. Refine, Check Angles, and Add Solid Lines and Volume
The next step involves refining your initial sketch with more defined outlines. Remember, observation is paramount. Drawing is as much about learning to see accurately as it is about applying pencil to paper.
Using your gesture drawing as a guide, carefully compare the angles and edges in your drawing to your actual subject. Identify areas that need adjustment. Meticulously observe the angles, shapes, and curves of your subject. Trace the contours with your eyes, paying close attention to the proportions you’ve initially established. Are they accurate? If not, make corrections now. Again, emphasize observation before placing any lines. Truly notice the details of your subject before committing them to paper. Draw what you genuinely see, not what you think you know is there.
A helpful technique is to use your pencil as a measuring tool. Align your pencil with an angle on your subject to accurately translate it onto your drawing. In the initial exploratory stage, you likely used several loose lines. Now, select the most accurate contour line and define it with a more solid, confident stroke. Strive to faithfully represent what you observe in front of you. This stage is critical for developing accuracy and understanding form when learning how to learn to draw.
4. Practice with Numerous Quick Sketches
Before proceeding to the finishing touches, take a step back and dedicate time to practicing quick sketches. You now have a loose underdrawing with basic shapes, refined with a more solid contour and defining angles. This is a significant achievement!
At this stage, the most effective practice is to create numerous rapid drawings. Choose an object and sketch it from various angles using quick, gestural lines. Aim to develop a seamless connection between your eye and hand, where visualizing a line translates effortlessly to drawing it on paper. This should become a fluid process with practice. While it takes time, consistent effort is crucial for developing hand-eye coordination. Focus on quantity over quality at this stage; create many quick sketches rather than striving for a single perfect drawing. For optimal learning, shorter, frequent practice sessions are more effective than infrequent, lengthy ones. Regular, brief sessions reinforce the techniques and build muscle memory essential for learning how to learn to draw.
These fundamental exercises might appear simple, but they are essential for building a strong drawing foundation. With consistent practice, these techniques will become intuitive, requiring less conscious thought.
5. Focus, Contrast, and Details
Now, let’s move towards finishing your drawing. At this point, you’ll want to add depth and polish to your sketch. However, it’s crucial to ensure your basic framework and proportions are accurate before adding details. If not, it’s perfectly fine to start a new drawing or revise your existing one. Starting over is a valuable part of the learning process.
In this step, introduce contrast, light and shadow areas, and subtle details like textures in specific areas. Each of these elements are advanced techniques that can be further explored. However, it’s important to avoid overdoing the details. Strategically place details and textures to guide the viewer’s eye to focal points.
Recall the mark-making exercises from the warm-up. Remember the diverse marks and lines your pencil can create – dots, lines, hatching, broken lines, varied line weights. Consider the textures appropriate for your subject and add details selectively, not uniformly.
Similarly, apply the concept of contrast and shadows sparingly. Add darker areas to suggest volume and depth in key areas, but avoid overworking the entire sketch. While adding shadows and details can be enjoyable, restraint is key. A few well-placed accents are more effective than excessive rendering. To simplify identifying value differences for shadows, try squinting slightly; this can help you see the light and dark areas more clearly, improving your understanding of light and form when learning how to learn to draw.
6. Practice Consistently and Learn from Mistakes
Essentially, the drawing process boils down to these steps:
- Start with basic shapes and light lines to establish proportions.
- Refine lines, check angles, and create solid outlines.
- Add details, textures, shadows, and highlights.
These are the fundamental steps. The key to mastering drawing lies in consistent practice. Accumulate “pencil miles” until these steps become second nature. Establish a regular practice habit by setting reminders to ensure consistent engagement.
Acknowledge that mistakes are inevitable and integral to the learning process. Don’t be discouraged by errors; instead, view them as learning opportunities to improve your next drawing. While the desire for instant proficiency is natural, developing hand-eye coordination and drawing skills requires time and repetition. Muscle memory needs to be built, which involves working through mistakes. Avoid frustration and trust the process. Even masters like Leonardo da Vinci went through a learning curve. Embrace mistakes as a normal and beneficial part of your journey to become a better sketcher when learning how to learn to draw.
7. Expand Your Knowledge with Advanced Concepts
This guide provides a solid foundation and will keep you engaged in practice for a considerable time.
When you’re ready to advance further, exploring more sophisticated drawing techniques will significantly enhance your abilities. Understanding concepts like visualizing in 3D volumes, perspective, values, light and shadow, and foreshortening are crucial for creating more realistic and compelling drawings.
To delve deeper into these concepts and develop comprehensive drawing skills, consider exploring further resources and courses. These advanced techniques will empower you to draw anything with greater skill and artistry, solidifying your journey of learning how to learn to draw.
By following these steps and dedicating time to practice, you’ll be well on your way to drawing anything you desire. Remember, the journey of learning how to learn to draw is ongoing and rewarding.