Learn How To Get Rid Of Learn More About This Picture icon on your Windows 11 desktop, offering a cleaner and more personalized experience with LEARNS.EDU.VN. This guide will explore simple yet effective methods to remove the icon, allowing you to customize your desktop view while still enjoying the beautiful wallpapers provided by Windows Spotlight. Enhance your digital workspace with these tips and tricks for a more streamlined user experience, including customizing desktop icons and managing display settings.
1. Understanding The “Learn More About This Picture” Icon
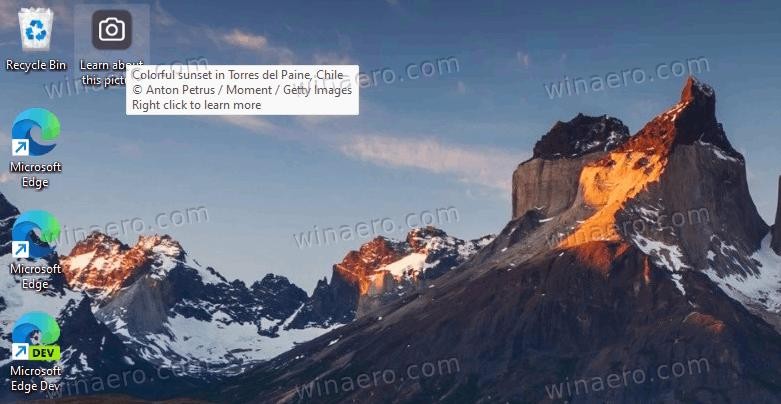
The “Learn more about this picture” icon is a feature of Windows Spotlight, designed to enhance user engagement with the operating system’s dynamic desktop backgrounds. Windows Spotlight automatically downloads stunning images from Bing and sets them as your desktop wallpaper. The icon provides quick access to information about the displayed image and options to rate or switch to a new background. This feature, while visually appealing, can sometimes become an unnecessary distraction for users who prefer a minimalist desktop or have specific aesthetic preferences.
1.1 What is Windows Spotlight?
Windows Spotlight is a feature in Windows 10 and 11 that automatically downloads and displays new background images on the lock screen and desktop. These images are sourced from Bing and are often high-quality photographs of landscapes, nature, and urban environments. Spotlight aims to keep the user interface fresh and engaging by regularly changing the background and providing options to learn more about each image.
1.2 Purpose of the Icon
The “Learn more about this picture” icon serves several purposes:
- Providing Information: It allows users to quickly find out details about the current wallpaper, such as the location, photographer, or related facts.
- User Engagement: It encourages users to interact with the Windows Spotlight feature by voting on images they like or disliking those they don’t. This feedback helps Microsoft curate better images for future display.
- Navigation: It offers shortcuts to switch to the next image or explore other available backgrounds.
1.3 Why Remove It?
Despite its utility, many users find the icon visually cluttering or redundant. Reasons for wanting to remove it include:
- Aesthetic Preferences: Some users prefer a clean, minimalist desktop without any unnecessary icons.
- Redundancy: Those familiar with Windows Spotlight may not need the quick access provided by the icon.
- Distraction: The icon can be a visual distraction, especially for users who need to focus on their work or studies.
1.4 Target Audience and Their Needs
The primary audience for this content includes:
-
Students (10-24 years): Students, whether in school or college, often seek to customize their devices to enhance focus and productivity. Removing distracting elements like the Spotlight icon can help create a more conducive study environment.
-
Professionals (25-65+ years): Working professionals may desire a clean and efficient workspace. They often customize their desktops to streamline workflows and reduce distractions.
-
Educators (25-65+ years): Teachers and lecturers might want to simplify their desktop for presentations or demonstrations, ensuring a clear and professional appearance.
-
Tech Enthusiasts (18-65+ years): Individuals interested in technology and customization are always looking for ways to optimize their user experience and personalize their devices.
These users share common challenges:
-
Finding Reliable Information: They need accurate and trustworthy guides to modify system settings.
-
Time Constraints: They seek quick and efficient solutions to customize their desktops without spending hours troubleshooting.
-
Fear of System Errors: They worry about making changes that could potentially harm their operating system.
LEARNS.EDU.VN addresses these needs by providing clear, step-by-step instructions and expert tips, ensuring users can confidently customize their Windows 11 experience.
2. Methods to Remove “Learn More About This Picture” Icon
There are several methods to remove the “Learn more about this picture” icon from your Windows 11 desktop. Each approach varies in complexity and suitability, depending on your comfort level with system modifications.
2.1 Using Registry Editor
The Registry Editor is a powerful tool that allows you to modify the Windows operating system’s settings at a low level. This method is effective but requires careful attention to detail to avoid making unintended changes.
2.1.1 Step-by-Step Instructions
-
Open Registry Editor: Press
Win + Rto open the Run dialog, typeregedit, and press Enter. -
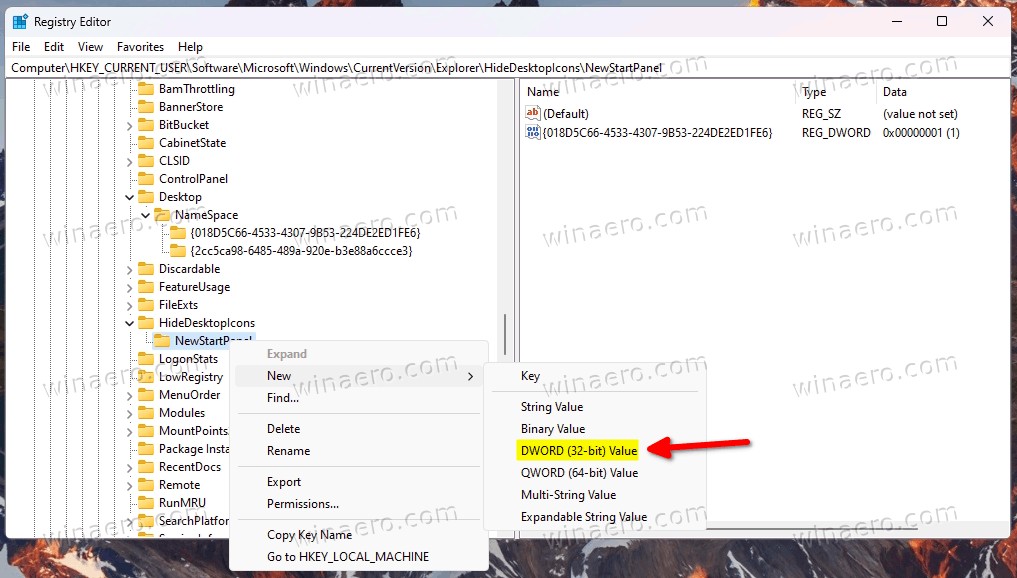
Navigate to the Correct Key: In the Registry Editor, navigate to the following path:
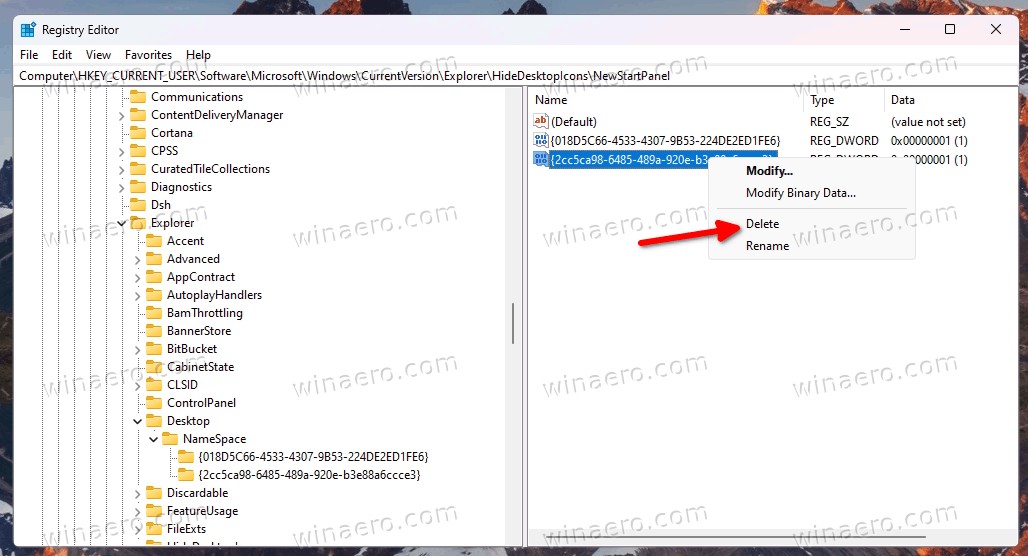
HKEY_CURRENT_USERSoftwareMicrosoftWindowsCurrentVersionExplorerHideDesktopIconsNewStartPanel -
Create a New DWORD Value: Right-click on the
NewStartPanelkey in the left pane, selectNew > DWORD (32-bit) Value. -
Name the Value: Name the new value
{2cc5ca98-6485-489a-920e-b3e88a6ccce3}. -
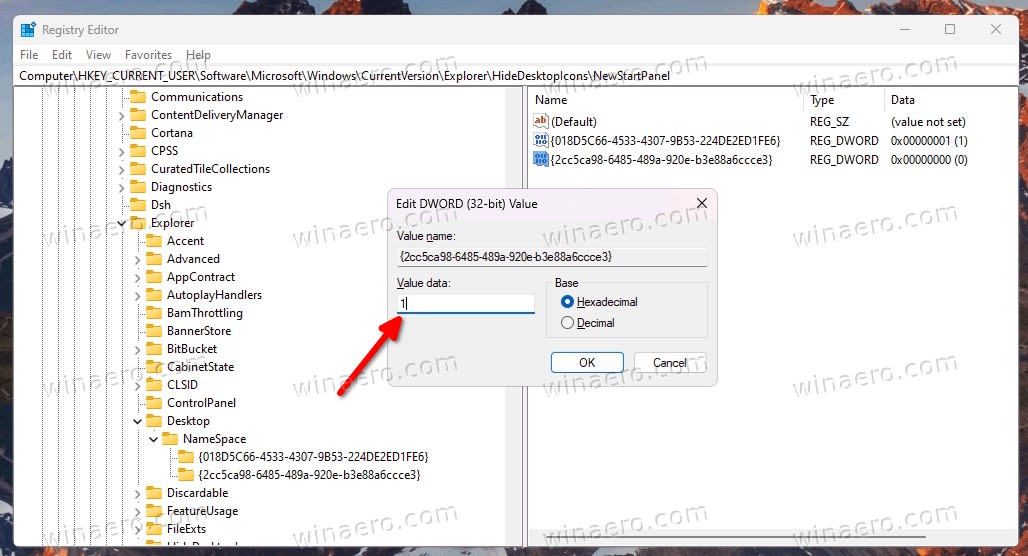
Modify the Value Data: Double-click on the newly created value, and change its
Value datafrom0to1. -
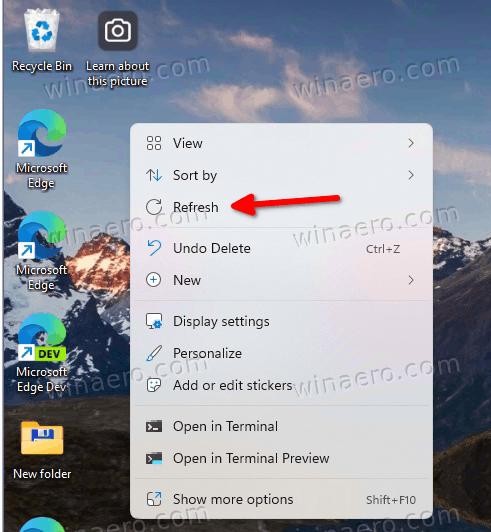
Refresh the Desktop: Right-click on your desktop and select
Refresh. The “Learn more about this picture” icon should disappear.
2.1.2 Restoring the Icon
If you want to restore the icon later, simply delete the {2cc5ca98-6485-489a-920e-b3e88a6ccce3} value from the Registry or change its Value data back to 0.
2.1.3 Precautions
- Backup the Registry: Before making any changes, it is crucial to back up the Registry. Go to
File > Export, choose a location, and save the file. This allows you to restore the Registry to its previous state if something goes wrong. - Double-Check the Path: Ensure you are navigating to the correct Registry key to avoid altering unrelated settings.
- Admin Privileges: Make sure you are running the Registry Editor with administrator privileges to make the necessary changes.
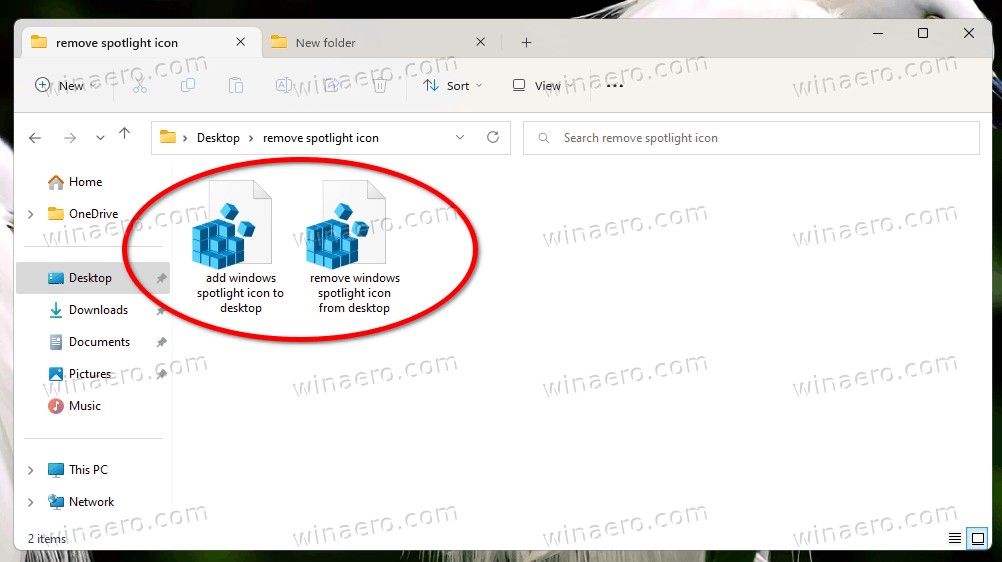
2.2 Using Ready-Made Registry Files
For those who prefer not to manually edit the Registry, ready-made Registry files can simplify the process. These files automate the creation and modification of the necessary Registry values.
2.2.1 Downloading and Using the Files
-
Download the Files: Download a ZIP archive containing the Registry files from a trusted source.
-
Extract the Contents: Extract the contents of the ZIP archive to a folder of your choice.
-
Run the Removal File: Double-click on the
remove windows spotlight icon from desktop.regfile. -
Confirm the Action: You may be prompted by User Account Control; click on the
Yesbutton to proceed. -
Refresh the Desktop: Right-click on your desktop and select
Refresh. The icon should disappear.
2.2.2 Restoring the Icon
To restore the icon, simply run the add windows spotlight icon to desktop.reg file and refresh the desktop.
2.2.3 Safety Considerations
- Source Reliability: Only download Registry files from trusted sources to avoid malware or unwanted changes to your system.
- Review the File: Before running the file, you can open it with a text editor (like Notepad) to review the changes it will make to the Registry.
- Backup: As with manual editing, backing up the Registry before running any REG file is advisable.
2.3 Using Third-Party Tools
Several third-party tools can help you manage and customize your Windows 11 experience, including removing the “Learn more about this picture” icon.
2.3.1 Winaero Tweaker
Winaero Tweaker is a popular customization tool that offers a wide range of options for tweaking Windows settings, including the ability to disable the Windows Spotlight desktop icon.
Steps to Use Winaero Tweaker:
-
Download and Install: Download Winaero Tweaker from the official website and install it.
-
Navigate to the Setting: Launch Winaero Tweaker and navigate to
Windows 11 > Windows Spotlight Desktop Iconin the left pane. -
Disable the Icon: On the right pane, place a checkmark next to the
Disable Windows Spotlight Desktop Iconoption. -
Apply Changes: You may need to refresh the desktop manually or sign out and back into your user account to apply the changes.
Restoring the Icon:
To restore the icon, simply uncheck the Disable Windows Spotlight Desktop Icon option in Winaero Tweaker.
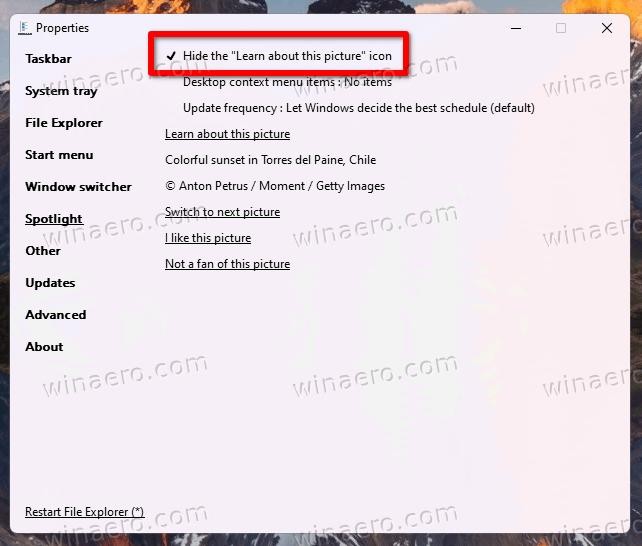
2.3.2 ExplorerPatcher
ExplorerPatcher is another tool that allows you to customize various aspects of Windows 11, including the taskbar and desktop. It provides an option to hide the Spotlight desktop icon.
Steps to Use ExplorerPatcher:
-
Download and Install: Download the latest version of ExplorerPatcher from its GitHub page.
-
Run the Setup: Run the downloaded file and follow the setup wizard.
-
Access Properties: After installation, right-click on the taskbar and select
Properties. -
Navigate to Spotlight Settings: Go to the
Spotlightsection on the left pane. -
Hide the Icon: Select the
Hide the "Learn about this picture" iconoption.
Restoring the Icon:
To restore the icon, uncheck the Hide the "Learn about this picture" icon option in ExplorerPatcher.
2.3.3 Advantages and Disadvantages
| Tool | Advantages | Disadvantages |
|---|---|---|
| Winaero Tweaker | User-friendly interface, multiple customization options | Requires installation, may include options not relevant to all users |
| ExplorerPatcher | Comprehensive customization, integrates deeply with the system | Can be overwhelming for beginners, may introduce compatibility issues |
2.3.4 Recommendations
- Choose Reputable Tools: Only use third-party tools from reputable sources to avoid malware or unwanted software.
- Read Reviews: Before installing any tool, read reviews and user feedback to understand its functionality and potential issues.
- Create a Restore Point: Create a system restore point before installing any third-party tool, allowing you to revert changes if necessary.
3. Advanced Customization Options
Beyond removing the “Learn more about this picture” icon, Windows 11 offers several advanced customization options to enhance your desktop experience.
3.1 Customizing Desktop Icons
Windows 11 allows you to customize the appearance of desktop icons, providing a more personalized and visually appealing experience.
3.1.1 Changing Icon Size
You can adjust the size of desktop icons to improve visibility or create a more streamlined look.
Steps to Change Icon Size:
- Right-Click on Desktop: Right-click on an empty area of your desktop.
- Select View: Choose
Viewfrom the context menu. - Choose Icon Size: Select
Large icons,Medium icons, orSmall iconsbased on your preference.
3.1.2 Changing Icon Image
You can replace the default icon image with a custom image for a more personalized touch.
Steps to Change Icon Image:
- Right-Click on Icon: Right-click on the icon you want to change and select
Properties. - Go to Customize Tab: In the Properties window, go to the
Customizetab. - Click Change Icon: Click the
Change Iconbutton. - Choose New Icon: Select a new icon from the list or browse to a custom icon file (ICO format).
- Apply Changes: Click
OKto apply the changes.
3.1.3 Hiding System Icons
You can hide default system icons like Recycle Bin, This PC, and Network from the desktop.
Steps to Hide System Icons:
- Open Settings: Press
Win + Ito open the Settings app. - Go to Personalization: Click on
Personalization. - Select Themes: Choose
Themesfrom the left sidebar. - Click Desktop Icon Settings: Under
Related Settings, click onDesktop icon settings. - Toggle Icons On/Off: In the Desktop Icon Settings window, check or uncheck the boxes next to the icons you want to show or hide.
- Apply Changes: Click
OKto apply the changes.
3.2 Managing Backgrounds and Themes
Windows 11 offers extensive options for managing desktop backgrounds and themes, allowing you to create a visually appealing and cohesive desktop environment.
3.2.1 Setting a Custom Background
You can set a custom image or slideshow as your desktop background.
Steps to Set a Custom Background:
- Open Settings: Press
Win + Ito open the Settings app. - Go to Personalization: Click on
Personalization. - Select Background: Choose
Backgroundfrom the left sidebar. - Choose Background Type: Select
Picture,Solid color, orSlideshowfrom thePersonalize your backgrounddropdown menu. - Browse for Image/Folder: If you choose
Picture, clickBrowseto select an image. If you chooseSlideshow, clickBrowseto select a folder containing images. - Choose Fit: Under
Choose a fit, select how the image should be displayed (e.g.,Fill,Fit,Stretch,Tile,Center,Span).
3.2.2 Using Themes
Themes allow you to customize the overall look and feel of Windows, including the background, colors, sounds, and mouse cursor.
Steps to Use Themes:
- Open Settings: Press
Win + Ito open the Settings app. - Go to Personalization: Click on
Personalization. - Select Themes: Choose
Themesfrom the left sidebar. - Choose a Theme: Select a pre-installed theme or click
Browseto install a custom theme. - Customize Theme: Click on the various options (e.g.,
Background,Colors,Sounds,Mouse cursor) to further customize the theme.
3.2.3 Creating a Custom Theme
You can create your own custom theme by combining your preferred background, colors, sounds, and mouse cursor.
Steps to Create a Custom Theme:
- Customize Settings: Customize your background, colors, sounds, and mouse cursor to your liking.
- Go to Themes: In the Settings app, go to
Personalization > Themes. - Save Theme: Click on
Save themeunderCurrent theme. - Name Theme: Enter a name for your theme and click
Save.
3.3 Optimizing Display Settings
Optimizing your display settings can improve readability, reduce eye strain, and enhance your overall desktop experience.
3.3.1 Adjusting Screen Resolution
Setting the correct screen resolution ensures that text and images are displayed clearly and sharply.
Steps to Adjust Screen Resolution:
- Open Settings: Press
Win + Ito open the Settings app. - Go to System: Click on
System. - Select Display: Choose
Displayfrom the left sidebar. - Choose Display Resolution: Under
Display resolution, select the recommended resolution or choose a different resolution from the dropdown menu.
3.3.2 Adjusting Text Size
Increasing the text size can improve readability, especially on high-resolution displays.
Steps to Adjust Text Size:
- Open Settings: Press
Win + Ito open the Settings app. - Go to Accessibility: Click on
Accessibility. - Select Text Size: Choose
Text sizefrom the left sidebar. - Adjust the Slider: Drag the slider to increase or decrease the text size.
- Apply Changes: Click
Applyto apply the changes.
3.3.3 Night Light
Night Light reduces the amount of blue light emitted by your screen, which can help reduce eye strain and improve sleep quality.
Steps to Enable Night Light:
- Open Settings: Press
Win + Ito open the Settings app. - Go to System: Click on
System. - Select Display: Choose
Displayfrom the left sidebar. - Toggle Night Light: Under
Night light, toggle the switch to turn it on or off. - Adjust Settings: Click on
Night light settingsto adjust the color temperature and schedule.
3.4 Best Practices for Desktop Customization
Customizing your desktop can enhance your productivity and enjoyment of your computer. Here are some best practices to keep in mind:
- Keep it Clean: Avoid cluttering your desktop with too many icons or shortcuts. Organize your files and folders logically and use the desktop for frequently accessed items only.
- Choose a Theme That Suits You: Select a theme that reflects your personal style and preferences. Consider factors like color scheme, background image, and icon design.
- Optimize for Readability: Adjust your display settings to ensure that text is easy to read and that images are displayed clearly.
- Use Consistent Design: Maintain a consistent design across your desktop, including icons, background, and theme elements.
- Backup Your Settings: Regularly back up your desktop settings, including themes, icons, and display settings, to avoid losing your customizations.
- Consider Accessibility: Make sure your desktop customizations do not hinder accessibility. Use high contrast themes and appropriate text sizes to ensure readability.
By following these guidelines, you can create a desktop environment that is both visually appealing and highly functional.
4. Common Issues and Troubleshooting
While customizing your desktop, you may encounter some common issues. Here’s how to troubleshoot them:
4.1 Icon Not Disappearing After Registry Change
If the “Learn more about this picture” icon does not disappear after making changes in the Registry Editor, try the following:
- Refresh the Desktop: Right-click on the desktop and select
Refresh. - Restart Explorer: Press
Ctrl + Shift + Escto open Task Manager, findWindows Explorerin the list, right-click on it, and selectRestart. - Restart Your Computer: If the icon still doesn’t disappear, try restarting your computer.
- Verify Registry Settings: Double-check that you have entered the correct values in the Registry Editor.
- Check Permissions: Ensure that you have the necessary permissions to modify the Registry.
4.2 Third-Party Tools Not Working
If a third-party tool like Winaero Tweaker or ExplorerPatcher is not working as expected, try the following:
- Update the Tool: Make sure you are using the latest version of the tool.
- Run as Administrator: Run the tool with administrator privileges.
- Check Compatibility: Verify that the tool is compatible with your version of Windows 11.
- Reinstall the Tool: Try uninstalling and reinstalling the tool.
- Check for Conflicts: Ensure that there are no conflicting applications or settings that may be interfering with the tool.
4.3 Display Issues After Customization
If you experience display issues after customizing your desktop, such as incorrect resolution or distorted images, try the following:
- Revert to Default Settings: Revert to the default display settings in the Settings app.
- Update Graphics Drivers: Update your graphics drivers to the latest version.
- Check Cable Connections: Ensure that your monitor cable is securely connected to your computer.
- Adjust Refresh Rate: Adjust the refresh rate of your monitor in the Advanced display settings.
- Run Display Troubleshooter: Windows 11 has a built-in display troubleshooter that can help identify and fix common display issues. To run it, go to Settings > System > Troubleshoot > Other troubleshooters and select “Display”.
4.4 Registry Editing Errors
If you encounter errors while editing the Registry, such as incorrect values or missing keys, try the following:
- Restore from Backup: Restore the Registry from the backup you created before making any changes.
- Double-Check Instructions: Double-check the instructions and verify that you have entered the correct values.
- Seek Expert Help: If you are not comfortable editing the Registry, seek help from a technical expert.
4.5 Preventing Future Issues
To minimize the risk of encountering issues while customizing your desktop, consider the following tips:
- Create a System Restore Point: Create a system restore point before making any significant changes to your system.
- Research Before Making Changes: Research the potential impact of any changes you plan to make to your system.
- Follow Instructions Carefully: Follow instructions carefully and double-check your work before applying any changes.
- Use Reputable Tools: Only use reputable tools from trusted sources.
- Backup Important Data: Regularly back up your important data to protect against data loss in case of system errors.
5. Benefits of a Customized Desktop
Customizing your desktop offers several benefits that can enhance your overall computing experience.
5.1 Increased Productivity
A well-organized and visually appealing desktop can help you stay focused and productive. By removing distractions, such as unnecessary icons, and optimizing your display settings, you can create a more efficient workspace.
5.2 Enhanced User Experience
Customizing your desktop allows you to create a computing environment that is tailored to your personal preferences and needs. This can lead to a more enjoyable and satisfying user experience.
5.3 Improved Organization
By organizing your desktop icons and folders logically, you can quickly access the files and applications you need. This can save you time and reduce frustration.
5.4 Personal Expression
Customizing your desktop allows you to express your personal style and creativity. By choosing a theme, background, and icons that reflect your interests, you can make your computer feel more like your own.
5.5 Reduced Eye Strain
Optimizing your display settings, such as adjusting text size and enabling Night Light, can reduce eye strain and improve your overall comfort while using your computer.
5.6 Greater Efficiency
A streamlined desktop can lead to greater efficiency in your daily tasks. By reducing clutter and optimizing your settings, you can accomplish more in less time.
5.7 Increased Enjoyment
Ultimately, customizing your desktop can make using your computer more enjoyable. By creating an environment that is both visually appealing and highly functional, you can enhance your overall computing experience.
6. Why LEARNS.EDU.VN is Your Go-To Resource
LEARNS.EDU.VN offers comprehensive, reliable, and easy-to-follow guides for customizing your Windows 11 experience. Our expert-authored content ensures you can confidently modify your system settings without fear of errors.
6.1 Expert-Authored Content
Our articles are written by experienced educators and tech experts who provide clear, step-by-step instructions.
6.2 Reliable Information
We source our information from trusted sources and verify all instructions to ensure accuracy and reliability.
6.3 Easy-to-Follow Guides
Our guides are designed to be easy to understand and follow, even for beginners.
6.4 Comprehensive Coverage
We cover a wide range of topics related to Windows 11 customization, providing you with all the information you need in one place.
6.5 Up-to-Date Information
We keep our content up-to-date with the latest Windows 11 updates and features, ensuring you always have access to the most current information.
6.6 Community Support
Join our community to ask questions, share tips, and get help from other users.
6.7 Call to Action
Ready to take control of your Windows 11 experience? Visit LEARNS.EDU.VN today for more tips, tricks, and in-depth guides on customizing your desktop and optimizing your system!
For more information, contact us at:
Address: 123 Education Way, Learnville, CA 90210, United States
Whatsapp: +1 555-555-1212
Website: LEARNS.EDU.VN
7. Summary: Mastering Your Windows 11 Desktop
Customizing your Windows 11 desktop can significantly enhance your computing experience. By removing the “Learn more about this picture” icon, customizing your icons and themes, and optimizing your display settings, you can create a personalized and efficient workspace.
7.1 Key Takeaways
- Removing the Icon: You can remove the “Learn more about this picture” icon using the Registry Editor, ready-made Registry files, or third-party tools like Winaero Tweaker and ExplorerPatcher.
- Customizing Icons: You can customize the size, image, and visibility of desktop icons.
- Managing Backgrounds and Themes: You can set custom backgrounds, use pre-installed themes, or create your own custom themes.
- Optimizing Display Settings: You can adjust the screen resolution, text size, and enable Night Light to improve readability and reduce eye strain.
- Troubleshooting: You can troubleshoot common issues like icons not disappearing, third-party tools not working, and display issues.
7.2 Final Thoughts
Customizing your Windows 11 desktop is a worthwhile investment that can enhance your productivity, enjoyment, and overall computing experience. By following the tips and techniques outlined in this guide, you can create a desktop environment that is tailored to your personal preferences and needs.
7.3 Additional Resources
- Microsoft Support: Windows Help
- learns.edu.vn: Windows 11 Customization Guides
8. FAQ: Frequently Asked Questions
8.1 What is Windows Spotlight?
Windows Spotlight is a feature in Windows 10 and 11 that automatically downloads and displays new background images on the lock screen and desktop.
8.2 Why is there a “Learn more about this picture” icon on my desktop?
The “Learn more about this picture” icon is a feature of Windows Spotlight that provides quick access to information about the current wallpaper.
8.3 Can I remove the “Learn more about this picture” icon?
Yes, you can remove the “Learn more about this picture” icon using the Registry Editor, ready-made Registry files, or third-party tools.
8.4 Is it safe to edit the Registry?
Editing the Registry can be risky if not done correctly. Always back up the Registry before making any changes and follow instructions carefully.
8.5 What are some third-party tools I can use to customize my desktop?
Some popular third-party tools for customizing your desktop include Winaero Tweaker and ExplorerPatcher.
8.6 How do I change the size of desktop icons?
You can change the size of desktop icons by right-clicking on the desktop, selecting View, and choosing the desired icon size.
8.7 How do I set a custom background?
You can set a custom background in the Settings app by going to Personalization > Background and selecting a picture or slideshow.
8.8 How do I enable Night Light?
You can enable Night Light in the Settings app by going to System > Display and toggling the Night light switch.
8.9 What should I do if the “Learn more about this picture” icon does not disappear after making changes?
Try refreshing the desktop, restarting Explorer, restarting your computer, and verifying your Registry settings.
8.10 How do I restore the “Learn more about this picture” icon if I change my mind?
If you used the Registry Editor, delete the {2cc5ca98-6485-489a-920e-b3e88a6ccce3} value or change its data back to 0. If you used ready-made Registry files, run the “add windows spotlight icon to desktop.reg” file. If you used a third-party tool, revert the setting in the tool.