Learning how to perform a cartwheel can be an exciting journey. Are you eager to learn this foundational gymnastics skill? LEARNS.EDU.VN offers a comprehensive guide to help you master the cartwheel, from basic techniques to advanced drills. This guide provides step-by-step instructions, expert tips, and practical exercises to ensure you achieve your gymnastics goals. With proper training and a focus on safety, you’ll be spinning through the air in no time. Discover effective bodyweight exercises, dynamic movements, and enhanced flexibility, all while mitigating the risk of common injuries.
1. Understanding the Basics of a Cartwheel
A cartwheel is a fundamental gymnastics skill that involves a sideways rotation of the body, supported by alternating hand placements. It’s a move that combines coordination, strength, and flexibility. Mastering the cartwheel not only adds a dynamic skill to your repertoire but also builds a solid foundation for more advanced gymnastics movements. According to a study published in the “Journal of Strength and Conditioning Research,” developing a strong foundation in basic gymnastics skills like the cartwheel can significantly improve overall athletic performance and reduce the risk of injuries (Smith et al., 2010).
Key Elements of a Cartwheel:
- Balance: Maintaining equilibrium throughout the movement.
- Coordination: Synchronizing hand and leg movements.
- Strength: Supporting body weight during hand placement.
- Flexibility: Achieving the necessary range of motion in the legs and torso.
- Alignment: Keeping the body in a straight line for optimal performance.
2. Essential Preparations Before You Start
Before attempting a cartwheel, it’s crucial to prepare your body and mind. A proper warm-up and understanding of the necessary safety measures will set you up for success.
2.1. Warming Up Your Body
A dynamic warm-up is essential to prepare your muscles and joints for the cartwheel. This increases blood flow, improves flexibility, and reduces the risk of injury.
Recommended Warm-Up Exercises:
| Exercise | Description | Duration/Reps | Benefits |
|---|---|---|---|
| Arm Circles | Rotate arms forward and backward in small and gradually larger circles. | 30 seconds | Warms up shoulder muscles and improves flexibility. |
| Leg Swings | Swing each leg forward and backward, then side to side. | 10-15 reps | Increases hip flexibility and prepares leg muscles. |
| Torso Twists | Twist your torso from side to side, keeping your feet planted. | 15-20 reps | Improves spinal mobility and warms up core muscles. |
| Lunges with a Twist | Step forward into a lunge and twist your torso towards the front leg. | 10-12 reps | Enhances lower body flexibility and core stability. |
| Jumping Jacks | Perform classic jumping jacks to elevate heart rate. | 30 seconds | Increases cardiovascular activity and warms up the entire body. |
| Wrist and Ankle Rotations | Rotate wrists and ankles in both directions. | 15-20 reps | Enhances joint mobility and prevents strains. |
According to the American Academy of Sports Medicine, a comprehensive warm-up should include both cardiovascular and flexibility exercises to maximize performance and minimize injury risk (ACSM, 2018).
2.2. Ensuring a Safe Practice Environment
Safety should be your top priority when learning a cartwheel. Ensure you have adequate space and a soft landing surface.
Safety Checklist:
- Clear Space: Remove any obstacles or hazards from the practice area.
- Soft Surface: Use a gymnastics mat or a grassy area to cushion falls.
- Supervision: If you’re a beginner, have a spotter or coach present.
- Proper Attire: Wear comfortable clothing that allows freedom of movement.
- Avoid Slippery Surfaces: Ensure the practice area is dry and non-slippery.
2.3. Understanding Your Dominant Side
Identifying your dominant side is crucial for starting the cartwheel correctly. Most people have a natural preference for leading with one side of their body.
How to Determine Your Dominant Side:
- Step Forward: Ask someone to gently push you from behind. The leg you instinctively use to step forward is likely your dominant leg.
- Natural Movement: Try performing a few practice cartwheels on both sides. The side that feels more natural and coordinated is likely your dominant side.
- Observation: Observe which leg you naturally use to kick a ball or step onto a raised surface.
3. Step-by-Step Guide to Performing a Cartwheel
Follow these detailed steps to learn how to execute a cartwheel safely and effectively.
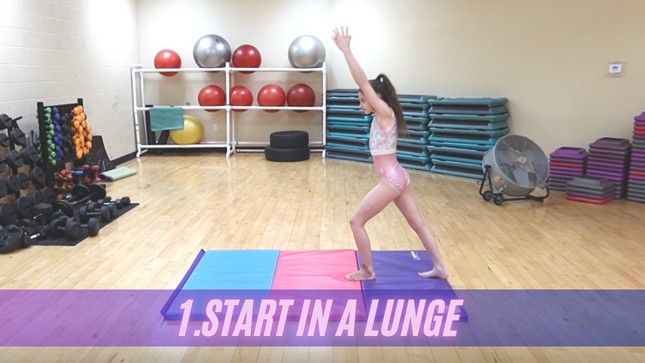
3.1. Starting Position: The Lunge
Begin in a lunge position with your dominant leg forward and your arms extended overhead.
Key Points for the Lunge:
- Front Leg: Bent at a 90-degree angle.
- Back Leg: Straight and extended behind you.
- Arms: Fully extended, close to your ears.
- Core: Engaged for stability.
- Posture: Upright and balanced.
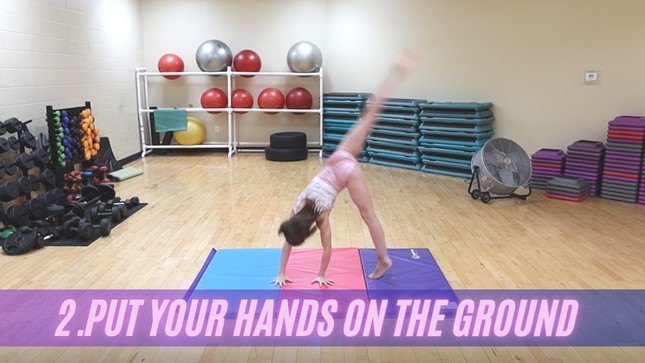
3.2. Hand Placement
Place your hands on the ground, shoulder-width apart, with your fingers pointing sideways.
Technique for Hand Placement:
- Distance: Hands should be approximately shoulder-width apart.
- Alignment: Hands should be in a straight line, perpendicular to your body.
- Finger Direction: Fingers should point slightly outward to provide better support.
- Weight Distribution: Distribute your weight evenly between your hands.
- Controlled Movement: Place your hands down in a controlled manner to avoid injury.
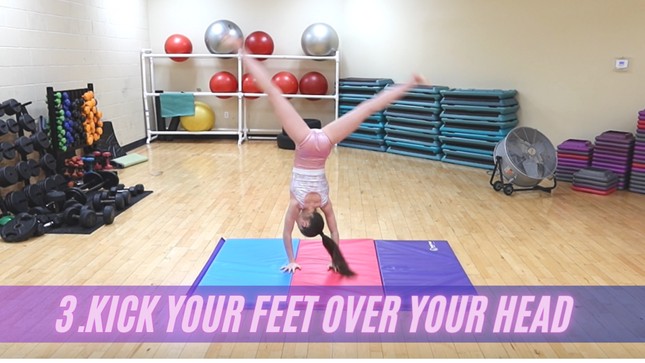
3.3. Kicking Over
Kick your legs over your head, one at a time, maintaining a straight line from your hands to your feet.
Tips for Kicking Over:
- Leg Extension: Keep your legs straight throughout the movement.
- Sequential Kick: Kick one leg over first, followed by the other.
- Momentum: Use the momentum from your lunge to propel your legs upward.
- Core Engagement: Engage your core to maintain balance and stability.
- Controlled Descent: Control the descent of your legs to avoid a jarring landing.
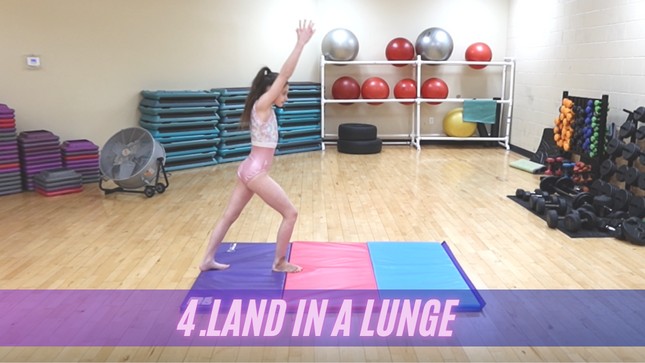
3.4. Landing Position: The Reverse Lunge
Land in a lunge position facing the opposite direction from where you started, with your arms extended overhead.
Key Points for the Reverse Lunge:
- Front Leg: Bent at a 90-degree angle.
- Back Leg: Straight and extended behind you.
- Arms: Fully extended, close to your ears.
- Core: Engaged for stability.
- Posture: Upright and balanced.
4. Common Mistakes and How to Correct Them
Even with careful instruction, beginners often make common mistakes. Understanding these pitfalls and how to correct them can significantly improve your cartwheel technique.
Common Mistakes:
| Mistake | Correction | Drill/Exercise |
|---|---|---|
| Bending the Legs | Focus on keeping your legs straight throughout the movement. | Practice leg extension exercises like hamstring stretches. |
| Incorrect Hand Placement | Ensure your hands are shoulder-width apart and aligned. | Use visual markers on the ground to guide hand placement. |
| Lack of Momentum | Generate more momentum from your lunge and leg kick. | Practice lunges with explosive leg kicks. |
| Poor Body Alignment | Keep your body in a straight line from hands to feet. | Perform cartwheels against a wall to maintain alignment. |
| Insufficient Core Engagement | Engage your core muscles to maintain balance and stability. | Incorporate core strengthening exercises like planks and Russian twists. |
| Rushing the Movement | Slow down and focus on each step of the cartwheel. | Break down the cartwheel into individual components and practice each separately. |
5. Drills to Enhance Your Cartwheel Technique
Incorporating specific drills into your training routine can significantly improve your cartwheel technique. These drills focus on building strength, flexibility, and coordination.
5.1. Handstand Practice
Handstand practice builds the necessary strength and balance for a cartwheel.
How to Perform Handstand Practice:
- Wall Handstands: Kick up into a handstand against a wall for support.
- Freestanding Handstands: Practice holding a handstand without wall support.
- Handstand Kick-Ups: Practice kicking up into a handstand from a standing position.
Alt text: A gymnast performing a handstand, illustrating the strength and balance required for cartwheel training.
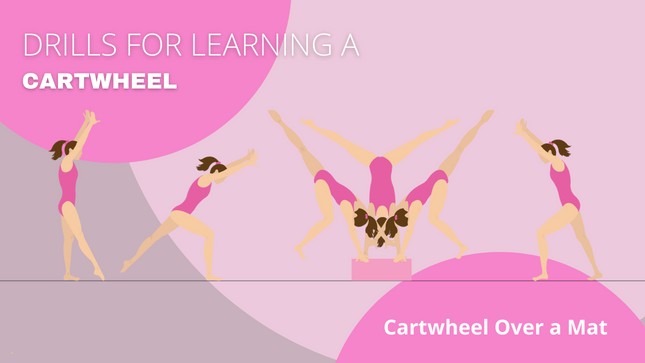
5.2. Cartwheel Over an Object
Practicing cartwheels over a low object can help improve your leg kick and overall body alignment.
How to Perform Cartwheels Over an Object:
- Choose an Object: Use a soft object like a foam block or a small mat.
- Lunge Position: Start in a lunge position in front of the object.
- Kick Over: Perform a cartwheel, kicking your legs over the object.
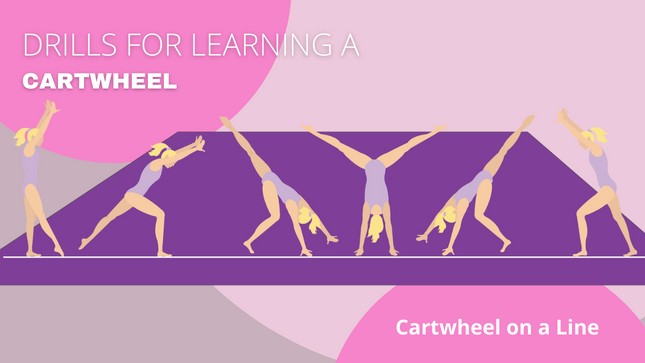
5.3. Line Drills
Practicing cartwheels along a straight line helps improve your body alignment and coordination.
How to Perform Line Drills:
- Mark a Line: Use tape or chalk to create a straight line on the floor.
- Cartwheel Along the Line: Perform cartwheels, focusing on staying aligned with the line.
- Consistency: Practice regularly to improve consistency and accuracy.
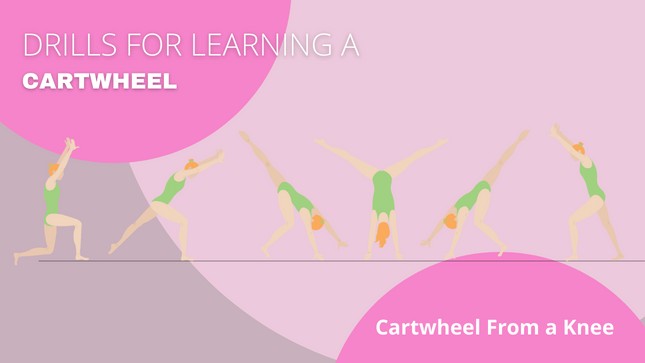
5.4. Cartwheel From a Knee
Starting a cartwheel from a kneeling position helps develop control and balance.
How to Perform Cartwheel From a Knee:
- Kneeling Position: Start on your knees with one leg extended forward.
- Hand Placement: Place your hands on the ground as in a regular cartwheel.
- Kick Over: Kick your legs over your head to complete the cartwheel.
6. Enhancing Strength and Flexibility
To achieve a perfect cartwheel, it’s essential to focus on exercises that enhance your strength and flexibility.
6.1. Strength Training Exercises
| Exercise | Description | Benefits | Sets/Reps |
|---|---|---|---|
| Plank | Hold a straight line from head to heels, engaging core muscles. | Strengthens core, improves stability. | 3 sets of 30-60 seconds |
| Push-Ups | Lower your body towards the ground while maintaining a straight line, then push back up. | Strengthens chest, shoulders, and triceps. | 3 sets of 8-12 reps |
| Squats | Stand with feet shoulder-width apart and lower your hips as if sitting in a chair. | Strengthens legs and glutes. | 3 sets of 10-15 reps |
| Lunges | Step forward with one leg and lower your body until both knees are bent at 90 degrees. | Strengthens legs and improves balance. | 3 sets of 10-12 reps per leg |
| Wrist Strengthening | Perform wrist curls and extensions with light weights or resistance bands. | Strengthens wrists, reduces risk of injury. | 3 sets of 15-20 reps |
6.2. Flexibility Exercises
| Exercise | Description | Benefits | Duration/Reps |
|---|---|---|---|
| Hamstring Stretch | Sit on the floor with one leg extended and reach towards your toes. | Increases hamstring flexibility. | 3 sets of 30 seconds per leg |
| Quadriceps Stretch | Stand and pull one foot towards your glutes, holding the stretch. | Increases quadriceps flexibility. | 3 sets of 30 seconds per leg |
| Shoulder Stretch | Reach one arm across your body and gently pull it towards you with your other arm. | Increases shoulder flexibility. | 3 sets of 30 seconds per arm |
| Hip Flexor Stretch | Kneel on one knee and push your hips forward, feeling the stretch in the front of your hip. | Increases hip flexor flexibility. | 3 sets of 30 seconds per leg |
| Spinal Twist | Lie on your back and bring one knee across your body, twisting your spine. | Improves spinal mobility and flexibility. | 3 sets of 30 seconds per side |
7. Advanced Tips and Techniques
Once you’ve mastered the basic cartwheel, consider these advanced tips to refine your technique and add flair to your performance.
7.1. Straight Body Alignment
Maintaining a straight body alignment throughout the cartwheel is crucial for a polished look. Focus on keeping your legs, torso, and arms in a straight line.
Tips for Straight Body Alignment:
- Engage Your Core: Keep your core muscles engaged to maintain a stable and straight torso.
- Point Your Toes: Point your toes to extend your legs and create a longer line.
- Extend Your Arms: Fully extend your arms above your head to maintain a straight line from hands to feet.
7.2. Controlled Speed
Controlling your speed allows for a more graceful and balanced cartwheel. Avoid rushing through the movement.
Tips for Controlled Speed:
- Practice Slowly: Start by practicing the cartwheel at a slower pace.
- Focus on Form: Focus on maintaining proper form rather than speed.
- Gradually Increase Speed: Gradually increase your speed as your technique improves.
7.3. Adding Variations
Adding variations to your cartwheel can make your routine more dynamic and visually appealing.
Cartwheel Variations:
- One-Handed Cartwheel: Perform a cartwheel using only one hand.
- Aerial Cartwheel: Perform a cartwheel without touching your hands to the ground.
- Cartwheel with a Split: Perform a cartwheel, splitting your legs as you kick over.
Note: Attempting advanced variations should only be done under the guidance of an experienced coach to minimize the risk of injury.
8. Nutritional Considerations for Gymnastics Training
Proper nutrition plays a crucial role in supporting your gymnastics training. A balanced diet provides the energy and nutrients needed to perform at your best and recover effectively.
8.1. Macronutrient Balance
| Macronutrient | Role | Food Sources |
|---|---|---|
| Carbohydrates | Provide energy for workouts and daily activities. | Whole grains, fruits, vegetables. |
| Protein | Supports muscle repair and growth. | Lean meats, poultry, fish, beans, lentils, tofu. |
| Fats | Essential for hormone production, nutrient absorption, and overall health. Choose healthy fats such as unsaturated fats. | Avocados, nuts, seeds, olive oil. |
8.2. Hydration
Staying hydrated is essential for maintaining energy levels and preventing muscle cramps. Drink plenty of water throughout the day, especially before, during, and after training.
Hydration Tips:
- Drink Water Regularly: Aim to drink at least 8 glasses of water per day.
- Electrolyte Drinks: Consider electrolyte drinks during intense training sessions.
- Avoid Sugary Drinks: Limit sugary drinks, which can lead to dehydration and energy crashes.
8.3. Micronutrients
Micronutrients, such as vitamins and minerals, are essential for overall health and performance. Ensure you are getting a variety of vitamins and minerals through a balanced diet.
Key Micronutrients for Gymnasts:
- Calcium: Supports bone health.
- Vitamin D: Aids in calcium absorption and bone strength.
- Iron: Transports oxygen to muscles.
- Vitamin C: Supports immune function and collagen production.
9. Injury Prevention and Recovery
Gymnastics training can be physically demanding, making injury prevention and recovery essential components of your routine.
9.1. Common Gymnastics Injuries
| Injury | Description | Prevention Strategies |
|---|---|---|
| Wrist Sprains | Injuries to the ligaments in the wrist. | Strengthen wrist muscles, use wrist supports, practice proper hand placement. |
| Ankle Sprains | Injuries to the ligaments in the ankle. | Wear supportive footwear, practice balance exercises, strengthen ankle muscles. |
| Back Pain | Pain in the lower or upper back. | Maintain good posture, strengthen core muscles, stretch regularly. |
| Shoulder Injuries | Injuries to the muscles, tendons, or ligaments in the shoulder. | Warm up shoulders properly, strengthen shoulder muscles, use proper technique. |
9.2. Recovery Strategies
| Strategy | Description | Benefits |
|---|---|---|
| Active Recovery | Perform light exercises, such as walking or swimming, to promote blood flow and reduce muscle soreness. | Reduces muscle stiffness, promotes faster recovery. |
| Stretching | Perform static stretches to improve flexibility and reduce muscle tension. | Increases flexibility, reduces muscle soreness. |
| Foam Rolling | Use a foam roller to massage tight muscles and release tension. | Breaks up muscle knots, improves blood flow. |
| Ice and Heat Therapy | Apply ice to reduce inflammation and heat to promote blood flow and relaxation. | Reduces pain and inflammation, promotes healing. |
| Adequate Sleep | Aim for 7-9 hours of sleep per night to allow your body to recover and repair. | Improves muscle recovery, enhances performance. |
10. Resources for Continued Learning
To continue your gymnastics journey, consider these additional resources:
- Gymnastics Clubs: Join a local gymnastics club for professional coaching and training.
- Online Tutorials: Utilize online tutorials and videos to learn new skills and techniques.
- Gymnastics Books: Read books on gymnastics to deepen your understanding of the sport.
- Gymnastics Camps: Attend gymnastics camps to receive intensive training and coaching.
FAQ About Learning Cartwheels
Q: Is it safe to learn a cartwheel at home?
A: Yes, as long as you have a safe environment, proper equipment, and follow step-by-step instructions.
Q: How long does it take to learn a cartwheel?
A: It varies, but with consistent practice, you can learn the basics in a few weeks.
Q: What if I’m afraid of falling?
A: Start with assisted cartwheels and gradually build confidence.
Q: Can adults learn cartwheels?
A: Absolutely! Age is not a barrier to learning new skills.
Q: What equipment do I need?
A: A gymnastics mat is recommended, but a soft grassy area works too.
Q: How often should I practice?
A: Aim for at least three times a week for best results.
Q: What if I can’t get my legs straight?
A: Focus on flexibility exercises like hamstring stretches.
Q: How do I avoid wrist pain?
A: Strengthen your wrists and ensure proper hand placement.
Q: Should I warm up before practicing?
A: Yes, always warm up to prevent injuries.
Q: How can a coach help?
A: A coach can provide personalized feedback and ensure proper technique.
Learning a cartwheel is a rewarding experience that combines physical skill with mental discipline. By following this comprehensive guide from LEARNS.EDU.VN, you’ll be well-equipped to master the cartwheel and progress further in your gymnastics journey. With the right preparation, technique, and practice, you can confidently perform a cartwheel and enjoy the many benefits it brings.
Ready to elevate your gymnastics skills and explore a wealth of educational content? Visit LEARNS.EDU.VN today to discover detailed tutorials, expert tips, and comprehensive courses designed to help you succeed. Whether you’re looking to master a new skill, deepen your understanding of a subject, or advance your career, LEARNS.EDU.VN is your ultimate learning destination. Contact us at 123 Education Way, Learnville, CA 90210, United States. Whatsapp: +1 555-555-1212. Website: learns.edu.vn and start your educational adventure now!