Embarking on a new creative journey can be both exciting and a little daunting. If you’ve ever been captivated by the intricate textures and handmade charm of crochet, you’re in the right place! Learning how to crochet is not only easier than you might think, but it’s also a wonderfully rewarding craft. Once you master the basics, you’ll unlock a world of possibilities, from cozy blankets and stylish scarves to adorable amigurumi and so much more. All it takes is a crochet hook, some yarn, and a little bit of patience to get started. You’ll quickly find yourself hooked on the rhythmic motion and the satisfaction of creating something beautiful with your own hands.
In my own crochet journey, I remember feeling a bit overwhelmed at first. Like many beginners, I turned to online tutorials and videos to ensure I was doing everything correctly. I wanted my creations to mirror the perfect examples I saw online. However, I soon learned that the key to crochet, like any skill, is practice. Those initial attempts, even if they don’t look perfect, are crucial for developing muscle memory, understanding yarn tension, and getting comfortable with your hook. Don’t be discouraged if your first few squares are a little wonky – every crocheter starts somewhere! In fact, those practice squares can become a beautiful patchwork blanket later on. How amazing is that?
This guide will walk you through the essential steps of learning how to crochet. We’ll cover everything from holding your hook and yarn to creating a slip knot, crocheting a chain, mastering the single crochet stitch, and finishing off your work neatly. Let’s dive in and discover the joy of crochet together!
Getting Ready to Crochet: What You’ll Need
Essential Supplies for Your First Crochet Project
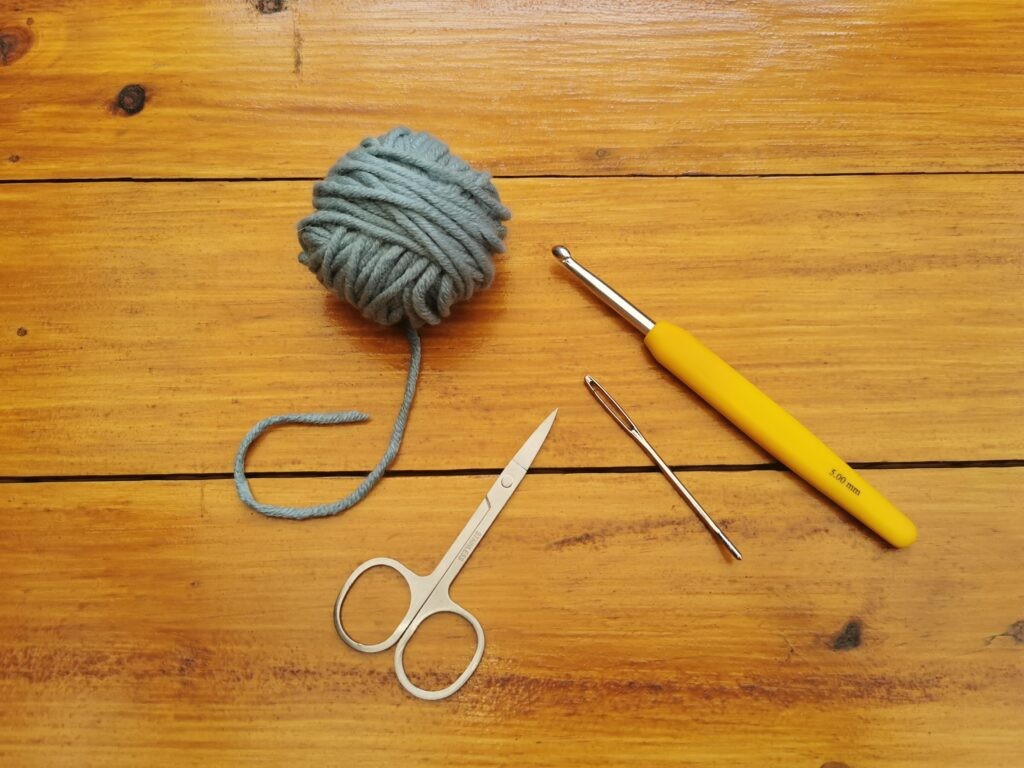
Before you begin your crochet adventure, gathering the right materials is essential. Luckily, you don’t need much to get started! Here are the must-have items:
- Yarn: This is the foundation of your crochet project. For beginners, I highly recommend using a thicker, smooth yarn in a light color. Worsted weight yarn (size 4) is a great starting point as it’s easy to handle and allows you to clearly see your stitches. Avoid fuzzy or novelty yarns initially, as they can make it harder to distinguish stitches.
- Crochet Hook: The size of your crochet hook should correspond to the weight of your yarn. The yarn label will usually recommend a hook size. For worsted weight yarn, a 5.5mm (I-9) hook is commonly suggested. Ergonomic hooks with comfortable handles can be a worthwhile investment, especially if you plan to crochet for longer periods.
- Scissors: A small pair of sharp scissors is needed to cut your yarn when you finish your project or need to change colors.
- Yarn Needle (or Darning Needle): This blunt-tipped needle with a large eye is used to weave in the yarn ends neatly, giving your finished piece a polished look.
Understanding Yarn Labels: Choosing the Right Yarn
When you venture into the yarn store (or browse online!), you’ll encounter a vast array of yarn types, colors, and textures. Yarn labels are your best friend in navigating this world. They provide crucial information to help you choose the right yarn for your project.
One of the most important things to look for on a yarn label is the yarn weight. This is indicated by a number, ranging from 0 (lace weight) to 7 (jumbo weight). For beginners, you’ll want to focus on size 4 (worsted/aran) and above. These thicker yarns are easier to work with and see your stitches.
The yarn label will also recommend a crochet hook size that works best with that particular yarn. Following these recommendations is a great starting point, especially when you’re learning. For size 4 yarn, you’ll typically see a recommendation for a 5.5mm or size I-9 hook.
Getting Started: Holding Your Hook and Yarn
Finding Your Grip: Hook Holds Explained
There’s no single “right” way to hold a crochet hook. Comfort is key! Experiment with different grips to find what feels most natural and allows you to crochet smoothly. However, two common methods are the knife hold and the pencil hold.
- Knife Hold: In this grip, you hold the hook much like you would hold a dinner knife, with your thumb and index finger close to the hook’s head. Many crocheters find this hold provides good control and maneuverability.
- Pencil Hold: As the name suggests, this grip resembles holding a pencil. You hold the hook between your thumb and index finger, resting it against your middle finger. Some find this hold more relaxed, especially for larger hooks.
Personally, I use the knife hold as it feels more intuitive and gives me better control. But truly, the best hold is the one that feels most comfortable and efficient for you. Try both and see which grip you prefer!
Creating the Foundation: Making a Slip Knot
The slip knot is the first knot you’ll make in almost every crochet project. It creates the initial loop on your hook from which you’ll begin your chain and subsequent stitches. Don’t worry, it’s simpler than it sounds!
Here’s a step-by-step guide to making a slip knot:
- Prepare the Yarn: Measure out about 3-4 inches of yarn tail. Hold the yarn in your non-dominant hand, pointing your index finger outwards like you’re making a finger gun!
- First Loop: Wrap the yarn around your index finger once, bringing the short tail end to the front of your finger.
- Second Loop: Wrap the yarn around your finger again, so you now have two loops on your index finger.
- Secure the Loops: Use your thumb and middle finger to hold both yarn ends – the short tail and the long tail connected to the yarn ball (the working yarn).
- Pull the Back Loop Over: Take the back loop and gently pull it over the front loop and off your index finger. Don’t pull it completely tight yet.
- Tighten the Knot: Now, remove the loop from your finger completely and gently pull both yarn ends to tighten the knot. You want the slip knot to be snug but still able to slide easily on your hook.
Congratulations! You’ve made your first slip knot!
To place it on your hook, insert your crochet hook into the loop and gently pull the working yarn to tighten the slip knot around the hook. Ensure the short tail end is facing away from the hook.
Managing Tension: How to Hold Your Yarn
Now that you have your hook hold and slip knot down, let’s talk about yarn tension. How you hold your yarn is crucial for maintaining consistent tension, which directly impacts the look and feel of your crochet fabric. Too tight, and your stitches will be stiff and difficult to work into; too loose, and your fabric will be floppy and uneven.
Again, there’s no single “correct” way to hold your yarn, and it may take some practice to find what works best for you. The goal is to keep the yarn flowing smoothly and consistently without too much tightness or slack.
Here’s a common method for holding your yarn in your non-dominant hand:
- Position the Yarn: With the slip knot on your hook and the hook in your dominant hand, place the yarn between your middle and index fingers of your non-dominant hand.
- Wrap Around Fingers: Bring the yarn down and wrap it around your pinky finger, then bring it back up to the front of your index finger. You can then wrap it around the back of your index finger for added control.
Experiment with wrapping the yarn around different fingers and applying varying degrees of pressure until you find a comfortable hold that allows the yarn to feed smoothly as you crochet. Relaxation in your yarn hand is key – avoid gripping the yarn too tightly.
Mastering the Basics: Crochet Chain and Single Crochet
The Foundation Chain: Your First Crochet Row
You’ve come so far already! Creating a chain is often the first step in most crochet projects. It forms the foundation row upon which you’ll build subsequent rows of stitches. It might feel a bit awkward at first, but with a little practice, you’ll be chaining like a pro!
With your slip knot on your hook and yarn held comfortably, here’s how to crochet a chain:
- Yarn Over: Bring the yarn over your hook from back to front. This is called a “yarn over” (YO).
- Pull Through: Use your hook to catch the yarn you just yarned over and pull it through the loop that’s already on your hook.
That’s it – you’ve made your first chain stitch! Repeat steps 1 and 2 to create a chain of desired length. For practice, try making a chain of 21 stitches. Remember, the loop currently on your hook does not count as a chain stitch.
As you practice, pay attention to your tension. Your chain should be loose enough that you can easily see the loops and work into them in the next row. If your chain is too tight, try using a slightly larger hook size.
Understanding Your Chain Stitches
Let’s take a closer look at your chain. You’ll notice that each chain stitch has a “V” shape on the front and two loops on the back. When you work into a chain, you typically insert your hook under the top two loops of the “V” unless a pattern specifies otherwise.
Single Crochet Stitch: The First Basic Stitch
Now, let’s move on to learning the single crochet (sc) stitch, one of the most fundamental crochet stitches. Mastering the single crochet opens up a vast range of projects.
Here’s how to work a single crochet stitch:
- Insert Hook: Skip the first chain stitch from your hook (this is the chain closest to the hook). Insert your hook into the center of the second chain stitch from your hook.
- Yarn Over: Yarn over (YO).
- Pull Up a Loop: Pull the yarn through the chain stitch and up onto your hook. You should now have two loops on your hook.
- Yarn Over Again: Yarn over again (YO).
- Pull Through Both Loops: Pull the yarn through both loops on your hook. Only one loop should remain on your hook. You’ve just completed your first single crochet stitch!
Continue working single crochet stitches into each chain stitch across your foundation chain. If you started with 21 chains, you should have 20 single crochet stitches in your first row (remember, you skipped the first chain).
Starting the Next Row: Turning Chain
To begin a new row of single crochet, you need to create a “turning chain.” This helps to bring your yarn up to the correct height for the next row and keeps the edges of your work straight.
- Chain One: At the end of your row, chain one (yarn over, pull through the loop on your hook). This chain 1 counts as your turning chain.
- Turn Your Work: Turn your work to rotate it, just like turning a page in a book. Always turn your work in the same direction for consistent fabric.
- Insert Hook into First Stitch: Insert your hook into the first single crochet stitch of the previous row (it will be the stitch right next to your turning chain). You’ll typically insert your hook under both loops of the “V” of the stitch.
Continue working single crochet stitches across the row, just as you did in the first row. Repeat the turning chain and rows of single crochet to create a swatch of fabric.
Finishing and Weaving in Ends: The Final Touches
Finishing Off: Securing Your Last Stitch
When you’ve reached the desired size for your crochet project, it’s time to “finish off” or “fasten off” (FO). This secures your last stitch and prevents your work from unraveling.
- Yarn Over and Pull Through: At the end of your last row, yarn over as if you were making a chain stitch.
- Extend the Loop: Pull the loop on your hook out a bit, making it larger.
- Cut the Yarn: Cut the yarn, leaving a tail of about 6-8 inches for weaving in.
- Pull Yarn Through Loop: Pull the yarn tail completely through the large loop on your hook and pull it tight to secure the knot.
Weaving in Ends: Hiding Yarn Tails
Weaving in the ends is essential for a neat and professional finish. It hides the yarn tails and prevents them from coming undone.
- Thread Yarn Needle: Thread your yarn needle with the yarn tail.
- Weave Through Stitches: Weave the yarn needle through several stitches on the wrong side (back) of your work, following the direction of the stitches. Avoid weaving through just the loops on the surface; try to weave through the body of the stitches for better security.
- Change Direction: After weaving for a few stitches, change direction and weave back in the opposite direction for a few more stitches. This zigzag pattern helps to secure the yarn end.
- Trim Excess Yarn: Once you’ve woven in the end securely, trim the excess yarn close to your work. Gently stretch the fabric to help the trimmed end disappear into the stitches.
Congratulations, you’ve learned how to crochet!
Keep Practicing and Explore More!
You’ve now mastered the basics of crochet: holding your hook and yarn, making a slip knot, crocheting a chain, and working the single crochet stitch. The best way to improve is to keep practicing! Make more sample squares, experiment with different yarns and hook sizes, and most importantly, have fun with it.
Crochet is a journey of continuous learning and creativity. As you become more comfortable with the single crochet, you can explore other basic stitches like double crochet, half double crochet, and treble crochet. There’s a whole world of crochet patterns and techniques waiting for you to discover.
Happy crocheting, and welcome to the wonderful world of yarn crafts!