Learn how to embroider with this comprehensive guide from LEARNS.EDU.VN, covering essential supplies, basic stitches, and expert tips to start your embroidery journey successfully. Whether you’re a complete novice or looking to refine your skills, discover the joy of creating beautiful embroidered art with our easy-to-follow lessons and techniques. Explore the world of needlework, stitching techniques, and creative embroidery projects, all designed to spark your passion for this timeless craft.
1. Understanding the Basics of Embroidery
Embroidery, the art of decorating fabric using a needle and thread, has a rich history and continues to be a beloved craft. From simple embellishments to intricate designs, embroidery offers a creative outlet for individuals of all skill levels. According to a study by the Embroiderers’ Guild of America, participation in embroidery and needlework crafts has seen a resurgence in recent years, with more people seeking hands-on hobbies that provide relaxation and a sense of accomplishment. At LEARNS.EDU.VN, we believe that anyone can learn to embroider with the right guidance and resources.
1.1. What is Embroidery?
Embroidery is the art of embellishing fabric or other materials with designs stitched in strands of thread, yarn, or other materials using a needle. It’s a versatile craft that can be used to decorate clothing, household items, and create artwork.
1.2. Why Learn Embroidery?
Learning embroidery offers numerous benefits:
- Creativity: Express your artistic side by creating unique designs.
- Relaxation: The repetitive motion of stitching can be meditative and stress-relieving.
- Customization: Personalize clothing, accessories, and home décor.
- Sustainability: Repair and upcycle old items, giving them a new lease on life.
- Sense of Accomplishment: Completing an embroidery project provides a tangible sense of achievement.
- Cognitive Benefits: Improves focus, concentration, and hand-eye coordination.
1.3. Types of Embroidery
Embroidery can be broadly categorized into several types, each with its unique techniques and aesthetics:
- Hand Embroidery: This involves creating designs using a needle and thread entirely by hand. It allows for intricate detailing and customization.
- Surface Embroidery: Stitches are worked on the surface of the fabric, creating a raised or textured effect. Examples include satin stitch, French knots, and seed stitch.
- Counted Thread Embroidery: Stitches are worked over a specific number of threads in the fabric, creating geometric or symmetrical designs. Cross-stitch and blackwork are examples of this type.
- Needlepoint: A type of canvas work where the entire fabric is covered with stitches, creating a dense, durable surface.
- Machine Embroidery: Designs are created using an automated embroidery machine. This is often used for mass production or intricate designs that would be time-consuming to create by hand.
Embroidery is more than just a craft; it’s a form of self-expression and a way to connect with history. At LEARNS.EDU.VN, we aim to provide you with the knowledge and skills to explore the diverse world of embroidery and create your own unique masterpieces.
2. Essential Supplies for Beginner Embroiderers
Embarking on your embroidery journey requires a few essential supplies. Gathering these tools will set you up for success and make the learning process more enjoyable. LEARNS.EDU.VN recommends starting with the basics and gradually expanding your collection as you gain experience.
2.1. Fabric
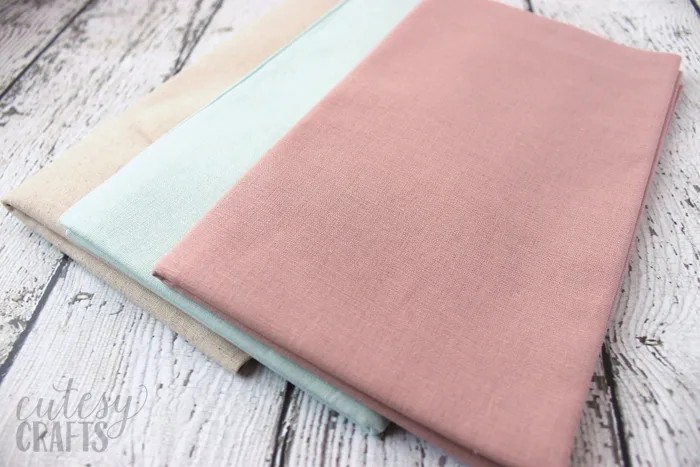
The choice of fabric is crucial for embroidery. Here are some popular options:
- Linen: A classic choice due to its even weave and durability.
- Cotton: Affordable and easy to work with, making it ideal for beginners.
- Muslin: A lightweight cotton fabric that is great for practice projects.
- Embroidery Fabric: Specifically designed for embroidery, these fabrics have a tighter weave and are less prone to fraying.
When selecting fabric, consider the weight and weave. A medium-weight fabric with a tight weave is generally easier to work with for beginners. According to textile experts at the Fashion Institute of Technology, the fabric should be sturdy enough to support the stitches without puckering or distorting.
2.2. Thread
Embroidery thread, also known as floss, comes in various materials and colors. Some common types include:
- Cotton Floss: The most popular choice, available in a wide range of colors and finishes.
- Rayon Floss: Adds a sheen to your embroidery, ideal for decorative projects.
- Silk Floss: Luxurious and adds a subtle luster to your designs.
- Metallic Floss: Adds sparkle and shine, perfect for embellishments.
Choose high-quality thread to prevent breakage and ensure your stitches look their best. Experiment with different types and colors to find what you enjoy working with.
2.3. Needles
Embroidery needles have a large eye to accommodate thicker threads and a sharp point for piercing fabric. Here are some types to consider:
- Embroidery Needles: Also known as crewel needles, these have a sharp point and a long eye.
- Tapestry Needles: Have a blunt point, making them suitable for counted thread embroidery on canvas.
- Chenille Needles: Have a large eye and a sharp point, ideal for thicker yarns and fabrics.
Needle size is important; a larger needle is used for thicker threads and looser weaves, while a smaller needle is used for finer threads and tighter weaves.
2.4. Hoop
An embroidery hoop keeps the fabric taut while you stitch, preventing puckering and ensuring even stitches.
- Wooden Hoops: Classic and affordable, available in various sizes.
- Plastic Hoops: Lightweight and durable, often with a tension adjustment mechanism.
- Spring Tension Hoops: Easy to use, with a spring mechanism that holds the fabric in place.
Choose a hoop size that is comfortable to hold and large enough to accommodate your design.
2.5. Tracing Supplies
Transferring your design to the fabric is a crucial step. Here are some options:
- Water-Soluble Pens: Easy to wash away after stitching.
- Heat-Erasable Pens: Disappear with the heat of an iron.
- Transfer Paper: Allows you to trace designs onto fabric using a pencil.
Select a method that works best for your fabric and design. Always test your chosen method on a scrap piece of fabric before transferring it to your final project.
2.6. Other Useful Tools
- Scissors: Small, sharp scissors for trimming threads.
- Threader: Helps thread needles, especially for those with smaller eyes.
- Seam Ripper: For removing unwanted stitches.
- Thimble: Protects your finger while stitching.
- Light Box: Illuminates the fabric, making it easier to trace designs.
Equipping yourself with these essential supplies will make your embroidery experience more enjoyable and successful. At LEARNS.EDU.VN, we provide detailed tutorials on how to use each tool effectively.
3. Mastering Basic Embroidery Stitches
Embroidery is built upon a foundation of basic stitches. Mastering these stitches will allow you to create a wide range of designs and textures. LEARNS.EDU.VN offers step-by-step instructions and video tutorials to help you learn each stitch with confidence.
3.1. Running Stitch
The running stitch is one of the simplest and most versatile embroidery stitches. It is used for outlining, filling, and creating dashed lines.
How to do it:
- Bring the needle up through the fabric.
- Make a stitch by inserting the needle back down through the fabric a short distance away.
- Bring the needle back up through the fabric a short distance away from the previous stitch.
- Repeat to create a line of evenly spaced stitches.
3.2. Backstitch
The backstitch creates a solid line, making it ideal for outlining and lettering. It is stronger than the running stitch and provides a more defined edge.
How to do it:
- Bring the needle up through the fabric.
- Make a stitch by inserting the needle back down through the fabric a short distance away.
- Bring the needle up through the fabric a short distance ahead of the previous stitch.
- Insert the needle back down into the end of the previous stitch, creating a solid line.
3.3. Split Stitch
The split stitch creates a textured line that is similar to a chain stitch but easier to execute. It is often used for outlining and filling.
How to do it:
- Bring the needle up through the fabric.
- Make a stitch by inserting the needle back down through the fabric a short distance away.
- Bring the needle up through the center of the previous stitch, splitting the thread.
- Repeat to create a line of split stitches.
3.4. Stem Stitch
The stem stitch is used to create smooth, flowing lines, making it perfect for outlining stems, vines, and curved shapes.
How to do it:
- Bring the needle up through the fabric.
- Make a stitch by inserting the needle back down through the fabric a short distance away.
- Bring the needle up through the fabric halfway between the start and end of the previous stitch, keeping the thread to one side.
- Repeat to create a line of stem stitches.
3.5. Satin Stitch
The satin stitch is used to fill in shapes with smooth, solid blocks of color. It is often used for petals, leaves, and other decorative elements.
How to do it:
- Bring the needle up through the fabric at one edge of the shape.
- Insert the needle back down through the fabric at the opposite edge of the shape.
- Bring the needle up through the fabric close to the previous stitch, filling in the shape with parallel stitches.
- Repeat to create a smooth, satin-like surface.
3.6. French Knot
The French knot is a decorative stitch that creates small, raised dots on the fabric. It is used for adding texture, detail, and embellishments to your designs.
How to do it:
- Bring the needle up through the fabric.
- Wrap the thread around the needle once or twice, depending on the desired size of the knot.
- Insert the needle back down through the fabric close to where it came up, holding the thread taut.
- Pull the thread through gently, creating a knot on the surface of the fabric.
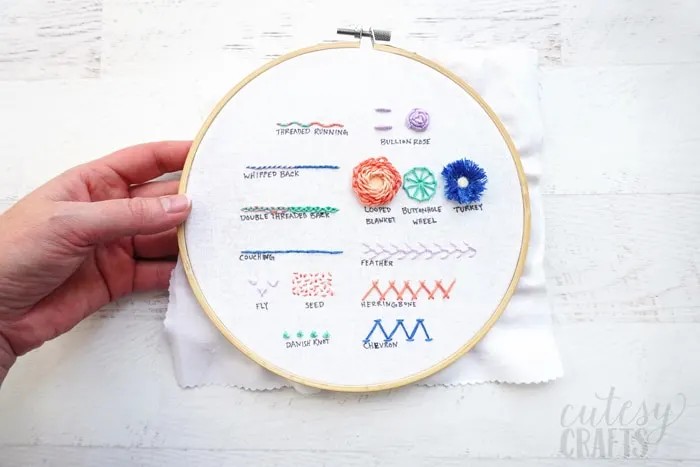
3.7. Other Useful Stitches
- Chain Stitch: Creates a chain-like line, ideal for outlining and decorative borders.
- Lazy Daisy Stitch: Forms a petal-like shape, often used for flowers and leaves.
- Seed Stitch: Small, scattered stitches that add texture and fill in gaps.
- Couching Stitch: Secures a thicker thread or yarn to the fabric surface.
Practicing these basic embroidery stitches will build your confidence and skill. At LEARNS.EDU.VN, we encourage you to experiment with different stitches and techniques to develop your unique style.
4. Choosing and Transferring Embroidery Patterns
Selecting the right pattern is essential for a successful embroidery project. Whether you’re a beginner or an experienced stitcher, LEARNS.EDU.VN offers a variety of patterns to suit your skill level and interests.
4.1. Types of Embroidery Patterns
- Simple Outlines: Ideal for beginners, these patterns feature basic shapes and lines.
- Detailed Designs: More complex patterns with intricate details and multiple stitch types.
- Floral Motifs: Popular for their beauty and versatility, floral patterns can be used on clothing, accessories, and home décor.
- Geometric Patterns: Modern and abstract designs that create a striking visual impact.
- Custom Patterns: Create your own unique designs using drawing or design software.
4.2. Finding Embroidery Patterns
- Online Resources: Websites like Etsy, Pinterest, and Creative Market offer a wide variety of embroidery patterns, both free and paid.
- Embroidery Books: Many books feature collections of patterns with detailed instructions and diagrams.
- Magazines: Craft magazines often include embroidery patterns and tutorials.
- LEARNS.EDU.VN: We provide a curated selection of patterns suitable for all skill levels, with new patterns added regularly.
4.3. Tips for Choosing Patterns
- Consider Your Skill Level: Start with simple patterns and gradually work your way up to more complex designs.
- Choose a Pattern You Love: Select a pattern that inspires you and reflects your personal style.
- Check the Instructions: Make sure the pattern includes clear instructions and diagrams for each stitch.
- Think About the Fabric: Choose a pattern that is appropriate for the type of fabric you plan to use.
4.4. Methods for Transferring Patterns
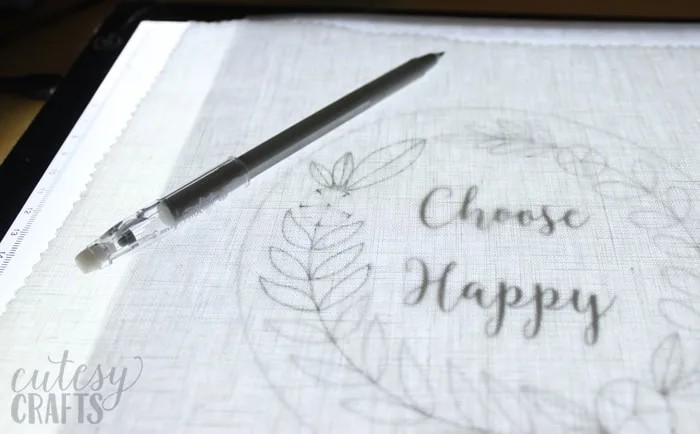
Once you’ve chosen a pattern, you’ll need to transfer it to your fabric. Here are some common methods:
- Tracing: Use a light box or a window to trace the pattern onto your fabric using a water-soluble or heat-erasable pen.
- Iron-On Transfers: Print the pattern onto iron-on transfer paper and then iron it onto your fabric.
- Stick-and-Rinse Stabilizer: Print the pattern onto a stick-and-rinse stabilizer, adhere it to your fabric, and then stitch through it. The stabilizer dissolves in water after you’re done.
4.5. Step-by-Step Guide to Pattern Transfer
- Prepare Your Fabric: Iron your fabric to remove any wrinkles or creases.
- Choose Your Method: Select the transfer method that works best for your fabric and design.
- Transfer the Pattern: Carefully transfer the pattern to your fabric, making sure to capture all the details.
- Secure the Fabric in a Hoop: Place your fabric in an embroidery hoop, making sure it is taut and wrinkle-free.
Transferring patterns accurately is crucial for achieving professional-looking results. LEARNS.EDU.VN provides detailed tutorials on each transfer method, ensuring you can confidently start your embroidery project.
5. Advanced Embroidery Techniques and Tips
As you gain experience, you can explore advanced embroidery techniques to add depth and complexity to your designs. LEARNS.EDU.VN offers tutorials and resources to help you master these techniques and take your embroidery skills to the next level.
5.1. Shading and Blending
Shading and blending techniques create subtle transitions between colors, adding dimension and realism to your embroidery.
- Thread Painting: Use varying shades of thread and different stitch lengths to create a painterly effect.
- Long and Short Stitch: A variation of the satin stitch that creates a textured, shaded effect.
- Needle Blending: Blend different colors of thread together in the needle to create a gradient effect.
5.2. Texture and Dimension
Adding texture and dimension to your embroidery can create a more tactile and visually interesting piece.
- Stumpwork: A technique that uses raised embroidery to create three-dimensional elements.
- Padding: Add layers of fabric or felt underneath your stitches to create a raised effect.
- Beading and Sequins: Incorporate beads and sequins into your embroidery for added sparkle and texture.
5.3. Freestyle Embroidery
Freestyle embroidery allows you to create designs without a pre-drawn pattern, giving you the freedom to express your creativity and experiment with different stitches and techniques.
- Improvisational Stitching: Stitch without a plan, letting the thread guide your design.
- Mixed Media Embroidery: Combine embroidery with other art forms, such as painting, drawing, or collage.
- Thread Sketching: Use embroidery stitches to create a sketch-like effect on fabric.
5.4. Tips for Advanced Embroidery
- Experiment with Different Threads: Try using different types of thread, such as silk, metallic, or variegated, to add interest to your designs.
- Mix Stitch Types: Combine different stitch types to create unique textures and effects.
- Use Color Theory: Understand the principles of color theory to create harmonious and visually appealing color palettes.
- Practice Regularly: The more you practice, the better you will become at embroidery.
5.5. Resources for Advanced Learning
- Online Courses: Platforms like Coursera, Skillshare, and Udemy offer advanced embroidery courses taught by experienced instructors.
- Workshops and Retreats: Attend workshops and retreats to learn new techniques and connect with other embroiderers.
- Embroidery Guilds: Join an embroidery guild to access resources, workshops, and networking opportunities.
LEARNS.EDU.VN is committed to providing you with the resources and support you need to advance your embroidery skills. Explore our website for more tutorials, tips, and inspiration.
6. Troubleshooting Common Embroidery Problems
Even experienced embroiderers encounter challenges from time to time. LEARNS.EDU.VN offers solutions to common embroidery problems, ensuring you can overcome obstacles and achieve successful results.
6.1. Puckering Fabric
Puckering occurs when the fabric is pulled too tightly during stitching, creating unsightly wrinkles.
Solutions:
- Loosen the Hoop: Make sure the fabric is taut but not overly tight in the hoop.
- Use a Stabilizer: Add a layer of stabilizer to the back of your fabric to prevent it from stretching.
- Adjust Your Tension: Reduce the tension on your sewing machine or hand stitches.
- Float Your Fabric: For machine embroidery, try floating your fabric on top of the stabilizer instead of hooping it.
6.2. Thread Breakage
Thread breakage can be frustrating, but it is often caused by a simple issue.
Solutions:
- Use High-Quality Thread: Choose a thread that is strong and durable.
- Check Your Needle: Make sure your needle is sharp and not damaged.
- Clean Your Machine: Remove lint and debris from your sewing machine regularly.
- Adjust Your Tension: Make sure the tension on your sewing machine is properly adjusted.
- Slow Down: Reduce the speed of your sewing machine to prevent thread breakage.
6.3. Uneven Stitches
Uneven stitches can detract from the overall appearance of your embroidery.
Solutions:
- Practice Your Technique: Consistent stitch length and tension are key to achieving even stitches.
- Use a Guide: Draw lines or use a template to guide your stitches.
- Adjust Your Stitch Length: Experiment with different stitch lengths to find what works best for your fabric and design.
- Use a Walking Foot: For machine embroidery, use a walking foot to ensure even fabric feed.
6.4. Shadowing or Bleeding
Shadowing or bleeding occurs when the color from your fabric or thread transfers to other areas of your embroidery.
Solutions:
- Pre-Wash Your Fabric: Wash your fabric before embroidering to remove excess dye.
- Use Colorfast Threads: Choose threads that are colorfast and resistant to bleeding.
- Avoid Dark Colors: Avoid using dark colors on light fabrics, as they are more likely to bleed.
- Use a Color Catcher: Add a color catcher to your wash to absorb any excess dye.
6.5. Resources for Troubleshooting
- Online Forums: Connect with other embroiderers on online forums to ask questions and share solutions.
- Embroidery Blogs: Many embroidery blogs offer troubleshooting tips and advice.
- Sewing Machine Manuals: Consult your sewing machine manual for troubleshooting tips specific to your machine.
LEARNS.EDU.VN is here to help you overcome any challenges you encounter in your embroidery journey. Visit our website for more troubleshooting tips and resources.
7. Creative Embroidery Projects for Inspiration
Embroidery offers endless possibilities for creative expression. LEARNS.EDU.VN showcases a variety of inspiring projects to spark your imagination and encourage you to explore new techniques.
7.1. Embroidered Clothing
- Custom Denim Jackets: Add unique embroidery designs to denim jackets for a personalized touch.
- Embroidered T-Shirts: Embellish t-shirts with floral motifs, geometric patterns, or custom lettering.
- Embroidered Dresses: Create stunning embroidered dresses for special occasions or everyday wear.
7.2. Embroidered Home Décor
- Embroidered Pillows: Add texture and color to your home with embroidered pillows.
- Embroidered Wall Art: Create unique wall art using embroidery hoops or stretched fabric.
- Embroidered Table Linens: Embellish table linens with delicate embroidery designs for a touch of elegance.
7.3. Embroidered Accessories
- Embroidered Bags: Personalize bags with embroidery designs that reflect your style.
- Embroidered Hats: Add unique embroidery designs to hats for a fashionable accessory.
- Embroidered Jewelry: Create delicate embroidered jewelry using small hoops or fabric scraps.
7.4. Seasonal Embroidery Projects
- Holiday Ornaments: Create festive holiday ornaments using embroidery techniques.
- Seasonal Wall Art: Design seasonal wall art that celebrates the changing seasons.
- Themed Embroidery Projects: Create embroidery projects that are themed around specific holidays or events.
7.5. Project Ideas and Inspiration
| Project Idea | Description | Skill Level | Supplies Needed |
|---|---|---|---|
| Embroidered Tote Bag | Customize a plain tote bag with floral or geometric embroidery designs. | Beginner | Tote bag, embroidery floss, needles, hoop, pattern |
| Embroidered Wall Hanging | Create a unique wall hanging using embroidery on fabric stretched over a wooden frame. | Intermediate | Fabric, embroidery floss, needles, hoop, frame, pattern |
| Embroidered Patches | Design and create custom embroidered patches to add to clothing or accessories. | Advanced | Fabric scraps, embroidery floss, needles, hoop, pattern, adhesive backing |
| Monogrammed Handkerchief | Personalize a handkerchief with a monogram or initial using delicate embroidery stitches. | Beginner | Handkerchief, embroidery floss, needles, hoop, pattern |
| Embroidered Book Cover | Create a unique book cover by embroidering a design onto fabric and attaching it to the book. | Intermediate | Fabric, embroidery floss, needles, hoop, pattern, book, adhesive |
| Embroidered Coasters | Design and embroider coasters to protect furniture and add a decorative touch to your home. | Beginner | Fabric scraps, embroidery floss, needles, hoop, pattern, cork or felt backing |
| Embroidered Ornaments | Create festive holiday ornaments using embroidery on felt or fabric scraps. | Intermediate | Felt or fabric scraps, embroidery floss, needles, hoop, pattern, stuffing, ribbon |
| Embroidered Phone Case | Customize a plain phone case by embroidering a design onto fabric and attaching it to the case. | Advanced | Fabric scraps, embroidery floss, needles, hoop, pattern, phone case, adhesive |
| Embroidered Art Quilt | Design and create an art quilt using a combination of embroidery, fabric scraps, and quilting techniques. | Expert | Fabric scraps, embroidery floss, needles, hoop, pattern, batting, backing fabric |
| Embroidered Hair Clips | Create unique hair clips by embroidering designs onto fabric and attaching them to hair clip blanks. | Beginner | Fabric scraps, embroidery floss, needles, hoop, pattern, hair clip blanks, adhesive |
| Embroidered Tea Towels | Add a personal touch to your kitchen with embroidered tea towels featuring floral or geometric designs. | Beginner | Tea towels, embroidery floss, needles, hoop, pattern |
| Embroidered Baby Bib | Create a personalized baby bib with a cute design or monogram using soft fabrics and embroidery techniques. | Intermediate | Soft fabric, embroidery floss, needles, hoop, pattern, backing fabric, snaps or Velcro |
| Embroidered Pencil Case | Design a unique pencil case by embroidering a design onto fabric and sewing it into a functional case. | Advanced | Fabric scraps, embroidery floss, needles, hoop, pattern, zipper, lining fabric, sewing machine |
At LEARNS.EDU.VN, we believe that the possibilities for embroidery are endless. Explore our website for more project ideas and inspiration, and start creating your own unique embroidered masterpieces.
8. Caring for Your Embroidered Creations
Proper care will ensure that your embroidered creations last for years to come. LEARNS.EDU.VN provides tips and guidelines for cleaning, washing, and storing your embroidered items.
8.1. Cleaning Embroidered Items
- Spot Cleaning: For minor stains, spot clean with a mild detergent and a soft cloth.
- Hand Washing: Hand wash delicate embroidered items in cold water with a mild detergent.
- Machine Washing: Machine wash durable embroidered items on a gentle cycle with cold water.
8.2. Washing Embroidered Items
- Turn Inside Out: Turn embroidered items inside out before washing to protect the stitches.
- Use a Laundry Bag: Place delicate items in a laundry bag to prevent damage.
- Avoid Bleach: Do not use bleach or harsh chemicals, as they can damage the fabric and threads.
8.3. Drying Embroidered Items
- Air Dry: Air dry embroidered items flat or hanging to prevent shrinkage and damage.
- Avoid Direct Sunlight: Avoid drying embroidered items in direct sunlight, as it can fade the colors.
- Do Not Tumble Dry: Do not tumble dry embroidered items, as the heat can damage the stitches and fabric.
8.4. Ironing Embroidered Items
- Iron on Reverse: Iron embroidered items on the reverse side, using a low heat setting.
- Use a Pressing Cloth: Use a pressing cloth between the iron and the embroidery to protect the stitches.
- Avoid Direct Contact: Avoid direct contact between the iron and the embroidery, as it can flatten the stitches.
8.5. Storing Embroidered Items
- Store Flat: Store embroidered items flat in a clean, dry place.
- Use Acid-Free Paper: Place acid-free paper between layers of embroidered items to prevent damage.
- Avoid Plastic Bags: Avoid storing embroidered items in plastic bags, as they can trap moisture and cause mildew.
Proper care will ensure that your embroidered creations remain beautiful and vibrant for years to come. At LEARNS.EDU.VN, we provide detailed care instructions for each type of embroidery project, ensuring your hard work is preserved.
9. Resources for Continuing Your Embroidery Education
Embroidery is a lifelong learning journey. LEARNS.EDU.VN offers a variety of resources to help you continue your education and expand your skills.
9.1. Online Courses and Tutorials
- LEARNS.EDU.VN Courses: Explore our curated selection of embroidery courses for all skill levels.
- Craftsy: Access a wide range of embroidery courses taught by experienced instructors.
- Skillshare: Discover embroidery tutorials and classes on Skillshare.
- Udemy: Find embroidery courses and resources on Udemy.
9.2. Embroidery Books and Magazines
- “The Embroidery Stitch Bible” by Betty Barnden: A comprehensive guide to embroidery stitches.
- “Royal School of Needlework: Embroidery Techniques” by Sally Saunders: An in-depth exploration of embroidery techniques.
- “Inspirations Magazine”: A quarterly magazine featuring stunning embroidery projects and techniques.
9.3. Embroidery Guilds and Organizations
- The Embroiderers’ Guild of America (EGA): A national organization that promotes the art of embroidery.
- The Embroiderers’ Guild, UK: An organization dedicated to preserving and promoting the art of embroidery in the United Kingdom.
- Local Embroidery Groups: Join a local embroidery group to connect with other embroiderers and share your passion.
9.4. Online Communities and Forums
- Reddit Embroidery Subreddit: Connect with other embroiderers on Reddit and share your projects.
- Facebook Embroidery Groups: Join Facebook groups dedicated to embroidery to ask questions, share tips, and find inspiration.
- Online Embroidery Forums: Participate in online embroidery forums to connect with other embroiderers from around the world.
9.5. Staying Updated with Embroidery Trends
- Follow Embroidery Blogs: Stay updated with the latest embroidery trends by following popular embroidery blogs.
- Explore Social Media: Follow embroidery artists and designers on social media platforms like Instagram and Pinterest.
- Attend Embroidery Events: Attend embroidery events and workshops to learn new techniques and see the latest trends.
LEARNS.EDU.VN is committed to providing you with the resources and support you need to continue your embroidery education. Explore our website for more information and inspiration.
10. FAQs About Learning How to Embroider
Here are some frequently asked questions about learning how to embroider, answered by the experts at LEARNS.EDU.VN.
10.1. Is embroidery difficult to learn?
No, embroidery is not difficult to learn. With the right guidance and resources, anyone can master the basics and create beautiful designs.
10.2. What are the essential supplies for beginner embroiderers?
The essential supplies include fabric, embroidery thread, needles, a hoop, and tracing supplies.
10.3. What are the basic embroidery stitches?
The basic embroidery stitches include the running stitch, backstitch, split stitch, stem stitch, satin stitch, and French knot.
10.4. How do I transfer a pattern to fabric?
You can transfer a pattern to fabric using tracing paper, iron-on transfers, or water-soluble pens.
10.5. How do I prevent fabric from puckering during embroidery?
To prevent fabric from puckering, make sure the fabric is taut but not overly tight in the hoop, and use a stabilizer.
10.6. How do I choose the right embroidery needle?
Choose an embroidery needle with a large eye to accommodate thicker threads and a sharp point for piercing fabric.
10.7. How do I care for embroidered items?
Care for embroidered items by hand washing or machine washing on a gentle cycle, and air drying or ironing on reverse.
10.8. What are some creative embroidery project ideas?
Creative embroidery project ideas include embroidered clothing, home décor, and accessories.
10.9. Where can I find embroidery patterns and inspiration?
You can find embroidery patterns and inspiration online, in books and magazines, and at local craft stores.
10.10. How can I continue my embroidery education?
Continue your embroidery education by taking online courses, joining embroidery guilds, and staying updated with the latest trends.
Embroidery is a rewarding and enjoyable craft that can be learned by anyone. With the guidance and resources provided by LEARNS.EDU.VN, you can confidently embark on your embroidery journey and create beautiful, personalized designs.
Ready to start your embroidery adventure? Visit LEARNS.EDU.VN today to explore our comprehensive guides, tutorials, and courses. Whether you’re a beginner or an experienced stitcher, we have the resources you need to enhance your skills and unleash your creativity. Join our community of passionate learners and discover the joy of embroidery with LEARNS.EDU.VN. Contact us at 123 Education Way, Learnville, CA 90210, United States. Whatsapp: +1 555-555-1212. Website: learns.edu.vn.