Lead climbing, a thrilling progression from toproping, involves clipping into protection as you ascend, and LEARNS.EDU.VN is here to guide you through mastering this skill. This comprehensive guide provides a step-by-step approach to learn the ropes, understand safety protocols, and develop the confidence needed to tackle your first lead climb, ensuring a safe and rewarding experience. Embark on this adventure with the right gear, solid techniques, and a mindset ready to conquer new heights. Let’s explore the essential skills and strategies to become a proficient lead climber.
1. Understanding the Fundamentals of Lead Climbing
Lead climbing introduces a dynamic layer of challenge compared to toproping. While toproping involves climbing with the rope already secured above you, lead climbing requires you to bring the rope up with you, clipping into protection points along the way. This increases the risk factor but also enhances the sense of accomplishment.
1.1 Lead Climbing vs. Toproping: Key Differences
The primary distinction lies in how the rope is managed. In toproping, the rope is fixed at the anchor above, providing immediate security. In lead climbing, the climber attaches the rope to protection points (quickdraws) as they ascend, which means a fall could be twice the distance from the last clipped point.
| Feature | Toproping | Lead Climbing |
|---|---|---|
| Rope Position | Fixed at the top anchor | Climber brings rope, clips to protection |
| Fall Distance | Minimal, limited by slack | Up to twice the distance from last clip |
| Risk Level | Lower | Higher |
| Skill Required | Basic climbing and belaying | Advanced climbing, clipping, risk assessment |
| Sense of Adventure | Controlled and secure | Increased autonomy and challenge |


1.2 Essential Gear for Lead Climbing
Having the right gear is paramount for both safety and performance. The essentials include:
- Harness: A comfortable and secure harness designed for climbing.
- Climbing Shoes: Properly fitting shoes that provide grip and precision.
- Rope: A dynamic climbing rope suitable for lead climbing, typically 9.5-10.2 mm in diameter.
- Quickdraws: Pre-assembled units consisting of two carabiners connected by a sling, used to clip the rope to bolts.
- Belay Device: A device used to control the rope and catch a fall, such as an ATC or GriGri.
- Locking Carabiners: Used for connecting the belay device to the harness and for anchor systems.
- Helmet: Essential for protecting against head injuries from falls or falling rocks.
1.3 Understanding Quickdraw Components and Function
Quickdraws are crucial for lead climbing. Each quickdraw consists of two carabiners connected by a sling. One carabiner clips to the bolt in the wall, and the other is for the rope. Correct orientation of quickdraws can prevent dangerous situations.
| Component | Function |
|---|---|
| Carabiners | Connect rope to bolt and rope to harness |
| Sling | Connects the two carabiners |
| Rubber Keeper | Prevents the rope-end carabiner from rotating |
2. Mastering Clipping Techniques: A Step-by-Step Guide
Clipping is the act of attaching the rope to the quickdraws as you climb. Efficient and correct clipping is crucial for safety and conserving energy.
2.1 Basic Clipping Methods: Same-Side vs. Opposite-Side
There are two primary methods for clipping:
- Same-Side Clipping: Clipping with the hand on the same side as the direction the gate faces.
- Opposite-Side Clipping: Clipping with the hand on the opposite side of the gate.
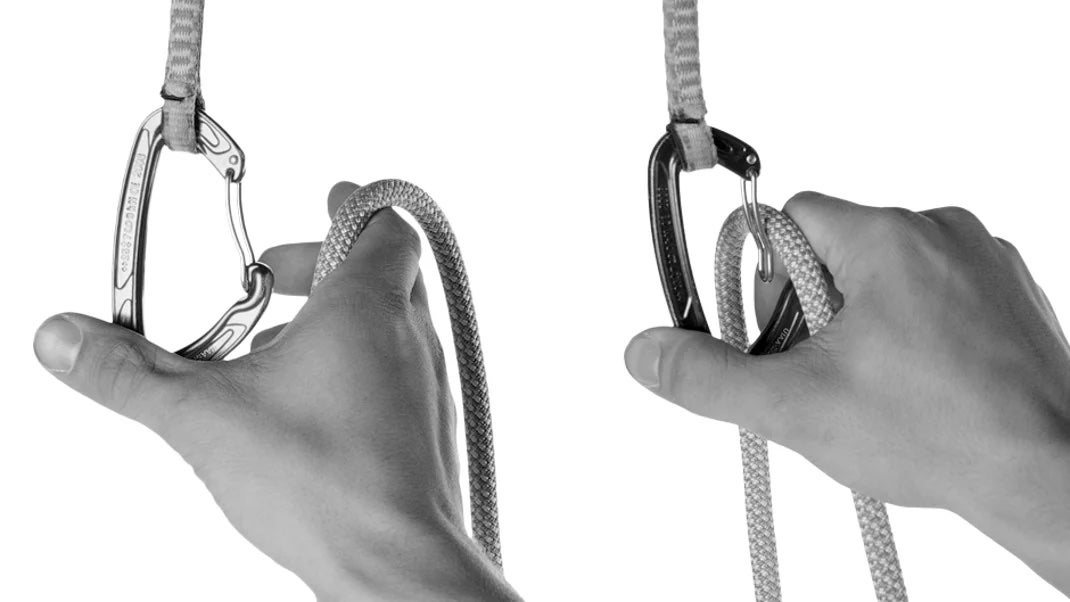
- Method 1: Same-side clipping. For use when clipping a left-facing draw with your left hand or a right-facing draw with your right hand. Reach down with your palm up and pinch the rope between your thumb and index finger. Pull the rope up to the draw. Loosen your grip on the rope so it’s either draped loosely over your pointer finger or pinched between your pointer and middle finger (try both: some people prefer one, some prefer the other). Next, wrap your thumb around the spine of the carabiner and position the rope in front of the carabiner’s gate. Then push the rope through the gate with your pointer finger. (See Figure A.)
- Method 2: opposite-side clipping. For use when clipping a right-facing draw with your left hand or a left-facing draw with your right hand. Pinch the rope between your thumb and pointer finger, then lay your middle finger inside the carabiner. Using your middle finger to hold the draw in place, push the rope through the gate with your thumb and forefinger. (Figure B)
2.2 Avoiding Common Clipping Errors: Back-Clipping and Z-Clipping
Avoiding these mistakes is essential for your safety and efficiency:
- Back-Clipping: This is when the rope runs through the carabiner from the wrong direction. If you fall, the rope can unclip itself from the quickdraw. Always ensure the rope comes from the wall towards you.
- Z-Clipping: This occurs when you pull the rope from below a lower quickdraw to clip into a higher one, creating a “Z” shape. This drastically increases rope drag and the potential fall distance.
2.3 Rope Management: Efficient Slack Pulling Techniques
Effective rope management reduces fatigue and ensures smooth clipping. Here are some tips:
- Pull Enough Slack: Ensure you have enough slack to clip comfortably without straining.
- Use Your Hips: Rotate your hips towards the quickdraw to bring it closer and reduce reach.
- Bite the Rope (With Caution): If necessary, use your lips or teeth to hold the rope to get more slack, but be extremely cautious to avoid injury.
2.4 Practice Drills for Improving Clipping Speed and Accuracy
Regular practice will improve your clipping skills:
- Ground Practice: Set up a mock scenario on the ground to practice clipping from different angles.
- Hangboard Drills: Combine hangboard training with clipping practice to simulate pump and fatigue.
- Mock Leads: Practice clipping while toproping to get used to the movement and rope management.
3. Lead Belaying: Ensuring Climber Safety from Below
Belaying is the art of managing the rope to protect the climber. Lead belaying requires extra attention and skill compared to toproping.
3.1 Differences Between Lead and Toprope Belaying
- Dynamic Belay: Lead belaying requires a dynamic catch to soften falls, which means moving with the fall.
- Attentive Monitoring: Lead belayers must constantly monitor the climber and anticipate their movements.
- Communication: Clear communication is crucial for coordinating and responding to the climber’s needs.
3.2 Mastering the Dynamic Belay Technique
The dynamic belay involves giving a soft catch by moving slightly upwards or jumping as the climber falls. This reduces the impact force on both the climber and the belayer.
| Aspect | Description |
|---|---|
| Body Position | Stand close to the wall, ready to move |
| Giving Slack | Allow a small amount of slack just before the catch, then brake firmly |
| Moving with Fall | Jump or move upwards to cushion the fall, reducing the shock |
| Braking Hand | Maintain a firm grip on the brake strand of the rope |
3.3 Using Belay Devices Safely: GRIGRI, ATC, and Others
Different belay devices require different techniques. Here’s a brief overview:
- GRIGRI: An assisted-braking device that automatically locks under load. Requires proper loading and technique to avoid misuse.
- ATC (Air Traffic Controller): A tube-style device that provides friction. Requires constant attention and a strong grip.
- Other Devices: Ensure you are trained in the specific use of any belay device you choose.
3.4 Communication Signals Between Climber and Belayer
Clear communication is vital. Standard calls include:
- “On Belay?” – Belayer confirms they are ready.
- “Belay On!” – Climber acknowledges the belay is secure.
- “Climbing!” – Climber is starting to climb.
- “Take!” – Climber needs the belayer to tighten the rope.
- “Falling!” – Climber is about to fall.
- “Safe!” – Climber is at the anchor.
3.5 Practicing Belaying Techniques in a Safe Environment
Practice makes perfect. Use a controlled environment to practice belaying:
- Gym Training: Gyms offer controlled environments to practice lead belaying.
- Experienced Mentors: Learn from experienced climbers who can provide feedback.
- Simulated Falls: Practice catching falls with a weighted bag or experienced climber.
4. Transitioning from Toprope to Lead: A Gradual Approach
Transitioning should be gradual and methodical to build confidence and competence.
4.1 Choosing Your First Lead Climb: Factors to Consider
Select a route that is:
- Closely Bolted: Reduces potential fall distance.
- Below Your Ability: Focus on technique, not difficulty.
- Free of Obstacles: Avoid routes with ledges or protrusions.
- Familiar: Ideally, a route you’ve toproped comfortably.
4.2 Mock Leading: Practicing the Process Without the Risk
Mock leading involves climbing on toprope while clipping a second rope into the quickdraws. This allows you to practice the physical and mental aspects of leading without the fall risk.
4.3 Pre-Climb Checklist: Ensuring Safety and Readiness
Before starting, ensure you:
- Check Your Gear: Harness, rope, belay device, and quickdraws.
- Communicate with Your Belayer: Discuss the route and potential hazards.
- Visualize the Climb: Plan your clipping strategy and anticipate difficulties.
- Warm-Up: Prepare your body with dynamic stretches and easy climbs.
4.4 Managing Fear and Building Confidence
Fear is a natural part of lead climbing. Strategies to manage it include:
- Deep Breathing: Use controlled breathing to calm your nerves.
- Positive Self-Talk: Replace negative thoughts with positive affirmations.
- Focus on Process: Concentrate on the steps and techniques rather than the outcome.
- Take Controlled Falls: Practice falling to desensitize yourself to the experience.
5. Essential Safety Practices for Lead Climbing
Safety is paramount. Always adhere to these practices.
5.1 Importance of Partner Checks
Before each climb, conduct a thorough partner check:
- Buckles: Ensure harness buckles are doubled back and secure.
- Knot: Verify the tie-in knot is properly tied and seated.
- Belay Device: Check the belay device is correctly loaded and locked.
- Communication: Confirm communication signals are understood.
5.2 Recognizing and Avoiding Dangerous Situations
Be vigilant for:
- Loose Rock: Identify and avoid climbing near loose rock.
- Rope Drag: Minimize rope drag by using longer quickdraws or strategically placing draws.
- Ledges: Be aware of potential obstacles in case of a fall.
- Weather: Avoid climbing in adverse weather conditions.
5.3 Using Appropriate Fall Zones and Communicating Effectively
- Clear Fall Zone: Ensure the area below the climb is clear of obstacles.
- Informative Communication: Use clear and concise language to communicate with your belayer.
- Yelling “Falling”: Always yell “Falling” to alert your belayer.
5.4 The Role of Helmets in Preventing Head Injuries
Helmets are essential for protecting against head injuries from falls or falling rocks. Always wear a helmet, regardless of the difficulty of the climb. According to a study published in the journal “Wilderness & Environmental Medicine,” helmets reduce the risk of head injuries by up to 85%.
5.5 Understanding Dynamic vs. Static Ropes and Their Applications
- Dynamic Ropes: Designed to stretch and absorb the energy of a fall, reducing impact force. Essential for lead climbing.
- Static Ropes: Designed for minimal stretch, used in rappelling and hauling. Not suitable for lead climbing.
6. Advanced Techniques for Lead Climbing
Once you’re comfortable with the basics, explore advanced techniques to improve your performance.
6.1 Strategic Clipping: Optimizing Quickdraw Placement
Strategic clipping involves placing quickdraws to:
- Reduce Rope Drag: Use longer draws or place draws to create smoother rope lines.
- Prevent Pendulums: Place draws to minimize swing potential in case of a fall.
- Protect Cruxes: Place draws near difficult sections to reduce fall potential.
6.2 Route Reading: Visualizing the Climb Before You Start
Route reading involves studying the route before climbing to:
- Identify Holds: Spot potential holds and plan your moves.
- Assess Difficulties: Anticipate challenging sections and plan strategies.
- Find Rest Spots: Identify opportunities to rest and recover.
6.3 Energy Conservation Techniques: Efficient Movement and Resting
Conserving energy is crucial for longer climbs:
- Use Your Legs: Rely on your leg muscles for power, not your arms.
- Rest Efficiently: Use rest holds to recover and shake out your arms.
- Breathe Deeply: Focus on deep, controlled breathing to maintain energy levels.
6.4 Overcoming Mental Barriers: Staying Focused and Positive
Mental strength is as important as physical strength:
- Stay Present: Focus on the current move, not the overall climb.
- Visualize Success: Imagine yourself successfully completing the route.
- Embrace the Challenge: View difficult sections as opportunities for growth.
7. Training Exercises for Lead Climbing
Consistent training is essential for improving your lead climbing abilities.
7.1 Strength Training: Building a Solid Foundation
Focus on exercises that target climbing-specific muscles:
- Pull-Ups: Strengthen back and arm muscles.
- Campus Boarding: Improve finger strength and contact strength.
- Core Work: Strengthen core muscles for stability and power.
7.2 Endurance Training: Increasing Stamina and Resistance
Endurance training helps you climb longer and harder:
- ARC Training (Aerobic Restoration and Capillarity): Low-intensity, high-volume climbing to improve endurance.
- Interval Training: Short bursts of intense climbing followed by rest periods.
- Long Routes: Practice climbing longer routes to build stamina.
7.3 Flexibility Training: Improving Range of Motion and Preventing Injuries
Flexibility is important for reaching holds and preventing injuries:
- Dynamic Stretching: Warm-up exercises to prepare muscles for climbing.
- Static Stretching: Cool-down exercises to improve flexibility and range of motion.
- Yoga and Pilates: Enhance flexibility, balance, and core strength.
7.4 Fingerboard Training: Enhancing Grip Strength
Fingerboard training is crucial for improving grip strength and endurance. Use a variety of holds and techniques to target different aspects of finger strength. According to research in the “Journal of Strength and Conditioning Research,” consistent fingerboard training can significantly improve climbing performance.
8. Climbing Ethics and Environmental Responsibility
Climbing comes with ethical considerations and responsibilities towards the environment.
8.1 Respecting Climbing Areas and Local Regulations
- Follow Regulations: Adhere to local climbing area rules and regulations.
- Minimize Impact: Avoid damaging vegetation or disturbing wildlife.
- Leave No Trace: Pack out all trash and gear.
8.2 Practicing Sustainable Climbing Techniques
- Use Existing Trails: Stay on established trails to avoid erosion.
- Avoid Creating New Anchors: Use existing bolts and anchors whenever possible.
- Educate Others: Share your knowledge of sustainable climbing practices with fellow climbers.
8.3 Contributing to Climbing Organizations and Conservation Efforts
Support organizations that promote responsible climbing and conservation:
- Access Fund: Advocates for climbing access and conservation efforts.
- Local Climbing Organizations: Participate in local climbing initiatives and conservation projects.
9. Understanding the Grading System for Climbing Routes
Familiarize yourself with the grading system to choose routes that match your ability level.
9.1 The Yosemite Decimal System (YDS): Understanding the Basics
The YDS is a common system used in North America. It consists of five classes:
- Class 1: Hiking on trails.
- Class 2: Hiking with some scrambling.
- Class 3: Scrambling with increased exposure.
- Class 4: Simple climbing, often with rope for safety.
- Class 5: Technical rock climbing requiring ropes and protection.
Within Class 5, routes are further graded from 5.0 to 5.15d, with higher numbers indicating greater difficulty.
9.2 Converting Between Different Grading Systems (e.g., French, Ewbank)
Different regions use different grading systems. Here’s a rough comparison:
| YDS | French | Ewbank |
|---|---|---|
| 5.5 | 4a | 14 |
| 5.8 | 4c | 16 |
| 5.10a | 5c | 18 |
| 5.11a | 6b | 20 |
| 5.12a | 7a | 22 |
9.3 Choosing Routes Appropriate for Your Skill Level
- Start Easy: Begin with routes well below your maximum ability.
- Progress Gradually: Gradually increase the difficulty as you improve.
- Seek Advice: Consult experienced climbers for route recommendations.
10. Resources for Further Learning and Improvement
Continue your education and development through various resources.
10.1 Books, Videos, and Online Courses on Lead Climbing
- Books: “Training for Climbing” by Eric Hörst, “Rock Climbing: Mastering the Basic Skills” by Craig Luebben.
- Videos: Numerous instructional videos on YouTube and climbing websites.
- Online Courses: Platforms like LEARNS.EDU.VN offer comprehensive lead climbing courses.
10.2 Joining a Climbing Gym or Club
- Access to Facilities: Gyms provide access to training walls and equipment.
- Community: Join a club to connect with experienced climbers and find partners.
- Instruction: Gyms and clubs often offer courses and workshops.
10.3 Seeking Guidance from Experienced Climbers and Mentors
- Learn from Experts: Seek advice from experienced climbers who can provide valuable insights.
- Find a Mentor: A mentor can provide personalized guidance and support.
- Attend Workshops: Participate in workshops and clinics to learn new skills and techniques.
10.4 Staying Updated on the Latest Climbing Techniques and Gear
- Read Climbing Magazines: Stay informed about new techniques, gear, and trends.
- Follow Climbing Websites and Blogs: Get the latest news and information from online sources.
- Attend Climbing Festivals and Events: Network with climbers and learn from industry experts.
Lead climbing is a rewarding and challenging activity that requires dedication, practice, and a commitment to safety. By following these guidelines and continuing to learn and improve, you can safely and confidently enjoy the thrill of leading climbs and progress to greater heights.
FAQ: Frequently Asked Questions About Lead Climbing
- What is the biggest difference between lead climbing and toproping?
- Lead climbing involves clipping the rope to protection as you climb, while toproping has the rope already secured at the top.
- What gear is essential for lead climbing?
- Harness, climbing shoes, dynamic rope, quickdraws, belay device, locking carabiners, and a helmet.
- What is back-clipping, and why is it dangerous?
- Back-clipping is when the rope runs through the carabiner in the wrong direction, which can cause the rope to unclip during a fall.
- How does dynamic belaying help the climber?
- Dynamic belaying provides a softer catch by moving with the fall, reducing the impact force on the climber.
- What should I look for in my first lead climb?
- Choose a route that is closely bolted, below your ability, free of obstacles, and familiar.
- How can I manage fear when lead climbing?
- Use deep breathing, positive self-talk, focus on the process, and take controlled falls.
- What is the importance of partner checks before climbing?
- Partner checks ensure that all gear is correctly set up and that communication is clear, reducing the risk of accidents.
- How can I minimize rope drag when leading?
- Use longer quickdraws or strategically place draws to create smoother rope lines.
- What is the Yosemite Decimal System (YDS), and how does it work?
- The YDS is a grading system for climbing routes, with ratings from 5.0 to 5.15d, where higher numbers indicate greater difficulty.
- Where can I find resources for further learning about lead climbing?
- Books, videos, online courses (like those offered on LEARNS.EDU.VN), climbing gyms, and experienced climbers and mentors.
Ready to take your climbing to the next level? Visit LEARNS.EDU.VN today to explore our comprehensive courses, expert guides, and resources designed to help you master lead climbing. Overcome your challenges and learn new skills with our detailed explanations and proven methods. Connect with our educational experts and discover the tools you need to succeed. Contact us at 123 Education Way, Learnville, CA 90210, United States, or Whatsapp: +1 555-555-1212. Start your journey to becoming a proficient lead climber with learns.edu.vn!