Guitar tablature, or “guitar tabs,” is a revolutionary method of music notation that empowers aspiring guitarists to swiftly and effortlessly learn their favorite songs. Similar to traditional music staff notation, guitar tabs provide essential musical information, indicating which notes to play, their duration, and the techniques involved. However, guitar tablature distinguishes itself by offering a significant advantage over standard notation: it visually represents where to play each note directly on the guitar fretboard.
This feature is particularly beneficial because the guitar fretboard allows for playing the same notes in multiple locations. Understanding guitar tablature and learning how to read tabs for guitar is incredibly advantageous for beginners. It allows students to embark on their guitar journey and learn to play songs without the initial hurdle of deciphering traditional musical notation.
At School of Rock, teaching students how to read guitar tablature is a core element of our guitar education. Guitar tabs effectively display both chords and single notes, establishing them as the quickest route to mastering your favorite songs. The learning curve is also gentler, as reading guitar tabs requires no prior specialized knowledge beyond identifying the strings and frets on your guitar.
If you’re eager to delve into the world of guitar tabs and discover their applications, you’ve come to the perfect resource. Let’s begin your journey into reading guitar tablature.
WHAT ARE GUITAR TABS?
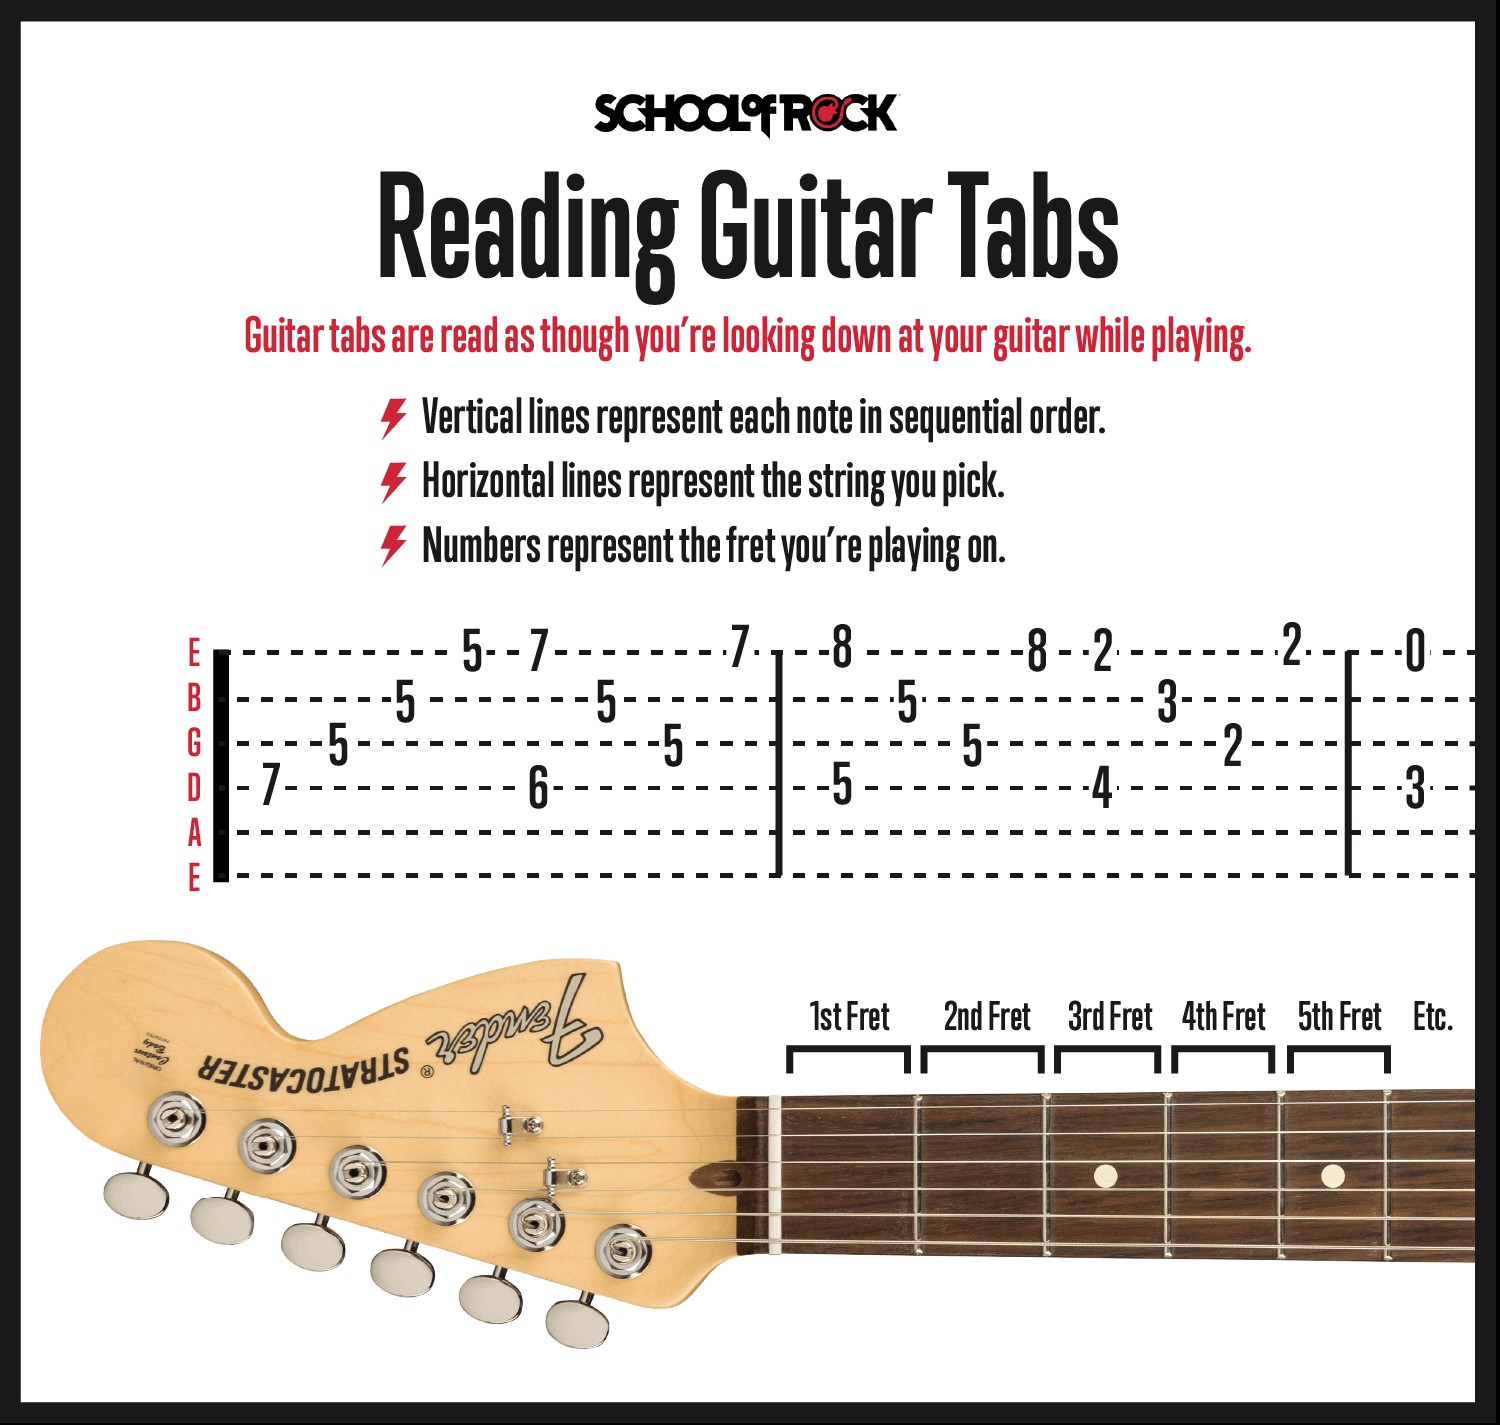
Guitar tablature serves as a visual map of the notes within a song. A standard guitar tab is composed of six horizontal lines, each symbolizing one of the six strings of a guitar. When learning how to read tabs for guitar, you read the tablature from top to bottom. The uppermost line represents the high E string (the thinnest string), followed by lines for the B, G, D, A, and low E strings (the thickest string).
This arrangement mirrors the perspective you have of the strings when looking down at your guitar in playing position. Think of guitar tablature as your personal roadmap, guiding you on the most direct path to learning guitar songs efficiently.
As you explore guitar tablature, you’ll encounter numbers positioned on each line. These numbers correspond to the frets on your guitar – the thin metal strips running across the fretboard. Frets are numbered from 0 to 24, starting from the nut (the piece closest to the headstock) and extending down the guitar neck.
A “0” on a string indicates playing that string “open,” meaning without pressing down on any fret with your fretting hand. A “1” signifies playing the note at the first fret. When learning how to read guitar tabs, remember that “1” represents the first fret, “2” the second, “3” the third, and so forth.
HOW TO READ GUITAR TABS
Guitar tablature is read from left to right, presenting notes in chronological order as they occur in the song. When numbers align vertically, they represent a chord. A chord is played by strumming all the indicated strings simultaneously. Guitar tab notation is remarkably beginner-friendly compared to standard notation because it explicitly shows you which notes form the chord and their exact location on the guitar.
WHAT DO I NEED TO KNOW TO READ GUITAR TABS?
For beginners to successfully learn how to read guitar tabs, familiarizing themselves with the six strings and the fret positions is essential. This foundational knowledge enables them to accurately locate the correct notes on their guitar using the tab as their guide. Understanding the relationship between strings and frets is the first step in mastering guitar tabs.
UNDERSTANDING THE GUITAR TAB STAFF
The guitar tab staff shares a visual similarity with the staff used in standard musical notation. However, a crucial distinction lies in the staff lines. In guitar tabs, these lines represent the 6 guitar strings, not musical pitches as in standard notation.
The top line always corresponds to the high E string, while the bottom line represents the low E string. This intuitive design makes learning how to read guitar tabs straightforward for beginners. To further avoid confusion with standard notation, the staff is typically labeled “TAB.”
UNDERSTANDING GUITAR FRETS
Guitar frets are the thin metal strips embedded across the fretboard of your guitar. These frets are crucial for altering the pitch of each string.
Most guitars are equipped with 19 to 24 frets. The distance between each consecutive fret represents one semitone, or half step, in musical pitch. Within each octave, there are 12 semitones (or frets). To aid in navigation, most guitars feature fret markers, often dots or inlays, positioned along the side of the neck or directly on the fretboard. These markers are typically found at the 3rd, 5th, 7th, 9th, and 12th frets, providing visual landmarks for easy fret position recognition while playing.
Remember, in guitar tabs, numbers represent fretted strings, while the number “0” specifically denotes open strings. An “open” string is played without pressing down any fret; you simply pick or pluck the string and allow it to resonate freely.
UNDERSTANDING GUITAR TAB CHORDS
While guitar chords don’t have dedicated symbols within guitar tabs, they are easily identifiable by their positioning. When multiple numbers are stacked vertically in a tab, they indicate notes to be played together as a chord. If a chord is arpeggiated, meaning the notes are played individually rather than simultaneously, it will appear as a sequence of single notes in the tab, even though you are still fretting the chord shape.
UNDERSTANDING GUITAR TAB RIFFS
Many rock songs are built upon “riffs”—short, repeated musical phrases that often define a song. Riffs usually combine single notes and partial chords, such as power chords. When reading guitar tabs for riffs, the same fundamental principles apply: vertically aligned notes are played simultaneously. This consistent approach makes learning how to read guitar tablature for riffs both quick and intuitive.
UNDERSTANDING GUITAR TABS VS CHORD CHARTS
Guitar tabs and chord charts, while both serving guitarists, differ in their presentation and purpose. A chord chart is a visual diagram displaying where to place your fingers on the fretboard to form a specific chord. It often includes finger numbers to guide finger placement. Chord charts are commonly integrated into guitar tabs, positioned above song lyrics to indicate chord changes within the song structure.
Chord charts primarily focus on the essential 3 to 4 notes that constitute a chord. However, a complete and nuanced song rendition may incorporate single notes, notes outside the basic chord, or arpeggios—patterns of playing individual notes within a chord—that chord charts alone do not represent. Therefore, chord charts often accompany guitar tabs to bridge this gap, helping beginner guitarists expand beyond basic chords and play songs more fully.
UNDERSTANDING FINGERS AND NUMBERS
Guitar tablature is linear, representing music sequentially, whereas chord charts offer a snapshot of the fretboard at a specific chord position. To guide finger placement, chord charts employ a numbering system for the fingers of the fretting hand—the hand that presses down strings on the fretboard. The index finger is designated as 1, the middle finger as 2, the ring finger as 3, and the pinky finger as 4.
This finger numbering contrasts with guitar tabs, where numbers indicate the fret to be played, not which finger to use. For this reason, easy guitar tabs may incorporate chord charts to assist beginners in proper hand positioning while playing chords.
PLAY GUITAR IN REAL PERFORMANCES ONSTAGE
Our music programs are led by experienced, practicing musicians dedicated to helping you learn to play. Gain real-world performance experience and hone your skills in a supportive environment designed for all skill levels.
HOW TO READ GUITAR TAB SYMBOLS
Beyond lines and numbers, guitar tabs incorporate various symbols that denote specific playing techniques. Learning to recognize and apply these guitar tab symbols is crucial for achieving authentic sounds and making reading guitar tabs even easier.
Before starting to play, always ensure your guitar tuning is accurate. Proper tuning is fundamental for your guitar to sound right.
MUTING GUITAR NOTES
Muting is a fundamental guitar technique, particularly prevalent in rock music genres. Many styles, including heavy metal, punk, and alternative, rely heavily on different muting techniques to create characteristic sounds and musical textures.
HOW TO MUTE GUITAR NOTES
Muting guitar notes, primarily executed with the picking hand, can also involve either hand or both hands in combination. Muting adds dynamic variation to your playing and is a valuable technique for achieving a polished sound. In many songs, verses might be muted for a subdued feel, while choruses or hooks are played without muting for greater impact.
Experienced guitarists often incorporate muting techniques instinctively and constantly while playing. Especially when playing at higher volumes, muting is essential to prevent unwanted noise or feedback.
GUITAR TECHNIQUE: PALM MUTING
Palm muting is among the most frequently used techniques in rock guitar playing. It involves lightly resting the palm of your picking hand on the strings near the bridge as you pick. Heavy palm muting creates a tight, rhythmic, percussive sound, while lighter palm muting allows notes to sustain slightly longer. Beginners learning to read guitar music should look for “P.M.” indicators above the tab staff section where palm muting is required.
GUITAR TECHNIQUE: MUTED NOTES
Muted notes, distinct from palm muting, are achieved using the fretting hand. In guitar tabs, muted notes are still picked, but they produce a percussive, less defined pitch because the fretting hand only lightly touches the strings without fully pressing them down to the fretboard. In guitar tablature, muted notes are represented by an “X” in place of the typical fret number.
BENDING GUITAR STRINGS
String bending is a technique that adds expressive, vocal-like qualities to guitar playing. In guitar tabs, bends are indicated by a curved arrow above the note to be bent. This arrow signifies that you should manipulate the string to raise its pitch. The arrow may also specify the bend interval, such as “½” for a half step (one fret) or “full” for a full step (two frets) bend. The target pitch achieved after bending is often referred to as the “target” note.
HOW TO BEND GUITAR STRINGS
Bending is executed by pushing the guitar string up or down along the fretboard, rather than pressing straight down as you normally would. For all strings except the low E, most players push the strings upwards towards the ceiling. The low E string, however, must be pushed downwards towards the floor. The key to successful bending is applying smooth, consistent pressure throughout the bend.
GUITAR TECHNIQUE: BENDING GUITAR STRINGS
Most string bends are performed using a combination of two or three fingers. The primary fretting finger, typically the ring finger, performs the bend, while the middle and index fingers provide support and strength. This multi-finger approach promotes smoother, easier bending and enhances control over the pitch of the bent note.
GUITAR TECHNIQUE: PRE-BENDING GUITAR STRINGS
When learning how to read tabs on a guitar, beginners might also encounter “pre-bends.” In a pre-bend, the string is bent to the target pitch before being picked. It is then picked and either released to return to the original pitch of the fretted note, or bent further to a new target note. Pre-bends are notated with a vertical arrow indicating the bend amount (full, ½, etc.) followed by a curved arrow pointing downwards, signifying the release. Pre-bent notes can resolve back to the original pitch or be bent further to a different target note.
SLIDING GUITAR NOTES
Sliding is another essential guitar technique. It involves smoothly transitioning from one note to another by sliding your fretting finger along the string to the target fret. You can slide upwards to a higher note or downwards to a lower note.
GUITAR TECHNIQUE: SLIDE UP
In guitar tabs, an upward slide is represented by a line connecting the starting note to the destination note. If the slide is to a higher-pitched note, the connecting line will typically slant slightly upwards.
GUITAR TECHNIQUE: SLIDE DOWN
Conversely, a downward slide is also indicated by a line connecting the starting and ending notes. For slides to a lower-pitched note, the connecting line will usually slant slightly downwards.
PLAYING HAMMER-ONS ON THE GUITAR
The hammer-on is an exciting guitar technique where you produce a note by “hammering on” to a fret with your fretting finger, without picking the string again. You can hammer-on from an open string or from a previously fretted note, and the resulting note will always be higher in pitch. In guitar tabs, hammer-ons are denoted by the letter “H” and a curved arc connecting either an open string (“0”) to the hammered-on note, or a fretted note to the hammered-on note.
HOW TO PLAY HAMMER-ONS ON THE GUITAR
To execute a hammer-on, strike the string onto the desired fret with sufficient force from your fretting finger to produce a clear note. Achieving a strong, clear hammer-on note may require some practice. It’s often easier to perform on an electric guitar with moderate volume. Start by practicing on the open low E string and hammer-on to the third fret, allowing the note to ring out. Repeat this exercise on different strings and frets to build proficiency.
PLAYING PULL-OFFS ON the GUITAR
Pull-offs are the inverse of hammer-ons. Instead of hammering onto a fret, you “pull off” a fretted finger from the string, causing it to sound either an open string or a note fretted by another finger at a lower pitch. Pull-offs are represented in guitar tabs by the letter “P” and a curved arc connecting the pulled-off note to the resulting lower-pitched note (either open or fretted). The resulting note will always be lower in pitch than the starting note.
HOW TO PLAY PULL-OFFS ON the GUITAR
To execute a pull-off, fret a note, and then pull your finger off the string in a sideways or downward motion, effectively plucking the string to sound the next note. When performing pull-offs, ensure you “grab” enough of the string with your fingertip to make it vibrate and sound clearly.
Hammer-ons and pull-offs can be combined in alternation to create rapid sequences, sometimes referred to as “trills.” Practicing these techniques together expands your legato playing capabilities.
PLAYING VIBRATO ON THE GUITAR
Vibrato is a technique that adds warmth and expressiveness to sustained notes. It involves repeatedly and subtly bending a note up and down in pitch, without fully releasing the fretted position. This creates a wavering, vocal-like tone. In guitar tabs, vibrato is typically indicated by a zig-zag line extending above the tab staff over the duration of the note where vibrato should be applied. The length of the zig-zag line often suggests the duration of the vibrato effect.
HOW TO PLAY VIBRATO ON the GUITAR
Vibrato is similar to bending, but with smaller pitch variations and a rhythmic oscillation. You can apply vibrato using a single finger or by using a primary finger supported by others. Start by practicing a smooth, slow vibrato, and gradually vary the speed to achieve different expressive effects. Like bending, vibrato is a highly personal technique that adds a unique “voice” to your guitar solos. Each guitarist’s vibrato is distinctive, much like a fingerprint.
Alt text: Guitar tab notation for vibrato technique, showing a zig-zag line above the note.
TAPPING GUITAR
Tapping is an advanced guitar technique where you use the index finger of your picking hand to fret notes on the fretboard, in addition to your regular fretting hand. The picking hand’s tapping motion is essentially a variation of a hammer-on. In guitar tabs, tapping is denoted by the letter “T” positioned above the tapped note.
HOW TO FINGER TAP GUITAR
Tapping gained widespread popularity through Eddie Van Halen, although the technique has roots in classical guitar. To finger tap, fret a note with your regular fretting hand, and then “tap” a higher note on the same string by forcefully striking the fretboard with your picking hand’s index finger.
Finger tapping is analogous to a hammer-on, but uses your picking hand instead of your fretting hand. This technique allows you to play notes spanning wide intervals that would be impossible to reach using only your fretting hand. Playing with overdrive or distortion and sufficient volume often enhances the clarity and impact of tapping. Tapping can enable incredibly fast playing, as you are effectively using both hands to fret notes.
GUITAR TECHNIQUE: TWO-HANDED TAPPING
Two-handed tapping extends the tapping concept further. As the name suggests, it’s a technique where both hands independently fret notes on the fretboard without traditional picking. This is achieved by both the fretting and picking hands using hammer-on motions to sound notes. In some applications, the fretting hand might tap bass notes while the picking hand taps melody or solo lines, creating complex textures.
STRUMMING GUITAR NOTES
When strumming chords on a guitar, two fundamental strumming directions are used: downstrokes and upstrokes.
Downstrokes begin on the lower-pitched strings and proceed towards the higher-pitched strings using a downward motion of the pick. In guitar tabs, downstrokes are symbolized by a thick horizontal line with two short “legs” pointing downwards on either side of the line.
Upstrokes are the opposite, starting on the higher-pitched strings and moving towards the lower-pitched strings with an upward pick motion. In guitar tablature, upstrokes are notated by a “V” shaped symbol.
HOW TO STRUM GUITAR NOTES
Various strumming patterns are employed when playing chords, dictated by the rhythmic feel of the song. You can use a consistent downstroke and upstroke pattern, or combine them in numerous variations. Songs with an eighth-note rhythm are often counted as: “one, and, two, and, three, and, four, and…” Many songs utilize alternating upstrokes and downstrokes in eighth-note rhythms, with downstrokes typically falling on the numbered beats (1, 2, 3, 4) and upstrokes on the “ands.”
GUITAR TECHNIQUE: PLAYING DOWNSTROKES AND UPSTROKES
The same downstroke and upstroke notations are applied even when playing single notes in guitar tabs. A downstroke is indicated by the thick horizontal bar with “legs” pointing down, signifying a downward motion of the pick as you play the note. Conversely, upstrokes are marked with a “V” above the note, representing an upward motion of the pick.
READY TO LEARN OTHER GUITAR TECHNIQUES?
Now that you’ve learned how to read tabs for guitar and explored a range of guitar techniques, you’re well-equipped to start playing! From absolute beginners to advanced players, School of Rock has a proven track record of guiding thousands of students to play guitar and reach their musical potential. From basic strumming to advanced tapping, our experienced instructors possess the knowledge to help you quickly learn your favorite rock songs and perform them onstage.
Ready to find guitar tabs and start playing? School of Rock provides resources for all levels, from easy songs for beginners to challenging pieces for experienced musicians. Our students enjoy unlimited access to a vast, high-quality sheet music library through Sheet Music Direct.
Thinking of purchasing a new guitar? Explore our helpful Guitar Buying Guide