Have you ever wanted to capture the world around you on paper? Many believe that drawing is a skill reserved for the talented few, but the truth is, anyone can Learn How To Sketch. It’s less about innate talent and more about learning fundamental techniques and dedicating time to practice. If you have the desire to learn, you absolutely can develop your sketching abilities. This guide will walk you through simple steps to get you started, proving that you can learn to draw anything with the right approach and consistent effort.
1. Warm Up + Practice Hand-Eye Coordination
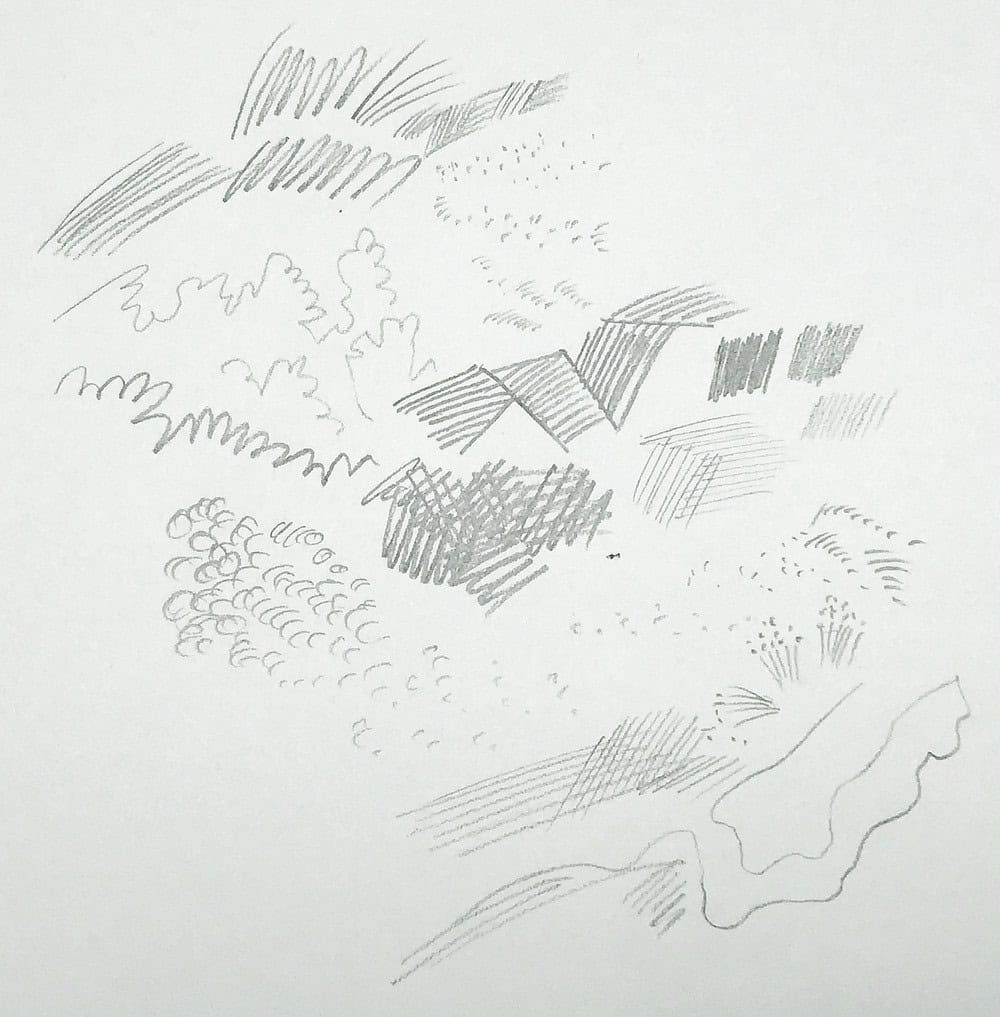
Before diving into complex drawings, it’s essential to warm up your hand and mind. Just like athletes warm up their muscles, artists need to prepare their hands and sharpen their focus. A warm-up helps you become comfortable with your drawing tools and connect your thoughts to the paper. Experimenting with different marks will also reveal the range of expression your pen or pencil can achieve.
Grab your pencil and start making various marks. Explore the possibilities of line work. Create scribbles, doodle freely, experiment with dots, stipples, hatching, and zig-zag lines. Vary the pressure you apply to your tool and observe the different effects. The key is to keep this stage enjoyable and playful, as this will encourage you to practice consistently.
To further enhance your warm-up, let’s train your hand-eye coordination. Practice drawing straight and curved lines of different lengths. Don’t aim for perfection; this is still just a warm-up. Next, draw round shapes like circles and ellipses, and try loose, flowing shapes like figure eights. Vary the size of these shapes and the pressure of your pencil. Experiment with drawing using your entire arm – locking your elbow and wrist and moving from your shoulder joint. Notice how this changes the smoothness of your arcs. Fill a page with these exercises. Remember to keep it light and fun. If you feel bored, take a break. The goal is to notice how your hand feels afterward – are you becoming more comfortable with your pencil?
Incorporating these simple warm-ups at the beginning of each drawing session can significantly improve the smoothness of your lines. For beginners especially, these exercises are invaluable for loosening up and gaining better pencil control, which are foundational skills in learning how to sketch.
2. Start with Basic Shapes + Light Lines
Now that you’re warmed up, let’s delve into the core principle of drawing: breaking down complex subjects into basic shapes. Fundamentally, everything you want to draw can be simplified into circles, rectangles, and triangles. If you can master drawing these basic geometrical shapes, and most people can, you possess the building blocks to draw virtually anything.
How does this work in practice? When you observe an object, your task is to visually dissect it and identify the underlying basic shapes. Whether you’re looking at a rose, a house, or a bird, try to see how it can be reduced to these simpler forms. It’s much easier to start with a circle and a line and then refine them, rather than immediately trying to capture the complexity of a flower or an animal in its entirety.
Use these basic shapes as a loose underdrawing. Begin with very light lines and rough shapes. This initial layer is meant to establish proportions and create a solid foundation to build upon. Refinement into more specific structures and defined shapes will come in the subsequent steps. At this stage, focus on getting the overall proportions correct and creating a workable underdrawing. Don’t worry about perfect lines, shadows, or details just yet – those elements will be added later.
These gestural drawings, characterized by their looseness and spontaneity, are excellent for warm-ups and for quickly capturing the essence of a subject on paper. They are a crucial step when you learn how to sketch effectively.
3. Refine, Check Angles and Edges, Add Solid Lines, and Volume to Your Drawing
Building on your initial sketch with basic shapes, the next step is refinement. This involves defining your drawing with a solid outline. Remember, observation is just as important as the act of drawing itself. Learning to see is a critical part of learning to draw.
Using your gesture drawing as a guide, carefully examine the angles and edges of your subject in relation to your sketch. Identify areas that need adjustment. Pay close attention to the angles, shapes, and curves of your subject’s contour. Trace the outline with your eyes, and be mindful of the proportions you’ve already established. Are they accurate? If not, make corrections now. Again, observe intently before making each line. Truly notice the subject’s appearance before committing to a line on paper. Draw what you actually see, not what you think you see or what you expect to see.
You can use your pencil as a measuring tool to help gauge angles. By aligning your pencil with an angle on your subject, you can more easily translate that angle to your drawing.
Often, your initial exploratory stage will involve drawing several loose lines. Now is the time to choose the most accurate contour line and define it with a solid, confident stroke. Strive to accurately represent what you observe in front of you.
4. Do Lots of Loose Quick Sketches
Before moving towards finishing touches, take a step back and engage in a practice that’s incredibly beneficial for skill development: creating numerous quick sketches. At this point, you have a basic framework built from shapes, refined with contours and angles. This is a good foundation.
To solidify your understanding and improve your hand-eye coordination, choose an object and draw it repeatedly in quick, gestural sketches from various angles. The aim is to reach a point where the process feels fluid – where you can effortlessly perceive a line and translate it onto paper. This fluidity takes time and practice, but it’s essential for becoming comfortable with hand-eye coordination, a core skill when you learn how to sketch. Focus on quantity over quality at this stage; create many quick drawings rather than striving for one perfect piece. For effective practice, shorter, more frequent sessions spread over several days are generally more effective than one long session per week.
These fundamental exercises may seem simple, even mundane, but they are truly the cornerstone of learning how to draw. With consistent practice, these techniques will become second nature, and you’ll find yourself applying them almost instinctively.
5. Focus, Contrast, Details
Now comes the exciting part: adding the finishing touches to make your sketch more complete and visually engaging. However, it’s crucial to ensure your basic framework and proportions are accurate before proceeding to this stage. If they aren’t, it’s better to start a new drawing or correct the existing one. Don’t hesitate to begin anew if necessary.
In this step, you’ll introduce contrast by adding light and dark areas, and incorporate details such as textures in select spots. Each of these elements – contrast, light and shadow, and texture – are techniques in themselves that can be further explored. However, a key tip is to avoid overdoing the details. Strategically place details and textures in just a few areas to guide the viewer’s eye and create focal points.
Recall the mark-making exercises from your warm-up. Remember the variety of marks and lines your pencil can create: dots, lines, hatching, broken lines, varied line weights. Consider what kind of texture would best represent your subject and add these details sparingly.
The same principle of moderation applies to contrast and shadows. Introduce darker areas to suggest volume and depth, but avoid overworking your sketch. It’s tempting to keep adding more, but often, just a few well-placed accents are sufficient. To help visualize values for shadows, try squinting slightly; this will simplify the scene and make it easier to see the areas of light and shadow.
6. Practice Over and Over, Learn from Your Mistakes
Essentially, the drawing process boils down to these steps:
- Begin with basic shapes and light lines, focusing on correct proportions.
- Refine lines, check angles, and establish solid outlines.
- Add details, textures, shadows, and highlights.
These are the fundamental steps to learn how to sketch. The key to improvement is consistent practice. You need to put in the “pencil miles” until these processes become ingrained and automatic. Develop a regular practice habit by setting reminders or integrating sketching into your daily routine.
A crucial aspect of learning is embracing mistakes. They are inevitable and are an integral part of the learning journey. Don’t get discouraged by mistakes; instead, view them as learning opportunities that will inform and improve your next drawing. It’s natural to want immediate proficiency, but developing hand skills and visual understanding takes time. Muscle memory needs to be built, and this involves working through errors. So, try to shift your perspective on mistakes – they are not setbacks but stepping stones on your path to becoming a better sketcher. Even masters like Leonardo da Vinci went through a learning process filled with errors. Embrace them; they are a normal and helpful part of your artistic development.
7. Deepen Your Knowledge and Learn More Advanced Concepts
This guide provides a strong starting point and will undoubtedly provide you with ample material to practice and develop your skills.
When you feel ready to advance further, there’s a wealth of more sophisticated drawing techniques and concepts to explore. Learning about visualizing in 3D volumes, understanding perspective, mastering values, light and shadow, and foreshortening will significantly enhance your abilities and enable you to create more complete and compelling drawings.
For those seeking a structured approach to understanding and applying these advanced concepts, consider exploring courses like “Sketching Fundamentals”. Such courses offer step-by-step guidance and teach the core principles of drawing in depth.
These courses are designed to teach you how to draw anything, with a particular focus on the natural world. Many offer options for guided learning with personalized feedback, as well as self-paced versions for independent study.
Explore resources like the “Sketching Fundamentals course” to further your drawing education.
(Optional: Image for PDF guide – could be placed at the end or integrated within content)