If you’ve always dreamed of playing music and decided to Learn Keyboard, you’re in the right place! Starting your musical journey can be incredibly rewarding, and the keyboard is a fantastic instrument for beginners. You don’t necessarily need expensive in-person lessons to get started. This guide provides beginner keyboard lessons, covering essential first steps, from understanding key positions and chords to developing good practice habits and hand placement. Let’s lay a solid foundation for your exciting keyboard adventure!
Understanding the Keyboard Keys: Notes and Octaves
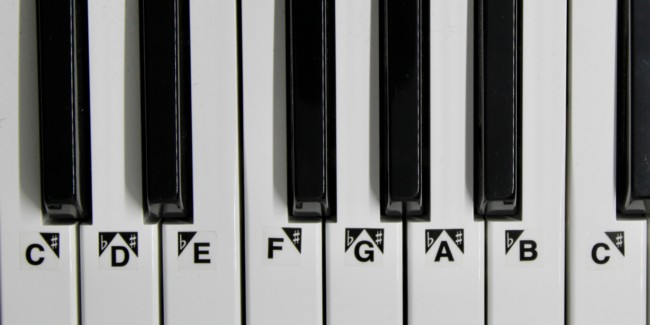
The first step in learning keyboard is familiarizing yourself with the keys. Each key represents a musical note, identified by letters A through G. These notes are the building blocks of music, and understanding their placement on the keyboard is crucial for reading music and playing songs.
A standard keyboard is organized into octaves. An octave is a repeating set of 12 keys: 7 white keys and 5 black keys.
- White Keys: These represent the natural notes – A, B, C, D, E, F, and G.
- Black Keys: These are sharps and flats, representing notes in between the white keys. A black key is either a semitone (half step) higher or lower than the white key next to it.
Within each octave, you’ll notice a pattern in the black keys: groups of two and groups of three. These black keys, sharps (♯) and flats (♭), add richness and complexity to music.
Learning the names of the keys is fundamental to reading sheet music and chord charts. The quicker you memorize these, the faster you’ll be able to translate written music into played notes. A helpful initial exercise is labeling the keys. Here’s a simple method to identify each white key:
- Locate a group of two black keys on your keyboard.
- The white key immediately to the left of this group is C.
- Moving to the right, the subsequent white keys are D, E, F, and G.
- After G, you’ll find A and B.
- The pattern then repeats, starting again with C.
By consistently finding the groups of two black keys, you can easily locate any C note on the keyboard. Notes to the right of any given key are higher in pitch, while notes to the left are lower. The ‘C’ that’s roughly in the middle of your keyboard is known as Middle C, a common reference point in music.
Delving into Chords: Harmony at Your Fingertips
Beyond individual notes, chords are essential for creating music. Chords are groups of notes played simultaneously, adding depth and harmony to melodies. Understanding scales and chords is the next step in your journey to learn keyboard.
Scales are ordered sequences of notes within an octave, defining the tonality of a piece of music. Major scales are frequently used and have a characteristic bright and cheerful sound. Here are the most common major scales:
- A Major: A, B, C♯, D, E, F♯, G♯, A
- B Major: B, C♯, D♯, E, F♯, G♯, A♯, B
- C Major: C, D, E, F, G, A, B, C
- D Major: D, E, F♯, G, A, B, C♯, D
- E Major: E, F♯, G♯, A, B, C♯, D♯, E
- F Major: F, G, A, B♭, C, D, E, F
- G Major: G, A, B, C, D, E, F♯, G
A chord typically consists of three notes played together, known as a triad. These three notes are derived from a scale:
- Root Note: The foundation of the chord, it’s the first note of the scale and gives the chord its name.
- Third Note: The third note in the scale (for major chords, it’s a major third interval from the root).
- Fifth Note: The fifth note of the scale (a perfect fifth interval from the root).
There are various types of chords, including major and minor chords. Minor chords are often described as sounding sadder or more melancholic compared to major chords. Minor chords are created by lowering the third note of a major chord by a half step (semitone).
Chord sheets and sheet music use notations to indicate which chords to play. Often, keyboard players use their left hand to play chords while the right hand plays the melody.
Mastering Hand and Finger Position: Building Technique
Correct hand and finger positioning is as vital as music theory when you learn keyboard. Developing proper hand placement from the beginning will accelerate your learning and prevent bad habits. Correct posture allows for efficient finger movement and reaching notes across the keyboard. Many keyboard exercises and sheet music include finger number indications to guide your playing.
First, let’s understand finger numbering. With your hands palm-down, number your fingers from 1 to 5, starting with your thumb as number 1 and ending with your pinky as number 5. This numbering system is universally used in keyboard music.
Keyboard exercises help you develop finger strength, dexterity, and comfort in pressing the keys. Here are a couple of essential exercises to get you started:
Exercise 1: Five-Finger Exercise
- Place your right hand on the keyboard with your thumb (finger 1) on Middle C.
- Play C with finger 1, D with finger 2, E with finger 3, F with finger 4, and G with finger 5, moving upwards.
- As you play each note, say its name aloud to reinforce note recognition.
- Reverse the sequence, playing downwards from G back to Middle C.
- Repeat the same exercise with your left hand, playing downwards from Middle C and then back up.
- To progress, shift your right hand one white key to the right, starting with your thumb on D, and repeat the five-finger pattern. Continue moving up the keyboard, starting on each white key within an octave.
Practice this exercise with both hands across different octaves. As you become more comfortable, gradually increase the tempo. However, maintain proper form throughout:
- Curved Fingers: Keep your fingers naturally curved over the keys.
- Relaxed Wrist: Avoid tension in your wrists; keep them flexible.
- Aligned Wrists and Elbows: Ensure your pinkies, wrists, and elbows are roughly in a straight line for optimal posture.
- Relaxed Shoulders: Keep your shoulders relaxed and avoid hunching.
Exercise 2: Scale Practice
Practicing scales is another fundamental keyboard lesson for beginners. Scales build finger dexterity, familiarize you with key signatures, and improve coordination. Using the C major scale as an example (C to C), use the following finger pattern:
Ascending (C to C): 1 (C) – 2 (D) – 3 (E) – 1 (F) – 2 (G) – 3 (A) – 4 (B) – 5 (C)
Notice how the thumb tucks under after the third finger to continue the scale. Practice this pattern ascending and descending with both hands. This exercise enhances finger independence and speed.
Developing Coordination Between Left and Right Hands
A hallmark of skilled keyboard playing is the ability to coordinate both hands independently. Often, the left hand plays chords or bass lines while the right hand handles melodies. Developing this independence is crucial.
Start by practicing the C major scale with both hands moving in opposite directions.
- Right hand starts on Middle C and plays the ascending C major scale.
- Left hand starts on Middle C and plays the descending C major scale.
- Both hands play simultaneously, moving towards each other and then back to Middle C.
Once comfortable with opposite directions, practice playing the scale with both hands moving in the same direction:
- Right hand starts on Middle C with the thumb (finger 1).
- Left hand starts an octave lower than Middle C with the pinky (finger 5).
- Both hands play the ascending C major scale simultaneously.
- The left-hand fingering for ascending will be: 5 – 4 – 3 – 2 – 1 – 3 – 2 – 1, ending with the left thumb on Middle C.
- Practice ascending and descending in this manner.
For further exercises and beginner keyboard lessons, explore resources like “Best Piano Books for Beginners” which offer structured lessons and practice material for developing hand coordination.
If you’re still choosing your first instrument, our guide on the “Best Keyboard Piano for Beginners” can help you select a suitable keyboard. It covers essential features for beginner keyboards and reviews various models.
Learning keyboard is an exciting and fulfilling journey. Consistent practice and a structured approach will set you on the path to musical enjoyment. Do you have more questions as you begin your keyboard career? Leave a comment below!
FAQs
How can I teach myself to play keyboard?
To learn keyboard on your own, first acquire a keyboard for practice. Familiarize yourself with the note names (A-G) and sharps/flats. Regularly practice scales, focusing on correct posture and hand position. Utilize online resources, apps, and beginner books for structured lessons and exercises. Consistent daily practice is key to self-teaching.
What should a beginner in piano learn?
A beginner pianist should start by getting comfortable with the instrument. Learn to identify and label keys, understand finger numbering, and practice correct hand positions. Master the C major scale and practice it until you can play it smoothly without looking at your hands or thinking about finger numbers. Basic music theory, including notes and rhythm, is also essential.
Is piano hard to learn?
Learning piano can be challenging, but the perceived difficulty largely depends on your practice commitment. Consistent practice is crucial for developing muscle memory, hand coordination, and familiarity with music theory. Daily practice leads to faster progress and makes many aspects of playing easier over time. Like any skill, dedication and persistence are key to success in learning piano.