Embarking on the journey of learning to draw as an adult can be incredibly rewarding. Contrary to common misconceptions, artistic talent isn’t a prerequisite for sketching and drawing. With the right guidance, consistent practice, and a genuine desire to learn, anyone can develop impressive drawing skills. This guide, brought to you by learns.edu.vn, your trusted resource for educational content, will provide you with a simple yet effective roadmap to Learn To Draw For Adults, even if you’re starting from absolute zero.
Many adults feel intimidated by drawing, believing it’s a skill reserved for the naturally gifted. However, drawing is fundamentally about understanding and applying basic techniques, much like learning any other skill. Our approach at learns.edu.vn is rooted in the belief that everyone can learn to draw. By mastering fundamental concepts and dedicating time to regular practice, you can achieve a level of proficiency you might not have thought possible. Let’s explore the essential steps to get you started on your drawing journey.
1. Warm-up and Hand-Eye Coordination Exercises
Just as athletes warm up their muscles before exercise, artists need to prepare their hands and minds for drawing. A warm-up routine helps you become comfortable with your drawing tools and establish a connection between your hand and eye. Engaging in mark-making exercises is an excellent way to loosen up your drawing muscles and focus your attention on the task at hand.
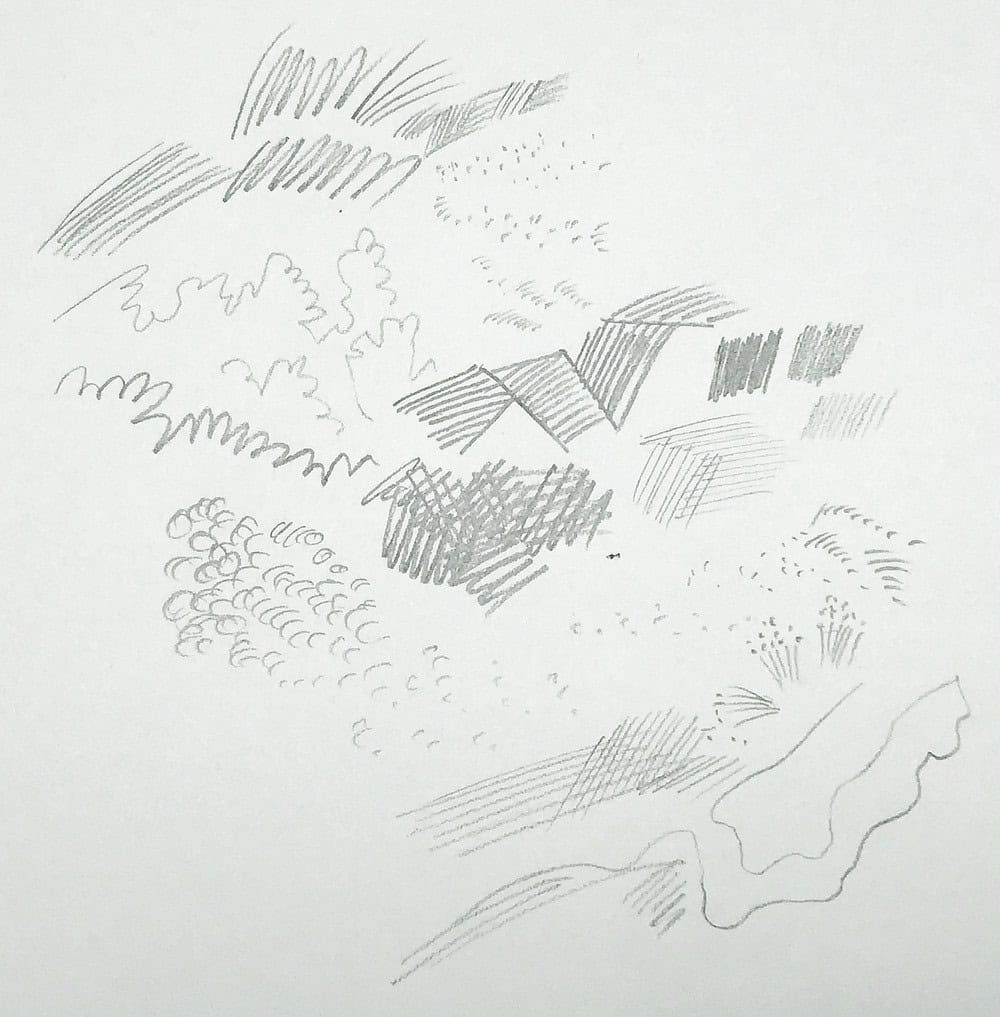
Take a pencil or pen and experiment with various marks. Explore the diverse possibilities of linework. Create scribbles, doodles, dots, stipples, hatching, and zig-zag lines. Experiment with different levels of pressure to observe how it affects your marks. The key is to make this stage enjoyable and playful. Drawing should be a fun and engaging activity; otherwise, it becomes difficult to maintain consistency in your practice.
To further enhance your preparation, dedicate some time to hand-eye coordination exercises. Using your pencil, practice drawing straight and curved lines of varying lengths. Don’t strive for perfection at this stage; it’s simply a warm-up. Next, practice drawing round shapes such as circles and ellipses, followed by loose, flowing shapes like figure eights. Vary the size and pressure as you draw. Experiment with drawing from your shoulder, keeping your elbow and wrist relatively still. Notice how moving your entire arm from the shoulder joint affects the smoothness of your arcs. Fill a page with these explorations, keeping the process light and enjoyable. If boredom sets in, take a break. The goal is to notice how your hand feels afterward. Do you feel more at ease with the pencil?
Incorporating these warm-up exercises at the beginning of each drawing session can significantly improve the fluidity of your linework. For adult beginners, these exercises are particularly beneficial for developing pencil control and easing into the drawing process.
2. Mastering Basic Shapes with Light Linework
After warming up, we can delve into the fundamental building blocks of drawing: basic shapes. All complex forms, regardless of how intricate they appear, can be broken down into combinations of simple geometric shapes. These primary shapes are circles (which you’ve already practiced in the warm-up), rectangles, and triangles. If you can confidently draw these basic shapes, you possess the foundational skill to draw virtually anything.
The process involves observing an object and mentally dissecting it into these manageable basic shapes. Whether you’re looking at a flower, a house, or an animal, train your eye to identify the underlying geometric forms. For instance, instead of being overwhelmed by the complexity of a rose, try to see it as a series of overlapping circles and curved lines. It’s far simpler to begin with a circle and gradually refine it into a flower than to attempt to replicate the entire flower in one go.
Use these basic shapes to create a loose preliminary sketch, often referred to as an underdrawing. Start with very light lines and approximate shapes. This initial stage focuses on capturing the overall proportions and structure of your subject. Refinement into more specific and defined shapes will come in the subsequent steps. At this point, don’t worry about perfect lines, shading, or intricate details. The primary objective is to establish a solid foundation to build upon.
These initial gestural drawings are often characterized by their looseness and spontaneity. They are excellent for warm-ups and for quickly capturing the essence of a subject on paper, helping you to learn to draw for adults in an accessible way.
3. Refining Contours, Angles, and Adding Solid Lines and Volume
The next crucial step involves refining your initial sketch by defining solid outlines and paying close attention to angles and edges. Effective drawing is as much about keen observation and learning to see as it is about physically making marks on paper. In fact, sharpening your observational skills is paramount to improving your drawing abilities.
Using your gesture drawing as a starting point, carefully compare the angles and edges in your drawing to your actual subject. Identify areas that require adjustment. Meticulously observe the angles, shapes, and curves of your subject. Trace the contours with your eyes, paying attention to the proportions you’ve already established. Are they accurate representations of what you are observing? If not, make corrections at this stage. Remember, close observation precedes accurate lines. Draw what you truly see, not what you think you see or what you assume should be there.
Utilize your pencil as a measuring tool to aid in angle accuracy. By aligning your pencil with an angle on your subject, you can more easily transfer that angle to your drawing paper.
During the initial exploratory phase, you might have drawn several tentative lines. Now, it’s time to commit to a single contour line and define it with a more solid, confident stroke. Strive to faithfully represent what you observe in front of you, enhancing your skills to learn to draw for adults through careful practice.
4. Practice with Numerous Quick Sketches
Before moving towards finalizing a drawing, it’s beneficial to take a step back and engage in a series of quick sketches. This practice phase is vital for solidifying the techniques you’ve learned. Select a simple object and draw it repeatedly from various angles, focusing on capturing its essence through rapid, gestural sketches.
The aim is to develop a fluid connection between your eye and hand, where translating visual information onto paper becomes almost effortless. This fluency takes time and consistent effort to develop, but it’s a cornerstone of drawing proficiency. At this stage, prioritize quantity over quality. Create many quick drawings rather than laboring over a single, “perfect” piece. For effective practice, shorter, more frequent sessions spread across several days are generally more effective than one long, infrequent drawing session.
While these foundational exercises might seem basic, they are indispensable for learning how to draw. With consistent practice, these techniques will become second nature, operating almost subconsciously, paving your path to learn to draw for adults effectively.
5. Focus, Contrast, and Detail Enhancement
Now, let’s address how to bring your drawings to a more finished state. At this point, you’ll want to refine your sketch, adding a sense of completeness and polish. However, it’s crucial to ensure your basic framework and proportions are accurate before proceeding to this stage. If not, it’s perfectly acceptable to start a new drawing or correct the existing one. Don’t hesitate to begin anew; sometimes, a fresh start is the most efficient way forward.
This step involves incorporating contrast, light and dark areas, and selective details, such as textures. Each of these elements—contrast, shading, and texture—are advanced techniques that can be further explored and practiced individually. However, a key principle here is restraint. Avoid overdoing details. Instead, strategically place detailed textures in a few key areas to guide the viewer’s eye and create visual interest.
Recall the mark-making exercises from the warm-up. Remember the variety of marks and lines your pencil can create – dots, lines, hatching, broken lines, varied line weights. Consider the type of texture that would best represent your subject and add details sparingly, focusing on specific areas rather than applying them uniformly across the drawing.
The same principle of selective application applies to contrast and shadows. Introduce darker areas to suggest volume and depth, but avoid overworking the shadows. It’s tempting to keep adding details and shading, but often, just a few well-placed accents are sufficient to create a compelling drawing. To simplify the process of observing values for shadows, try squinting slightly; this helps to reduce detail and makes the tonal values more apparent.
6. Consistent Practice and Learning from Mistakes
The drawing process we’ve outlined can be summarized into these core steps:
- Begin with basic shapes and light lines, focusing on accurate proportions.
- Refine lines, check angles, and establish solid outlines.
- Add details, textures, shadows, and highlights to finish.
These steps, while simple, are the foundation of drawing. The secret to improvement lies in consistent practice. You need to accumulate “pencil miles”—dedicate significant time to drawing—until these processes become intuitive. Establish a regular practice schedule and use reminders to maintain consistency.
Regarding mistakes, they are an inevitable and valuable part of the learning process. Don’t be discouraged by errors; instead, view them as opportunities for learning and improvement. While it’s natural to desire immediate proficiency, developing drawing skills requires time for your hand to internalize these concepts and build muscle memory. Embrace mistakes as feedback that guides you towards better drawings. Even master artists like Leonardo da Vinci went through a learning process filled with errors. So, accept mistakes as a normal part of your journey to learn to draw for adults; they are stepping stones to becoming a more skilled artist.
7. Deepening Knowledge and Exploring Advanced Concepts
This guide provides a solid starting point and offers ample material for practice and initial skill development. However, to truly excel and achieve advanced drawing capabilities, further learning and exploration are essential.
Numerous advanced drawing techniques and concepts can significantly enhance your skills. Understanding and applying principles such as perceiving in 3D volumes, perspective, values, light and shadow, and foreshortening will enable you to create more realistic and sophisticated drawings.
For those seeking a structured approach to mastering these advanced concepts and developing well-rounded drawing skills, consider exploring comprehensive drawing courses. Resources like the “Sketching Fundamentals” course available at Sketching Fundamentals course offer in-depth instruction and guidance.
Such courses typically cover how to draw a wide range of subjects, often with a focus on the natural world, and provide step-by-step instruction on fundamental drawing principles. These courses may be available in guided formats with personalized feedback or self-paced options for independent learning. Investing in further education is a worthwhile step for adults serious about learning to draw and reaching their full potential.