Have you ever considered the ground beneath your feet as a source of creativity? For those in Georgia with a spark for pottery and a curiosity about natural materials, the answer might be closer than you think. Working with backyard clay, especially Georgia’s rich earth, is a rewarding journey that connects you to the land and the ancient art of pottery. Many potters, even seasoned ones, often overlook the incredible resource of wild clay, unaware of its abundance and the straightforward process of transforming it into usable material. This guide is your definitive starting point for learning how to identify, process, and ultimately, work with the clay you can find right in your own Georgia backyard.
Clay in its Natural State: Key Visual Clues
Identifying clay in nature is the first step in this exciting endeavor. Clay possesses unique visual characteristics that make it stand out to the observant eye:
- Crackled texture when dry
- Hard, angular chunks when dry
- Soft, plastic texture when wet
Building upon previous explorations of clay locations, this article focuses on honing your identification skills and processing techniques. While we’ve previously discussed ideal places to find clay, here, we’ll equip you to recognize clay in various environments and transform it into pottery-ready material. For those eager to delve deeper and visually experience each step of finding and processing native clay, consider exploring resources like online classes dedicated to wild clay, where you can gain comprehensive knowledge and personalized guidance.
Spotting Clay in the Georgia Landscape
Whether you’re hiking through Georgia’s diverse terrains or simply exploring your own backyard, keeping an eye out for clay is key. Equip yourself with a small digging tool like a garden trowel or a mason’s hammer for sample collection. For efficient exploration, zipper bags are excellent for collecting samples from different locations, allowing you to label and track each find. Don’t forget a notebook and pen or your phone to record detailed notes about each location. This meticulous approach will be invaluable when you begin testing and processing your gathered clay.
Deciphering Clay’s Natural Characteristics
Mastering the visual cues of clay is crucial for successful identification. Let’s explore these characteristics in detail:
The Tell-Tale Crackle of Dry Clay
The crackled surface is a strong indicator of clay presence beneath the surface. Think of dried mud puddles – the cracked patterns you see are a result of clay content. Clay is “expansive,” meaning it expands when wet and contracts as it dries. This expansion and contraction cause the characteristic crackling as the clay shrinks and fractures upon drying. Spotting this crackled texture is a prime indicator of clay-rich soil that could be suitable for pottery.
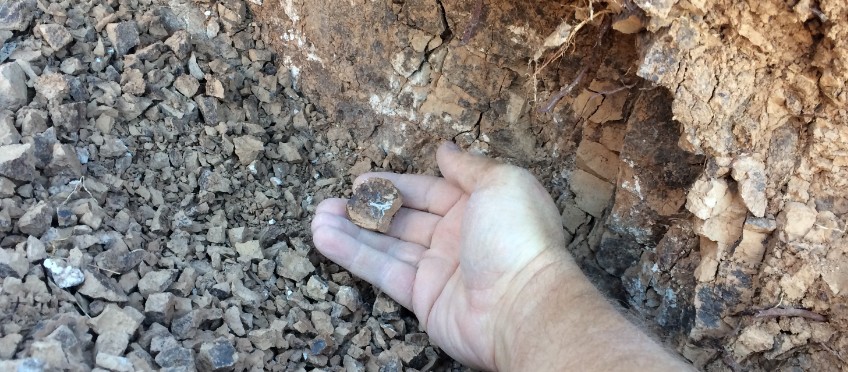
Hard, Angular Chunks: Nature’s Building Blocks
When dry and in the ground, clay often solidifies into hard, angular chunks, sometimes displaying a patina from mineral leaching over time. Clay frequently dries into hard, angular chunks, approaching the hardness of rocks but distinguishable by a slightly waxy or soapy feel. This is particularly noticeable in areas where underground clay deposits are exposed, such as road cuttings or stream banks common in Georgia’s varied landscapes. These angular chunks can sometimes exhibit a darker patina on certain surfaces, a testament to the long-term effects of wetting and drying cycles that leach minerals into the clay’s fractures over centuries.
The Plastic Promise of Wet Clay
Wet clay reveals its identity through its distinctive soft, plastic consistency. Clay becomes significantly easier to recognize when wet, exhibiting the soft, pliable texture we associate with it. When walking on damp ground, be attentive to slick or sticky patches – these often signal clay deposits underneath. In areas that have recently been wet, look for deep tire tracks or footprints, telltale signs of people or vehicles having traversed clay-rich soil, further indicating potential clay sources in your Georgia backyard or local environment.
Backyard Clay Field Test: The Plasticity Check
When you encounter a material that you suspect might be clay, but you’re unsure, conducting a plasticity test is the next logical step. Plasticity, the ability of clay to be molded and retain its shape, is a key characteristic for pottery. To test plasticity, simply moisten the clay if it’s dry. Wetting dry natural clay is usually straightforward – pour water onto a sample in your hand and begin kneading it. You might need to knead for a few minutes or re-wet it to achieve the right consistency, as each clay type behaves slightly differently. Once thoroughly wet, attempt to roll a small coil of clay in your hands. Then, carefully bend the coil around your finger. If it cracks easily, the clay may lack sufficient plasticity. However, if it bends smoothly around your finger without cracking, it likely possesses good plasticity.
A clay that can form a coil and bend without cracking is a promising candidate for pottery. If your clay passes this test, collect a larger sample to take home and experiment with. Consider sharing a small portion with fellow pottery enthusiasts – the joy of discovering local clay is best when shared!
Processing Your Georgia Backyard Clay
Having successfully located and identified clay, the next exciting stage is processing it into a workable state for pottery. The true test of your clay’s suitability lies in creating something with it. Dry processing is an efficient method to quickly prepare your wild clay for use.
Dry Processing Natural Clay: A Simple Method
Ensure your clay is completely dry before processing. If it’s damp, allow it to air dry in a sheltered location for a few days. Alternatively, you can expedite drying by spreading it thinly on a cookie sheet and placing it in a low-temperature oven for a couple of hours. Rest assured, a standard oven won’t reach temperatures high enough to fire the clay into ceramic.
Once thoroughly dry, the next step is to grind the clay. A simple method is to pound it on a concrete surface like a patio or driveway using a hammer or a sturdy rock. The goal is to reduce the clay to a sand-like consistency, not as fine as baby powder.
After grinding, incorporate approximately 20% sand into the clay and mix it thoroughly. Why add sand? Sand acts as a crucial “opening” agent, increasing the clay’s porosity. This enhanced porosity facilitates moisture evaporation, which is essential for preventing cracks during the drying process of your pottery. A 20% sand addition can be easily achieved using a 4:1 ratio – four parts ground clay to one part sand. While 20% is a good starting point, feel free to experiment with different ratios to find the optimal blend for your specific clay.
Now, you’re ready to rehydrate your clay. Gradually add water, kneading continuously to ensure even mixing. Continue adding water until the clay reaches a desirable plastic consistency. Achieving the perfect consistency can be a bit of an art, especially for those new to working with clay. Too much water will result in overly sticky and gloopy clay, while too little will make it crumbly and prone to cracking.
Next Steps: From Backyard Clay to Finished Piece
While this guide focuses on finding and processing clay, firing is the essential final step in transforming your backyard clay into pottery. If you’re interested in primitive firing techniques, resources are available to guide you through firing pottery without a kiln.
For those planning to fire in an electric kiln, caution is advised. Since the firing temperature tolerance of wild clay is unknown, start with low firing temperatures and gradually increase in subsequent firings. To safeguard your kiln, place your wild clay creation in a bowl or on a tile made from commercially prepared clay known to withstand high temperatures. This precaution will contain any potential melting and prevent damage to your kiln.
Expanding Your Clay Knowledge
This article provides a solid foundation for learning to work with backyard clay in Georgia, but there’s always more to discover. For a more in-depth exploration of finding, processing, and utilizing wild clay, consider seeking out video-based online classes dedicated to this topic. These resources offer a comprehensive learning experience and often include opportunities for direct interaction and personalized guidance. Additionally, online video platforms can be valuable resources, showcasing practical demonstrations of finding and processing wild clays.
If you have any questions or insights to share about your experiences with backyard clay, please leave a comment below. Your contributions enrich the learning community, and your questions will be addressed to further your journey into the world of natural clay pottery.