Can You Learn The Splits As An Adult? Absolutely, with consistent practice and the right approach, most adults can achieve the splits. At LEARNS.EDU.VN, we believe flexibility is attainable at any age. This guide will provide you with the knowledge and techniques to safely and effectively work towards your flexibility goals, incorporating stretches for flexibility, a flexibility training program and tips for improved flexibility. Whether you’re interested in gymnastics flexibility, dance flexibility or simply increasing your overall range of motion, you’ll find valuable insights here.
1. Understanding the Possibility of Achieving Splits as an Adult
Many adults wonder, “Can I still learn to do the splits?” The answer is a resounding yes. While it’s generally easier for children due to their higher natural flexibility, adults can certainly achieve the splits with dedication and a structured approach. Keep in mind that adult flexibility training requires patience, consistency, and awareness of your body’s limitations.
1.1. Flexibility and Age
Flexibility tends to decrease with age due to factors like reduced collagen elasticity and decreased physical activity. However, this doesn’t mean adults can’t improve their flexibility. With targeted exercises and a consistent stretching routine, significant progress is possible. A study published in the “Journal of Gerontology” found that regular stretching exercises can improve flexibility in older adults, highlighting the importance of a well-designed flexibility program.
1.2. Factors Influencing Flexibility
Several factors influence an individual’s flexibility, including:
- Genetics: Some people are naturally more flexible than others.
- Age: Flexibility tends to decrease with age.
- Gender: Women tend to be more flexible than men.
- Activity Level: Regular physical activity and stretching can improve flexibility.
- Injuries: Previous injuries can limit range of motion.
- Body Composition: Excess body fat can restrict movement.
1.3. Setting Realistic Goals
It’s important to set realistic goals when starting your splits journey. Don’t expect to achieve the splits overnight. Gradual progress is key to preventing injuries and staying motivated. Start with achievable milestones and celebrate your progress along the way. According to the American Academy of Orthopaedic Surgeons, setting small, achievable goals is crucial for maintaining motivation and preventing discouragement.
2. Assessing Your Current Flexibility Level
Before starting any flexibility training program, it’s essential to assess your current flexibility level. This will help you understand your starting point and track your progress. Here are a few simple tests you can perform at home:
2.1. Hamstring Flexibility Test (Toe Touch Test)
- Stand with your feet together and legs straight.
- Slowly bend forward from your hips, keeping your back straight.
- Reach towards your toes.
Interpretation:
- Fingertips reach past toes: Good hamstring flexibility.
- Fingertips reach toes: Average hamstring flexibility.
- Fingertips reach shins: Below average hamstring flexibility.
- Fingertips reach knees or above: Poor hamstring flexibility.
2.2. Hip Flexor Flexibility Test (Thomas Test)
- Sit on the edge of a table or bed.
- Lie back, bringing both knees towards your chest.
- Let one leg hang down towards the floor.
Interpretation:
- Thigh rests parallel to the table: Good hip flexor flexibility.
- Thigh is elevated above the table: Tight hip flexors.
2.3. Shoulder Flexibility Test (Back Scratch Test)
- Reach one arm over your shoulder and down your back.
- Reach the other arm up your back from below.
- Try to touch your fingers together.
Interpretation:
- Fingers overlap: Good shoulder flexibility.
- Fingers touch: Average shoulder flexibility.
- Fingers close but don’t touch: Below average shoulder flexibility.
- Fingers far apart: Poor shoulder flexibility.
2.4. Side Split Test
- Stand next to a chair or table and put your leg on it.
- Make sure that both of your hips are in one line with the leg that’s raised.
- Repeat this test with the other leg.
If you can do these then you have technically done the “half splits” on both sides! Thus, you don’t need to be naturally flexible or in shape to start your training.
Please note that you should check with a healthcare professional first if you’ve had any kind of hamstring injury or have concerns about achieving this level of flexibility. Doing the splits isn’t for everyone!
3. Understanding the Muscles Involved in the Splits
To effectively train for the splits, it’s important to understand the muscles involved. The splits require flexibility in several key muscle groups:
3.1. Hamstrings
The hamstrings are a group of three muscles located on the back of the thigh:
- Biceps femoris: Allows knee flexion and hip extension.
- Semitendinosus: Assists in knee flexion and hip extension.
- Semimembranosus: Aids in knee flexion and hip extension.
3.2. Hip Flexors
The hip flexors are a group of muscles located on the front of the hip:
- Iliopsoas: The primary hip flexor, responsible for lifting the leg.
- Rectus femoris: Also part of the quadriceps, assists in hip flexion and knee extension.
- Sartorius: Assists in hip flexion, abduction, and external rotation.
3.3. Groin Muscles (Adductors)
The adductors are a group of muscles located on the inner thigh:
- Adductor longus: Adducts, flexes, and externally rotates the thigh.
- Adductor brevis: Adducts, flexes, and externally rotates the thigh.
- Adductor magnus: Adducts and extends the thigh.
- Gracilis: Adducts, flexes, and internally rotates the thigh.
3.4. Glutes
The glutes are a group of muscles located in the buttocks:
- Gluteus maximus: The largest gluteal muscle, responsible for hip extension and external rotation.
- Gluteus medius: Abducts and internally rotates the thigh.
- Gluteus minimus: Abducts and internally rotates the thigh.
3.5. Calves
The calves are a group of muscles located on the back of the lower leg:
- Gastrocnemius: Plantar flexes the foot and flexes the knee.
- Soleus: Plantar flexes the foot.
4. Designing a Safe and Effective Flexibility Training Program
A well-designed flexibility training program is crucial for achieving the splits safely and effectively. Here are some key principles to keep in mind:
4.1. Warm-Up
Always start with a warm-up to prepare your muscles for stretching. A warm-up can include light cardio, such as jogging or jumping jacks, followed by dynamic stretches like arm circles, leg swings, and torso twists. According to the Mayo Clinic, warming up increases blood flow to your muscles, reducing the risk of injury.
4.2. Static Stretching
Static stretching involves holding a stretch for a specific period, typically 20-30 seconds. Focus on stretching the hamstrings, hip flexors, groin muscles, glutes and calves. Examples of static stretches include:
- Hamstring stretch: Sit with legs extended and reach towards your toes.
- Hip flexor stretch: Kneel with one leg forward and gently push your hips forward.
- Groin stretch: Sit with soles of feet together and gently press your knees towards the floor.
- Calf stretch: Stand facing a wall, place one foot back, and lean forward.
4.3. Dynamic Stretching
Dynamic stretching involves moving through a range of motion. Dynamic stretches can improve flexibility, increase blood flow, and prepare your muscles for activity. Examples of dynamic stretches include:
- Leg swings: Swing your leg forward and backward, gradually increasing the range of motion.
- Arm circles: Rotate your arms forward and backward, gradually increasing the range of motion.
- Torso twists: Twist your torso from side to side, keeping your feet planted.
4.4. Proprioceptive Neuromuscular Facilitation (PNF) Stretching
PNF stretching is an advanced stretching technique that involves contracting and relaxing the muscles being stretched. This technique can help increase range of motion more effectively than static stretching alone. A study published in the “Journal of Strength and Conditioning Research” found that PNF stretching can significantly improve flexibility compared to static stretching.
4.5. Consistency and Patience
Consistency is key to achieving the splits. Aim to stretch at least 3-5 times per week. Be patient and don’t push yourself too hard, especially in the beginning. Gradual progress is more sustainable and less likely to result in injury.
5. Effective Stretches for Achieving the Splits
Here are some effective stretches you can incorporate into your flexibility training program:
5.1. Hamstring Stretches
- Seated Hamstring Stretch: Sit with legs extended and reach towards your toes.
- Standing Hamstring Stretch: Stand with one leg forward and bend forward from your hips.
- Lying Hamstring Stretch: Lie on your back and pull one leg towards your chest.
5.2. Hip Flexor Stretches
- Kneeling Hip Flexor Stretch: Kneel with one leg forward and gently push your hips forward.
- Couch Stretch: Place one foot on a couch or wall behind you and gently push your hips forward.
- Pigeon Pose: Start on your hands and knees, bring one knee towards your wrist, and lower your hips towards the floor.
5.3. Groin Stretches
- Butterfly Stretch: Sit with soles of feet together and gently press your knees towards the floor.
- Wide-Legged Forward Fold: Stand with legs wide apart and bend forward from your hips.
- Side Lunge: Step to the side and bend one knee while keeping the other leg straight.
5.4. Glute Stretches
- Figure Four Stretch: Lie on your back, cross one ankle over the opposite knee, and pull your thighs towards your chest.
- Seated Spinal Twist: Sit with legs extended, bend one knee, and twist your torso towards that knee.
- Pigeon Pose: Start on your hands and knees, bring one knee towards your wrist, and lower your hips towards the floor.
5.5. Calf Stretches
- Standing Calf Stretch: Stand facing a wall, place one foot back, and lean forward.
- Downward-Facing Dog: Start on your hands and knees, lift your hips up and back, and push your heels towards the floor.
- Seated Calf Stretch: Sit with legs extended and flex your feet.
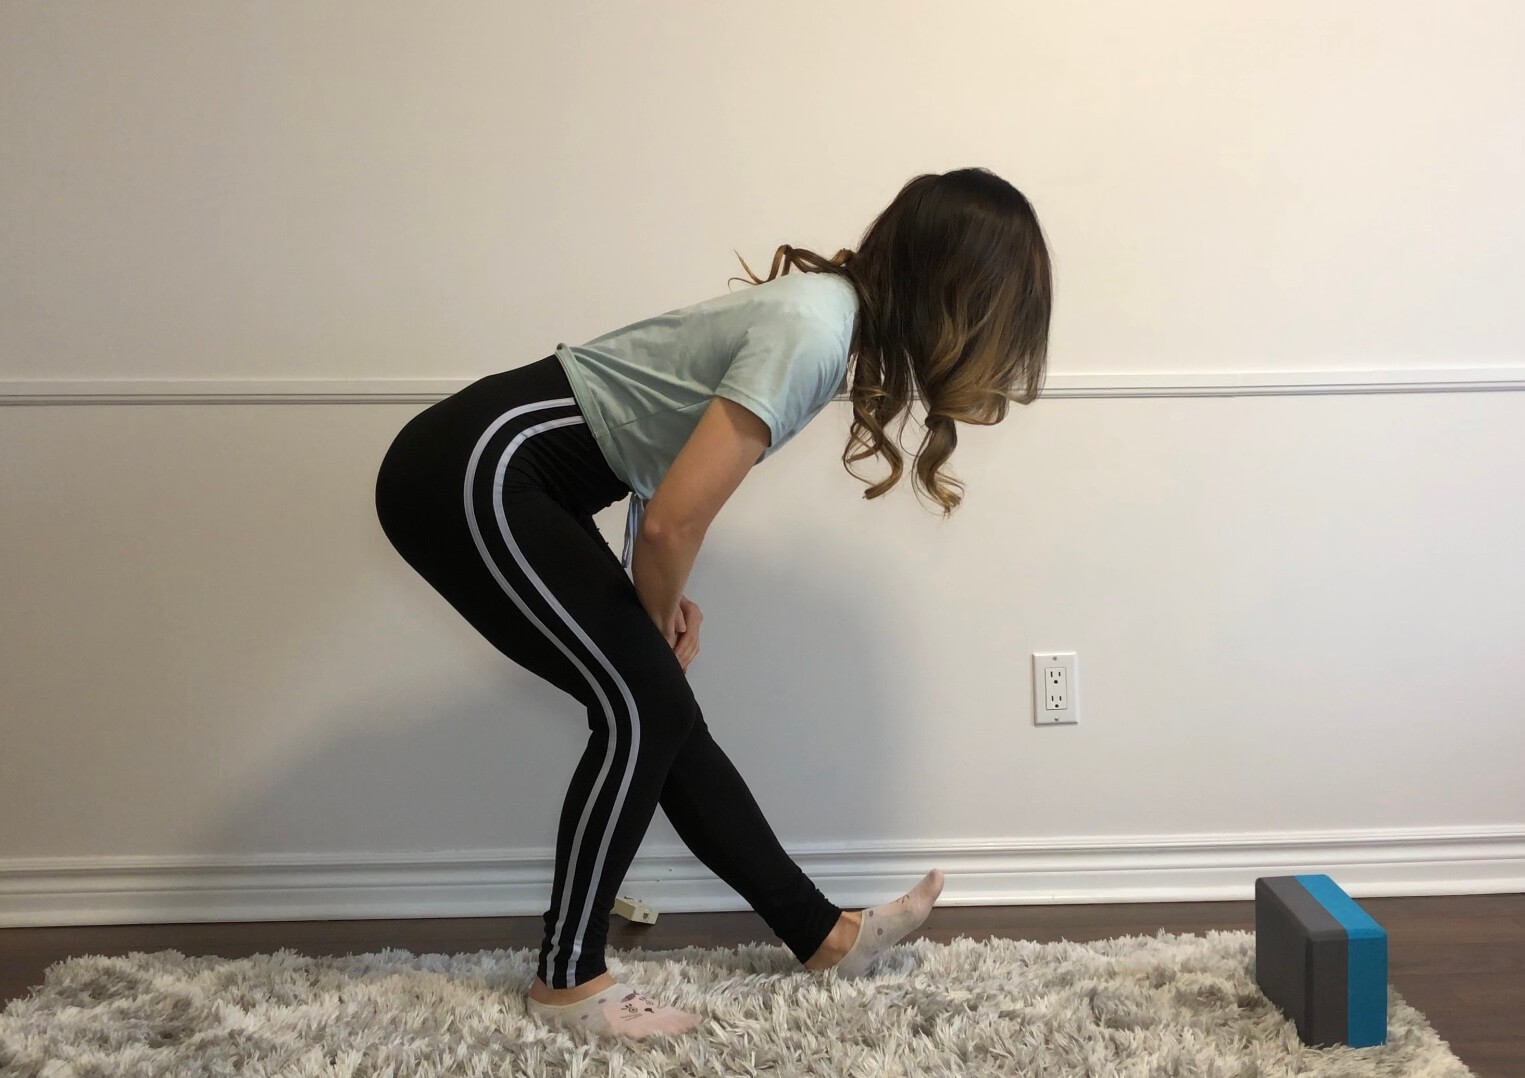
5.6) Standing Calf Stretch with Bent Knee
Stretching out your calves will help you straighten out your legs when doing the splits. Improving my calf flexibility made it easier to reach for my toes and correctly perform more advanced stretches such as the downward facing dog. Calves are so important but it’s often neglected while training for the splits.
- With your core engaged, step forward with your right leg and flex your foot.
- Bend your left knee as you hinge forward. Your back should be flat.
- Rest your hand on your leg. Focus on flexing your right foot. You can pull the right foot towards your body if you can reach with a flat back.
- Breathe and hold for 20-30 seconds, repeat on the other side.
5.7) Goddess Stretch
The Goddess pose in yoga strengthens the calves, quadriceps, inner thighs and core. Adding a twist with this pose stretches the hips, groins, upper back and chest.
- Stand with your feet yoga mat width apart with your feet pointing out.
- Bend your knees to get to a pile position. Your thighs should be parallel to the floor.
- Press your right hand on the inside of the knee and twist your shoulders to the left. This will open your upper back. For a more gentler variation, rest your elbows inside your knees with your hands together in prayer. Use your elbow to press the insides of your knees outwards
- Breathe and hold the twist for 20 seconds, repeat on the other side.
5.8) Wide Leg Forward Fold
This pose is also called the Standing Head-to-Knees. It stretches and lengthens the hamstrings and calves. It’s a good stretch for blood circulation and spinal movement.
- Stand with your feet yoga mat width apart with your feet pointing forward.
- Bend forward, reaching your heads towards your toes.
- You can hold onto a yoga block for support or grab onto both elbows. Let your head hang as you gently swing your elbows forward and backwards, side-to-side.
- Breathe and hold for 30 seconds.
5.9) Pyramid Stretch
The Pyramid pose stretches the hips, hamstring and shoulders as you bend your body forward. This pose requires balance and full body coordination, it calms the mind and improves posture.
- Stand with your legs 3 feet apart. Twist your body and legs to the right. Your feet should also be pointing to the right.
- Hinge forward keeping your back as flat as possible.
- Rest your hands on your leg. Try to reach a little further each time as you breathe. Your back should still be flat.
- Breathe and hold for 30 seconds, repeat on the other side.
5.10) Low Lunge with Side Stretch
This stretch targets the psoas muscles and stretches muscles deep within the hip flexors. This is one of my favourite stretches to do in the morning. Doing this stretch will help you keep your hips squared while doing the splits.
- With your core engaged, step forward with your right leg.
- Lowering your hips until the back knee is on the ground. Both knees should be bent at a 90-degree angle. Your front knee should be directly above your ankle. Your back knee should line up with your hips.
- Hold on to a yoga block with your right hand if you need support. Reach your left arm up and over to the right for a good side stretch. You should feel this stretch down the side of your body through to the left hip flexor.
- Breathe and hold for 20-30 seconds, repeat on the other side.
5.11) Half Split Hold
This pose is also called the Runner’s Lunge. It stretches the hips, lower back, legs and elongates the spine. This stretch will prepare you for getting into the splits pose.
- Start in a kneeling position, extend your right leg out in front of you. Flex the foot.
- Keeping your hips square, bend forward with your back flat. Place yoga blocks on both sides to help with balance.
- Breath and hold for 20-30 seconds, repeat on the other side.
6. Advanced Techniques for Improving Flexibility
Once you’ve established a solid foundation with basic stretches, you can incorporate advanced techniques to further improve your flexibility.
6.1. Active Flexibility
Active flexibility involves using your own muscles to hold a stretch, without external assistance. This technique can help improve strength and control in your end ranges of motion. For example, you can try lifting your leg as high as possible and holding it there without using your hands.
6.2. Loaded Stretching
Loaded stretching involves adding weight to a stretch. This technique can help increase flexibility and strength simultaneously. For example, you can hold a dumbbell while performing a hamstring stretch. However, it’s important to use caution and start with light weights to avoid injury.
6.3. Myofascial Release
Myofascial release involves applying pressure to tight muscles and fascia (connective tissue) to release tension and improve flexibility. You can use a foam roller or massage ball to perform myofascial release on your hamstrings, hip flexors, and other tight areas.
6.4. Heat Therapy
Applying heat to your muscles before stretching can help increase blood flow and improve flexibility. You can use a heating pad, hot towel, or warm bath to prepare your muscles for stretching.
6.5. Cold Therapy
Applying cold to your muscles after stretching can help reduce inflammation and soreness. You can use an ice pack or cold compress to soothe your muscles after a stretching session.
7. Common Mistakes to Avoid When Training for the Splits
To avoid injury and maximize your progress, it’s important to avoid common mistakes when training for the splits:
7.1. Pushing Too Hard, Too Soon
One of the most common mistakes is trying to progress too quickly. Pushing yourself too hard can lead to muscle strains, ligament sprains, and other injuries. Start slowly and gradually increase the intensity and duration of your stretches over time.
7.2. Neglecting the Warm-Up
Skipping the warm-up can increase your risk of injury. Always warm up your muscles before stretching to increase blood flow and prepare them for activity.
7.3. Holding Your Breath
Holding your breath can restrict blood flow and increase muscle tension. Breathe deeply and evenly throughout your stretches to promote relaxation and improve flexibility.
7.4. Ignoring Pain
It’s normal to feel some discomfort when stretching, but you should never feel sharp or intense pain. If you experience pain, stop stretching and consult with a healthcare professional.
7.5. Neglecting Supporting Muscles
Focusing solely on the muscles directly involved in the splits can lead to imbalances and increase your risk of injury. Be sure to also strengthen the supporting muscles, such as your core, glutes, and quadriceps.
8. The Importance of Proper Nutrition and Hydration
Proper nutrition and hydration play a crucial role in maintaining flexibility and preventing injuries.
8.1. Nutrition
A balanced diet that includes plenty of protein, vitamins, and minerals is essential for muscle health and recovery. Protein is particularly important for repairing and rebuilding muscle tissue after stretching. Foods rich in vitamins and minerals, such as fruits, vegetables, and whole grains, can help reduce inflammation and improve overall health.
8.2. Hydration
Staying hydrated is crucial for maintaining flexibility. Water helps lubricate your joints and keeps your muscles pliable. Dehydration can lead to muscle stiffness and increase your risk of injury. Aim to drink at least eight glasses of water per day, especially before, during, and after stretching sessions.
9. Staying Motivated on Your Splits Journey
Achieving the splits can be a long and challenging process. Here are some tips for staying motivated:
9.1. Track Your Progress
Keep a record of your stretching sessions and note any improvements in your flexibility. Seeing your progress can be a great motivator.
9.2. Find a Stretching Buddy
Stretching with a friend can make the process more enjoyable and help you stay accountable.
9.3. Set Realistic Goals
Set small, achievable goals and celebrate your progress along the way.
9.4. Reward Yourself
Treat yourself to something you enjoy after reaching a milestone.
9.5. Listen to Your Body
Don’t push yourself too hard and take rest days when needed.
10. Consulting with Professionals
If you have any concerns about your flexibility or experience any pain while stretching, it’s important to consult with a healthcare professional. A physical therapist, chiropractor, or certified personal trainer can assess your flexibility, identify any underlying issues, and develop a personalized stretching program for you.
10.1. Physical Therapist
A physical therapist can evaluate your flexibility, identify any muscle imbalances or joint restrictions, and develop a customized stretching and strengthening program to address your specific needs.
10.2. Chiropractor
A chiropractor can assess your spinal alignment and identify any misalignments that may be contributing to muscle tightness or restricted range of motion. They can use adjustments and other techniques to restore proper alignment and improve flexibility.
10.3. Certified Personal Trainer
A certified personal trainer can design a safe and effective flexibility training program based on your individual goals and fitness level. They can also provide guidance on proper stretching techniques and help you stay motivated on your splits journey.
FAQ: Can You Learn The Splits As An Adult?
-
Is it really possible to learn the splits as an adult?
Yes, it is possible, but it requires consistent effort, patience, and a tailored stretching routine. At LEARNS.EDU.VN, we provide resources to help you structure your flexibility training effectively.
-
How long will it take to achieve the splits as an adult?
The timeline varies greatly depending on your current flexibility level, age, and consistency. It could take anywhere from several months to a year or more.
-
What muscles need to be flexible to do the splits?
Key muscles include the hamstrings, hip flexors, groin muscles (adductors), glutes, and calves. Targeted stretching for these areas is crucial.
-
What are some good stretches for improving flexibility for the splits?
Effective stretches include seated hamstring stretches, kneeling hip flexor stretches, butterfly stretches, side lunges, and calf stretches. Check LEARNS.EDU.VN for detailed guides and videos.
-
How often should I stretch to improve my flexibility?
Aim to stretch at least 3-5 times per week for about 20-30 minutes each session. Consistency is key.
-
What are the risks of trying to learn the splits too quickly?
Trying to rush the process can lead to muscle strains, ligament sprains, and other injuries. Gradual progress is safer and more sustainable.
-
Can yoga or Pilates help with flexibility for the splits?
Yes, both yoga and Pilates can be very beneficial for improving flexibility and core strength, which are essential for achieving the splits.
-
What is the best time of day to stretch for flexibility?
The best time is when your muscles are warm, either after a light workout or a warm bath. Consistency matters more than the specific time.
-
Should I stretch before or after a workout?
It’s best to do dynamic stretching before a workout to prepare your muscles and static stretching after a workout to improve flexibility and reduce muscle soreness.
-
Are there any medical conditions that would prevent someone from doing the splits?
Certain conditions like severe arthritis, hip impingement, or previous injuries may limit your ability to achieve the splits. Consult with a healthcare professional if you have concerns.
Achieving the splits as an adult is a challenging but rewarding goal. With dedication, patience, and a well-designed flexibility training program, you can improve your flexibility, increase your range of motion, and achieve the splits. Remember to listen to your body, avoid common mistakes, and consult with professionals when needed.
Ready to embark on your flexibility journey? Explore the wealth of resources available at LEARNS.EDU.VN. From detailed stretching guides to expert advice, we’re here to support you every step of the way. Whether you’re a beginner or an experienced athlete, LEARNS.EDU.VN provides the tools and knowledge you need to reach your flexibility goals. Start your journey today and unlock your body’s full potential. For more information, visit us at 123 Education Way, Learnville, CA 90210, United States, contact us via Whatsapp at +1 555-555-1212, or visit our website at learns.edu.vn.