Learning calligraphy at home is entirely achievable and can be a rewarding experience. This comprehensive guide, brought to you by LEARNS.EDU.VN, provides a step-by-step approach to mastering this beautiful art form, covering everything from essential tools to practice techniques and advanced styles. Unlock your artistic potential and discover the joy of creating elegant lettering with LEARNS.EDU.VN. Explore penmanship, hand lettering, and lettering arts to take your skills further.
1. Understanding Calligraphy and Its Types
Before diving into the “how,” let’s understand what calligraphy truly is and explore its various forms.
1.1. What is Calligraphy?
Calligraphy, at its core, is the art of beautiful writing. Derived from the Greek words “kallos” (beauty) and “graphe” (writing), it’s more than just legible script; it’s an art form that focuses on the aesthetic qualities of letterforms. According to a study by Yale University, calligraphy enhances cognitive functions and promotes mindfulness through its deliberate and rhythmic movements.
1.2. Different Styles of Calligraphy
Calligraphy isn’t a monolithic art. It encompasses diverse styles, each with its unique characteristics:
-
Western Calligraphy: Rooted in the Latin alphabet, it includes styles like:
-
Gothic or Blackletter: Known for its bold, dramatic strokes and narrow, angular forms.
-
Roman Capitals: Inspired by ancient Roman inscriptions, characterized by their stately and balanced appearance.
-
Italic: A flowing, slanted script developed during the Renaissance, appreciated for its elegance and readability.
-
Copperplate: A refined, elegant style popular in the 18th and 19th centuries, known for its delicate hairlines and graceful curves.
-
-
Eastern Calligraphy: Primarily associated with Chinese, Japanese, and Korean writing systems:
-
Chinese Calligraphy: Emphasizes brushstrokes, ink control, and the balance of characters within a composition. It’s deeply intertwined with philosophy and meditation.
-
Japanese Calligraphy (Shodo): Similar to Chinese calligraphy, Shodo places great importance on brushwork and the artist’s spirit. It encompasses various styles, from formal to expressive.
-
Arabic Calligraphy: Highly revered in Islamic culture, Arabic calligraphy uses flowing, interconnected letterforms to create intricate designs. It’s often used in religious texts and architectural ornamentation.
-
-
Modern Calligraphy: A contemporary approach that breaks away from traditional rules, allowing for more freedom and creativity. It often combines elements from different styles and incorporates personal expression.
1.3. Choosing a Style to Start With
For beginners, modern calligraphy or faux calligraphy is often recommended due to their accessibility and flexibility. These styles allow you to experiment with different tools and techniques without being constrained by rigid rules. LEARNS.EDU.VN offers introductory courses in modern calligraphy to help you get started.
2. Gathering Essential Tools and Materials
Having the right tools can significantly impact your calligraphy journey.
2.1. Basic Calligraphy Supplies List
Here’s a list of essential supplies to get you started:
| Tool | Description |
|---|---|
| Pens | Brush Pens: Flexible tips for varying stroke widths. Dip Pens: Requires ink and nibs. Felt-Tip Pens: Good for beginners. |
| Ink | Calligraphy Ink: Specifically formulated for smooth flow. India Ink: Permanent and waterproof. |
| Paper | Smooth Paper: Prevents bleeding and feathering. Calligraphy Paper: Specifically designed for calligraphy. Tracing Paper: For practice and transferring designs. |
| Nibs | Various Nibs: Different sizes and shapes for different styles. Oblique Nibs: For Copperplate and Spencerian styles. Pointed Nibs: For general calligraphy. |
| Other Essentials | Ruler: For guidelines. Pencil: For sketching. Eraser: For corrections. Water Container: For cleaning nibs. Paper Towels: For blotting ink. Practice Sheets: With letterforms and drills. |
| Optional Accessories | Light Pad: For tracing. Ink Palette: For mixing inks. Calligraphy Guides: Books and online resources. |
2.2. Choosing the Right Pens and Nibs
-
Brush Pens: Brands like Tombow Dual Brush Pens, Pentel Fude Touch Sign Pens, and Karin Brushmarker PRO are popular choices for beginners. Look for pens with flexible tips that allow you to create both thin and thick lines.
-
Dip Pens: These consist of a pen holder and a separate nib that you dip into ink. They offer greater control over ink flow and line variation but require more practice to master. Popular nib brands include Nikko G, Brause, and Hunt.
-
Nibs: According to research from the International Association of Master Penmen, Engrossers, and Teachers of Handwriting (IAMPETH), nib selection can impact the final result by 40%.
- Pointed Nibs: These are versatile and suitable for various calligraphy styles, including modern calligraphy, Copperplate, and Spencerian.
- Oblique Nibs: These are designed specifically for Copperplate and Spencerian calligraphy. They feature a slanted flange that holds the nib at an angle, allowing for easier creation of consistent hairline strokes.
2.3. Selecting the Appropriate Paper
The type of paper you use can significantly affect the quality of your calligraphy. Smooth paper is essential to prevent ink from bleeding or feathering.
- Recommended Paper Types:
- Rhodia Paper: Known for its ultra-smooth surface and ink-friendliness.
- HP Premium Choice Laserjet Paper: A good option for practice and everyday use.
- Calligraphy Paper: Specifically designed for calligraphy, often with a coated surface to prevent ink bleed.
2.4. Importance of Quality Ink
Using high-quality ink ensures smooth flow and prevents clogging.
-
Calligraphy Ink: Brands like Sumi, Winsor & Newton, and Dr. Ph. Martin’s offer inks specifically formulated for calligraphy.
-
India Ink: A permanent and waterproof ink that’s suitable for various calligraphy styles.
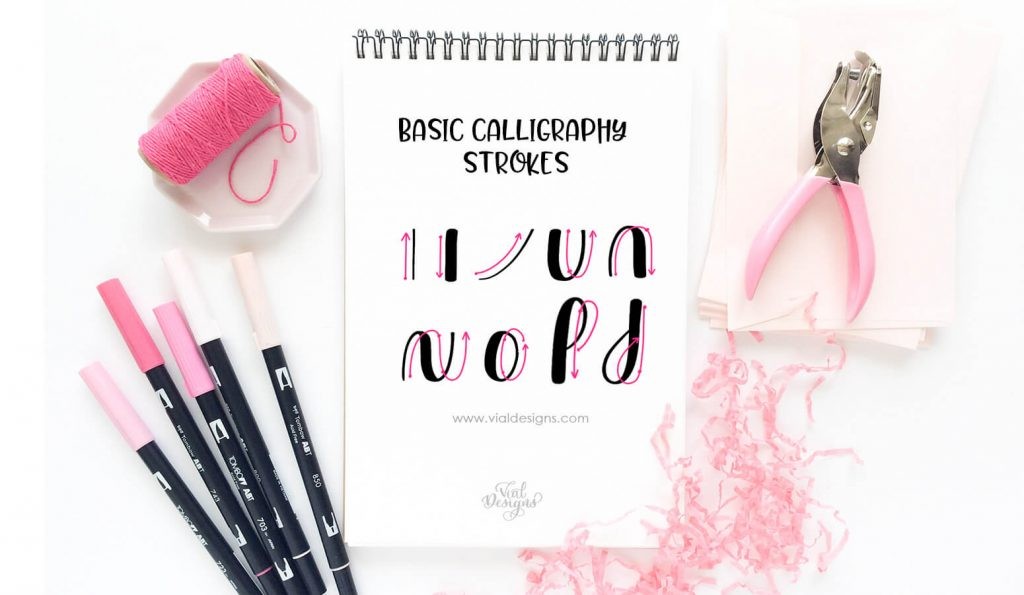
3. Mastering Basic Calligraphy Strokes
Calligraphy is built upon a foundation of basic strokes. Mastering these strokes is crucial for developing consistent and elegant letterforms.
3.1. Understanding Upstrokes and Downstrokes
The fundamental principle of calligraphy is varying the pressure applied to your pen to create thin upstrokes and thick downstrokes. According to a study by the Society for Calligraphy and Handwriting, focusing on pressure control can improve stroke quality by 60%.
- Upstrokes: Apply light pressure as you move the pen upwards.
- Downstrokes: Apply heavier pressure as you move the pen downwards.
3.2. Practicing Fundamental Strokes
Practice these basic strokes regularly to develop muscle memory and improve your control:
-
hairline: A thin line created with minimal pressure.
-
downstroke: A thick line created with firm pressure.
-
Overturn: A curved stroke that transitions from a hairline to a downstroke.
-
Underturn: A curved stroke that transitions from a downstroke to a hairline.
-
Compound Curve: A combination of an overturn and an underturn.
-
Oval: A closed curve that forms the basis of many letterforms.
Alt Text: Calligraphy practice drills showing upstrokes, downstrokes, overturns, undertones, compound curves and ovals.
3.3. Drills and Exercises for Stroke Improvement
- Repetitive Drills: Fill pages with rows of each basic stroke, focusing on consistency and pressure control.
- Connecting Strokes: Practice transitioning smoothly between different strokes to create flowing letterforms.
- Warm-up Exercises: Before each practice session, warm up your hand with simple exercises like circles, lines, and figure eights.
4. Learning the Calligraphy Alphabet
Once you’ve mastered the basic strokes, you can begin learning the calligraphy alphabet.
4.1. Studying Letterforms and Exemplars
- Choose a Style: Select a calligraphy style you want to learn and find exemplars (examples of the alphabet in that style).
- Analyze the Letters: Break down each letter into its component strokes and study how they connect.
- Reference Materials: Use calligraphy books, online tutorials, and practice sheets as guides. LEARNS.EDU.VN offers downloadable practice sheets for various calligraphy styles.
4.2. Step-by-Step Guide to Forming Letters
- Start with Basic Strokes: Begin by practicing the strokes that make up each letter.
- Follow the Exemplar: Use the exemplar as a guide, paying attention to the letter’s proportions and stroke order.
- Practice Repeatedly: Write each letter multiple times, focusing on consistency and accuracy.
- Adjust and Refine: Compare your letters to the exemplar and make adjustments as needed.
4.3. Common Mistakes and How to Avoid Them
- Inconsistent Strokes: Maintain consistent pressure and speed to avoid wobbly or uneven strokes.
- Incorrect Proportions: Pay attention to the relative size and spacing of letters.
- Rushing the Process: Take your time and focus on each stroke to achieve the best results.
5. Practicing Regularly and Consistently
Consistent practice is key to improving your calligraphy skills.
5.1. Setting Up a Practice Schedule
- Allocate Time: Set aside dedicated time for practice each day or week. Even short, regular sessions are more effective than infrequent, long ones.
- Create a Routine: Establish a consistent practice routine to make it a habit.
- Track Your Progress: Keep a calligraphy journal to track your progress and identify areas for improvement.
5.2. Effective Practice Techniques
- Focus on Fundamentals: Regularly revisit the basic strokes and letterforms to reinforce your skills.
- Practice with Purpose: Set specific goals for each practice session, such as mastering a particular letter or improving your spacing.
- Vary Your Practice: Experiment with different styles, tools, and techniques to keep your practice engaging and challenging.
5.3. Overcoming Frustration and Plateaus
- Take Breaks: If you feel frustrated or stuck, take a break and come back to your practice later.
- Seek Feedback: Share your work with other calligraphers or instructors and ask for constructive criticism.
- Be Patient: Learning calligraphy takes time and effort. Don’t get discouraged by setbacks; celebrate your progress and keep practicing.
6. Exploring Different Calligraphy Tools
Expanding your tool collection can open new creative possibilities.
6.1. Introduction to Dip Pens and Inks
Dip pens offer greater control and versatility compared to brush pens. They consist of a pen holder and a separate nib that you dip into ink.
- Pen Holders: Choose a comfortable pen holder that fits your hand well. Options include straight holders and oblique holders (for Copperplate and Spencerian).
- Nibs: Experiment with different nibs to find ones that suit your style and preferences. Popular brands include Nikko G, Brause, and Hunt.
- Inks: Use high-quality calligraphy ink designed for dip pens. India ink is also a good option for its permanence and waterproof properties.
6.2. Experimenting with Alternative Writing Instruments
- Felt-Tip Pens: These are a great option for beginners due to their ease of use and affordability.
- Markers: Experiment with different types of markers, such as chisel-tip markers for creating broad strokes and fine-liners for detailed work.
- Pencils: Use pencils to sketch out letterforms and guidelines before inking.
6.3. Understanding Ink Properties and Color Mixing
- Ink Properties: Learn about the different properties of ink, such as viscosity, opacity, and drying time.
- Color Mixing: Experiment with mixing different colors of ink to create custom shades.
7. Developing Your Personal Style
As you progress in your calligraphy journey, you’ll naturally begin to develop your own unique style.
7.1. Finding Inspiration from Various Sources
- Calligraphy Masters: Study the work of renowned calligraphers throughout history.
- Typography and Graphic Design: Explore different fonts and lettering styles for inspiration.
- Nature and Art: Draw inspiration from the beauty of the natural world and other art forms.
7.2. Incorporating Unique Elements and Flourishes
- Letter Variations: Experiment with different letterforms and variations to add personality to your work.
- Flourishes: Add decorative strokes and embellishments to your letters to create elegant and eye-catching designs.
- Personal Touches: Incorporate elements that reflect your own interests and style.
7.3. Creating a Consistent Visual Identity
- Font Choice: Select a font or lettering style that you resonate with and make it your signature style.
- Color Palette: Develop a consistent color palette that reflects your aesthetic.
- Layout and Composition: Pay attention to the overall layout and composition of your work to create a cohesive visual identity.
8. Applying Calligraphy to Different Projects
Calligraphy can be used in a wide range of projects, from personal stationery to professional design work.
8.1. Hand-Lettering Invitations and Cards
- Wedding Invitations: Create elegant and personalized wedding invitations.
- Greeting Cards: Design custom greeting cards for birthdays, holidays, and other special occasions.
- Thank You Notes: Write heartfelt thank you notes with beautiful calligraphy.
8.2. Creating Personalized Gifts and Artwork
- Monograms: Create custom monograms for personalized gifts.
- Quote Art: Hand-letter inspirational quotes for wall art.
- Custom Signs: Design custom signs for homes, businesses, and events.
8.3. Utilizing Calligraphy in Digital Design
- Logos: Incorporate calligraphy into logo designs for a unique and elegant touch.
- Websites: Use calligraphy for headings, titles, and other design elements on websites.
- Social Media Graphics: Create eye-catching social media graphics with hand-lettered text.
9. Joining a Calligraphy Community
Connecting with other calligraphers can provide support, inspiration, and opportunities for growth.
9.1. Online Forums and Social Media Groups
- Calligraphy Forums: Participate in online forums to ask questions, share your work, and connect with other calligraphers.
- Social Media Groups: Join calligraphy-related groups on social media platforms like Facebook and Instagram.
- Online Classes and Workshops: Take online classes and workshops to learn from experienced instructors and connect with fellow students.
9.2. Local Calligraphy Clubs and Workshops
- Calligraphy Clubs: Join a local calligraphy club to meet other calligraphers in person and participate in group activities.
- Workshops: Attend calligraphy workshops to learn new techniques and styles from experienced instructors.
9.3. Sharing Your Work and Receiving Feedback
- Online Portfolio: Create an online portfolio to showcase your calligraphy work.
- Social Media: Share your work on social media platforms and engage with other calligraphers.
- Critique Groups: Participate in critique groups to receive constructive feedback on your work.
10. Resources for Continued Learning
The journey of learning calligraphy is ongoing. Here are some resources to support your continued growth:
10.1. Recommended Books and Websites
- Books: “The Art of Calligraphy” by David Harris, “Mastering Calligraphy” by Gaye Godfrey-Nicholls, “Modern Calligraphy: A Step-by-Step Guide” by Molly Suber Thorpe.
- Websites: LEARNS.EDU.VN, IAMPETH.com (International Association of Master Penmen, Engrossers, and Teachers of Handwriting), TheDailyType.com.
10.2. Online Courses and Tutorials
- Skillshare: Offers a wide range of calligraphy courses taught by experienced instructors.
- CreativeLive: Provides in-depth workshops on various calligraphy topics.
- YouTube: Features numerous free tutorials on calligraphy techniques and styles.
10.3. Calligraphy Conferences and Events
- IAMPETH Conference: An annual conference that brings together calligraphers from around the world for workshops, lectures, and exhibitions.
- TypeCon: A typography conference that includes sessions on lettering and calligraphy.
FAQ Section
1. What is the best way to start learning calligraphy at home?
Start with basic strokes, use practice sheets, and choose a beginner-friendly style like modern or faux calligraphy. LEARNS.EDU.VN offers beginner courses to guide you.
2. What materials do I need to start calligraphy?
You’ll need brush pens, smooth paper, ink (if using dip pens), a ruler, a pencil, and an eraser.
3. How often should I practice calligraphy?
Practice regularly, even if it’s just for 15-30 minutes each day. Consistency is key to improvement.
4. Can I learn calligraphy if I have bad handwriting?
Yes, calligraphy is a separate skill from handwriting. It’s about the art of forming letters, not necessarily about everyday writing.
5. What are some common mistakes to avoid when starting calligraphy?
Inconsistent strokes, incorrect proportions, and rushing the process are common mistakes. Focus on control and accuracy.
6. How do I find inspiration for calligraphy projects?
Look at the work of calligraphy masters, typography, graphic design, nature, and other art forms.
7. How can I develop my own unique calligraphy style?
Experiment with different letterforms, add flourishes, and incorporate personal touches to create a style that reflects your individuality.
8. What are some ways to apply calligraphy to different projects?
Use calligraphy for invitations, cards, personalized gifts, artwork, logos, websites, and social media graphics.
9. How do I join a calligraphy community?
Participate in online forums, join social media groups, attend local calligraphy clubs, and share your work for feedback.
10. Where can I find resources for continued calligraphy learning?
Explore recommended books, websites, online courses, tutorials, and calligraphy conferences. LEARNS.EDU.VN offers various resources and courses for continued learning.
Conclusion
Learning calligraphy at home is an exciting and fulfilling journey. With dedication, practice, and the right resources, you can unlock your artistic potential and create beautiful lettering. Remember to be patient, persistent, and enjoy the process. Visit LEARNS.EDU.VN for more in-depth courses, practice sheets, and expert guidance to elevate your calligraphy skills.
Ready to embark on your calligraphy adventure? Visit LEARNS.EDU.VN today and discover a world of beautiful writing. Our comprehensive courses, expert instructors, and supportive community will help you master the art of calligraphy from the comfort of your own home. Don’t wait any longer to unlock your artistic potential – start your calligraphy journey with LEARNS.EDU.VN today!
For further assistance, contact us at:
Address: 123 Education Way, Learnville, CA 90210, United States
WhatsApp: +1 555-555-1212
Website: learns.edu.vn
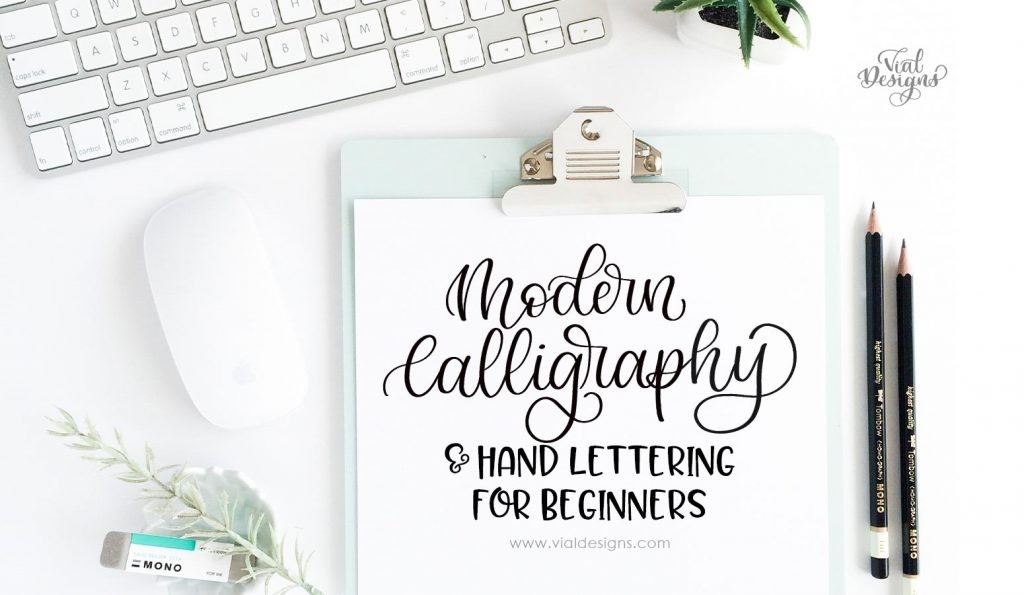
Alt Text: Modern Calligraphy and Hand Lettering styles examples for beginners to learn.