Are you looking to enhance your drawing skills by mastering the art of shading? With the right techniques and understanding of light and shadow, you can bring depth and realism to your artwork. LEARNS.EDU.VN offers resources and guidance to help you learn shading and other artistic skills. Discover practical tips, expert advice, and structured learning paths to improve your artistic abilities.
1. Understanding the Fundamentals of Shading
How Can I Learn To shade objects effectively? Mastering shading involves understanding light and shadow, as these elements are crucial for creating the illusion of depth and form in your drawings. Begin by understanding how light interacts with objects and how shadows define their shape. Shading is the key to transforming a flat sketch into a three-dimensional representation.
1.1 The Importance of Light and Shadow
Light and shadow are fundamental to visual arts. Light reveals the form of an object, while shadows define its contours and volume. Without proper shading, objects appear flat and unrealistic. Understanding these principles is vital, whether you’re a beginner or an experienced artist. By studying how light behaves, you can accurately depict the interplay of light and shadow, adding depth to your artwork.
1.2 Identifying Light Sources
Identifying the light source is the first step in shading. Determine where the light is coming from, as this will dictate the placement and intensity of shadows. A single light source is typically easier to manage when learning. Once you establish the light source, observe how it affects the object, noting the areas that are brightly lit and those that fall into shadow.
1.3 Types of Shadows: Form and Cast
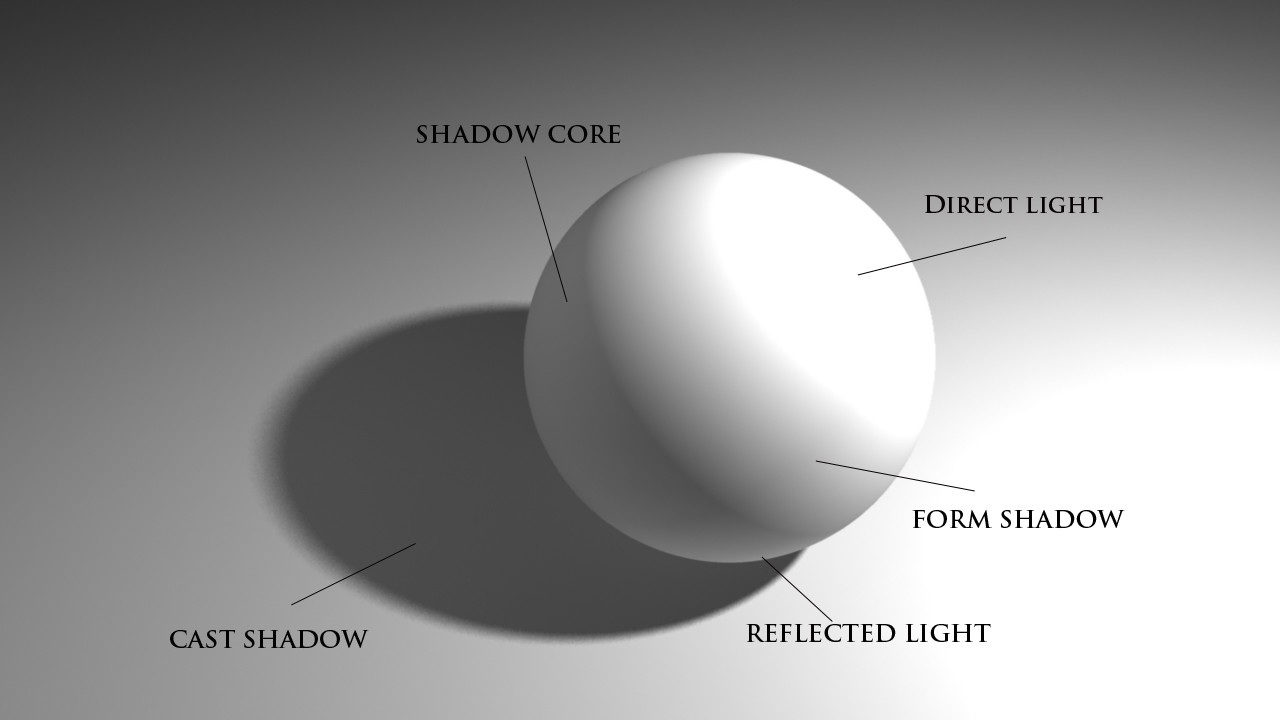
There are two primary types of shadows: form shadows and cast shadows. Form shadows occur on the object itself, indicating its curves and surfaces. They are usually soft and gradual. Cast shadows, on the other hand, are projected by the object onto nearby surfaces. They have sharper edges and can be more intense, depending on the light source.
- Form Shadows: These shadows define the shape of an object, transitioning smoothly from light to dark. They are subtle and require careful observation.
- Cast Shadows: These shadows are projected onto other surfaces, creating depth and spatial relationships in the drawing. They often have distinct edges.
1.4 Value Scales and Gradation
A value scale is a range of tones from white to black, including various shades of gray. Understanding value scales is essential for creating realistic shading. Gradation refers to the smooth transition between different values. Practicing value scales and smooth gradations will improve your shading technique.
1.5 Basic Shading Techniques
Several basic shading techniques can help you achieve different effects. These include hatching, cross-hatching, stippling, blending, and scumbling. Each technique offers a unique way to build up value and create texture.
| Technique | Description | Best Used For |
|---|---|---|
| Hatching | Creating parallel lines to build up value. | Suggesting form and creating tonal variations. |
| Cross-Hatching | Layering intersecting lines to create darker values. | Adding depth and richness to shadows. |
| Stippling | Using dots to create value; denser dots create darker areas. | Simulating texture and creating subtle gradations. |
| Blending | Smoothing values together for a seamless transition. | Achieving soft, realistic shading. |
| Scumbling | Creating texture with random, scribbled lines. | Adding a loose, textured effect to drawings. |
2. Setting Up Your Drawing Environment
How can I learn to create an ideal drawing environment? The right environment can significantly enhance your learning experience. Setting up a well-lit space and selecting appropriate materials can make a big difference in your ability to practice and improve your shading skills.
2.1 Lighting and Still Life Setups
Proper lighting is crucial for accurate shading. A single, directional light source is ideal for studying how light interacts with objects. Set up a still life with simple objects such as fruits, geometric shapes, or draped fabrics. Arrange the objects to create interesting patterns of light and shadow.
2.2 Choosing the Right Materials
Selecting the right materials can greatly improve your drawing experience. Pencils, erasers, paper, and blending tools are essential for effective shading. Different grades of pencils (e.g., HB, 2B, 4B, 6B) allow for a range of values.
| Material | Description | Use |
|---|---|---|
| Graphite Pencils | Available in various grades from hard (H) to soft (B). | Creating a range of values from light to dark. |
| Charcoal Pencils | Offer a richer, darker value than graphite. | Producing deep shadows and expressive strokes. |
| Erasers | Kneaded erasers are ideal for lifting graphite and creating highlights. | Correcting mistakes and refining shading. |
| Blending Stumps | Used to smooth and blend values for a seamless effect. | Achieving smooth transitions and soft shadows. |
| Drawing Paper | Choose paper with a slight tooth for better graphite adhesion. | Providing a surface that allows for layering and blending. |
2.3 Understanding Pencil Grades
Pencils are graded using the H and B scale. H pencils are hard and produce light, fine lines. B pencils are soft and create dark, broad lines. The higher the number, the harder or softer the pencil. For example, 2H is harder than HB, and 6B is softer than 2B.
- H Pencils: Use for light sketches and detailed work.
- HB Pencils: A good general-purpose pencil for basic shading.
- B Pencils: Use for darker values and bolder lines.
3. Practicing Form Shadows
How can I practice creating convincing form shadows? Form shadows define the shape of an object and require careful observation and technique. Learning to create smooth gradations and subtle value changes is essential for mastering form shadows.
3.1 Creating Smooth Gradations
Smooth gradations are key to creating realistic form shadows. Practice blending values together to achieve a seamless transition from light to dark. Use a blending stump or your finger to gently smooth the graphite on the paper.
3.2 Identifying the Shadow Core
The shadow core is the darkest part of the form shadow. It is typically located in the area that receives the least amount of light. Identifying and accurately depicting the shadow core will add depth and realism to your shading.
3.3 Understanding Reflected Light
Reflected light is the subtle illumination that bounces off surrounding surfaces and back onto the object. It is usually found on the edge of the shadow and is lighter than the shadow core. Including reflected light in your shading will create a more realistic and three-dimensional effect.
3.4 Practicing on Basic Shapes
Start by practicing form shadows on basic shapes such as spheres, cubes, and cylinders. These shapes are simple to understand and provide a good foundation for more complex objects. Focus on creating smooth gradations and accurately depicting the shadow core and reflected light.
4. Mastering Cast Shadows
How can I master the technique of drawing cast shadows? Cast shadows add depth and realism to your drawings by showing how objects interact with their environment. Understanding the principles of cast shadows is essential for creating convincing compositions.
4.1 Understanding Light Direction
The direction of the light source determines the shape and placement of cast shadows. Observe how the light source affects the cast shadow, noting its length, angle, and intensity. Practice drawing cast shadows from different light directions to improve your understanding.
4.2 Drawing Sharp Edges
Cast shadows typically have sharper edges than form shadows. Use a harder pencil (e.g., HB or 2H) to create crisp, defined edges. Pay attention to the shape of the cast shadow and how it interacts with the surfaces it falls upon.
4.3 Depicting Variations in Intensity
The intensity of a cast shadow can vary depending on the distance from the object and the angle of the light source. Shadows closer to the object are usually darker and more defined, while those farther away become lighter and softer. Practice depicting these variations in intensity to create more realistic cast shadows.
4.4 Creating Depth and Spatial Relationships
Cast shadows help create depth and spatial relationships in your drawings. By accurately depicting the placement and shape of cast shadows, you can show how objects are positioned in space and how they interact with their environment.
5. Advanced Shading Techniques
How can I enhance my shading skills with advanced techniques? Once you have mastered the basics of shading, you can explore advanced techniques to add more depth, texture, and realism to your drawings.
5.1 Layering and Building Up Value
Layering involves applying multiple layers of graphite to build up value gradually. This technique allows for greater control over the final result and helps create smooth gradations. Start with light layers and gradually add darker values as needed.
5.2 Using Different Pencil Grades
Using different pencil grades can help you achieve a wider range of values and create more detailed shading. Use harder pencils (e.g., 2H or HB) for light areas and softer pencils (e.g., 2B, 4B, or 6B) for darker areas.
5.3 Adding Texture with Shading
Shading can be used to create texture in your drawings. Use techniques such as stippling, hatching, or scumbling to simulate the texture of different surfaces. Experiment with different techniques to find what works best for you.
5.4 Combining Techniques
Combining different shading techniques can create interesting and complex effects. For example, you can use hatching to build up value and then blend the lines together for a smoother effect. Experiment with different combinations to find your own unique style.
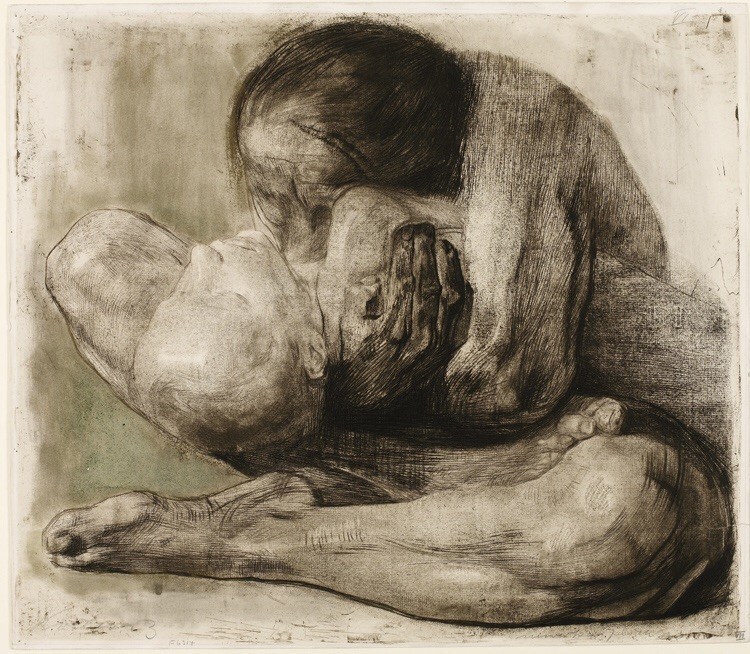
6. Studying Master Artists
How can studying the works of master artists help improve my shading skills? Studying the works of master artists can provide valuable insights into shading techniques and help you develop your own style.
6.1 Analyzing Lighting in Paintings
Analyze how master artists use light and shadow in their paintings. Pay attention to the placement of light sources, the types of shadows they create, and the overall effect of the lighting on the composition.
6.2 Identifying Shading Techniques
Identify the shading techniques used by master artists. Look for examples of hatching, cross-hatching, stippling, and blending in their works. Try to replicate these techniques in your own drawings.
6.3 Learning from Caravaggio
Caravaggio was a master of chiaroscuro, a technique that uses strong contrasts between light and dark to create dramatic effects. Study his paintings to learn how to use light and shadow to create depth and emotion in your artwork. Notice how the light consistently comes from one side, creating cast shadows on the opposite side of every object.
6.4 Learning from John Singer Sargent
John Singer Sargent was a master of capturing light and form in his portraits and landscapes. Study his paintings to learn how to use shading to create a sense of realism and depth. Notice the strong cast shadow on the wall created by theatrical lighting in “El Jaleo.”
7. Practice Exercises for Shading
How can I improve my shading through targeted practice exercises? Targeted practice exercises can help you develop specific shading skills and improve your overall technique.
7.1 Value Scale Exercises
Create value scales using different pencil grades. Practice creating smooth gradations from white to black. This exercise will help you develop control over your pencil and improve your understanding of value.
7.2 Sphere Shading Exercise
Draw a sphere and practice shading it to create a three-dimensional effect. Focus on creating smooth gradations and accurately depicting the shadow core and reflected light. Experiment with different light sources and shading techniques.
7.3 Cube Shading Exercise
Draw a cube and practice shading it to create a three-dimensional effect. Pay attention to the different planes of the cube and how they are affected by the light source. Practice drawing sharp edges and depicting variations in intensity.
7.4 Still Life Shading Exercise
Set up a simple still life with a few objects and practice shading it. Focus on accurately depicting the form shadows and cast shadows. Pay attention to the overall composition and how the lighting affects the scene.
8. Common Mistakes to Avoid
How can I avoid common shading mistakes? Avoiding common shading mistakes can help you improve your technique and create more realistic drawings.
8.1 Inconsistent Lighting
Inconsistent lighting can make your drawings look confusing and unrealistic. Make sure that the light source is consistent throughout the drawing and that the shadows are placed accordingly.
8.2 Lack of Gradation
Lack of gradation can make your shading look flat and uninteresting. Practice creating smooth transitions between different values to add depth and realism to your drawings.
8.3 Over Blending
Over blending can make your shading look muddy and indistinct. Use blending tools sparingly and focus on creating clear, defined values.
8.4 Neglecting Reflected Light
Neglecting reflected light can make your shading look flat and unrealistic. Remember to include subtle highlights on the edges of shadows to create a more three-dimensional effect.
9. Digital Shading Techniques
How can I apply shading techniques in digital art? Digital shading offers unique tools and capabilities for creating stunning artwork. Understanding digital tools and techniques is essential for any digital artist.
9.1 Using Digital Drawing Software
Familiarize yourself with digital drawing software such as Adobe Photoshop, Procreate, or Corel Painter. These programs offer a wide range of tools for creating and manipulating values, colors, and textures.
9.2 Understanding Layers and Blending Modes
Layers and blending modes are essential for digital shading. Use layers to separate different elements of your drawing and blending modes to create interesting effects and smooth transitions.
9.3 Digital Brushes for Shading
Experiment with different digital brushes for shading. Soft brushes are ideal for creating smooth gradations, while textured brushes can be used to simulate different surfaces.
9.4 Creating Depth with Digital Shading
Use digital shading techniques to create depth and realism in your artwork. Pay attention to the placement of light sources, the types of shadows you create, and the overall effect of the lighting on the composition.
10. Resources for Further Learning
How can I find additional resources to continue learning about shading? Numerous resources are available to help you continue learning about shading, including online courses, books, and workshops.
10.1 Online Courses and Tutorials
Explore online courses and tutorials on platforms such as LEARNS.EDU.VN, Udemy, Coursera, and Skillshare. These resources offer structured lessons and expert guidance on shading techniques.
10.2 Art Books on Shading
Read art books on shading to learn more about the principles of light and shadow. Look for books that cover basic techniques as well as advanced concepts.
10.3 Art Workshops and Classes
Attend art workshops and classes to learn from experienced instructors and receive personalized feedback on your work. These in-person experiences can be invaluable for improving your shading skills.
10.4 Online Art Communities
Join online art communities to connect with other artists, share your work, and receive feedback. These communities can provide support and inspiration as you continue to develop your shading skills. ArtProf.org is an excellent platform for free online visual arts education.
By following these guidelines and practicing regularly, you can develop your shading skills and create stunning artwork. Remember to be patient and persistent, and don’t be afraid to experiment with different techniques.
To further enhance your understanding and skills, check out LEARNS.EDU.VN for more comprehensive courses and detailed tutorials. We offer a range of resources designed to help you master shading and other artistic techniques. Whether you are a beginner or an experienced artist, you will find valuable information and guidance to improve your abilities.
FAQ: Shading Techniques
1. How can I learn to blend graphite smoothly?
To blend graphite smoothly, use a blending stump or tortillon and apply gentle, circular motions. Start with light layers of graphite and gradually build up the value. Avoid pressing too hard, as this can create a muddy effect.
2. What are the best pencils for shading?
The best pencils for shading are those that offer a range of values. Use harder pencils (e.g., 2H or HB) for light areas and softer pencils (e.g., 2B, 4B, or 6B) for darker areas. Experiment with different grades to find what works best for you.
3. How do I create realistic shadows?
To create realistic shadows, pay attention to the light source and the shape of the object. Use smooth gradations to create form shadows and sharp edges to create cast shadows. Don’t forget to include reflected light on the edges of shadows.
4. What is the shadow core?
The shadow core is the darkest part of the form shadow. It is typically located in the area that receives the least amount of light. Identifying and accurately depicting the shadow core will add depth and realism to your shading.
5. How can I improve my shading consistency?
To improve your shading consistency, practice regularly and pay attention to the details. Use a consistent light source and stick to a consistent set of techniques. Review your work and identify areas where you can improve.
6. How do I add texture to my shading?
To add texture to your shading, use techniques such as stippling, hatching, or scumbling. Experiment with different techniques to find what works best for you. You can also use textured paper to add a natural texture to your drawings.
7. What is the difference between hatching and cross-hatching?
Hatching involves creating parallel lines to build up value, while cross-hatching involves layering intersecting lines to create darker values. Both techniques can be used to create texture and depth in your drawings.
8. How do I avoid making my shading look muddy?
To avoid making your shading look muddy, use light layers of graphite and avoid pressing too hard. Use blending tools sparingly and focus on creating clear, defined values. Erase any areas that look too dark or muddy.
9. How can I learn to shade complex objects?
To learn to shade complex objects, start by breaking them down into simpler shapes. Practice shading each shape individually and then combine them to create the complex object. Pay attention to the light source and the overall composition.
10. What are some good resources for learning about shading?
Some good resources for learning about shading include online courses, art books, and art workshops. You can also find valuable information and guidance on websites such as LEARNS.EDU.VN and ArtProf.org.
Learning to shade objects is a rewarding journey that enhances your artistic skills and brings depth to your drawings. Remember to practice consistently, study the masters, and explore various techniques to find your unique style. With dedication and the right resources, you can master the art of shading and create stunning, realistic artwork.
Ready to take your drawing skills to the next level? Visit LEARNS.EDU.VN today to discover a wide range of courses and resources designed to help you master shading and other artistic techniques. Whether you are a beginner or an experienced artist, our comprehensive learning paths will guide you towards achieving your artistic goals. Contact us at 123 Education Way, Learnville, CA 90210, United States, or reach out via Whatsapp at +1 555-555-1212. Let learns.edu.vn be your partner in artistic growth!
