Ready to master the push-up? LEARNS.EDU.VN offers a structured, step-by-step approach to help you achieve your first perfect push-up, regardless of your current fitness level, incorporating variations, proper form, and effective training plans. Unlock your strength potential and start your push-up journey with expert guidance, building upper body power, core stability, and overall fitness.
1. Understanding the Push-Up Progression Plan
The cornerstone of any successful push-up endeavor, as highlighted by fitness experts and coaches, is consistency. Similar to mastering any skill, consistent effort in training the muscles involved in push-ups is crucial. Whether you’re starting from zero or have some experience, a structured plan that you adhere to regularly will yield the best results.
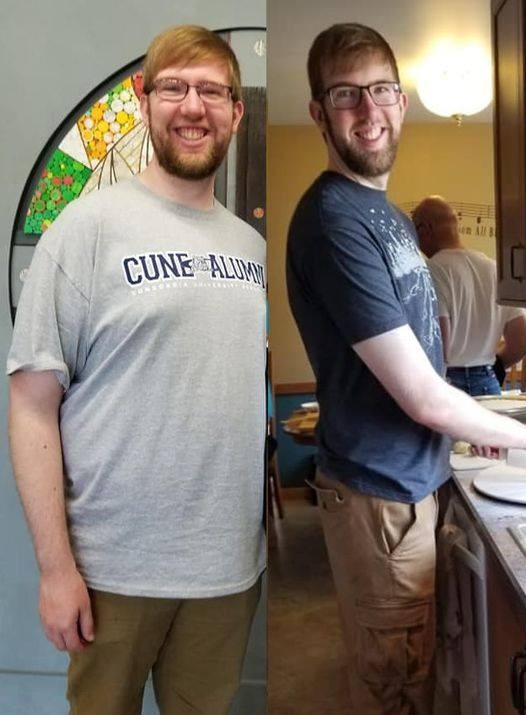
Consider the inspiring journey of Mason, who progressed from wall push-ups to diamond push-ups while losing 70 pounds. His success underscores the effectiveness of consistent training. The journey starts with mastering easier variations and gradually increasing the difficulty as strength improves.
To achieve your first push-up, embrace a consistent push-up progression plan. This involves selecting a variation you can perform comfortably for 8-10 repetitions across 3-4 sets.
2. Finding Your Starting Point: Push-Up Variations
Elevated push-up variations are a great starting point because they reduce the amount of body weight you need to lift. By placing your hands on an elevated surface, you decrease the percentage of your body weight that your arms and chest need to support.
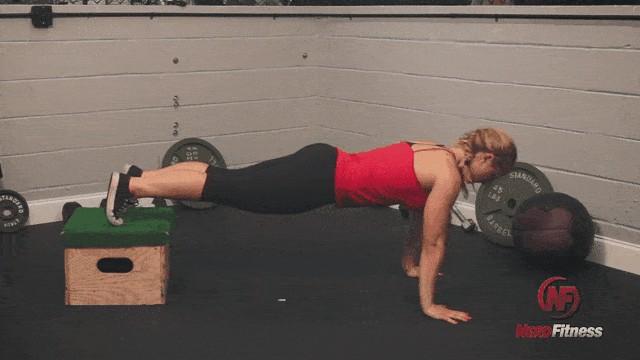
Conversely, elevating your feet increases the resistance, making the push-up more challenging:
According to exercise science research, the percentage of body weight supported by the hands changes with the elevation:
| Elevation | Percentage of Body Weight |
|---|---|
| 4’ Elevated Push-up (Wall) | 9% |
| 3′ Elevated Push-up (Countertop) | 20% |
| 2′ Elevated Push-up | 36-41% |
| Knee Push-up | 49% |
| 1′ Elevated Push-up | 54% |
| Regular Push-up | 64% |


The goal is to systematically decrease the elevation, gradually increasing the load until you can perform a standard push-up on the floor.
3. Four Essential Push-Up Variations
These variations serve as benchmarks. If you cannot complete 8-10 repetitions of a particular variation, train at the level below until you build enough strength to move up.
The four key variations in your progression plan include:
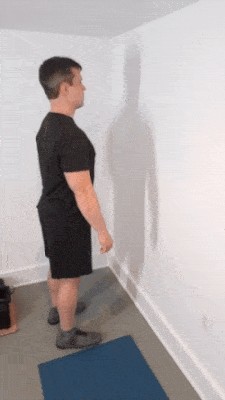
3.1. Push-Up Progression Level 1: Wall Push-Ups
Wall push-ups are the easiest variation, ideal for beginners.
How to Perform Wall Push-Ups:
- Stand facing a wall and place your hands on the wall at chest height, shoulder-width apart.
- Lean towards the wall, bending your elbows, until your chest nearly touches the wall.
- Push back to the starting position, fully extending your arms.
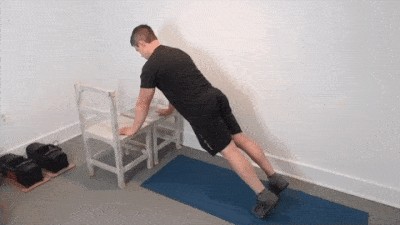
3.2. Push-Up Progression Level 2: Waist-High Push-Ups
Waist-high push-ups increase the challenge by requiring you to support more of your body weight.
How to Perform Waist-High Push-Ups:
- Place your hands on a sturdy surface, such as a countertop or bench, at waist height.
- Position yourself so that your body forms a straight line from head to heels.
- Lower your chest towards the surface, bending your elbows.
- Push back up to the starting position, maintaining a straight line throughout your body.
3.3. Push-Up Progression Level 3: Knee-High Push-Ups
Knee-high push-ups further reduce the elevation, bringing you closer to a standard push-up.
How to Perform Knee-High Push-Ups:
- Use a surface like a sturdy box or step that is about knee height.
- Place your hands on the surface, ensuring your body forms a straight line.
- Lower your chest towards the surface, bending your elbows.
- Push back up to the starting position, keeping your body aligned.
3.4. Push-Up Progression Level 4: Knee Push-Ups
Knee push-ups are performed on the floor with your knees supporting some of your weight.
How to Perform Knee Push-Ups:
- Start in a plank position, then lower your knees to the ground.
- Keep your body in a straight line from your shoulders to your knees.
- Lower your chest towards the floor, bending your elbows.
- Push back up to the starting position, maintaining body alignment.
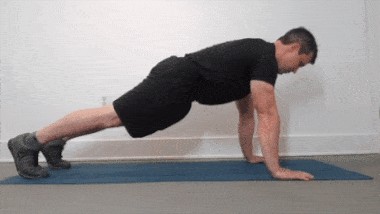
3.5. Final Boss: Push-Ups
The ultimate goal is the standard push-up, performed with your body fully extended and only your hands and toes touching the ground.
How to Perform Standard Push-Ups:
- Start in a plank position with your hands shoulder-width apart and your body in a straight line from head to heels.
- Lower your chest towards the floor, bending your elbows to a 90-degree angle.
- Push back up to the starting position, fully extending your arms while maintaining body alignment.
Progress to the next level when you can comfortably perform 8-10 repetitions with good form. If you’re looking for a structured program with clear progression signals, LEARNS.EDU.VN can help.
4. Mastering Proper Push-Up Form
Correct form is crucial for preventing injuries and maximizing the effectiveness of push-ups. Here’s a breakdown of how to perform a perfect push-up:
- Starting Position: Begin with your arms straight, glutes clenched, and abs braced. Your body should form a straight line from head to heels.
- Lowering Phase: Steadily lower yourself until your elbows are at a 90-degree angle or less. Keep your elbows relatively close to your body.
- Bottom Position: Once your chest (or nose/chin) touches the floor (or your arms reach a 90-degree angle), pause slightly.
- Pushing Phase: Push back up until you return to the starting position, maintaining a straight line throughout your body.
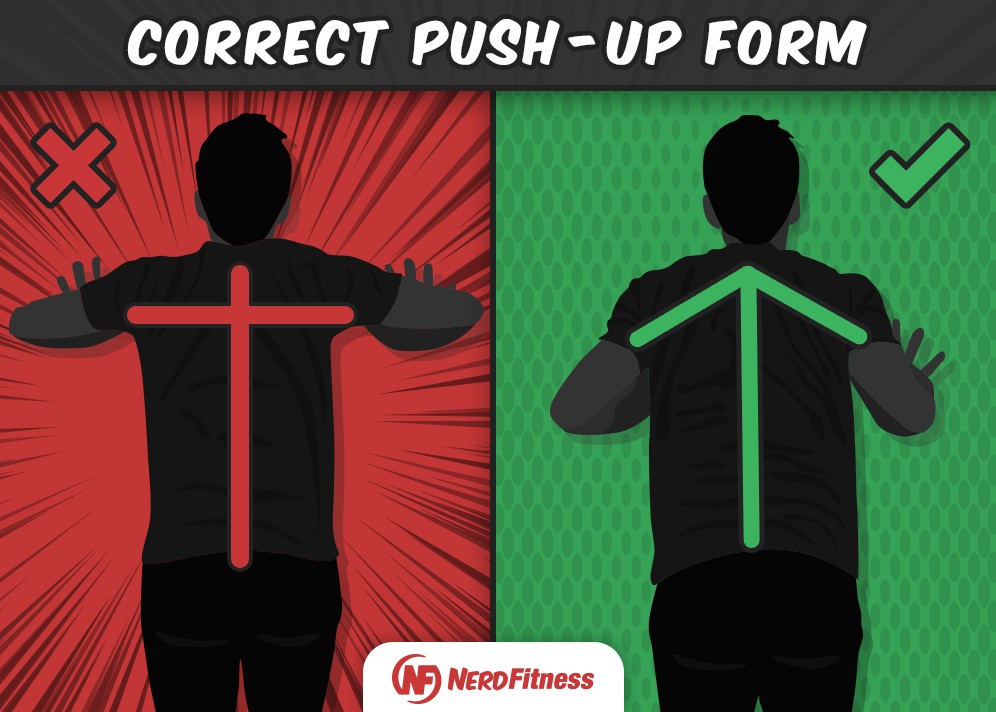
4.1. Common Mistakes to Avoid
- Elbow Flare: Ensure your elbows stay close to your body, forming an arrow shape rather than a T shape.
- Head Position: Keep your head in line with your body to avoid neck strain and ensure a full range of motion.
- Hip Sagging: Maintain a straight line from head to heels, avoiding any sagging in the hips.
- Range of Motion: Aim for a full range of motion, touching your chest to the ground or the surface you’re using for elevated push-ups, as long as it’s pain-free.
5. Exercises to Support Push-Up Progression
Two key exercises can significantly aid in achieving your first push-up:
- Push-up Negatives
- Front Planks or Top of Push-up Holds
5.1. Push-Up Negatives
The “negative” portion of an exercise involves focusing on the lowering phase, which builds strength and control.
How to Perform Push-Up Negatives:
- Start at the top of a push-up position, with your body in a straight line from shoulders to feet.
- Slowly lower yourself towards the ground, maintaining control.
- Once you reach the bottom, let your knees rest on the ground to help you push back up to the starting position.
Push-up negatives can also be performed from an elevated surface.
5.2. Front Planks or Top of Push-Up Holds
These exercises build a strong core, which is essential for maintaining proper form during push-ups.
Benefits of Planks and Holds:
- Strong Midsection: A sturdy core supports your body during push-ups, preventing sagging and ensuring efficient movement.
- Foundation for Push-Ups: If you cannot hold the top of a push-up position, completing a full repetition will be challenging.
There are several variations of planks and holds to suit different fitness levels:
5.2.1. Hold Level 1: Knee Planks
Knee planks are a modified version that reduces the load on your core.
How to Perform Knee Planks:
- Hold yourself up on your forearms and knees, with your body in a straight line from shoulders to knees.
- Engage your core and hold the position.
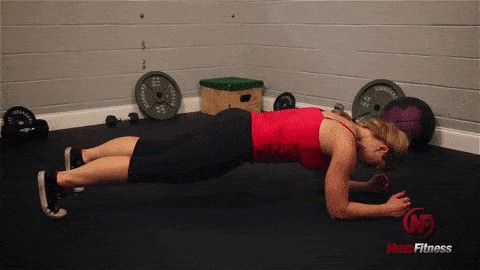
5.2.2. Hold Level 2: Front Planks
Front planks engage your entire core and improve stability.
How to Perform Front Planks:
- Lie on the floor with your forearms flat, ensuring your elbows are aligned directly under your shoulders.
- Engage your core and raise your body off the floor in a straight line from head to feet, keeping your forearms planted.
- Avoid letting your hips rise or drop.
5.2.3. Hold Level 3: Push-Up Hold
The push-up hold mimics the top position of a push-up, building strength and stability.
How to Perform Push-Up Holds:
- Hold yourself up at the top of a push-up position, with your body in a straight line from shoulders to feet.
- Engage your core and hold the position.
6. Developing a Push-Up Workout Plan
Consistency is paramount in push-up progression. Aim for three workouts per week with a rest day in between. For example, you could train on Monday, Wednesday, and Friday, or Tuesday, Thursday, and Sunday. If you can only manage two workouts per week, that’s fine too—just do your best.
A Sample “Get Your First Push-Up” Workout:
- Warm-Up
- 3-4 sets of a Push-Up Variation for 8-10 reps
- 2-3 reps of a Push-Up Negative
- 60-second Plank or Hold
6.1. Step 1: Warm-Up
A proper warm-up prepares your muscles and joints for exercise, reducing the risk of injury.
- Arm Circles: 10 repetitions in each direction
- Wrist Stretches: 5 repetitions on each side
6.2. Step 2: Train with a Push-Up Variation
Alternate between two variations to challenge your muscles in different ways.
- Day A: Perform 3-4 sets of a push-up variation that you can do for 8-10 reps.
- Day B: Perform 3-4 sets of a push-up variation that you can do for 5-8 reps (a more challenging variation).
For example, on Monday you might do 3 sets of waist-high push-ups for 10 reps, and on Wednesday, you could do 3 sets of knee-high push-ups for 8 reps. Then, on Friday, return to the waist-high variation.
6.3. Step 3: Incorporate Negatives
Attempt 2-3 reps of a negative push-up after your regular push-up sets. If these are too difficult, use an easier variation like knee push-up negatives.
Any of the variations can be performed as a negative, helping to build the necessary strength for a full push-up.
6.4. Step 4: Finish with Planks/Holds
Conclude your workout with a plank or hold to strengthen your core. Choose your preferred variation and aim to hold the position for a full minute, with as few sets as possible.
If needed, break up the 60-second hold into multiple sets (e.g., three sets of 20 seconds each or two sets of 30 seconds each). Gradually increase the duration as you get stronger. If you cannot hold for a full minute, work on knee or elevated planks.
7. Continuous Improvement: Progressive Overload
As you progress, continually increase the challenge to stimulate muscle growth and strength gains. This is known as progressive overload.
Strategies for Progressive Overload:
- Add more repetitions (e.g., increase from 8 to 9 reps of waist-high push-ups).
- Add more sets (e.g., increase from 3 to 4 sets of knee push-ups).
- Progress to a more difficult variation (e.g., move from waist-high push-ups to knee-high push-ups).
By consistently challenging yourself, you’ll steadily move closer to achieving your first full push-up.
8. Advanced Push-Up Techniques
For those who have mastered the standard push-up and are looking to advance further, here are some advanced techniques:
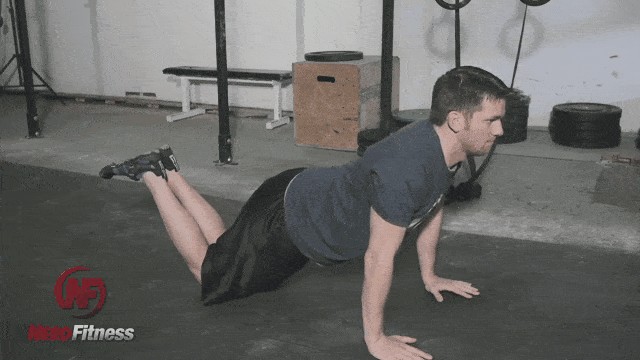
8.1. Decline Push-Ups
Decline push-ups involve elevating your feet, which shifts more of your body weight onto your upper body, increasing the intensity.
How to Perform Decline Push-Ups:
- Place your feet on a bench or elevated surface.
- Assume the standard push-up position with your hands on the floor.
- Lower your chest towards the floor, bending your elbows.
- Push back up to the starting position, maintaining a straight line from head to heels.
8.2. Diamond Push-Ups
Diamond push-ups target the triceps more directly by positioning your hands close together in a diamond shape under your chest.
How to Perform Diamond Push-Ups:
- Form a diamond shape with your thumbs and index fingers directly under your chest.
- Lower your chest towards your hands, bending your elbows.
- Push back up to the starting position, focusing on engaging your triceps.
8.3. Plyometric Push-Ups
Plyometric push-ups involve explosive movements, increasing power and strength.
How to Perform Plyometric Push-Ups:
- Start in the standard push-up position.
- Lower your chest towards the floor, then explosively push back up, lifting your hands off the ground.
- Land softly and immediately lower into the next repetition.
8.4. One-Arm Push-Ups
One-arm push-ups require significant strength and balance, engaging your core and stabilizing muscles.
How to Perform One-Arm Push-Ups:
- Start in the standard push-up position.
- Position your feet wider than usual for added stability.
- Place one hand behind your back.
- Lower your chest towards the floor, bending your elbow.
- Push back up to the starting position, maintaining balance and control.
9. The Educational and Health Benefits of Push-Ups
Push-ups are more than just a physical exercise; they provide numerous educational and health benefits that contribute to overall well-being.
9.1. Physical Health Benefits
- Upper Body Strength: Push-ups primarily target the chest, shoulders, and triceps, leading to increased upper body strength.
- Core Stability: Maintaining proper form during push-ups requires engaging the core muscles, which improves stability and balance.
- Cardiovascular Health: Push-ups can elevate your heart rate, contributing to improved cardiovascular health.
- Muscle Endurance: Performing multiple repetitions of push-ups increases muscle endurance, enabling you to perform physical tasks for longer periods.
9.2. Mental and Cognitive Benefits
- Improved Mood: Physical activity, including push-ups, releases endorphins, which can improve mood and reduce stress.
- Increased Energy Levels: Regular exercise can boost energy levels, making you feel more alert and active throughout the day.
- Enhanced Cognitive Function: Studies have shown that exercise can improve cognitive function, including memory and attention.
- Discipline and Goal Setting: Achieving push-up goals requires discipline and consistent effort, which can translate to other areas of life.
9.3. Educational Applications
- Physical Education: Push-ups are a staple in physical education programs, teaching students about bodyweight training and proper form.
- Athletic Training: Push-ups are used in athletic training to build strength and endurance for various sports.
- Rehabilitation: Modified push-ups can be used in rehabilitation programs to help individuals recover from injuries and rebuild strength.
- Self-Improvement: Learning to do push-ups provides a sense of accomplishment and encourages individuals to pursue further fitness goals.
9.4. Statistics and Research
- A study published in the Journal of Strength and Conditioning Research found that push-ups are an effective exercise for improving upper body strength and endurance.
- Research from Harvard University indicates that regular physical activity can reduce the risk of chronic diseases such as heart disease, stroke, and type 2 diabetes.
- The American Heart Association recommends that adults engage in at least 150 minutes of moderate-intensity or 75 minutes of vigorous-intensity aerobic activity each week, which can include exercises like push-ups.
10. Resources and Further Learning at LEARNS.EDU.VN
LEARNS.EDU.VN offers a wide range of resources to help you continue your fitness journey and expand your knowledge.
10.1. Fitness Courses and Programs
LEARNS.EDU.VN provides comprehensive fitness courses and programs designed to help you achieve your fitness goals. These courses cover various topics, including:
- Bodyweight Training
- Strength Training
- Core Strengthening
- Flexibility and Mobility
Each course includes detailed video tutorials, step-by-step instructions, and personalized feedback from experienced trainers.
10.2. Articles and Guides
LEARNS.EDU.VN features a library of articles and guides covering a wide range of fitness topics. These resources provide valuable information on:
- Exercise Techniques
- Nutrition
- Workout Plans
- Injury Prevention
All articles are written by experts in the field and are regularly updated to reflect the latest research and best practices.
10.3. Community Forum
LEARNS.EDU.VN hosts a community forum where you can connect with other fitness enthusiasts, ask questions, and share your experiences. This forum provides a supportive and encouraging environment where you can:
- Get advice from experienced trainers and fellow learners
- Share your progress and celebrate your achievements
- Find motivation and inspiration to stay on track
10.4. Expert Support
LEARNS.EDU.VN offers access to expert trainers who can provide personalized guidance and support. These experts can help you:
- Develop a customized workout plan based on your fitness level and goals
- Assess your form and provide feedback to prevent injuries
- Answer your questions and address your concerns
To access these resources and take your fitness journey to the next level, visit LEARNS.EDU.VN today.
11. Frequently Asked Questions (FAQ)
Q1: How long will it take to learn to do a push-up?
It varies, but with consistent training using the progression plan, you can expect to see progress within a few weeks to a few months.
Q2: What if I can’t do any of the push-up variations?
Start with wall push-ups and focus on building strength in your chest and arms.
Q3: How often should I train push-ups?
Aim for three times a week with a rest day between workouts.
Q4: Is it okay to feel sore after push-up workouts?
Some soreness is normal, but if you experience sharp pain, stop and consult a healthcare professional.
Q5: Can I do push-ups every day?
It’s best to allow your muscles time to recover, so avoid doing push-ups every day.
Q6: What are the benefits of doing push-ups?
Push-ups improve upper body strength, core stability, and cardiovascular health.
Q7: How can I make push-ups more challenging?
Try decline push-ups, diamond push-ups, or plyometric push-ups.
Q8: Are push-ups a good exercise for weight loss?
Push-ups can contribute to weight loss by building muscle, which increases your metabolism.
Q9: What should I do if I plateau in my push-up progress?
Vary your training by trying different push-up variations or increasing the intensity.
Q10: Can I learn to do push-ups at any age?
Yes, with proper modifications and a gradual progression, people of all ages can learn to do push-ups.
12. Conclusion: Your Path to Push-Up Mastery Begins Now
Learning to do push-ups is an achievable goal with the right approach and consistent effort. By following the progression plan outlined in this guide, mastering proper form, and incorporating supportive exercises, you can build the strength and confidence to perform push-ups effectively.
Remember, consistency is key. Stick to your workout plan, gradually increase the challenge, and celebrate your progress along the way. Whether you’re starting from scratch or looking to advance your skills, LEARNS.EDU.VN provides the resources and support you need to succeed.
Take the first step towards push-up mastery today and unlock the numerous physical, mental, and educational benefits that come with it. Visit LEARNS.EDU.VN to explore our fitness courses, articles, and community forum, and connect with experts who can guide you on your journey.
Ready to transform your fitness and achieve your push-up goals?
Contact us:
- Address: 123 Education Way, Learnville, CA 90210, United States
- WhatsApp: +1 555-555-1212
- Website: LEARNS.EDU.VN
Start your journey with learns.edu.vn and experience the power of consistent, guided training!