How Did Man Learn To Make Fire? Man learned to make fire through various methods, including friction, using lenses, and chemical reactions, a crucial survival skill. LEARNS.EDU.VN explores these methods in detail, providing insights into the ingenuity and persistence of our ancestors, while equipping modern learners with valuable outdoor skills. Let’s dive into the techniques of early fire creation, the evolution of fire-starting tools, and the cultural significance of this mastery to spark your curiosity.
Table of Contents
- Friction-Based Fire Making
- The Hand Drill Method
- The Fire Plough Technique
- The Bow Drill Technique
- Flint and Steel Method
- Lens-Based Methods
- Traditional Lenses Method
- Balloons and Condoms Method
- Fire From Ice Method
- Soda Can and Chocolate Bar Method
- Batteries and Steel Wool Method
- FAQ: How Did Man Learn to Make Fire?
1. Friction-Based Fire Making
Friction-based fire making represents one of the earliest and most challenging methods of creating fire. This technique involves generating heat through the rapid rubbing of wood against wood, eventually producing an ember that can be used to ignite tinder. Mastering this method requires patience, skill, and a deep understanding of the properties of different types of wood.
The essential components for friction-based fire making include a fireboard and a spindle. The fireboard is a flat piece of wood with a small notch cut into it, while the spindle is a straight, dry stick used to create friction against the fireboard. The choice of wood is crucial; ideal types include cottonwood, juniper, aspen, willow, cedar, cypress, and walnut, all known for their ability to create embers when rubbed together.
The process begins with ensuring that the wood is completely dry. Moisture can prevent the generation of sufficient heat, rendering the effort futile. Once dry wood is secured, the spindle is placed into a depression on the fireboard, and rapid, consistent pressure is applied by rolling the spindle between the hands. This continuous friction eventually produces a small ember in the notch of the fireboard. The ember is then carefully transferred to a tinder nest made of dry grass, leaves, and bark, where it is gently blown upon to ignite a flame.
While friction-based fire making is undoubtedly challenging, it offers a profound connection to our ancestral past and provides a valuable survival skill in situations where modern tools are unavailable.
2. The Hand Drill Method
The hand drill method is arguably the most primitive and demanding technique for starting a fire. This method necessitates only wood, perseverance, and significant physical effort. The process involves creating friction by rapidly spinning a spindle between the palms of your hands against a fireboard to generate an ember.
- Build a tinder nest: Create a tinder nest from easily combustible materials like dry grass, leaves, and bark. This nest will serve as the foundation for transforming the ember into a flame.
- Prepare the fireboard: Cut a V-shaped notch into the fireboard and make a small depression adjacent to it. This notch will collect the ember produced by friction.
- Position the bark: Place a piece of bark underneath the notch to catch the ember as it falls from the fireboard.
- Initiate spinning: Place the spindle into the depression on the fireboard. The spindle should ideally be about two feet long for effective use. Apply consistent pressure to the board and begin rolling the spindle rapidly between your hands, moving them quickly down the spindle’s length.
- Sustain the effort: Continue this spinning motion until an ember forms on the fireboard. This process requires sustained effort and patience.
- Start the fire: Once a glowing ember is visible, carefully tap the fireboard to drop the ember onto the piece of bark. Transfer the bark with the ember to your tinder nest. Gently blow on the ember to encourage it to ignite the tinder and start a flame.
The hand drill method, while challenging, underscores the ingenuity of early humans and their ability to harness natural resources to create fire. For additional insights and practical tips on mastering this ancient skill, visit LEARNS.EDU.VN, where you can discover a wealth of educational resources to enhance your knowledge and abilities.
3. The Fire Plough Technique
The fire plough is another friction-based method for starting a fire, involving rubbing a spindle along a groove in a fireboard to generate heat and create an ember. This technique is less common than the hand drill or bow drill but offers a viable alternative when other tools are unavailable.
- Prepare the Fireboard: Begin by cutting a groove into the fireboard. This groove will serve as the track for the spindle as you rub it back and forth.
- Initiate Rubbing: Take the tip of your spindle and place it in the groove of the fireboard. Apply pressure and start rubbing the tip of the spindle up and down the groove in a consistent, rapid motion.
- Create an Ember: Continue rubbing until the friction generates enough heat to produce an ember. This process requires sustained effort and may take some time.
- Start a Fire: Position your tinder nest at the end of the fireboard, so that the embers you create are plowed directly into it as you rub. Once an ember catches in the tinder nest, gently blow on it to encourage it to ignite and start a flame.
The fire plough technique, while simple in concept, requires precision and persistence to execute effectively. By exploring the resources at LEARNS.EDU.VN, you can deepen your understanding of this ancient method and gain valuable skills for wilderness survival.
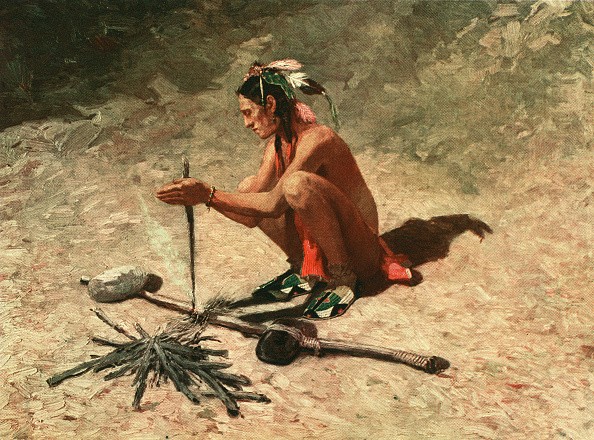
4. The Bow Drill Technique
The bow drill stands out as one of the most efficient friction-based methods for initiating fire, primarily because it simplifies the maintenance of both speed and pressure, crucial for generating adequate friction. In addition to the spindle and fireboard, this technique necessitates a socket and a bow.
- Acquire a Socket: The socket is instrumental in applying pressure to the upper end of the spindle while it is being rotated by the bow. This can be a stone or a piece of wood. When opting for wood, select a piece that is harder than the spindle material. Woods containing sap or oil are particularly advantageous as they provide lubrication between the spindle and socket.
- Construct Your Bow: The bow should approximate the length of your arm and be crafted from a flexible piece of wood with a gentle curve. The bowstring can be fashioned from any durable material, such as a shoelace, rope, or strip of rawhide. Ensure the string is securely fastened to the bow.
- Prepare the Fireboard: Cut a V-shaped notch and create a depression adjacent to it in the fireboard. Place your tinder underneath this notch to catch the ember.
- Set Up the Spindle: Position the spindle within the loop of the bowstring. Place one end of the spindle in the depression on the fireboard, and apply pressure to the other end using the socket.
- Begin Sawing: Employing the bow, initiate a back-and-forth sawing motion. This action effectively turns your setup into a rudimentary mechanical drill, causing the spindle to rotate rapidly.
- Create an Ember: Persist with the sawing motion until the friction generates an ember within the notch on the fireboard. This process may require several minutes of consistent effort.
- Start Your Fire: Carefully transfer the ember into the tinder nest and gently blow on it to ignite the tinder.
The bow drill is celebrated for its effectiveness and mechanical advantage, making it a favored method among survival experts. For more comprehensive guidance and advanced techniques, visit LEARNS.EDU.VN, where you can access detailed tutorials and expert advice on mastering fire-starting and other essential outdoor skills.
5. Flint and Steel Method
The flint and steel method is a time-honored technique for creating fire, and carrying a flint and steel set is always a wise precaution during camping trips. While matches can become useless when wet, a spark can still be reliably generated by striking steel against flint.
If you find yourself without a dedicated flint and steel set, improvisation is possible using quartzite and the steel blade of your pocketknife. Additionally, char cloth, which is cloth transformed into charcoal, is essential for catching the spark and smoldering without immediately bursting into flames. In the absence of char cloth, a piece of fungus or birch bark can serve as a substitute.
- Grip the Rock and Char Cloth: Hold the piece of rock between your thumb and forefinger, ensuring that an edge extends about 2 or 3 inches. Grasp the char cloth between your thumb and the flint.
- Strike: Hold the steel striker or the back of your knife blade and strike it against the flint multiple times. The sparks produced from the steel will land on the char cloth, causing it to glow.
- Start a Fire: Fold the char cloth into a tinder nest and gently blow on it to encourage a flame.
The flint and steel method is reliable and effective, making it a valuable skill for outdoor enthusiasts. For further information and detailed instructions, visit LEARNS.EDU.VN, where you can access a wealth of resources to enhance your knowledge and skills.
6. Lens-Based Methods
Utilizing a lens to ignite a fire offers a straightforward, matchless method that harnesses the power of sunlight. The fundamental principle involves focusing sunlight onto a small area to generate sufficient heat to ignite tinder.
7. Traditional Lenses Method
To initiate a fire using a traditional lens, any type of lens capable of concentrating sunlight into a focused point will suffice. Magnifying glasses, eyeglasses, and binocular lenses are all viable options. Enhancing the lens’s effectiveness can be achieved by adding water, which intensifies the beam.
- Focus the Sunlight: Angle the lens towards the sun to concentrate the beam into the smallest possible area. This maximizes the heat generated at the focal point.
- Position the Tinder: Place your tinder nest directly under the focal point of the lens. Ensure the tinder is dry and easily combustible.
- Ignite the Tinder: Hold the lens steady, allowing the concentrated sunlight to heat the tinder. Within a short period, the tinder should begin to smoke and eventually ignite.
- Start a Fire: Once the tinder is burning, carefully transfer it to a larger tinder bundle and gently blow on it to encourage a flame.
The primary limitation of the lens-based method is its dependence on sunlight. It is ineffective during nighttime or overcast conditions.
8. Balloons and Condoms Method
Balloons and condoms can be ingeniously transformed into fire-starting lenses by filling them with water.
- Fill with Water: Carefully fill a balloon or condom with water and securely tie off the end. The goal is to create a spherical shape that will effectively focus sunlight.
- Shape the Lens: Ensure the inflated balloon or condom is not too large, as excessive size can distort the sunlight’s focal point. Experiment by gently squeezing the balloon or condom to find a shape that produces a sharp, concentrated circle of light.
- Focus the Light: Hold the makeshift lens 1 to 2 inches above your tinder nest. Adjust the position until the sunlight is focused into a small, intense spot on the tinder.
- Ignite the Tinder: Allow the concentrated sunlight to heat the tinder until it begins to smoke and ignite.
- Start a Fire: Once the tinder is burning, carefully transfer it to a larger tinder bundle and gently blow on it to encourage a flame.
Condoms and balloons typically have a shorter focal length than traditional lenses, requiring closer proximity to the tinder. This method is a creative and resourceful way to start a fire using everyday materials.
9. Fire From Ice Method
Creating fire from ice is not just a concept from a cliché movie; it’s a practical survival skill. By shaping ice into a lens, you can concentrate sunlight to ignite tinder, making it particularly useful in winter camping scenarios.
- Obtain Clear Water: Start with clear water to ensure the ice is transparent. Impurities or cloudiness in the ice will prevent it from focusing sunlight effectively. The best way to get clear ice is to fill a bowl, cup, or foil container with clear lake or pond water, or melted snow.
- Freeze the Water: Let the water freeze until a block of ice about 2 inches thick is formed. Ensure the ice is solid and free of cracks.
- Shape the Ice into a Lens: Use a knife to carefully carve the ice into a lens shape. Remember, a lens is thicker in the middle and narrower at the edges.
- Polish the Lens: After achieving the rough shape of a lens, polish it with your hands. The heat from your hands will melt the ice slightly, creating a smooth surface.
- Focus the Light: Angle the ice lens towards the sun, just as you would with any other lens. Focus the light on your tinder nest.
Witnessing the transformation of this once-clichéd idea into reality can be a rewarding experience.
10. Soda Can and Chocolate Bar Method
The soda can and chocolate bar method may seem unconventional, but it demonstrates a clever application of physics for fire-starting. This technique relies on using chocolate as a polishing agent to create a reflective surface on the bottom of a soda can, which then acts as a parabolic mirror to focus sunlight.
- Polish the Soda Can: Begin by opening a chocolate bar and rubbing it on the bottom of the soda can. The chocolate acts as a polishing compound, making the can’s surface shiny and reflective. If chocolate is unavailable, toothpaste can be used as an alternative.
- Create a Parabolic Mirror: After polishing, the bottom of the can essentially becomes a parabolic mirror. Sunlight reflects off the polished surface, converging at a single focal point. This is similar to how a mirror telescope works.
- Focus the Light: Point the bottom of the can towards the sun. The reflected sunlight will create a highly focused ray aimed directly at your tinder.
- Ignite the Tinder: Place the tinder about an inch away from the focal point of the reflecting light. Within a few seconds, the concentrated sunlight should ignite the tinder, creating a flame.
This method underscores the resourcefulness of using everyday items in unexpected ways to achieve survival goals.
11. Batteries and Steel Wool Method
The batteries and steel wool method is straightforward and serves as an engaging educational activity, particularly for children. This technique exploits the principle of electrical resistance to generate heat and ignite the steel wool.
- Prepare the Steel Wool: Stretch out a piece of steel wool to be about 6 inches long and ½ inch wide. This increases the surface area and allows for better airflow.
- Rub the Battery on the Steel Wool: Hold the steel wool in one hand and the battery in the other. While any battery will work, a 9-volt battery is most effective due to its higher voltage. Rub the side of the battery with the contacts against the steel wool.
- Ignite the Steel Wool: As the battery contacts the steel wool, electrical resistance will cause the wool to heat up rapidly and begin to glow and burn.
- Transfer to Tinder Nest: Once the steel wool is burning, gently blow on it to encourage a flame. Transfer the burning wool quickly to your tinder nest to ignite it. The steel wool’s flame will extinguish rapidly, so act promptly.
- Start a Fire: With the tinder nest ignited, continue to gently blow on it until a steady flame is established.
This method demonstrates a practical application of basic physics principles and can be a valuable skill in emergency situations.
FAQ: How Did Man Learn to Make Fire?
- What were the first methods humans used to create fire?
Early humans likely used friction-based methods such as the hand drill, fire plough, and bow drill, as well as striking flint against pyrite to generate sparks. These methods required significant skill and persistence. - How important was fire to early human survival?
Fire was crucial for warmth, cooking, protection from predators, and extending the day into the night. It allowed humans to inhabit colder climates and improve their diet. - What is the bow drill method, and why is it effective?
The bow drill uses a bow to spin a spindle against a fireboard, generating friction and heat. It’s effective because it allows for consistent speed and pressure, making it easier to create an ember. - What is the significance of tinder in fire starting?
Tinder is essential because it’s easily combustible material that catches the initial spark or ember and turns it into a flame. Common tinder materials include dry grass, leaves, and bark. - Can lenses really be used to start a fire?
Yes, lenses can focus sunlight to create a hot point that can ignite tinder. Magnifying glasses, eyeglasses, and even water-filled balloons or ice can be shaped into lenses for this purpose. - How does striking flint and steel create a fire?
Striking steel against flint produces sparks that can ignite char cloth or other tinder. The sparks are hot enough to cause the tinder to smolder, which can then be blown into a flame. - What is char cloth, and why is it useful for fire starting?
Char cloth is fabric that has been partially burned, making it extremely easy to ignite with a spark. It’s useful because it catches sparks readily and smolders long enough to transfer to a tinder nest. - Why is the right choice of wood important in friction-based fire making?
Certain woods, like cottonwood, juniper, and cedar, are more effective for friction-based fire making because they are soft enough to create friction easily but also produce a good ember. - What role did fire play in the development of human society?
Fire led to advancements in cooking, which made food more digestible and nutritious. It also facilitated social gatherings, provided light for nighttime activities, and played a role in early technologies like pottery and metalworking. - How can I learn more about traditional fire-making techniques?
Visit LEARNS.EDU.VN for detailed guides, tutorials, and resources on traditional fire-making techniques, as well as other essential survival skills. You’ll find expert advice and practical tips to enhance your knowledge and abilities.
Understanding how our ancestors mastered fire-making is a fascinating journey into human ingenuity and resilience. At LEARNS.EDU.VN, we are dedicated to providing comprehensive and accessible educational content to help you explore a wide range of topics, from ancient skills to modern innovations.
Are you eager to deepen your understanding of fire-making techniques or explore other survival skills? Visit LEARNS.EDU.VN today to discover our extensive collection of articles, tutorials, and courses designed to empower you with knowledge and practical skills.
For further inquiries, please contact us at:
Address: 123 Education Way, Learnville, CA 90210, United States
WhatsApp: +1 555-555-1212
Website: LEARNS.EDU.VN
Explore, learn, and grow with learns.edu.vn!