Learning how to do a handstand involves progressive training, and at LEARNS.EDU.VN we’ve simplified this process into manageable steps. Mastering this skill requires a blend of strength, balance, and coordination that can be achieved through consistent practice and a strategic approach. This comprehensive guide will provide you with the best handstand progression and the know-how to achieve your fitness goals, also enhance your core strength, improve body awareness, and increase confidence.
1. Essential Handstand Concepts
Before diving into the physical aspects of handstands, understanding the fundamental principles is crucial. A solid foundation in these concepts will significantly enhance your learning experience and prevent common pitfalls.
1.1. The 5P Framework
At LEARNS.EDU.VN, we structure our training sessions using the “5P Framework”: Prepare, Practice, Play, Push, and Ponder. This framework ensures a well-rounded approach to learning and mastering the handstand.
- Prepare: Targeted exercises to warm up your body for the specific handstand work ahead.
- Practice: Breaking down the handstand into smaller, manageable components.
- Play: Exploring your capabilities with comfortable variations.
- Push: Improving conditioning for the handstand.
- Ponder: Reflecting on the session to learn and improve for the next time.
The 5P Framework is essential for a structured handstand practice, as it prepares your body, refines technique, encourages exploration, builds strength, and fosters mindful reflection.
1.2. Additional Tips for Handstand Success
To maximize your progress and enjoyment, keep these tips in mind:
- What is an attempt: Focus on performing a clean attempt at your current level. Avoid information overload and concentrate on one aspect per attempt.
- How to rest between attempts: Use active rest to mindfully consider your previous attempt and plan your next focus.
- Let go of expectations: Progress isn’t linear. Accept that you’ll have good and bad days, and simply show up consistently.
- Know when to call it a day: Stop practicing when your form deteriorates to avoid reinforcing bad habits.
- Working on your line vs. holding for time: Prioritize building endurance and strength, which will provide more opportunities to refine your handstand alignment.
1.3. The Importance of Body Awareness
Understanding how your body moves and balances is critical. Developing body awareness helps you make subtle adjustments to maintain balance and alignment in your handstand. This involves paying attention to how your weight is distributed through your hands, how your core engages, and how your legs contribute to stability.
1.4. Setting Realistic Goals
Starting with realistic goals is essential for staying motivated. Instead of aiming for a perfect handstand immediately, focus on incremental improvements. For example, set a goal to hold a wall-assisted handstand for 15 seconds, then 30 seconds, and so on.
1.5. Consistency is Key
Consistency is one of the most important factors in learning a handstand. Regular practice, even if it’s just for a few minutes each day, will lead to steady progress. Make handstand training a part of your routine, and you’ll gradually build the strength, balance, and coordination needed to succeed.
2. Handstand Assessment: Find Your Weak Spots
Before you start training, it’s crucial to assess your current physical condition. This assessment helps you identify areas that need improvement and prevents potential injuries.
2.1. Wrist Strength & Flexibility Assessment
This assessment determines your wrist extension ability. Limited extension doesn’t preclude handstands but indicates a need for more wrist preparation.
2.2. Shoulder Mobility Assessment
Similar to the wrist assessment, this evaluates your shoulder flexion. Tight shoulders may require additional preparation and a lower-level practice.
2.3. Wall Walk Assessment
This assessment tests your comfort and stability upside down. Perform it slowly, especially if it’s your first time.
2.4. Core Strength Assessment
Your core is essential for maintaining stability in a handstand. Assess your core strength with exercises like planks and hollow body holds. If you struggle with these, incorporate core-strengthening exercises into your routine.
2.5. Balance Assessment
Your balance is crucial for holding a handstand. Assess your balance by standing on one leg and performing small movements. If you struggle, incorporate balance exercises like single-leg squats and wobble board training.
2.6. Flexibility Assessment
Flexibility in your wrists, shoulders, and hamstrings is essential for a good handstand. Assess your flexibility by performing stretches and noting any tight areas. Incorporate stretching exercises into your routine to improve your flexibility.
2.7. Importance of Regular Assessments
Regular assessments are crucial for tracking your progress and adjusting your training plan accordingly. Conduct these assessments every few weeks to ensure you’re moving in the right direction and addressing any weaknesses.
3. Handstand Warm-Up (Prepare Your Body)
Warming up is crucial to prepare your body for the demands of handstand practice. It increases blood flow to the muscles, improves joint mobility, and reduces the risk of injury.
3.1. Wrist Exercises
Handstands place significant strain on the wrists, so it’s essential to prepare them properly.
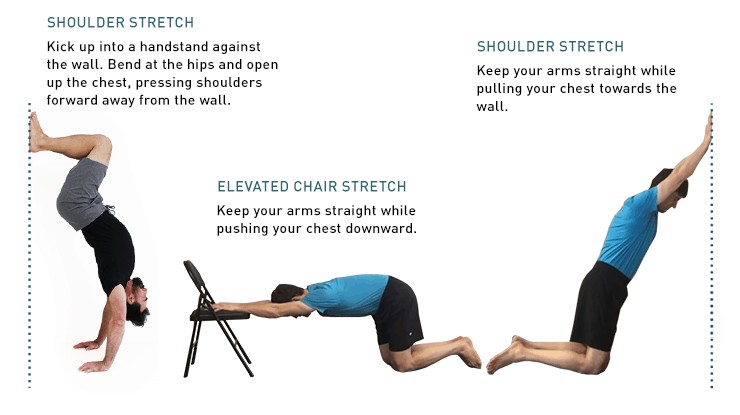
3.2. Shoulder Warm-Up Exercises
Good shoulder mobility is crucial for proper alignment in a handstand.
Shoulder stretches are crucial for handstand preparation, enhancing flexibility, preventing injuries, and ensuring proper alignment and balance.
3.3. Additional Warm-Up Exercises
- Seated Leg Squeeze: Helps you understand how to squeeze your lower body while upside down.
- Handstand Bails: Learn to bail comfortably to overcome fear and prevent injury.
3.4. Dynamic Stretching
Incorporate dynamic stretching exercises into your warm-up routine to further enhance mobility and prepare your muscles for the workout. Examples include arm circles, leg swings, and torso twists.
3.5. Core Activation
Activate your core muscles with exercises like planks, bird-dog, and dead bugs. This will improve stability and control during your handstand practice.
3.6. Importance of Progressive Warm-Up
Start with light exercises and gradually increase the intensity to avoid shocking your body. A progressive warm-up ensures that your muscles and joints are fully prepared for the demands of handstand training.
4. Step-by-Step Handstand Drills & Progressions (Practice Your Handstand Skills)
The Practice portion is the most critical part of learning any skill, including handstands. Consistent, focused practice is key to mastering the necessary skills.
4.1. Handstand Progressions
A handstand symbolizes strength, balance, and body control, serving as both a physical challenge and a testament to dedication and progressive training.
- Elevated A-Frame: Develop foundational strength and stability.
- Frogger: Build core strength and balance.
- High Frogger: Increase core engagement and control.
- Elevated L-Stand: Improve shoulder strength and alignment.
- Wall Entries: Practice controlled entries into a handstand position.
- Wall Float: Enhance balance and body awareness.
- Wall Line Work: Refine alignment and stability against the wall.
- Split Leg Kick Up: Develop control and precision in your kick-up.
- Straddle Handstand: Work on balance and alignment in a straddled position.
- Full Handstand Entries: Practice freestanding handstand entries.
4.2. Treat Exercises as Tetris Pieces
Instead of viewing these exercises as rigid steps, think of them as pieces of a Tetris board. Adapt them to your specific needs and progress.
4.3. Proper Alignment
Focus on maintaining proper alignment throughout each progression. This involves keeping your body in a straight line from your hands to your feet, engaging your core, and squeezing your glutes and legs.
4.4. Controlled Movements
Perform each exercise with controlled movements, avoiding any jerky or rushed motions. This will help you build strength, balance, and body awareness while minimizing the risk of injury.
4.5. Regular Practice
Regular practice is crucial for making progress. Aim to practice these progressions several times a week, gradually increasing the difficulty as you improve.
4.6. Listen to Your Body
Pay attention to how your body feels during each exercise, and don’t push yourself too hard, especially when you’re just starting. Rest when needed, and modify exercises if necessary to accommodate any limitations or discomfort.
4.7. Record Your Progress
Keep track of your progress by recording your workouts and noting any improvements or challenges. This will help you stay motivated and make informed decisions about your training plan.
5. Handstand Exploration (Play with Your Skills)
Playful exploration is key to mastering the skills you’ve practiced. It allows you to develop creativity, adaptability, and a deeper understanding of the handstand.
5.1. What is Play?
Play involves experimenting with variations that you’re completely comfortable with. It’s about finding different ways to explore those variations.
5.2. Examples of Play
If you’ve been working on wall kick-ups, try moving your head around in different directions to see how it changes things. Or experiment with different ways of breathing, or with where you place the pressure through your palms.
5.3. Integrating Play into Your Routine
Incorporate play into your training sessions by setting aside time for experimentation. This could involve trying new variations, combining exercises, or simply exploring different ways to move and balance on your hands.
5.4. Benefits of Play
Play helps you develop creativity, adaptability, and a deeper understanding of the handstand. It also makes training more enjoyable and less monotonous, which can improve motivation and adherence.
5.5. Safety Considerations
While play is about exploration, it’s essential to prioritize safety. Start with variations that you’re comfortable with, and gradually progress to more challenging ones as your skills improve.
5.6. Document Your Explorations
Keep a journal of your explorations, noting any insights or discoveries you make. This will help you track your progress and identify new areas for exploration.
5.7. Share Your Experiences
Share your experiences with other handstand practitioners, either online or in person. This can provide valuable feedback and inspiration, and help you discover new ways to play and explore the handstand.
6. Handstand Conditioning (Push Your Skills)
Conditioning strengthens your body and improves your range of motion, enabling you to hold a straighter handstand for longer.
6.1. Handstand Conditioning Exercises
- Band Drill: Enhances shoulder stability and strength.
- A-Frame Shrugs: Strengthens the shoulders and upper back.
- Hollow Body Hold: Builds core strength and stability.
- High Frogger: Improves core engagement and control.
6.2. Focus on Lower-Level Skills
Work at a lower skill level to maintain high-quality movement. This ensures that you’re building strength and stability without compromising your form.
6.3. Targeted Drills
These exercises focus on specific parts of the handstand, unlike simply trying to hold a handstand for as long as possible. This approach is much more effective, especially for beginners.
6.4. Progressive Overload
Gradually increase the intensity and duration of your conditioning exercises to continue challenging your body. This could involve adding resistance, increasing the number of repetitions, or holding exercises for longer periods.
6.5. Rest and Recovery
Allow your body adequate rest and recovery between conditioning sessions. This will help prevent overtraining and reduce the risk of injury.
6.6. Nutrition
Support your conditioning efforts with a balanced diet that provides the nutrients your body needs to build and repair muscle tissue.
6.7. Stay Consistent
Consistency is key to seeing results from your conditioning efforts. Make it a regular part of your training routine, and you’ll gradually build the strength and endurance needed to perform a handstand with confidence.
7. Reflect on Your Practice and Learn from Mistakes (Ponder on Your Performance)
Mindful reflection is crucial for improving your handstand practice. Taking time to analyze your performance can dramatically enhance your overall experience and progress.
7.1. Key Points for Reflection
- Take a few minutes after each session to reflect on what you’ve learned.
- Think about what went well, what you struggled with, and how you can apply that to the next session.
- If you’re not enjoying the process, reexamine your approach.
7.2. The Importance of Expectations
Progress isn’t linear, and it’s easy to get discouraged by day-to-day fluctuations in performance. By reflecting on your practice, you can see the bigger picture over time.
7.3. Recording Your Reflections
Keep a journal to document your reflections, noting any insights, challenges, or breakthroughs you experience. This will provide a valuable record of your progress and help you identify patterns or areas for improvement.
7.4. Seek Feedback
Share your reflections with other handstand practitioners or a coach, and ask for feedback. This can provide valuable perspective and help you identify blind spots in your practice.
7.5. Adjust Your Approach
Use your reflections to adjust your approach to handstand training. This could involve modifying your exercises, changing your training schedule, or seeking additional resources or guidance.
7.6. Celebrate Your Successes
Take time to celebrate your successes, no matter how small they may seem. This will help you stay motivated and build confidence in your abilities.
7.7. Embrace the Process
Remember that learning a handstand is a journey, not a destination. Embrace the process, and enjoy the challenges and rewards that come with it.
8. Handstand Positioning and Breathing Tips
Proper positioning and breathing are essential for a successful handstand. Understanding these concepts can transform your practice and make the journey smoother.
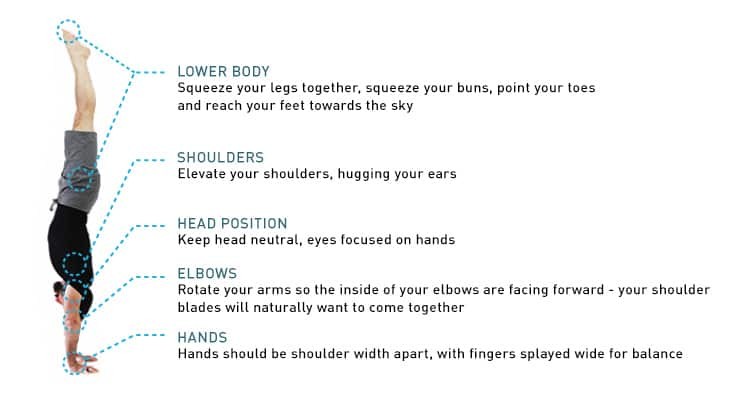
8.1. Key Positioning Tips
Proper handstand positioning involves stacking joints, maintaining tension, balancing through the hands, and controlled breathing to ensure stability and alignment.
- Stack the blocks: Align your joints in a straight line for a solid position.
- Maintain tension: Squeeze everything to create stability, keeping your neck loose and comfortable.
- Balance through your hands: Shift your body slightly to maintain balance by pressing through your fingers and the heels of your hands.
- Say your ABCs: A technique to ensure you breathe while in the handstand.
- Cartwheel to bail: Practice your cartwheel to safely exit the handstand when needed.
8.2. Breathing Techniques
Proper breathing is crucial for maintaining stability and control in a handstand. Practice breathing techniques such as diaphragmatic breathing to engage your core and maintain balance.
8.3. Visualizations
Use visualizations to improve your positioning and balance. Imagine yourself as a solid, straight line from your hands to your feet, engaging your core and maintaining proper alignment.
8.4. Practice Regularly
Regular practice is crucial for mastering proper positioning and breathing techniques. Dedicate time to these aspects of your training, and you’ll gradually improve your handstand performance.
8.5. Seek Guidance
If you’re struggling with positioning or breathing, seek guidance from a qualified handstand coach or instructor. They can provide personalized feedback and help you address any challenges.
8.6. Stay Patient
Mastering proper positioning and breathing takes time and practice. Stay patient with yourself, and focus on making incremental improvements over time.
8.7. Incorporate Mobility Work
Incorporate mobility work into your routine to improve your range of motion and flexibility. This can help you achieve proper positioning and reduce the risk of injury.
9. Learn to Handstand: Your Training Plan
Putting all the pieces together will streamline your handstand practice and make it more focused and directed.
9.1. Basic Practice Tips
- Practice 2-4 times a week for efficient skill acquisition.
- Aim for 15-45 minute sessions, depending on your commitment.
- Remember that progress varies; stay consistent and you’ll improve.
9.2. Sample Program (4 Days a Week, 45 Minutes Per Session)
| Monday/Thursday | Tuesday/Friday |
|---|---|
| Prepare | Prepare |
| 10 minutes total: | 15 minutes total: |
| • Wrist prep | • Do the full prep routine |
| • Shoulder prep | |
| • A-Frame Shrugs | |
| Practice | Practice |
| 20 minutes total: | 20 minutes total: |
| • Bailing Practice and Entries [5 minutes] | • Bailing Practice and Entries [5 minutes] |
| • Single attempt handstand holds [15 minutes] | • Single attempt handstand holds [15 minutes] |
| Play | Play |
| 5 minutes total: | 5 minutes total: |
| • Kicking up to hold before you bail | • Kicking up to hold before you bail |
| • High Frogger tying to pause at the top | • High Frogger tying to pause at the top |
| • Wall Floats | • Wall Floats |
| Push | Push |
| 5 minutes total: | No push session today! Take it easy 🙂 |
| • 1-minute Stamina Hold x 3 | |
| • 1-minute Hollow Body Hold x 2 | |
| Ponder | Ponder |
| 5 minutes total: | 5 minutes total: |
| • Reflect on the session and prep for the next one. | • Reflect on the session and prep for the next one. |


9.3. Adjust the Program
Adapt this template to fit your individual needs and goals. Adjust the exercises, duration, and frequency as needed to challenge yourself while staying within your abilities.
9.4. Variety in Training
Incorporate variety into your training plan to keep things interesting and prevent plateaus. This could involve trying new exercises, exploring different handstand variations, or seeking out new resources and guidance.
9.5. Listen to Your Body
Pay attention to how your body feels during each workout, and don’t hesitate to modify your training plan if needed. Rest when needed, and adjust exercises to accommodate any limitations or discomfort.
9.6. Stay Flexible
Be prepared to adjust your training plan as needed based on your progress and any challenges that arise. Flexibility is key to staying on track and achieving your handstand goals.
9.7. Long-Term Planning
Think about your long-term goals and create a training plan that supports them. This could involve setting milestones, tracking your progress, and celebrating your achievements along the way.
10. Advanced Handstand Variations
For those who’ve achieved a high level of skill, taking their practice further can be a rewarding challenge.
10.1. Exploring Advanced Skills
In the world of advanced hand balancing, people are constantly pushing the boundaries. Some variations are truly awe-inspiring.
10.2. Resources for Advanced Training
While we’re not advanced hand balancers, we have some good resources for certain skills. For Cirque-du-Soleil-level tricks, we recommend Yuval Ayalon, Yuri Marmerstein, or Miguel Santana.
10.3. One-Arm Handstand (OAHS)
This is a challenging skill that requires a high level of strength, balance, and control. Work towards this gradually, focusing on proper alignment and technique.
10.4. Handstand Push-Ups
These can be done against a wall or freestanding. They require significant upper body strength and core stability.
10.5. Press Handstands
These involve pressing from a seated or standing position into a handstand. They require a combination of strength, flexibility, and body control.
10.6. Acrobatic Handstand Variations
These include skills such as handstand walks, handstand rolls, and other dynamic movements. They require a high level of coordination and body awareness.
10.7. Safety First
When attempting advanced handstand variations, prioritize safety. Work with a qualified coach or instructor, and use proper spotting techniques to prevent injury.
11. FAQs about Holding a Handstand
With the rising popularity of handstands, many people have questions about their benefits, practice methods, and safety.
11.1. What if I Can’t Keep My Balance?
Master the set-up, control the kick-up, and learn to bail. These three components are crucial for perfecting your handstand balance.
11.2. Do Handstands Build Muscle?
Not really, no. Handstand practice primarily improves strength in the fingers, wrists, arms, shoulders, back, core, and legs.
11.3. Do You Need to Be Strong to Do a Handstand?
You don’t need to be mega strong to get started. However, you want to make sure that your wrists, shoulders, and arms are strong and flexible enough to support your weight in an inverted position.
11.4. How Do You Get Strong Enough to Do a Handstand?
With practice! Start with the most basic progressions and gradually build up your strength and control.
11.5. How Do You Do a Handstand Against a Wall?
There are two ways to do this:
- Facing the wall—Walk up the wall.
- Facing away from the wall—Use a split leg kick-up.
11.6. What Muscles Does a Handstand Use?
The entire body. However, you will mainly feel it in your fingers, wrists, shoulders, and core when done properly.
11.7. Are Handstands Good for You?
Sure. They can be when done in a safe and healthy manner. Some of the benefits of practicing handstand include:
- Increased blood circulation
- Improves spatial awareness
- Builds wrist, shoulder, and core strength
- Improves balance and control throughout the body
- Can help your mind relax once you get past the initial frustration aspect of learning them
- Makes you cooler at parties
11.8. How Do You Train to Do a Handstand?
- First, train safety and strength—practice bails and wall walks.
- Then, train the entry for balance while continuing to work on strength—practice kick-ups and wall work.
- Finally, work on your endurance for the freestanding handstand—practice freestanding kick-ups, holds, and wall holds.
11.9. How Long Should I Do a Handstand For?
If you’re asking this question then I say for as long as you can. Depending on the particular goals you have, being able to hold it for 10 seconds could be adequate.
11.10. How Do You Hold a Handstand for a Minute?
Like anything, you gradually work up to it. A great way to train at any level is to perform your best freestanding hold for as long as you can, then immediately go to the wall facing inwards and hold it for 5 to 10 seconds longer than your freestanding handstand attempt.
11.11. How Long Does It Take to Learn Handstands?
There isn’t one answer to that. It depends on so many variabilities for each individual, so there’s really no way for me to give a blanket answer to that.
11.12. Should You Do Handstands Every Day?
I wouldn’t say you should but some people do enjoy doing them everyday. If that is something you’d like to do then I suggest slowly building up to doing that.
11.13. Are Handstands Bad for Your Back?
They can be if you find yourself performing “banana” handstands due to poor core stability or poor range of motion in your shoulders. But if you build up your strength slowly and with an emphasis on control, practicing handstands is not bad for the back at all.
11.14. Can Headstands Be Dangerous?
Any movement can be dangerous. That is why it is good to start at the beginning and gradually work on increasing your strength, flexibility, and control with each progression or variation before moving on to the next level. But no, headstands are not inherently dangerous.
11.15. Are Handstand Push-Ups Dangerous?
Only if done in a dangerous way.
11.16. Can You Lose Weight Doing Handstands?
Weight loss comes down to good nutritional habits. Not doing more handstands.
11.17. Is the Headstand or Handstand Harder?
The majority of people will find it easier to learn the headstand because the length of the lever, your body, has been decreased.
11.18. What Is the Longest Someone Has Held a Handstand?
No idea, but those kinds of “feats” seem a bit silly to me. Plus, there are a lot of factors to be considered like what kind of handstand, what kind of form allowed, etc, etc.
11.19. Does Doing Handstands Help Hair Growth?
No. Handstand practice is extremely frustrating and stressful and a large cause of premature baldness in the movement community. (kidding, of course, but Google says a lot of people have this question, so we figured we’d add it in here).
12. What Else Can You Do to Improve Being on Your Hands?
Whew! That was a LOT of information! If you’re working on handstands, or plan to at some point in the future, I recommend using LEARNS.EDU.VN to refer to it whenever you need.
12.1. Seek Professional Guidance
Consider working with a qualified handstand coach or instructor who can provide personalized feedback and guidance.
12.2. Attend Workshops and Seminars
Attend handstand workshops and seminars to learn from experienced practitioners and gain new insights and techniques.
12.3. Join a Handstand Community
Connect with other handstand enthusiasts online or in person to share experiences, ask questions, and find support.
12.4. Stay Inspired
Watch videos of skilled handstand practitioners and draw inspiration from their performances.
12.5. Be Patient and Persistent
Learning a handstand takes time and effort. Be patient with yourself, stay persistent, and enjoy the journey.
13. Ready to Take Your Handstand Journey to the Next Level?
At LEARNS.EDU.VN, we understand the dedication it takes to achieve your fitness goals. That’s why we offer a wealth of resources, expert guidance, and personalized training plans to help you master the handstand and many other physical skills. Whether you’re looking to enhance your core strength, improve body awareness, or simply challenge yourself with a new skill, our platform provides the support and knowledge you need to succeed.
Ready to explore a world of learning and skill development? Visit LEARNS.EDU.VN today and discover how our comprehensive resources can transform your fitness journey.
Contact us:
- Address: 123 Education Way, Learnville, CA 90210, United States
- WhatsApp: +1 555-555-1212
- Website: LEARNS.EDU.VN
Let learns.edu.vn be your partner in achieving your handstand goals and beyond. Start your journey with us today and experience the power of structured, expert-led training.
14. Free Cheatsheet: Learn How to Do a Handstand
Download this entire tutorial and our simple cheatsheet for easy reference. Working towards, and maintaining, a solid handstand is great training. If you follow the instructions and guidelines I’ve shared here, I know you’ll find the practice both rewarding and fun 🙂
This handstand cheatsheet offers concise steps for mastering handstands, combining visual aids with clear instructions to simplify the learning process.