How Do I Start Learning To Draw? It’s a question many aspiring artists ask. LEARNS.EDU.VN offers a practical solution, guiding you through essential techniques and principles to unlock your artistic potential. By mastering these fundamental skills, you’ll be well on your way to creating impressive artwork.
Table of Contents
1. Essential Drawing Warm-Ups and Hand-Eye Coordination
2. Mastering Basic Shapes as Building Blocks for Drawing
3. Refining Your Drawings: Angles, Edges, and Solid Lines
4. The Power of Quick Sketches: Practice and Fluidity
5. Adding Focus, Contrast, and Details to Your Drawings
6. Consistent Practice and Learning from Mistakes in Drawing
7. Advancing Your Skills: Exploring Advanced Drawing Concepts
FAQ Section
1. Essential Drawing Warm-Ups and Hand-Eye Coordination
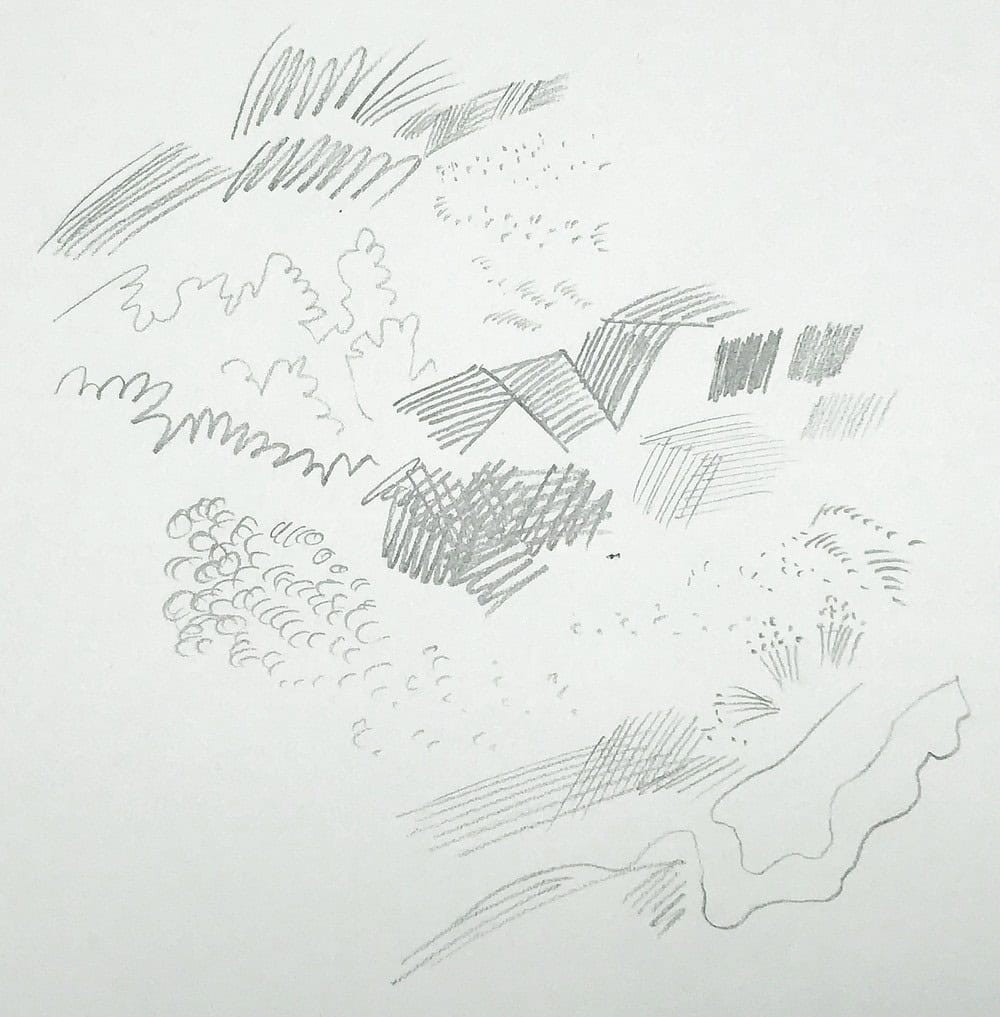
Before diving into complex subjects, it’s beneficial to start with warm-up exercises. Think of it like stretching before a workout – it prepares your “drawing muscles” and enhances your connection with the tools. This stage is essential for beginners and experienced artists alike.
-
The Importance of Warming Up: Warming up helps you become more comfortable with your drawing tools and allows your thoughts to flow onto the page more freely.
-
Exploring Mark-Making Techniques: Experiment with various marks to discover the full range of your pen or pencil.
- Scribbles: Loose, freeform lines that help loosen your hand.
- Doodles: Spontaneous drawings that encourage creativity.
- Dots and Stipples: Small marks used to create texture and shading.
- Hatching: Parallel lines used to create tonal effects.
- Zig-Zag Lines: Alternating lines that add dynamic energy to your drawings.
-
Varying Pressure: Altering the pressure applied to your drawing tool can create different line weights and tonal variations, adding depth and interest to your work.
Training Hand-Eye Coordination
Enhancing hand-eye coordination is critical for improving drawing accuracy. Regular practice of basic shapes and lines can significantly boost your control and precision.
- Straight and Curved Lines: Practice drawing long and short straight lines, as well as various curved lines. Focus on maintaining consistent pressure and direction.
- Circles and Ellipses: These shapes form the basis of many objects. Practice drawing them in different sizes and orientations.
- Loose Shapes: Experiment with shapes like lying eights to develop fluidity and control.
- Arm Movement: Try drawing with your entire arm, keeping your elbow and wrist locked and moving from the shoulder joint. This can help you create smoother, more consistent arcs.
Tips for Effective Warm-Ups
- Keep it Playful: Make your practice enjoyable to maintain motivation.
- Short Sessions: Even a few minutes of warm-ups can make a noticeable difference.
- Regularity: Incorporate warm-ups into each drawing session.
- Notice Your Hand: Pay attention to how your hand feels to track your progress.
Warming up at the start of each drawing session can significantly improve your line work and overall control. For beginners, these exercises are particularly helpful in loosening up and gaining confidence.
2. Mastering Basic Shapes as Building Blocks for Drawing
At the core of drawing lies the ability to break down complex subjects into simpler forms. This approach simplifies the drawing process, making it more manageable and accessible.
Understanding Basic Shapes
Basic shapes such as circles, rectangles, and triangles are the fundamental building blocks of all drawings. By learning to identify and draw these shapes, you can construct any object, regardless of its complexity.
- Circles: Perfect for round objects or elements.
- Rectangles: Useful for structures and objects with straight edges.
- Triangles: Ideal for creating angles and dynamic shapes.
Breaking Down Complex Objects
The key to drawing anything is to visually deconstruct it into these basic shapes. This technique allows you to approach complex subjects with confidence and precision.
- Observe: Carefully examine the object you want to draw.
- Identify: Determine the basic shapes that make up the object.
- Simplify: Reduce the object to its essential forms.
For instance, a rose can be seen as a series of overlapping circles and curved lines. A house can be represented by rectangles and triangles. Even a bird can be simplified into a combination of circles, ovals, and triangles.
Creating Loose Underdrawings
Start your drawings with light, rough shapes to establish proportions and structure. This underdrawing serves as a foundation for further refinement.
- Light Linework: Use light, erasable lines for your initial shapes.
- Rough Shapes: Don’t worry about perfection at this stage. Focus on capturing the overall form.
- Proportions: Ensure the shapes are accurately sized and positioned relative to each other.
Refining Your Drawing
Once you have a solid underdrawing, you can refine the shapes and add details.
- Defined Shapes: Gradually refine the rough shapes into more accurate forms.
- Specific Structure: Add structural details to enhance the realism of your drawing.
- No Perfection: Avoid focusing on details or shadows in the early stages.
Benefits of Using Basic Shapes
- Simplifies Complexity: Makes complex objects easier to draw.
- Improves Accuracy: Helps establish correct proportions and structure.
- Enhances Creativity: Allows for spontaneous and gestural drawings.
- Builds Confidence: Provides a solid foundation for further development.
3. Refining Your Drawings: Angles, Edges, and Solid Lines
After establishing the basic shapes, the next step is to refine your drawing by focusing on angles, edges, and solid lines. This stage brings definition and clarity to your artwork.
The Importance of Observation
Drawing is as much about seeing as it is about putting lines on paper. Observational skills are critical for accurately capturing the essence of your subject.
- Observe Closely: Pay meticulous attention to the details of your subject.
- Learn to See: Train yourself to see beyond the surface and understand the underlying forms.
- Mindful Proportions: Be aware of the relationships between different parts of your subject.
Checking Angles and Edges
Use your gesture drawing as a foundation and meticulously check all angles and edges against your subject. This ensures accuracy and realism in your final drawing.
- Angles: Match angles in your drawing to the angles in your subject.
- Shapes: Compare the shapes in your drawing to the shapes in your subject.
- Curves: Accurately represent the curves in your subject.
- Adjustments: Make corrections as needed to align your drawing with your observations.
Using Your Pencil as a Measuring Tool
You can use your pencil to measure angles and proportions, making it easier to translate them accurately onto paper.
- Match Angles: Hold your pencil up to your subject and align it with a specific angle.
- Transfer to Paper: Replicate that angle on your drawing.
- Proportions: Use your pencil to compare the relative sizes of different parts of your subject.
Adding Solid Lines
In the initial stages, you may have drawn several loose lines. Now is the time to choose the best contour line and define it with a solid, confident stroke.
- Choose One Line: Select the line that best represents the edge of your subject.
- Solid Stroke: Draw a clean, unbroken line to define the contour.
- Stay True: Remain faithful to your observations as you finalize your lines.
Adding Volume
While refining lines, begin to consider how you can add volume to your drawing. This can be achieved through subtle shading and attention to form.
- Contour Lines: Use contour lines to suggest the three-dimensional form of your subject.
- Overlapping Shapes: Indicate depth by overlapping shapes and lines.
- Light and Shadow: Begin to think about how light and shadow can define volume.
Tips for Refining Your Drawings
- Patience: Take your time and observe carefully.
- Accuracy: Strive for precision in your angles, edges, and proportions.
- Confidence: Draw solid lines with purpose and conviction.
- Adaptability: Be willing to make corrections as you go.
4. The Power of Quick Sketches: Practice and Fluidity
Creating numerous quick sketches is a valuable exercise for developing your drawing skills. This practice enhances hand-eye coordination and fosters a more intuitive approach to drawing.
Benefits of Quick Sketches
- Hand-Eye Coordination: Improves the connection between what you see and what you draw.
- Fluidity: Encourages a more natural and spontaneous drawing style.
- Observation Skills: Sharpens your ability to quickly assess and capture essential forms.
- Confidence: Builds confidence in your ability to draw.
How to Practice Quick Sketches
- Choose an Object: Select a simple object to draw.
- Set a Time Limit: Allocate a short amount of time (e.g., 5-10 minutes) for each sketch.
- Multiple Angles: Draw the object from various angles to understand its form in three dimensions.
- Focus on Essence: Capture the essential lines and shapes without getting bogged down in details.
Making the Process Fluid
The goal is to make the process of seeing a line and transferring it to paper as seamless as possible.
- Relaxation: Stay relaxed and avoid tension in your hand and arm.
- Continuous Lines: Try to draw with continuous lines, rather than short, hesitant strokes.
- Rhythm: Develop a rhythmic flow to your drawing process.
Incorporating Quick Sketches into Your Routine
- Short Sessions: Frequent, short sessions are more effective than infrequent, long sessions.
- Daily Practice: Aim to practice quick sketches every day, even if only for a few minutes.
- Variety: Draw different objects and subjects to keep your practice interesting.
The Importance of Simplicity
These basic techniques may seem simple, but they are essential for building a strong foundation in drawing.
- Master the Basics: Focus on mastering the fundamentals before moving on to more advanced techniques.
- Patience: Be patient with yourself and trust the process.
- Persistence: Keep practicing, even when you don’t see immediate results.
Over time, these techniques will become second nature, and you won’t have to think about them consciously. This will allow you to draw more freely and expressively.
5. Adding Focus, Contrast, and Details to Your Drawings
Once you have a solid framework and accurate proportions, you can enhance your drawing by adding focus, contrast, and details. This stage brings your artwork to life and adds depth and visual interest.
Ensuring a Solid Framework
Before adding details, make sure your basic framework and proportions are accurate. If not, it’s better to start over or make corrections.
- Review: Check your drawing for any errors in proportion or structure.
- Correct: Make necessary adjustments before proceeding.
- Restart: If the drawing is fundamentally flawed, don’t hesitate to start over.
Adding Contrast and Light/Dark Areas
Contrast refers to the difference between light and dark areas in your drawing. Adding contrast creates volume and dimension.
- Identify Light Sources: Determine where the light is coming from and how it affects your subject.
- Shadows: Add darker areas to represent shadows.
- Highlights: Leave areas untouched to represent highlights.
- Squinting: Squinting can help you see the values (lightness and darkness) more easily.
Adding Details and Textures
Details and textures add visual interest and realism to your drawing. However, it’s important not to overdo it.
- Selective Details: Focus on adding details in a few key areas to draw the viewer’s eye.
- Texture Techniques: Use various mark-making techniques to create different textures.
- Mark-Making Exercise: Refer back to your initial mark-making exercises for inspiration.
Mark-Making Techniques
- Dots: Use dots to create subtle textures.
- Lines: Vary line weight and density to create different effects.
- Hatching: Use parallel lines to create tonal variations.
- Broken Lines: Use broken lines to suggest rough or uneven textures.
- Varied Lines: Combine different types of lines to add interest and complexity.
Avoiding Overdoing Details
It’s tempting to add lots of details, but restraint is key. Overworking your sketch can make it look cluttered and lifeless.
- Focal Points: Focus on adding details to your focal points.
- Accents: Use details as accents to enhance the overall composition.
- Restraint: Know when to stop adding details.
Techniques for Adding Shadows
- Hatching: Use parallel lines to create shadows.
- Cross-Hatching: Use intersecting lines to create darker shadows.
- Stippling: Use dots to create subtle shading.
- Blending: Use a blending stump or your finger to smooth out shadows.
6. Consistent Practice and Learning from Mistakes in Drawing
The journey to becoming a skilled artist is paved with consistent practice and a willingness to learn from mistakes. Embrace the process, and you’ll see steady improvement over time.
The Drawing Process
The process for drawing can be summarized in three simple steps:
- Basic Shapes: Start with basic shapes and light lines to establish proportions.
- Refine Lines: Refine your lines, check angles, and add solid outlines.
- Add Details: Add details, textures, shadows, and highlights to finish your drawing.
The Key to Improvement
The key to getting good at drawing is to practice these skills consistently over time. The more you practice, the more natural the process will become.
- Pencil Miles: Put in the “pencil miles” to develop muscle memory and intuition.
- Habit Building: Make drawing a habit by setting reminders and incorporating it into your daily routine.
Embracing Mistakes
Mistakes are a natural part of the learning process. Don’t get discouraged by them. Instead, use them as opportunities to learn and improve.
- Learning Opportunities: View mistakes as learning opportunities.
- Hand Understanding: Understand that your hand needs time to learn and adapt.
- Muscle Memory: Allow time to build muscle memory through repetition.
- Trust the Process: Trust that you will improve over time with consistent practice.
Avoiding Frustration
It’s natural to feel frustrated when you make mistakes, but try not to let it discourage you.
- Patience: Be patient with yourself and the learning process.
- Perspective: Keep mistakes in perspective and don’t let them derail you.
- Positive Mindset: Maintain a positive mindset and focus on your progress.
Learning from the Masters
Even the greatest artists made mistakes as they learned. Embrace the fact that mistakes are a necessary part of the journey.
- Leonardo da Vinci: Consider how Leonardo da Vinci learned to draw through trial and error.
- Expect Mistakes: Expect to make mistakes and view them as a normal part of the process.
- Embrace Mistakes: Embrace your mistakes and use them to become a better artist.
7. Advancing Your Skills: Exploring Advanced Drawing Concepts
Once you’ve mastered the basics, you can take your drawing skills to the next level by exploring advanced concepts.
Advanced Techniques
- 3D Volumes: Understanding how to see and draw objects in three dimensions.
- Perspective: Learning the rules of perspective to create realistic depth.
- Values: Mastering the use of values to create contrast and dimension.
- Light and Shadow: Understanding how light and shadow interact to define form.
- Foreshortening: Learning how to represent objects that are receding into the distance.
Recommended Resources
- LEARNS.EDU.VN: Explore LEARNS.EDU.VN for in-depth articles and courses on advanced drawing techniques.
- “Sketching Fundamentals” Course: Consider enrolling in a comprehensive drawing course that covers all the principles of drawing.
Benefits of Advanced Skills
- Realistic Drawings: Create drawings that are more realistic and lifelike.
- Fully Rounded Drawings: Produce drawings that are fully realized and complete.
- Enhanced Creativity: Express your creativity more effectively.
Continuing Education
Continuing your education is essential for ongoing growth as an artist.
- Courses: Take courses to learn new techniques and concepts.
- Workshops: Attend workshops to learn from experienced artists.
- Practice: Practice regularly to reinforce your skills.
By deepening your knowledge and continuously practicing, you can achieve your artistic goals and create stunning drawings.
Are you ready to take your drawing skills to the next level? Visit LEARNS.EDU.VN today for more resources, tutorials, and courses designed to help you master the art of drawing! Contact us at 123 Education Way, Learnville, CA 90210, United States. Whatsapp: +1 555-555-1212. Website: LEARNS.EDU.VN
FAQ Section
Q1: What is the best way to start learning to draw if I have no prior experience?
A: Begin with basic shapes and practice drawing them regularly. Focus on improving your hand-eye coordination through warm-up exercises.
Q2: How often should I practice drawing to see noticeable improvement?
A: Aim for short, frequent practice sessions (e.g., 15-30 minutes daily) rather than long, infrequent sessions. Consistency is key.
Q3: What are the essential drawing tools for beginners?
A: A set of pencils (HB, 2B, 4B), a good eraser, a sketchbook, and a pencil sharpener are sufficient to start.
Q4: How can I improve my accuracy in drawing proportions?
A: Use basic shapes to map out your drawing and continuously compare the proportions of different elements in your subject.
Q5: What should I do when I make mistakes in my drawing?
A: Don’t get discouraged. Analyze your mistakes, learn from them, and keep practicing. Mistakes are a natural part of the learning process.
Q6: Is it necessary to take a formal drawing class to learn how to draw well?
A: While formal classes can be beneficial, they are not essential. Many resources, including online tutorials and practice exercises, can help you learn effectively on your own.
Q7: How can I add depth and dimension to my drawings?
A: Use shading techniques such as hatching, cross-hatching, and stippling to create contrast and suggest form.
Q8: What is the best way to learn about perspective in drawing?
A: Start by learning the basic principles of one-point and two-point perspective. Practice drawing simple objects like boxes and rooms to apply these principles.
Q9: How can I find inspiration for my drawings?
A: Look to the world around you. Draw from life, study the works of other artists, and explore different subjects and styles to find what inspires you.
Q10: What are some good resources for learning advanced drawing techniques?
A: Websites like learns.edu.vn, books on drawing, online courses, and workshops are all excellent resources for advancing your drawing skills.