How Long To Learn How To Handstand is a common question, and at LEARNS.EDU.VN, we understand your eagerness to master this impressive skill. With the right approach, consistent practice, and a focus on building foundational strength and balance, you can achieve your handstand goals. We are here to guide you through the process with expert advice, step-by-step instructions, and supportive resources. Start your handstand journey with us and discover the joy of mastering this challenging skill. Handstand training requires dedication and personalized strategies for optimal learning.
1. Understanding Handstand Timelines: What To Expect
The question “How long does it take to learn how to handstand?” doesn’t have a straightforward answer. The timeline varies significantly based on several factors, including your current fitness level, consistency of practice, and the quality of your training. Understanding these factors will help you set realistic expectations and stay motivated throughout your handstand journey.
1.1. Factors Influencing Your Handstand Learning Curve
Several elements influence how quickly you can achieve a handstand. Being aware of these factors allows you to tailor your training and address specific challenges effectively.
- Current Fitness Level: Your baseline strength, flexibility, and balance play a crucial role. Those with a background in gymnastics or yoga may progress faster due to existing body awareness and strength.
- Consistency of Practice: Regular practice is key. Short, frequent sessions are more effective than sporadic, long sessions. Aim for at least 3-4 sessions per week.
- Quality of Training: Following a structured, progressive training plan ensures you build the necessary foundational skills without risking injury.
- Body Awareness: A good sense of body positioning and control helps you make quicker adjustments and maintain balance.
- Age and Overall Health: Younger individuals may find it easier to adapt and learn new skills. However, people of all ages can achieve handstands with dedication and proper training. Pre-existing health conditions or injuries may require modifications to the training plan.
- Mental Fortitude: Handstands can be mentally challenging. Patience, persistence, and a positive attitude are essential for overcoming obstacles.
- Access to Resources and Guidance: Having access to quality resources, such as tutorials, experienced coaches, and supportive communities, can significantly accelerate your learning. LEARNS.EDU.VN provides a wealth of information and expert guidance to support your handstand journey.
1.2. Realistic Timelines: Beginner To Freestanding Handstand
While individual progress varies, here’s a general timeline to help you gauge your journey:
- Beginner (0-3 Months): Focus on building foundational strength and flexibility. This includes wrist strengthening exercises, shoulder mobility drills, and core engagement exercises. You’ll work on wall-assisted handstands to get comfortable with the inverted position.
- Intermediate (3-6 Months): Start refining your technique and working on freestanding handstand attempts. Focus on controlled entries, proper alignment, and balance adjustments. Practice bailing techniques to minimize the risk of injury.
- Advanced (6+ Months): Aim for longer holds and explore variations. This stage involves fine-tuning your balance, improving your line, and adding elements like handstand push-ups or one-arm variations.
1.3. Case Studies: Real-Life Handstand Journeys
Hearing about others’ experiences can provide valuable insights and motivation. Here are a few examples:
- Sarah, 25, Yoga Enthusiast: With a background in yoga, Sarah had good flexibility and body awareness. She dedicated 30 minutes, 4 times a week, to handstand training. Within 4 months, she achieved a consistent 10-second freestanding handstand.
- Mark, 35, Office Worker: Mark had limited experience with physical activity. He started with basic strength training and wrist conditioning. He practiced 3 times a week for 20 minutes. It took him 8 months to achieve a 5-second freestanding handstand.
- Emily, 16, Gymnast: Emily had a strong foundation in gymnastics. She focused on refining her technique and balance. Within 2 months, she achieved a 30-second freestanding handstand with excellent form.
These case studies highlight that progress depends on your starting point and dedication. Remember that everyone’s journey is unique, and consistency is key.
2. Essential Pre-Requisites For Handstand Mastery
Before diving into handstand training, it’s crucial to ensure you have the necessary physical foundation. Neglecting these pre-requisites can lead to frustration, injury, and slower progress.
2.1. Building Foundational Strength
Handstands require strength in various muscle groups to support your body weight and maintain stability.
- Core Strength: A strong core is essential for maintaining a straight line and preventing excessive arching in the back. Exercises like planks, hollow body holds, and reverse crunches are highly effective.
- Shoulder Strength: Strong shoulders are necessary for supporting your weight and controlling your movement. Exercises like pike push-ups, dumbbell shoulder presses, and scapular retractions are beneficial.
- Wrist Strength: Your wrists bear a significant amount of weight in a handstand. Wrist strengthening exercises like wrist extensions, wrist curls, and fingertip push-ups are crucial.
- Back Strength: The back muscles help stabilize your spine and maintain proper alignment. Exercises like bird dogs, superman extensions, and rows can improve back strength.
2.2. Enhancing Flexibility And Mobility
Flexibility and mobility are essential for achieving proper alignment and preventing strain.
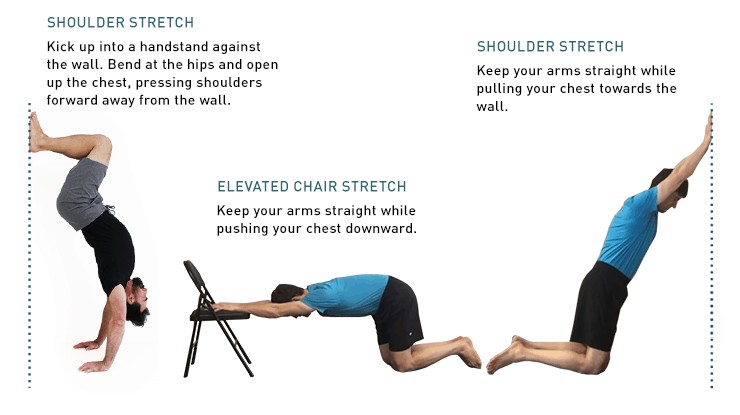
- Shoulder Mobility: Adequate shoulder mobility allows you to stack your joints and maintain a straight line. Exercises like wall slides, shoulder dislocates with a band, and doorway stretches can improve shoulder mobility.
- Wrist Flexibility: Flexible wrists are necessary for distributing weight evenly and preventing pain. Exercises like wrist extensions, wrist flexions, and wrist circles can improve wrist flexibility.
- Hamstring Flexibility: While not directly involved in the handstand, flexible hamstrings can improve your overall body awareness and alignment. Exercises like hamstring stretches, forward folds, and toe touches are helpful.
2.3. Developing Balance And Coordination
Balance and coordination are critical for maintaining stability in a handstand.
- Balance Training: Incorporate balance exercises like single-leg stands, wobble board exercises, and yoga poses to improve your balance.
- Coordination Drills: Practice coordination drills like juggling, skipping rope, and agility ladder exercises to enhance your body awareness and control.
2.4. Sample Pre-Requisite Workout Routine
Here’s a sample workout routine to build foundational strength and flexibility:
| Exercise | Sets | Reps | Notes |
|---|---|---|---|
| Plank | 3 | 30-60 sec hold | Focus on engaging your core and maintaining a straight line from head to heels |
| Hollow Body Hold | 3 | 20-30 sec hold | Keep your lower back pressed against the floor and engage your core |
| Pike Push-Ups | 3 | 8-12 | Modify on your knees if needed |
| Wrist Extensions | 3 | 15-20 | Use light weight or resistance band |
| Shoulder Dislocates (Band) | 3 | 10-15 | Use a light resistance band and maintain good form |
| Hamstring Stretch | 3 | 30 sec hold per leg | Focus on lengthening the back of your leg |
| Single-Leg Stand | 3 | 30 sec hold per leg | Try closing your eyes to increase the challenge |

Regularly performing this routine will prepare your body for the demands of handstand training.
3. Handstand Training: Step-By-Step Guide
Once you have a solid foundation, it’s time to start handstand training. This step-by-step guide will help you progress safely and effectively.
3.1. Wrist Warm-Up And Preparation
Your wrists will bear a significant amount of weight, so it’s crucial to warm them up properly.
- Wrist Circles: Rotate your wrists clockwise and counterclockwise for 10-15 repetitions each way.
- Wrist Extensions And Flexions: Extend and flex your wrists for 10-15 repetitions each.
- Fingertip Push-Ups: Start on your hands and knees, then lift your palms off the ground and balance on your fingertips for 10-15 repetitions.
- Weight Shifting: Get on your hands and knees, then gently shift your weight forward and backward, side to side, to prepare your wrists for weight-bearing.
3.2. Shoulder Warm-Up And Activation
Warming up your shoulders is essential for mobility and injury prevention.
- Arm Circles: Perform small and large arm circles forward and backward for 10-15 repetitions each way.
- Scapular Retractions: Squeeze your shoulder blades together and hold for a few seconds. Repeat 10-15 times.
- Wall Slides: Stand with your back against a wall, arms bent at 90 degrees, and slide your arms up and down the wall while maintaining contact. Repeat 10-15 times.
- Band Pull-Aparts: Hold a resistance band with both hands and pull it apart, squeezing your shoulder blades together. Repeat 10-15 times.
3.3. Core Activation
Engaging your core is essential for maintaining stability and preventing arching.
- Plank: Hold a plank position for 30-60 seconds, focusing on engaging your core and maintaining a straight line from head to heels.
- Hollow Body Hold: Lie on your back, lift your arms and legs off the ground, and engage your core to maintain a slight curve in your lower back. Hold for 20-30 seconds.
- Bird Dog: Start on your hands and knees, then extend one arm and the opposite leg simultaneously, focusing on maintaining a straight line from head to heel. Repeat 10-15 times per side.
3.4. Handstand Progression Exercises
Follow these progression exercises to gradually build your handstand skills.
-
Wall-Assisted Handstands:
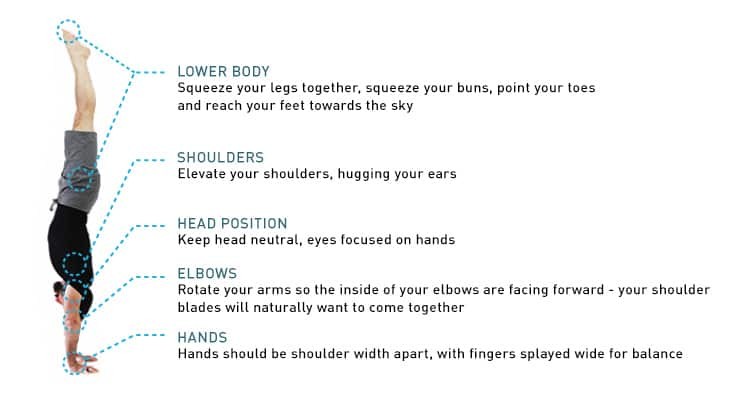
- Kick up to a handstand against the wall, focusing on maintaining a straight line from your hands to your heels.
- Hold for as long as you can maintain good form, gradually increasing the duration over time.
- Practice different hand positions and weight distribution to find your balance.
-
Wall Walks:
- Start with your hands close to the wall and walk your feet up the wall until you reach a handstand position.
- Focus on maintaining a straight line and engaging your core.
- Gradually increase the distance between your hands and the wall as you become more comfortable.
-
Handstand Push-Ups Against The Wall:
- Kick up to a handstand against the wall, then bend your elbows and lower your head towards the ground.
- Push back up to the starting position, focusing on controlled movement and engaging your shoulder muscles.
- Start with a small range of motion and gradually increase it as you get stronger.
-
Freestanding Handstand Attempts:
- Practice kicking up to a handstand away from the wall, focusing on controlled entries and proper alignment.
- Start with short attempts and gradually increase the duration as you improve your balance.
- Use a spotter or crash mat for added safety.
-
Bailing Techniques:
- Practice different bailing techniques, such as cartwheeling out or falling into a controlled tuck, to minimize the risk of injury.
- Get comfortable with bailing from different positions and angles.
3.5. Sample Handstand Training Schedule
Here’s a sample training schedule to guide your progress:
| Day | Activity | Sets | Reps/Duration | Notes |
|---|---|---|---|---|
| Monday | Wrist Warm-Up, Wall-Assisted Handstands | 3 | Hold for as long as possible | Focus on proper alignment and engaging your core |
| Tuesday | Shoulder Warm-Up, Handstand Push-Ups Against Wall | 3 | 8-12 | Start with a small range of motion and gradually increase it as you get stronger |
| Wednesday | Rest | Allow your body to recover | ||
| Thursday | Wrist Warm-Up, Wall Walks | 3 | 5-10 | Focus on maintaining a straight line and engaging your core |
| Friday | Shoulder Warm-Up, Freestanding Handstand Attempts | 5 | Short attempts | Use a spotter or crash mat for added safety |
| Saturday/Sunday | Rest or Active Recovery (Yoga, Light Cardio) | Focus on flexibility and mobility |
Adjust this schedule based on your individual progress and needs. Remember to listen to your body and take rest days when needed.
4. Common Challenges And How To Overcome Them
Learning handstands comes with its set of challenges. Being aware of these challenges and knowing how to address them can help you stay on track.
4.1. Wrist Pain And Discomfort
Wrist pain is a common issue for beginners.
- Cause: Insufficient wrist strength and flexibility, improper weight distribution.
- Solution: Focus on wrist strengthening and flexibility exercises. Ensure you are distributing your weight evenly across your hands, using your fingertips and knuckles for balance. Take breaks when needed and avoid pushing through pain.
4.2. Fear Of Falling
The fear of falling can be a significant obstacle.
- Cause: Lack of confidence, previous negative experiences.
- Solution: Practice bailing techniques to build confidence. Use a spotter or crash mat for added safety. Start with wall-assisted handstands to reduce the fear of falling.
4.3. Balance Issues
Maintaining balance in a handstand can be challenging.
- Cause: Insufficient core strength, improper alignment, lack of body awareness.
- Solution: Focus on core strengthening exercises and proper alignment. Practice balance drills, such as shifting your weight forward and backward, side to side, to improve your body awareness.
4.4. Plateauing Progress
Progress may stall at some point.
- Cause: Lack of variation in training, insufficient recovery, mental fatigue.
- Solution: Introduce new exercises and variations to challenge your body. Ensure you are getting enough rest and recovery. Take breaks from handstand training if needed and focus on other activities to refresh your mind.
4.5. Maintaining Motivation
Staying motivated throughout the handstand journey can be tough.
- Cause: Lack of progress, frustration, boredom.
- Solution: Set realistic goals and celebrate small victories. Find a training partner or join a supportive community. Track your progress and visualize your success. Remember why you started and focus on the long-term benefits of handstand training.
5. Handstand Variations And Advanced Techniques
Once you’ve mastered the basic handstand, you can explore various variations and advanced techniques to challenge yourself further.
5.1. Handstand Push-Ups
Handstand push-ups require significant strength and control.
- Technique: Kick up to a handstand against the wall, then bend your elbows and lower your head towards the ground. Push back up to the starting position, focusing on controlled movement and engaging your shoulder muscles.
- Progression: Start with a small range of motion and gradually increase it as you get stronger. You can also practice handstand push-ups on parallettes to increase the range of motion.
5.2. One-Arm Handstands
One-arm handstands are a challenging variation that requires exceptional balance and strength.
- Technique: Start with a regular handstand, then gradually shift your weight to one arm while lifting the other arm off the ground. Maintain your balance and hold for as long as possible.
- Progression: Practice weight shifting drills to build strength and balance in one arm. You can also use a wall for support while learning the one-arm handstand.
5.3. Handstand Walking
Handstand walking requires coordination and control.
- Technique: Start in a handstand position, then take small steps with your hands to move forward, backward, or sideways. Focus on maintaining your balance and engaging your core.
- Progression: Practice walking short distances and gradually increase the distance as you become more comfortable. You can also use a wall for support while learning to handstand walk.
5.4. Straddle Handstands
Straddle handstands involve holding a handstand with your legs split apart.
- Technique: Kick up to a handstand, then open your legs into a straddle position while maintaining your balance. Focus on engaging your inner thighs and maintaining a straight line from your hands to your hips.
- Progression: Practice straddle stretches to improve your flexibility. You can also use a wall for support while learning the straddle handstand.
5.5. Pike Handstands
Pike handstands involve holding a handstand with your legs bent at the hips.
- Technique: Kick up to a handstand, then bend your legs at the hips, bringing your knees towards your chest while maintaining your balance. Focus on engaging your core and maintaining a straight line from your hands to your hips.
- Progression: Practice pike stretches to improve your flexibility. You can also use a wall for support while learning the pike handstand.
6. Optimizing Your Training Environment
The environment in which you train can significantly impact your progress.
6.1. Choosing The Right Surface
- Hard Surface: A hard surface like a wooden floor or concrete provides stability and allows you to feel the ground beneath your hands.
- Soft Surface: A soft surface like a gymnastics mat or carpet can provide cushioning and reduce the impact of falls.
- Combination: Consider using a combination of surfaces, such as a hard floor with a crash mat nearby, to provide both stability and safety.
6.2. Ensuring Adequate Space
- Clear Area: Make sure you have enough clear space around you to practice handstands without obstacles or distractions.
- Ceiling Height: Ensure the ceiling is high enough to allow you to fully extend your arms without hitting your head.
6.3. Using Mirrors For Feedback
- Visual Feedback: Training in front of a mirror allows you to see your form and make corrections in real-time.
- Proper Positioning: Position the mirror so you can see your entire body from head to toe.
6.4. Creating A Distraction-Free Zone
- Minimize Distractions: Choose a quiet area where you won’t be interrupted or distracted.
- Turn Off Electronics: Turn off your phone, TV, and other electronic devices to stay focused on your training.
7. Nutrition And Recovery For Handstand Training
Proper nutrition and recovery are essential for supporting your handstand training.
7.1. Fueling Your Body For Performance
- Balanced Diet: Consume a balanced diet that includes plenty of fruits, vegetables, lean protein, and whole grains.
- Hydration: Stay hydrated by drinking plenty of water throughout the day.
- Pre-Workout Meal: Eat a light, easily digestible meal 1-2 hours before your training session to provide energy.
- Post-Workout Meal: Consume a protein-rich meal within 30-60 minutes after your training session to promote muscle recovery.
7.2. Importance Of Rest And Recovery
- Sleep: Get 7-9 hours of sleep per night to allow your body to recover and rebuild.
- Rest Days: Take 1-2 rest days per week to give your muscles a chance to recover.
- Active Recovery: Engage in light activities like yoga or walking on your rest days to promote blood flow and reduce muscle soreness.
- Stretching: Incorporate regular stretching into your routine to improve flexibility and reduce the risk of injury.
7.3. Supplements For Handstand Training
- Protein: Protein supplements can help you meet your protein needs and support muscle recovery.
- Creatine: Creatine can improve strength and power, which can be beneficial for handstand training.
- Joint Support: Supplements like glucosamine and chondroitin can help protect your joints and reduce the risk of injury.
Disclaimer: Consult with a healthcare professional before taking any supplements.
8. Leveraging Technology And Resources
Utilizing technology and available resources can significantly enhance your handstand journey.
8.1. Online Tutorials And Courses
- LEARNS.EDU.VN: Explore the comprehensive tutorials and courses offered by LEARNS.EDU.VN to learn handstand techniques, progressions, and tips from experienced instructors.
- YouTube: Watch instructional videos from qualified handstand coaches to learn proper form and technique.
8.2. Mobile Apps For Tracking Progress
- Handstand Apps: Use mobile apps designed for tracking handstand progress, timing holds, and providing feedback on your form.
- Fitness Trackers: Utilize fitness trackers to monitor your activity levels, sleep patterns, and heart rate to optimize your training and recovery.
8.3. Social Media Communities
- Online Forums: Join online forums and social media groups dedicated to handstand training to connect with other practitioners, share tips, and ask questions.
- Instagram: Follow handstand coaches and enthusiasts on Instagram for inspiration, motivation, and valuable insights.
8.4. Expert Guidance And Coaching
- Certified Coaches: Seek guidance from certified handstand coaches who can provide personalized instruction and feedback.
- Workshops And Seminars: Attend handstand workshops and seminars to learn from experienced instructors and improve your skills.
9. Injury Prevention And Safety Tips
Prioritizing safety is crucial to avoid injuries and ensure long-term progress.
9.1. Proper Warm-Up And Cool-Down
- Warm-Up: Always warm up your wrists, shoulders, and core before starting your handstand training session.
- Cool-Down: Cool down with gentle stretches to improve flexibility and reduce muscle soreness after your training session.
9.2. Progressive Overload
- Gradual Progression: Gradually increase the intensity and duration of your handstand training to avoid overloading your body.
- Listen To Your Body: Pay attention to your body’s signals and avoid pushing through pain.
9.3. Bailing Techniques
- Practice Bailing: Practice different bailing techniques to minimize the risk of injury when you lose your balance.
- Controlled Falls: Focus on falling in a controlled manner to avoid landing awkwardly.
9.4. Spotting And Supervision
- Use A Spotter: Use a spotter when attempting new or challenging handstand variations.
- Supervision: Train in a supervised environment, especially when you are first starting out.
9.5. Common Handstand Injuries And How To Avoid Them
- Wrist Pain: Strengthen your wrists and distribute your weight evenly.
- Shoulder Pain: Improve your shoulder mobility and avoid overtraining.
- Back Pain: Engage your core and maintain proper alignment.
If you experience any pain or discomfort, stop training and consult with a healthcare professional.
10. Handstand Benefits: More Than Just A Cool Trick
Beyond the aesthetic appeal, handstands offer numerous physical and mental benefits.
10.1. Physical Benefits
- Increased Strength: Handstands build strength in your wrists, shoulders, arms, core, and back.
- Improved Balance: Handstands enhance your balance and coordination.
- Enhanced Body Awareness: Handstands improve your body awareness and proprioception.
- Increased Circulation: Handstands can increase blood flow to your brain and upper body.
- Improved Posture: Handstands can help improve your posture and alignment.
10.2. Mental Benefits
- Increased Confidence: Mastering a handstand can boost your confidence and self-esteem.
- Improved Focus: Handstands require focus and concentration, which can improve your mental clarity.
- Stress Reduction: Handstands can help reduce stress and anxiety by promoting relaxation and mindfulness.
- Mind-Body Connection: Handstands enhance your mind-body connection, allowing you to become more aware of your physical and mental state.
By embracing the handstand journey, you’re not just learning a skill; you’re cultivating strength, balance, and a deeper connection with your body.
Ready to take the plunge? LEARNS.EDU.VN is here to provide the knowledge, support, and resources you need.
FAQ: Your Handstand Questions Answered
1. How Often Should I Practice Handstands?
Aim for 3-5 times per week, allowing for rest days in between.
2. What If I Can’t Hold A Handstand For More Than A Few Seconds?
Focus on building foundational strength and flexibility. Practice wall-assisted handstands and bailing techniques to build confidence.
3. Is It Normal To Experience Wrist Pain When Starting Handstands?
Yes, but it should be mild and temporary. Focus on wrist strengthening and flexibility exercises.
4. What Are The Best Exercises For Building Handstand Strength?
Planks, hollow body holds, pike push-ups, and wrist extensions are highly effective.
5. How Can I Overcome The Fear Of Falling?
Practice bailing techniques and use a spotter or crash mat for added safety.
6. What Should I Do If I Plateau In My Handstand Progress?
Introduce new exercises and variations to challenge your body. Ensure you are getting enough rest and recovery.
7. Can Handstands Help With Weight Loss?
While handstands can burn calories and build muscle, weight loss primarily comes down to good nutritional habits.
8. Are Handstands Bad For My Back?
They can be if you have poor core stability or poor shoulder mobility. Focus on proper alignment and engaging your core.
9. How Long Should I Hold A Handstand To See Benefits?
Even short holds (5-10 seconds) can provide benefits. Gradually increase the duration as you improve your balance and strength.
10. Can Anyone Learn To Do A Handstand?
Yes, with dedication, consistent practice, and the right approach, most people can learn to do a handstand.
Start Your Handstand Journey With LEARNS.EDU.VN
Ready to defy gravity and master the art of the handstand? At LEARNS.EDU.VN, we’re committed to providing you with the knowledge, resources, and support you need to succeed.
- Comprehensive Tutorials: Access step-by-step guides, video tutorials, and expert tips to learn proper handstand techniques and progressions.
- Personalized Training Plans: Develop customized training plans tailored to your fitness level, goals, and schedule.
- Supportive Community: Connect with other handstand enthusiasts, share your progress, and get inspired by others’ achievements.
- Expert Guidance: Receive guidance from certified handstand coaches who can provide personalized feedback and address your specific challenges.
Visit LEARNS.EDU.VN today to unlock a wealth of information and start your handstand journey with confidence. Our resources are designed to help you build a solid foundation, overcome obstacles, and achieve your handstand goals.
LEARNS.EDU.VN – Your Partner In Learning And Growth
Contact Information:
- Address: 123 Education Way, Learnville, CA 90210, United States
- WhatsApp: +1 555-555-1212
- Website: LEARNS.EDU.VN
Start your journey to handstand success with learns.edu.vn today!