Learning to do a handstand might seem daunting, but with the right approach, it’s achievable. How Long To Learn To Do A Handstand? It varies, but dedication and smart practice are key. At LEARNS.EDU.VN, we believe in making fitness goals attainable with structured guidance and resources. Discover realistic timelines, essential techniques, and effective training plans to help you nail that handstand! Dive into our comprehensive guide and embark on a journey of balance, strength, and perseverance. Unlock your potential with expert tips on handstand progressions, body conditioning, and mindful reflection.
1. Understanding the Journey: How Long to Learn a Handstand
So, how long to learn to do a handstand? The answer isn’t a simple number. It depends on several factors, including your current fitness level, dedication, and practice methods. Let’s break down what influences your handstand timeline:
- Current Fitness Level: Those with a background in gymnastics or yoga may progress faster due to existing core strength and flexibility.
- Practice Consistency: Regular, focused practice is more effective than sporadic, lengthy sessions.
- Training Methods: Structured progressions and targeted exercises accelerate learning.
- Individual Differences: Everyone learns at their own pace. Patience and persistence are crucial.
1.1. Realistic Timeframes for Handstand Mastery
While individual progress varies, here’s a general timeline:
| Stage | Description | Estimated Timeframe |
|---|---|---|
| Beginner | Building foundational strength and wrist flexibility. | 1-3 months |
| Intermediate | Achieving consistent wall-assisted handstands and working on balance. | 3-6 months |
| Advanced | Holding freestanding handstands for extended periods and refining technique. | 6+ months |
Remember, these are estimates. Focus on consistent effort and celebrate small victories along the way.
1.2. Factors Influencing Your Handstand Timeline
Several elements can either speed up or slow down your progress:
- Age: Younger individuals may have an easier time adapting to new physical skills.
- Body Weight: Lower body weight can make balancing easier.
- Fear and Mental Barriers: Overcoming fear is a significant part of the process.
- Quality of Instruction: Expert guidance can prevent bad habits and accelerate learning.
1.3. The Role of Consistency and Frequency
Consistency trumps intensity when it comes to skill acquisition. Aim for short, regular practice sessions rather than infrequent marathons.
- Ideal Frequency: 3-5 sessions per week.
- Session Length: 15-30 minutes of focused practice.
- Active Recovery: Incorporate rest days and gentle stretching to prevent injuries.
A study by the Journal of Strength and Conditioning Research found that consistent, short training sessions are more effective for motor skill learning than longer, less frequent sessions.
1.4. Setting Realistic Goals
Avoid comparing yourself to others. Set achievable milestones and celebrate your progress.
- Example Goals:
- Week 1: Hold a plank for 60 seconds.
- Month 1: Perform wrist stretches daily.
- Month 3: Hold a wall-assisted handstand for 30 seconds.
- Month 6: Achieve a 5-second freestanding handstand.
1.5. Expert Insights on Handstand Progression
According to experts at LEARNS.EDU.VN, the key to mastering a handstand lies in consistent, focused practice, combined with a structured progression plan. Our approach emphasizes building a strong foundation through targeted exercises and drills, ensuring you develop the necessary strength, balance, and confidence.
2. Essential Concepts for Handstand Beginners
Before diving into the physical aspects, it’s crucial to grasp some fundamental concepts. These will guide your practice and prevent frustration.
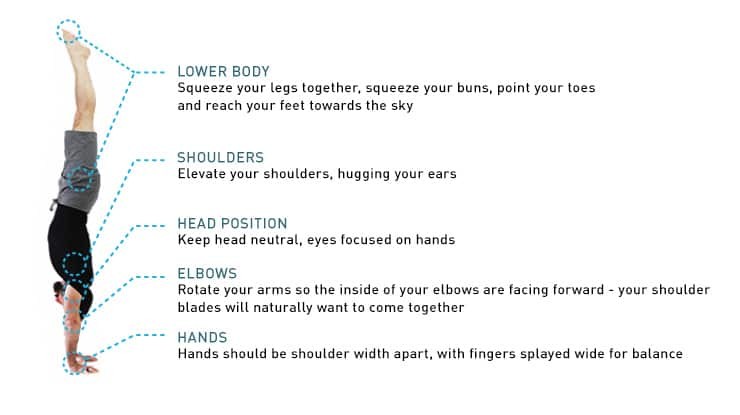
2.1. Understanding Body Alignment
Proper alignment is the cornerstone of a stable handstand.
- Stacked Joints: Aim for a straight line from your wrists to your shoulders, hips, and ankles.
- Engaged Core: Tighten your abdominal muscles to stabilize your spine.
- Neutral Head Position: Avoid tilting your head back or tucking your chin too tightly.
2.2. Mastering Weight Distribution
Balancing in a handstand involves subtle shifts in weight.
- Fingertip Control: Use your fingertips to make micro-adjustments and prevent falling forward.
- Heel of the Hand: Engage the heel of your hand to prevent falling backward.
- Even Pressure: Distribute your weight evenly across your palm.
2.3. The Importance of Core Engagement
A strong core is essential for maintaining stability and preventing injuries.
- Hollow Body Position: Practice engaging your core by drawing your navel towards your spine.
- Ribcage Control: Prevent your ribs from flaring out by keeping your core tight.
- Glute Activation: Squeeze your glutes to further stabilize your lower body.
2.4. Overcoming Fear and Building Confidence
Fear is a natural barrier when learning inversions.
- Start with Assisted Handstands: Use a wall or spotter for support.
- Practice Bailing Techniques: Learn how to safely exit a handstand.
- Visualize Success: Imagine yourself confidently holding a handstand.
- Celebrate Small Wins: Acknowledge your progress and build momentum.
2.5. The 5P Framework for Handstand Training
At LEARNS.EDU.VN, we structure our training sessions using the 5P Framework:
- Prepare: Warm-up exercises to ready your body.
- Practice: Breaking down the handstand into smaller, manageable components.
- Play: Exploring your capabilities and having fun with variations.
- Push: Strengthening your body for longer holds and better control.
- Ponder: Reflecting on your session to improve future performance.
This framework ensures a well-rounded and effective approach to handstand training.
3. Assessing Your Readiness for Handstands
Before jumping into handstand training, it’s essential to assess your current physical condition. This helps identify areas that need improvement and prevents injuries.
3.1. Wrist Strength and Flexibility Assessment
Handstands place significant stress on your wrists.
- Wrist Extension Test: Can you comfortably extend your wrists to 90 degrees?
- Wrist Loading Test: Can you support your weight on your hands without pain?
- Wrist Mobility Exercises: Incorporate daily wrist stretches and rotations.
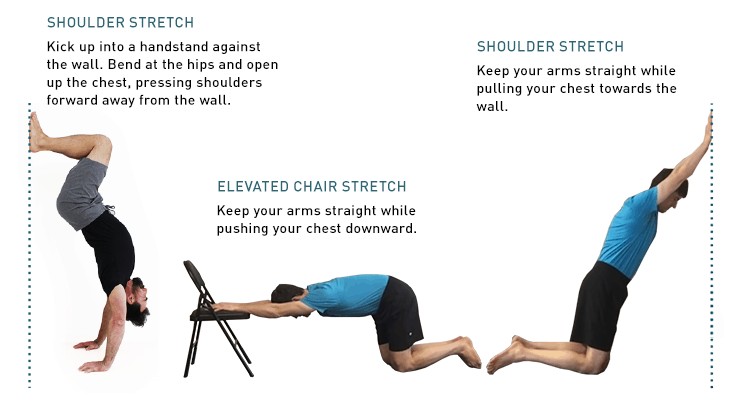
3.2. Shoulder Mobility Assessment
Adequate shoulder mobility is crucial for proper alignment.
- Shoulder Flexion Test: Can you raise your arms overhead without arching your back?
- Shoulder Impingement Test: Do you experience pain or clicking in your shoulders during arm movements?
- Shoulder Stretches: Perform regular shoulder stretches to improve flexibility.
3.3. Core Strength Assessment
A strong core is essential for stability and control.
- Plank Test: Can you hold a plank for 60 seconds with proper form?
- Hollow Body Hold Test: Can you maintain a hollow body position for 30 seconds?
- Core Exercises: Include planks, hollow body holds, and other core-strengthening exercises in your routine.
3.4. Wall Walk Assessment
This assessment tests your ability to move into an inverted position.
- Controlled Ascent: Can you walk your feet up a wall while maintaining control?
- Shoulder Activation: Can you push away from the wall with your shoulders engaged?
- Safe Descent: Can you walk your feet back down the wall without losing control?
3.5. Identifying Weak Spots
Based on your assessment results, identify areas that need improvement.
- Wrist Weakness: Focus on wrist strengthening exercises.
- Shoulder Tightness: Prioritize shoulder mobility drills.
- Core Instability: Incorporate more core-strengthening exercises.
4. Warming Up: Preparing Your Body for Handstands
A proper warm-up is essential to prevent injuries and optimize performance.
4.1. Wrist Warm-Up Exercises
Prepare your wrists for the demands of handstands.
- Wrist Rotations: Perform circular motions with your wrists in both directions.
- Finger Stretches: Extend and spread your fingers to increase flexibility.
- Wrist Flexion and Extension: Gently bend your wrists up and down.
- Weight Shifting: Practice shifting your weight on your hands to build strength.
4.2. Shoulder Warm-Up Exercises
Increase shoulder mobility and stability.
- Arm Circles: Perform small and large arm circles in both directions.
- Shoulder Rolls: Roll your shoulders forward and backward to loosen them up.
- Wall Slides: Slide your arms up a wall while maintaining contact with your wrists and elbows.
- Scapular Retractions: Squeeze your shoulder blades together to activate your back muscles.
4.3. Core Activation Exercises
Engage your core muscles to stabilize your spine.
- Plank: Hold a plank position, focusing on engaging your core and glutes.
- Hollow Body Hold: Lie on your back and lift your arms and legs off the ground, maintaining a hollow body position.
- Bird Dog: Start on your hands and knees, then extend one arm and the opposite leg simultaneously.
4.4. Leg Squeezes
Get a feel for squeezing your legs together while upside down.
- Seated Leg Squeezes: Sit on the floor with your knees bent and squeeze a block or ball between your knees.
- Standing Leg Squeezes: Stand with your feet hip-width apart and squeeze your thighs together.
4.5. Handstand Bails
Practice safely exiting a handstand.
- Cartwheel Bail: Practice cartwheeling out of a handstand to safely land on your feet.
- Forward Roll Bail: Tuck your chin and roll forward out of a handstand.
5. Handstand Progressions: Step-by-Step Drills
Follow these progressions to gradually build your handstand skills.
5.1. Elevated A-Frame
Start with your feet elevated on a box or bench.
- Hand Placement: Position your hands shoulder-width apart on the floor.
- Body Angle: Maintain an A-frame shape with your body.
- Shoulder Activation: Push away from the floor with your shoulders.
- Hold Time: Hold for 30-60 seconds.
5.2. Frogger
Place your knees on your elbows in a tucked position.
- Elbow Placement: Position your elbows on a box or bench.
- Knee Tuck: Tuck your knees into your elbows.
- Core Engagement: Engage your core to maintain balance.
- Hold Time: Hold for 15-30 seconds.
5.3. High Frogger
Extend your legs higher in the frogger position.
- Leg Extension: Gradually extend your legs higher.
- Core Stability: Maintain a stable core position.
- Shoulder Push: Push away from the floor with your shoulders.
- Hold Time: Hold for 10-20 seconds.
5.4. Elevated L-Stand
Kick up into an L-shape against a wall.
- Wall Support: Use a wall for support.
- L-Shape: Maintain an L-shape with your body.
- Core Engagement: Engage your core to stabilize your spine.
- Hold Time: Hold for 30-60 seconds.
5.5. Wall Entries
Practice kicking up to a handstand against a wall.
- Controlled Kick-Up: Kick up to the wall with control.
- Shoulder Activation: Push away from the wall with your shoulders.
- Body Alignment: Aim for a straight line from your wrists to your heels.
- Hold Time: Hold for 15-30 seconds.
5.6. Wall Float
Practice floating away from the wall.
- Gentle Push: Gently push away from the wall.
- Balance Control: Maintain balance using your fingertips and core.
- Float Time: Aim to float for 1-3 seconds.
- Controlled Return: Return to the wall with control.
5.7. Wall Line Work
Focus on maintaining a straight line against the wall.
- Body Alignment: Stack your joints to create a straight line.
- Core Engagement: Engage your core to prevent arching your back.
- Hold Time: Hold for 15-30 seconds.
5.8. Split Leg Kick Up
Practice kicking up with one leg split forward.
- Leg Split: Split one leg forward and one leg back.
- Controlled Kick: Kick up with control, using your legs for momentum.
- Balance Focus: Focus on finding your balance point.
5.9. Straddle Handstand
Practice kicking up with legs straddled.
- Leg Straddle: Straddle your legs wide apart.
- Controlled Kick: Kick up with control, using your legs for momentum.
- Balance Focus: Focus on finding your balance point.
5.10. Full Handstand Entries
Practice kicking up to a full handstand.
- Controlled Kick: Kick up with control, using your legs for momentum.
- Body Alignment: Stack your joints to create a straight line.
- Balance Focus: Focus on finding your balance point.
- Hold Time: Hold for as long as possible.
6. Handstand Exploration: Playing with Your Skills
Once you’ve mastered the basics, it’s time to explore different variations and have fun with your skills.
6.1. Wall Kick-Ups with Head Movements
Try moving your head in different directions while kicking up against a wall.
- Head Rotation: Rotate your head left and right.
- Head Tilt: Tilt your head forward and backward.
- Body Awareness: Notice how these movements affect your balance.
6.2. Breathing Variations
Experiment with different breathing techniques.
- Deep Breaths: Take slow, deep breaths to relax your body.
- Short, Quick Breaths: Try short, quick breaths to increase energy.
- Breathing Coordination: Coordinate your breathing with your movements.
6.3. Pressure Point Exploration
Focus on different pressure points in your palms.
- Fingertip Pressure: Emphasize pressure on your fingertips.
- Heel of the Hand Pressure: Emphasize pressure on the heel of your hand.
- Even Pressure: Distribute your weight evenly across your palm.
6.4. Playful Variations
Invent your own handstand variations and have fun.
- One-Arm Handstand Attempts: Practice lifting one arm off the ground.
- Handstand Push-Up Attempts: Try bending your elbows in a handstand.
- Creative Poses: Combine handstands with other acrobatic movements.
6.5. The Importance of Play
Remember, play is a crucial part of skill mastery.
Practice happens at the edge of your ability; Play happens at the core of your competence.
Focus on variations that you are comfortable with and explore different ways to express yourself.
7. Handstand Conditioning: Pushing Your Skills
Conditioning exercises help strengthen your body and improve your ability to hold a handstand for longer.
7.1. Band Drills
Use resistance bands to strengthen your shoulders and back.
- Band Pull-Aparts: Pull a resistance band apart while keeping your arms straight.
- Face Pulls: Pull a resistance band towards your face, focusing on squeezing your shoulder blades together.
7.2. A-Frame Shrugs
Strengthen your shoulders and upper back.
- A-Frame Position: Start in an elevated A-frame position.
- Shoulder Shrugs: Shrug your shoulders up towards your ears.
- Controlled Movement: Perform the shrugs with control.
7.3. Hollow Body Hold
Strengthen your core muscles.
- Hollow Body Position: Lie on your back and lift your arms and legs off the ground, maintaining a hollow body position.
- Core Engagement: Engage your core to prevent arching your back.
- Hold Time: Hold for 30-60 seconds.
7.4. High Frogger Holds
Increase your balance and control.
- High Frogger Position: Start in a high frogger position.
- Balance Focus: Focus on maintaining your balance.
- Hold Time: Hold for 15-30 seconds.
7.5. The Value of Lower-Level Skills
Focus on lower-level skills to improve the quality of your movement.
Rather than trying to hold a handstand for as long as possible, focus on drills that target specific parts of the handstand.
8. Reflecting on Your Practice: Learning from Mistakes
Mindful reflection is essential for improving your handstand skills.
8.1. Reflecting on Each Session
Take a few minutes at the end of each session to reflect on your performance.
- What did you learn?
- What did you struggle with?
- What did you do well?
8.2. Identifying Patterns
Look for patterns in your performance over time.
- Are there certain days when you perform better?
- Are there certain exercises that you consistently struggle with?
- Are there any external factors that are affecting your performance?
8.3. Adjusting Your Approach
Use your reflections to adjust your approach to training.
- If you are consistently struggling with a certain exercise, try breaking it down into smaller steps.
- If you are feeling fatigued, take a rest day.
- If you are not enjoying the process, reexamine your approach.
8.4. The Importance of Mindful Reflection
Mindful reflection can dramatically improve your overall performance and experience with the handstand.
By taking a few minutes throughout and at the end of your session to mindfully reflect on how things went, where you struggled, and any big wins you had, you’ll start to see the bigger picture over time.
8.5. Progress is Not Linear
Remember that progress is anything but linear.
If you don’t know what to expect, it can really mess with your head. It’s easy to start feeling down about your progress if you get too caught up in day-to-day fluctuations in your performance.
9. Handstand Positioning and Breathing Tips
Proper positioning and breathing are crucial for a stable and efficient handstand.
9.1. Stacking the Blocks
Think of stacking your joints like blocks.
- Straight Line: Aim for a straight line from your wrists to your shoulders, hips, and ankles.
- Joint Alignment: Stack your joints to create a solid foundation.
- Stable Position: This is the most solid position you can be in.
9.2. Maintaining Tension
Squeeze everything to create better stability.
- Full Body Engagement: Squeeze your fingers, wrists, arms, shoulders, core, glutes, and legs.
- Neck Relaxation: Keep your neck loose and comfortable.
- Reduced Effort: The more tension you have through your body while you’re in the handstand, the less effort you’ll need to put in to holding your body upside down.
9.3. Balancing Through Your Hands
Shift your body slightly to maintain balance.
- Fingertip Pressure: Press through your fingertips to prevent falling forward.
- Heel of the Hand Pressure: Press through the heel of your hand to prevent falling backward.
- Balance Point: Find your balance point by making subtle adjustments.
9.4. Saying Your ABCs
Use this technique to ensure you keep breathing.
- Conscious Breathing: Focus on taking slow, deep breaths.
- Verbal Cue: Say your ABCs to remind yourself to breathe.
- Oxygen Supply: Proper breathing helps supply oxygen to your muscles.
9.5. Cartwheel Bail
Practice your cartwheel so you can safely exit a handstand.
- Cartwheel Technique: Learn how to cartwheel out of a handstand.
- Safe Exit: Use the cartwheel to safely land on your feet.
- Injury Prevention: This will protect you from injury if (and when) you fall out of the handstand.
10. Your Handstand Training Plan
A structured training plan will help you stay on track and make consistent progress.
10.1. Practice Frequency
Aim to practice 2-4 times per week.
- Central Nervous System: Frequent practice helps your central nervous system acquire the skill efficiently.
- Realistic Schedule: Choose a schedule that you can realistically stick to.
10.2. Session Length
Aim for 15-45 minutes per session.
- Super Serious: If you’re super serious, aim for 45 minutes.
- Realistic Approach: For most people, 15-20 minutes is a lot more realistic.
10.3. Sample Program (4 Days a Week, 45 Minutes Per Session)
Here’s a sample program that you can use as a template.
| Monday/Thursday | Tuesday/Friday |
|---|---|
| Prepare | Prepare |
| 10 minutes total: • Wrist prep • Shoulder prep • A-Frame Shrugs | 15 minutes total: • Do the full prep routine |
| Practice | Practice |
| 20 minutes total: • Bailing Practice and Entries (either using wall or freestanding split leg kick-up) [5 minutes] • Single attempt handstand holds (either using wall or freestanding for attempts) [15 minutes] | 20 minutes total: • Bailing Practice and Entries (either using wall or freestanding split leg kick-up) [5 minutes] • Single attempt handstand holds (either using wall or freestanding for attempts) [15 minutes] |
| Play | Play |
| 5 minutes total: Choose a movement at an appropriate level and explore. Some examples: • Kicking up to hold before you bail • High Frogger tying to pause at the top • Wall Floats | 5 minutes total: Choose a movement at an appropriate level and explore. Some examples: • Kicking up to hold before you bail • High Frogger tying to pause at the top • Wall Floats |
| Push | Push |
| 5 minutes total: • 1-minute Stamina Hold x 3 (Using wall facing in or the band standing up) • 1-minute Hollow Body Hold x 2 | No push session today! Take it easy 🙂 |
| Ponder | Ponder |
| 5 minutes total: Spend some time reflecting on the session and prepping for the next one. | 5 minutes total: Spend some time reflecting on the session and prepping for the next one. |
10.4. Adjusting the Program
Adjust the program based on your individual needs and progress.
- Listen to Your Body: If you’re feeling fatigued, take a rest day.
- Modify Exercises: Modify exercises to make them easier or harder.
- Track Your Progress: Keep track of your progress to stay motivated.
10.5. The GMB Training Structure
This is the same overall training structure that guides all of our programs at LEARNS.EDU.VN.
By following this structure, you’ll be able to make consistent progress towards your handstand goals.
11. Advanced Handstand Variations
For those who have mastered the basics, here are some advanced variations to challenge yourself.
11.1. One-Arm Handstand
Balance on one arm.
- Prerequisites: Requires significant strength, balance, and control.
- Progression: Start by practicing lifting one arm briefly.
- Spotting: Use a spotter to prevent falls.
11.2. Handstand Push-Ups
Perform push-ups in a handstand position.
- Prerequisites: Requires significant upper body strength.
- Progression: Start with wall-assisted handstand push-ups.
- Controlled Movement: Perform the push-ups with control.
11.3. Planche
Hold your body parallel to the ground.
- Prerequisites: Requires extreme strength and control.
- Progression: Start with planche leans.
- Joint Preparation: Prepare your wrists and shoulders for the stress.
11.4. Press to Handstand
Press up into a handstand from a seated position.
- Prerequisites: Requires significant core and shoulder strength.
- Progression: Start with tuck press variations.
- Controlled Movement: Press up with control.
11.5. Taking Your Practice Further
For advanced hand balancers, there are many resources available to help you take your practice further.
We recommend Yuval Ayalon, Yuri Marmerstein, or Miguel Santana for help with learning advanced tricks.
12. FAQs About Holding a Handstand
Here are some frequently asked questions about handstands.
12.1. What If I Can’t Keep My Balance?
Master these three components:
- Master the set-up
- Control the kick-up
- Learn to bail
12.2. Do Handstands Build Muscle?
Not really, no. But, you’ll see improved strength in the fingers, wrists, arms, shoulders, back, core, legs, and throughout the whole body.
12.3. Do You Need to Be Strong to Do a Handstand?
To get started? No, you don’t need to be mega strong or anything.
12.4. How Do You Get Strong Enough to Do a Handstand?
With practice! Start with the most basic progressions and gradually build up your strength and control.
12.5. How Do You Do a Handstand Against a Wall?
There are two ways to do this:
- Facing the wall—Walk up the wall.
- Facing away from the wall—Use a split leg kick-up.
12.6. What Muscles Does a Handstand Use?
The entire body. However, you will mainly feel it in your fingers, wrists, shoulders, and core when done properly.
12.7. Are Handstands Good for You?
Sure. They can be when done in a safe and healthy manner. Some of the benefits include:
- Increased blood circulation
- Improves spatial awareness
- Builds wrist, shoulder, and core strength
- Improves balance and control throughout the body
- Can help your mind relax once you get past the initial frustration aspect of learning them
- Makes you cooler
12.8. How Do You Train to Do a Handstand?
- First, train safety and strength—practice bails and wall walks.
- Then, train the entry for balance while continuing to work on strength—practice kick-ups and wall work.
- Finally, work on your endurance for the freestanding handstand—practice freestanding kick-ups, holds, and wall holds.
12.9. How Long Should I Do a Handstand For?
For as long as you can.
12.10. How Do You Hold a Handstand for a Minute?
Like anything, you gradually work up to it.
12.11. How Long Does It Take to Learn Handstands?
There isn’t one answer to that. It depends on so many variabilities for each individual.
12.12. Should You Do Handstands Every Day?
I wouldn’t say you should but some people do enjoy doing them everyday. If that is something you’d like to do then I suggest slowly building up to doing that.
12.13. Are Handstands Bad for Your Back?
They can be if you find yourself performing “banana” handstands due to poor core stability or poor range of motion in your shoulders.
12.14. Can Headstands Be Dangerous?
Any movement can be dangerous. That is why it is good to start at the beginning and gradually work on increasing your strength, flexibility, and control with each progression or variation before moving on to the next level. But no, headstands are not inherently dangerous.
12.15. Are Handstand Push-Ups Dangerous?
Only if done in a dangerous way.
12.16. Can You Lose Weight Doing Handstands?
Weight loss comes down to good nutritional habits. Not doing more handstands.
12.17. Is the Headstand or Handstand Harder?
The majority of people will find it easier to learn the headstand because the length of the lever, your body, has been decreased.
12.18. What Is the Longest Someone Has Held a Handstand?
No idea, but those kinds of “feats” seem a bit silly to me. Plus, there are a lot of factors to be considered like what kind of handstand, what kind of form allowed, etc, etc.
12.19. Does Doing Handstands Help Hair Growth?
No. Handstand practice is extremely frustrating and stressful and a large cause of premature baldness in the movement community.
(…kidding, of course, but Google says a lot of people have this question, so we figured we’d add it in here).
13. Enhance Your Handstand Journey with LEARNS.EDU.VN
Are you ready to take your handstand journey to the next level? LEARNS.EDU.VN offers a wealth of resources and expert guidance to help you achieve your fitness goals.
13.1. Explore Comprehensive Guides
Dive deeper into various fitness topics with our detailed guides:
- Flexibility Training: Unlock your body’s full potential with targeted flexibility exercises.
- Core Strength: Build a strong foundation for stability and balance.
- Advanced Acrobatics: Explore more challenging movements and skills.
13.2. Access Personalized Training Plans
Our platform provides customized training plans tailored to your individual needs and goals. Whether you’re a beginner or an advanced practitioner, we have a plan for you.
13.3. Connect with Expert Coaches
Receive personalized feedback and guidance from our experienced coaches. Get the support you need to overcome challenges and achieve your goals.
13.4. Join Our Community
Connect with other learners and share your experiences. Get inspired, stay motivated, and learn from others on the same journey.
13.5. Contact Us
For more information, visit our website at LEARNS.EDU.VN or contact us at:
- Address: 123 Education Way, Learnville, CA 90210, United States
- WhatsApp: +1 555-555-1212
- Website: LEARNS.EDU.VN
Conclusion
Learning to do a handstand is a rewarding journey that requires dedication, patience, and the right approach. By understanding the essential concepts, assessing your readiness, following a structured training plan, and reflecting on your progress, you can achieve your handstand goals. Remember, consistency and mindful practice are key.
At LEARNS.EDU.VN, we’re committed to providing you with the resources and guidance you need to succeed. Whether you’re looking to build foundational strength, improve your balance, or master advanced variations, we’re here to support you every step of the way.
Ready to embark on your handstand adventure? Visit learns.edu.vn today to explore our comprehensive guides, personalized training plans, and expert coaching. Let’s unlock your potential together.