How Long To Learn To Handstand? Mastering a handstand is a rewarding journey that combines strength, balance, and body awareness. At LEARNS.EDU.VN, we believe everyone can achieve this impressive feat with the right guidance and consistent practice. This comprehensive guide breaks down the process, offers a realistic timeline, and provides expert tips to help you invert your world safely and effectively. Discover the joy of defying gravity and unlock a new level of physical prowess.
1. Understanding the Handstand Journey
Embarking on the path to mastering the handstand is an exciting endeavor, but it’s crucial to understand that there’s no one-size-fits-all answer to the question of “how long to learn to handstand.” Numerous factors influence the timeline, including your current fitness level, body awareness, consistency of practice, and the quality of your training. This journey requires patience, dedication, and a strategic approach to ensure progress and prevent injuries.
1.1. Factors Influencing Your Handstand Timeline
Several elements play a significant role in determining how quickly you’ll achieve a stable and controlled handstand. Understanding these factors can help you set realistic expectations and tailor your training to your specific needs.
| Factor | Description | Impact on Timeline |
|---|---|---|
| Current Fitness Level | Your existing strength, flexibility, and body awareness will significantly impact your learning curve. Individuals with a background in gymnastics, yoga, or other disciplines that require similar skills may progress faster. | Those with a solid foundation may see results sooner, while beginners may need to focus on building foundational strength and flexibility first. |
| Body Awareness | A strong sense of proprioception (awareness of your body in space) is crucial for balance and control in a handstand. Individuals who are naturally attuned to their body position and movements will have an advantage. | Enhanced body awareness allows for quicker adjustments and improved balance, leading to faster progress. |
| Consistency of Practice | Regular and consistent practice is essential for developing the necessary strength, balance, and coordination. Sporadic training will hinder progress and may increase the risk of injury. | Consistent practice, even in short sessions, is more effective than infrequent, long sessions. |
| Quality of Training | The effectiveness of your training program is paramount. A well-structured plan that incorporates proper warm-up, skill progressions, conditioning exercises, and mindful reflection will yield better results than random practice. Seeking guidance from experienced instructors can also be invaluable. | A high-quality training program optimizes learning and reduces the risk of setbacks, leading to more efficient progress. |
| Age and Recovery | Age can affect muscle recovery and joint flexibility, influencing the pace of progression. Adequate rest and recovery are crucial for all ages but become increasingly important as you get older. | Younger individuals may recover faster, allowing for more frequent training sessions. Older individuals may need to prioritize recovery and adjust their training intensity. |
1.2. Realistic Timeframes for Handstand Mastery
While individual timelines vary, here are some general estimates based on different levels of commitment and experience:
- Beginner (No prior experience): 6 months – 2 years. Focus on building foundational strength, flexibility, and body awareness.
- Intermediate (Some experience with related activities like yoga or gymnastics): 3-12 months. Refine technique, improve balance, and increase hold time.
- Advanced (Strong foundation and consistent practice): 1-6 months. Perfect alignment, develop variations, and increase endurance.
Remember, these are just estimates. The most important thing is to enjoy the process and celebrate your progress along the way.
2. Essential Foundations for Handstand Success
Before you kick up into a handstand, it’s crucial to establish a solid foundation. This involves developing the necessary strength, flexibility, and body awareness to support your body weight and maintain balance.
2.1. Building Strength for Handstands
Handstands require significant strength in your wrists, shoulders, core, and back. Incorporating these exercises into your routine will help you develop the necessary strength:
- Wrist Warm-ups and Strengthening: Wrist circles, extensions, and flexions using resistance bands.
- Shoulder Strengthening: Pike push-ups, dips, and overhead presses.
- Core Strengthening: Planks, hollow body holds, and dead bugs.
- Back Strengthening: Superman’s, bird dogs, and rows.
Aim for 2-3 strength training sessions per week, focusing on proper form and progressive overload.
2.2. Enhancing Flexibility and Mobility
Flexibility in your wrists, shoulders, and hamstrings is essential for achieving a straight line and maintaining balance. Incorporate these stretches into your routine:
- Wrist Stretches: Prayer stretch, reverse prayer stretch, and wrist extensions with gentle pressure.
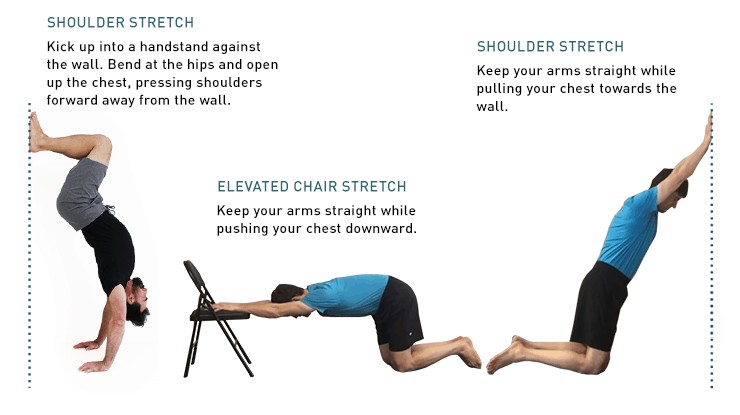
- Shoulder Stretches: Doorway stretch, cross-body shoulder stretch, and overhead tricep stretch.
- Hamstring Stretches: Seated hamstring stretch, standing toe touch, and downward-facing dog.
Hold each stretch for 30-60 seconds and perform them daily for optimal results.
2.3. Developing Body Awareness
Body awareness, or proprioception, is the ability to sense your body’s position in space. This is crucial for making微调adjustments and maintaining balance in a handstand. Here are some exercises to improve your body awareness:
- Blindfolded Balance Exercises: Stand on one leg with your eyes closed and try to maintain your balance for as long as possible.
- Yoga and Pilates: These practices emphasize body alignment and control, helping to improve your proprioception.
- Mirror Work: Practice basic handstand drills in front of a mirror to get visual feedback on your alignment.
3. Handstand Training: A Step-by-Step Progression
Learning a handstand is best approached through a series of progressive drills that gradually build your strength, balance, and confidence.
3.1. Wrist Preparation Exercises
These exercises help to warm up and strengthen your wrists, preparing them for the demands of a handstand. Proper wrist preparation is essential to prevent injuries and ensure comfortable practice.
| Exercise | Description | Sets/Reps |
|---|---|---|
| Wrist Circles | Gently rotate your wrists in both clockwise and counter-clockwise directions. | 2 sets of 10 reps each direction |
| Wrist Extensions | Extend your hands forward with palms down, then gently bend your wrists up, feeling the stretch. | 2 sets of 10 reps |
| Wrist Flexions | Extend your hands forward with palms up, then gently bend your wrists down, feeling the stretch. | 2 sets of 10 reps |
| Finger Stretches | Spread your fingers wide, then make a fist. Repeat to improve finger and wrist flexibility. | 2 sets of 10 reps |
| Wrist Waves | Mimic a wave motion with your hands, alternating between wrist extension and flexion. | 2 sets of 10 reps |
3.2. Shoulder Warm-up Exercises
These exercises enhance shoulder mobility and stability, which are crucial for maintaining proper alignment in a handstand. Warming up your shoulders helps to prevent strains and ensures optimal performance.
| Exercise | Description | Sets/Reps |
|---|---|---|
| Arm Circles (Forward) | Rotate your arms in small circles forward, gradually increasing the size of the circles. | 2 sets of 10 reps |
| Arm Circles (Backward) | Rotate your arms in small circles backward, gradually increasing the size of the circles. | 2 sets of 10 reps |
| Shoulder Rolls | Roll your shoulders forward and backward to loosen up the shoulder joints. | 2 sets of 10 reps each direction |
| Cross-Body Arm Stretch | Gently pull one arm across your body, holding it with the opposite hand to stretch the shoulder. | Hold for 30 seconds each side |
| Overhead Tricep Stretch | Reach one arm overhead and bend at the elbow, then use the opposite hand to gently pull the elbow further down. | Hold for 30 seconds each side |
3.3. Handstand Drills and Progressions
- Wall Walks: Start with your feet on the wall and walk your hands closer to the wall, gradually increasing the angle of your body.
- Wall Handstands: Kick up into a handstand against the wall, focusing on maintaining a straight line from head to heels.
- Bailing Practice: Practice safely exiting a handstand by cartwheeling out or gently lowering your feet to the ground.
- Freestanding Handstand Attempts: Once you feel comfortable with the wall handstand, start practicing freestanding attempts, focusing on maintaining your balance and control.
Aim for short, frequent practice sessions (15-30 minutes) several times per week.
3.4 A-Frame Progression
The A-Frame Progression is a foundational step in learning to handstand. It helps build the necessary shoulder strength and body awareness before moving to more advanced stages. This exercise simulates the handstand position in a less demanding way.
| Progression | Description | Sets/Reps |
|---|---|---|
| Elevated A-Frame | Place your feet on an elevated surface (like a box or bench) and your hands on the ground, forming an “A” shape. Hold this position, focusing on pushing through your shoulders. | 3 sets of 30-60 second holds |
| A-Frame Shrugs | In the elevated A-frame position, shrug your shoulders up towards your ears and then push them down, engaging your shoulder muscles. | 3 sets of 10-15 reps |
| Hollow Body A-Frame | Maintain the A-frame position while engaging your core to create a hollow body shape. | 3 sets of 20-30 second holds |
3.5 Frogger Progression
The Frogger Progression is a crucial step in building core strength and balance control. It helps in transitioning weight onto the hands while maintaining stability. This exercise bridges the gap between basic strength exercises and full handstand attempts.
| Progression | Description | Sets/Reps |
|---|---|---|
| Frogger Hold | Start in a squat position, place your hands on the ground, and then lift your hips up, resting your knees on your elbows. Hold this position, focusing on balance. | 3 sets of 20-30 second holds |
| High Frogger | From the frogger position, try to straighten your arms slightly, lifting your hips higher. | 3 sets of 10-15 reps |
| Frogger Transitions | Practice transitioning smoothly between the squat and frogger positions, maintaining control and balance. | 3 sets of 5-10 reps |
3.6 L-Stand Progression
The L-Stand Progression is designed to improve core stability and balance while inverted. It prepares you for the vertical alignment required in a handstand. Mastering this step enhances body control and proprioception.
| Progression | Description | Sets/Reps |
|---|---|---|
| Elevated L-Stand | Use a wall for support and kick up into an L-shape, with your legs parallel to the ground. Hold this position, focusing on core engagement. | 3 sets of 30-60 second holds |
| L-Stand Holds | Practice holding the L-stand away from the wall, using your core and shoulder strength to maintain balance. | 3 sets of 10-20 second holds |
| L-Stand Transitions | Gently shift your weight from side to side in the L-stand, improving your balance and control. | 3 sets of 5-10 reps |
3.7 Wall Entry Progression
The Wall Entry Progression builds confidence and control in getting upside down. It teaches the proper body alignment against the wall, which is essential before attempting freestanding handstands. This step minimizes the fear of falling and allows focus on form.
| Progression | Description | Sets/Reps |
|---|---|---|
| Wall Entries | Start facing the wall, place your hands on the ground, and walk your feet up the wall until you reach a handstand position. | 5-10 reps |
| Wall Float | From the handstand position against the wall, try to float one foot away from the wall, maintaining balance. | 3 sets of 5-10 second holds per leg |
| Wall Line Work | Focus on achieving a straight line from your hands to your heels against the wall, engaging your core and squeezing your glutes. | 3 sets of 30-60 second holds |
3.8 Kicking Up
Kicking Up is a key skill for achieving a handstand away from the wall. It involves using momentum and control to lift your legs into the vertical position. Practicing this step improves coordination and helps in finding the balance point.
| Progression | Description | Sets/Reps |
|---|---|---|
| Split Leg Kick Up | Start with one leg forward and kick up, using the momentum to lift your body into a handstand. | 5-10 reps per leg |
| Straddle Handstand | Kick up into a handstand with your legs straddled apart, which can provide more stability and control. | 5-10 reps |
| Full Handstand Entries | Practice kicking up into a full handstand, aiming for a straight line from your hands to your heels. | 5-10 reps |
3.9. Handstand Conditioning Exercises
In addition to skill-specific drills, it’s important to incorporate conditioning exercises to build the strength and endurance needed for longer handstand holds.
- Plank Variations: Forearm plank, side plank, and plank with shoulder taps.
- Hollow Body Holds: Lie on your back with your legs and arms extended, lifting your shoulders and legs off the ground while maintaining a flat back.
- Handstand Push-ups (against a wall): Kick up into a handstand against the wall and perform push-ups, bending your elbows to lower your body towards the ground.
Aim for 2-3 conditioning sessions per week, focusing on proper form and progressive overload.
4. Mastering Balance and Alignment
Achieving a stable and controlled handstand requires mastering balance and alignment. This involves understanding the subtle adjustments you need to make to stay upright and maintaining a straight line from head to heels.
4.1. Finding Your Balance Point
Your balance point is the position where your body weight is evenly distributed over your hands. To find your balance point, focus on:
- Finger and Palm Pressure: Use your fingers and palms to make微调adjustments to maintain balance. Press down with your fingertips to correct forward imbalances and with your palms to correct backward imbalances.
- Shoulder Engagement: Keep your shoulders actively engaged by pushing the ground away from you.
- Core Activation: Engage your core muscles to maintain stability and prevent swaying.
Practice shifting your weight slightly in different directions to get a feel for your balance point.
4.2. Achieving Proper Alignment
Proper alignment is crucial for both balance and injury prevention. Aim for a straight line from head to heels, with your:
- Wrists: Stacked directly under your shoulders.
- Shoulders: Actively engaged and pushing the ground away from you.
- Core: Engaged to prevent arching in your back.
- Glutes: Squeezed to maintain a neutral pelvis.
- Legs: Together and pointed towards the ceiling.
Practice in front of a mirror or record yourself to get visual feedback on your alignment.
5. Overcoming Common Handstand Challenges
Learning a handstand is not without its challenges. Here are some common obstacles and how to overcome them:
- Fear of Falling: Practice bailing techniques and gradually increase your time upside down to build confidence.
- Wrist Pain: Warm up your wrists thoroughly and gradually increase the amount of weight you’re putting on them. If you experience persistent pain, consult a healthcare professional.
- Balance Issues: Focus on finding your balance point and making微调adjustments with your fingers and palms.
- Lack of Strength: Incorporate strength training exercises to build the necessary strength in your wrists, shoulders, core, and back.
Remember, progress is not always linear. Be patient with yourself, celebrate your successes, and learn from your setbacks.
6. Advanced Handstand Variations
Once you’ve mastered the basic handstand, you can explore more challenging variations to further develop your skills and strength.
- One-Arm Handstand: A challenging variation that requires exceptional balance and strength.
- Handstand Push-ups: Perform push-ups while in a handstand to build upper body strength.
- Pinch Handstand: A dynamic entry that involves jumping into a handstand from a standing position.
Approach these variations with caution and gradually progress as your skills and strength improve.
7. Handstand Training Plan
To help you on your journey, here’s a sample handstand training plan that you can adapt to your own needs and schedule. This plan incorporates the principles and exercises discussed throughout this guide. Remember to listen to your body and adjust the plan as needed. LEARNS.EDU.VN recommends consulting with a qualified fitness professional or healthcare provider before starting any new exercise program.
7.1. Weekly Schedule
| Day | Activity | Duration | Focus |
|---|---|---|---|
| Monday | Wrist and Shoulder Warm-up, Wall Walks | 30 min | Building strength and getting comfortable upside down |
| Tuesday | Core and Back Strengthening | 45 min | Developing the necessary strength for stability |
| Wednesday | Rest or Active Recovery (Yoga, Stretching) | 30-60 min | Promoting recovery and enhancing flexibility |
| Thursday | Wrist and Shoulder Warm-up, Wall Handstands | 30 min | Refining alignment and balance |
| Friday | Handstand Conditioning Exercises | 45 min | Building endurance and strength for longer holds |
| Saturday | Freestanding Handstand Attempts, Bailing | 30 min | Practicing balance and safe exits |
| Sunday | Rest | – | Allowing your body to recover and rebuild |
7.2. Daily Routine
Each training session should include the following components:
- Warm-up (5-10 minutes): Wrist circles, shoulder stretches, and light cardio.
- Skill Work (15-20 minutes): Wall walks, wall handstands, bailing practice, and freestanding attempts.
- Conditioning (15-20 minutes): Plank variations, hollow body holds, and handstand push-ups (against a wall).
- Cool-down (5-10 minutes): Static stretching, focusing on wrists, shoulders, and hamstrings.
7.3. Progression Guidelines
- Focus on Form: Prioritize proper form over quantity. It’s better to do fewer repetitions with good form than more repetitions with poor form.
- Listen to Your Body: Pay attention to your body’s signals and rest when needed. Don’t push through pain.
- Progress Gradually: Gradually increase the difficulty of your exercises as your strength and skills improve.
- Be Patient: Learning a handstand takes time and dedication. Be patient with yourself and celebrate your progress along the way.
8. Essential Tips for Success
Here are some additional tips to help you succeed on your handstand journey:
- Find a Training Partner: Having a training partner can provide motivation, support, and feedback.
- Record Your Progress: Track your progress to stay motivated and identify areas for improvement.
- Visualize Success: Visualize yourself performing a perfect handstand to boost your confidence and improve your performance.
- Stay Positive: Maintain a positive attitude and believe in your ability to achieve your goals.
9. The Role of LEARNS.EDU.VN in Your Handstand Journey
At LEARNS.EDU.VN, we’re committed to providing you with the knowledge, resources, and support you need to achieve your handstand goals. We offer a variety of resources, including:
- Detailed Articles: In-depth guides on handstand training, balance, alignment, and injury prevention.
- Video Tutorials: Step-by-step demonstrations of handstand drills, conditioning exercises, and bailing techniques.
- Personalized Coaching: Customized training plans and one-on-one coaching from experienced handstand instructors.
- Community Forum: A supportive online community where you can connect with other handstand enthusiasts, share your progress, and ask questions.
Visit LEARNS.EDU.VN today to access these valuable resources and take your handstand training to the next level.
10. FAQs About Learning to Handstand
Here are some frequently asked questions about learning to handstand:
10.1. How long does it take to learn a handstand?
The time it takes to learn a handstand varies depending on your current fitness level, consistency of practice, and quality of training. Most people can achieve a stable handstand within 6 months to 2 years with consistent practice.
10.2. What muscles do handstands work?
Handstands work your wrists, shoulders, core, back, glutes, and legs.
10.3. Are handstands dangerous?
Handstands can be dangerous if not performed correctly. It’s important to progress gradually, focus on proper form, and practice bailing techniques to prevent injuries.
10.4. Can I learn a handstand if I’m not strong?
Yes, you can learn a handstand even if you’re not naturally strong. The key is to start with basic exercises and gradually build your strength and endurance.
10.5. What should I do if I experience wrist pain?
If you experience wrist pain, stop practicing and rest your wrists. Warm up your wrists thoroughly before each training session and gradually increase the amount of weight you’re putting on them. If the pain persists, consult a healthcare professional.
10.6. How often should I practice handstands?
Aim for 3-5 handstand training sessions per week, with rest days in between to allow your body to recover.
10.7. Can handstands help me lose weight?
Handstands can help you burn calories and improve your overall fitness, but they are not a primary weight loss tool. A healthy diet and regular exercise are essential for weight loss.
10.8. Is it better to practice handstands against a wall or freestanding?
Both wall handstands and freestanding handstands have their benefits. Wall handstands are great for building strength, refining alignment, and overcoming the fear of falling. Freestanding handstands are ideal for developing balance and control.
10.9. What is the most important thing to focus on when learning a handstand?
The most important thing to focus on when learning a handstand is proper form. Prioritize quality over quantity and focus on maintaining a straight line from head to heels.
10.10 What if I can’t keep my balance?
If you’re struggling to hold a handstand for more than a couple of seconds, the most likely culprit is to be found in perfecting these three components of your practice:
- Master the set-up so you have a solid foundation to balance on top of.
- Control the kick-up so your momentum doesn’t pull you off balance.
- Learn to bail so you have the confidence to practice without fear of falling.
Contact LEARNS.EDU.VN
For more information and personalized guidance, contact us:
- Address: 123 Education Way, Learnville, CA 90210, United States
- WhatsApp: +1 555-555-1212
- Website: LEARNS.EDU.VN
Conclusion
Learning a handstand is a challenging but rewarding journey that requires patience, dedication, and a strategic approach. By following the principles and guidelines outlined in this guide, you can set realistic expectations, establish a solid foundation, and gradually progress towards your handstand goals. Remember to listen to your body, celebrate your successes, and never give up on your dreams. With the right guidance and consistent practice, you can invert your world and unlock a new level of physical prowess. Visit learns.edu.vn to discover more educational content and resources. Happy handstanding!