Learning how to do a back handspring can be an incredibly rewarding experience, boosting your confidence and opening doors to more advanced skills. At LEARNS.EDU.VN, we break down the process into manageable steps, combining strength training, flexibility exercises, and essential drills, including back handspring over the barrel, ensuring your journey is both safe and successful. Discover the keys to mastering this foundational skill, and unlock new heights in your athletic pursuits with resources designed to support you every step of the way. By understanding the required techniques, strength, flexibility, back handspring progressions, and essential tools you will be able to master the back handspring.
1. What is a Back Handspring and Why Learn It?
A back handspring is a fundamental gymnastics skill where an individual propels themselves backward, using their hands to push off the ground for momentum and rotation, ultimately landing back on their feet. It’s a cornerstone in gymnastics, cheerleading, and various acrobatic activities.
1.1. Defining the Back Handspring
The back handspring requires a harmonious blend of strength, flexibility, and coordination to execute safely and effectively. It’s frequently integrated into gymnastics and cheerleading routines and serves as a building block for more complex tumbling sequences. Mastering the back handspring is a significant achievement for athletes in disciplines involving acrobatics and tumbling.
1.2. Benefits of Mastering the Back Handspring
Learning to do a back handspring offers numerous benefits that extend beyond the realm of gymnastics and cheerleading:
- Enhanced Physical Fitness: Performing back handsprings requires significant strength, flexibility, and coordination, leading to improvements in overall physical fitness.
- Increased Confidence: Successfully executing a back handspring can boost self-esteem and confidence, empowering individuals to tackle new challenges in other areas of their lives.
- Improved Body Awareness: Mastering the back handspring enhances body awareness and spatial orientation, which can be beneficial in various sports and physical activities.
- Foundation for Advanced Skills: The back handspring serves as a prerequisite for more advanced tumbling skills, such as back tucks and aerials, opening doors to further progression in gymnastics and acrobatics.
- Versatility: The back handspring is a versatile skill that can be incorporated into various routines and performances, adding excitement and flair to gymnastics, cheerleading, and dance routines.
- Mental Toughness: Overcoming the mental and physical challenges associated with learning a back handspring can foster mental toughness and resilience, valuable traits for success in any endeavor.
- Fun and Enjoyment: Learning and performing back handsprings can be an enjoyable and rewarding experience, providing a sense of accomplishment and personal growth.
- Transferable Skills: The coordination, balance, and spatial awareness gained from mastering a back handspring can transfer to other sports and activities, enhancing athletic performance in various domains.
2. Step-by-Step Guide: How to Do a Back Handspring
Important Safety Note: Attempting a back handspring without proper supervision and spotting from a qualified adult can lead to severe injuries or even death. Always seek guidance from a trained professional and practice in a safe environment.
2.1. The Five Key Steps
-
Sit, Lean, Push:
- Bend your legs to approximately a 90-degree angle.
- Lean backward while simultaneously pushing off the ground forcefully with your legs.
- This initial movement generates momentum and sets the stage for the subsequent steps.
-
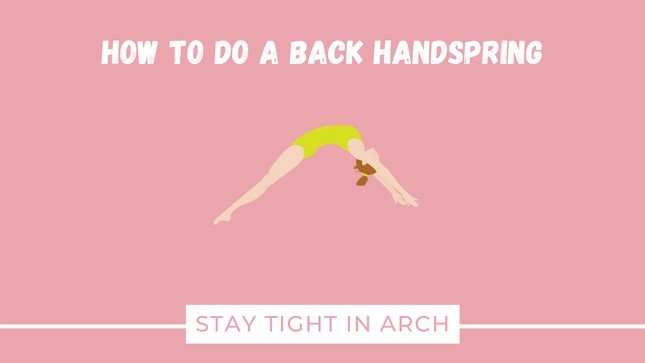
Tight Arch:
- Jump backward, maintaining a tight arch position throughout the movement.
- Keep your eyes focused on your hands, ensuring proper alignment and visual guidance.
- The arched position helps to maintain body tension and facilitates rotation.
-
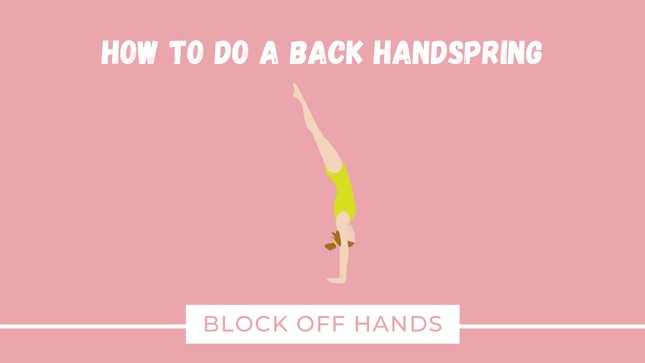
Tight Arch Handstand:
- Continue pushing through your shoulders and hands off the floor.
- This step requires upper body strength and control to maintain the handstand position.
- Focus on maintaining a straight line from your hands to your shoulders to maximize stability.
-
Tight Hollow Position:
- As you reach the peak of the handstand, transition into a tight hollow body position.
- Ensure your arms are aligned with your ears, and your legs are squeezed tightly together.
- This position helps to maintain momentum and prepares you for the landing.
-
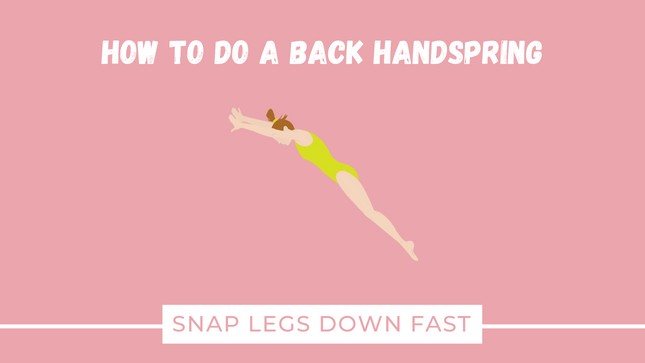
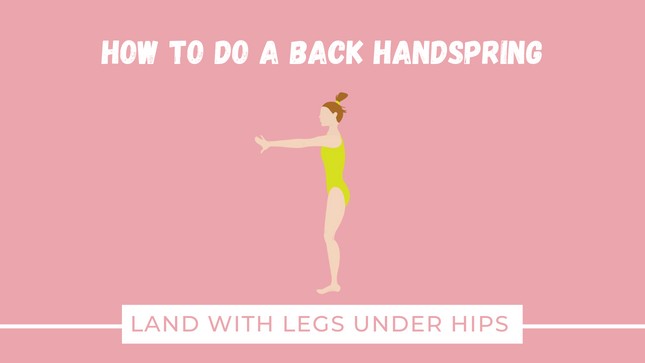
Landing:
- Bring your legs down rapidly to maintain the momentum generated throughout the back handspring.
- If performing a standing back handspring, aim to land with your feet directly under your hips for stability.
- In a connected back handspring, land with your feet slightly in front of your hips to facilitate the transition to the next skill.
2.2. Detailed Breakdown of Each Step
To truly master the back handspring, each step requires focused attention and practice:
- Sit, Lean, Push: This step is crucial for initiating the backward momentum. Imagine sitting down on a chair behind you while simultaneously pushing off the ground. This simultaneous action will create the necessary force to propel you backward.
- Tight Arch: Maintaining a tight arch throughout the jump is essential for body control and proper rotation. Visualize forming a rainbow shape with your body, keeping your core engaged and your back muscles activated.
- Tight Arch Handstand: This phase demands upper body strength and stability. Focus on pushing through your shoulders and hands, maintaining a straight line from your fingertips to your shoulders. This will ensure a solid handstand position and prevent collapsing.
- Tight Hollow Position: Transitioning into a tight hollow body position is vital for maintaining momentum and preparing for the landing. Squeeze your legs together, engage your core muscles, and keep your arms aligned with your ears. This position will help you control your body in the air and facilitate a smooth landing.
- Landing: The landing is the culmination of all the previous steps. Bring your legs down swiftly while maintaining a tight core and controlled body position. Whether you’re performing a standing back handspring or a connected one, landing with proper alignment is crucial for stability and preventing injuries.
2.3. Visual Aids and Demonstrations
Complementing these steps with visual aids and demonstrations can significantly accelerate your learning process. Resources like video tutorials and demonstrations from experienced gymnasts or coaches provide valuable insights into proper technique and form.
At LEARNS.EDU.VN, you can find a library of instructional videos and demonstrations that break down each step of the back handspring, allowing you to visualize the movements and refine your technique effectively. These visual resources, combined with hands-on practice and guidance from a qualified instructor, will set you on the path to mastering the back handspring with confidence and precision.
3. Back Handspring Prep Workout: Building Strength and Flexibility
A successful back handspring hinges on a foundation of strength and flexibility. This prep workout focuses on strengthening key muscle groups and enhancing flexibility to ensure you’re physically prepared to execute the skill safely and effectively.
3.1. Essential Muscles for a Back Handspring
Mastering a back handspring demands a harmonious blend of strength and flexibility, targeting specific muscle groups to ensure optimal performance and minimize the risk of injury. Understanding the muscles involved and incorporating targeted exercises into your training regimen is crucial for success.
- Legs: Powerful leg muscles are essential for generating the initial push off the ground, providing the momentum needed to propel you backward into the back handspring.
- Core: A strong core is vital for maintaining body control and stability throughout the back handspring, as well as facilitating the rapid movement of your legs over your head.
- Upper Body: Upper body strength, particularly in the shoulders and arms, is necessary for blocking off the floor and snapping down to your feet during the handstand phase of the back handspring.
- Back and Shoulder Flexibility: Adequate flexibility in the back and shoulders is crucial for achieving the arched position and maintaining proper body alignment during the back handspring.
3.2. Flexibility Exercises
Achieving optimal flexibility is paramount for executing a back handspring with proper form and minimizing the risk of injury. Focus on these exercises to improve your range of motion:
- Shoulder Stretches:
- Cross-Body Shoulder Stretch: Gently pull one arm across your body, holding it in place with your opposite hand. This stretch targets the deltoids and upper back muscles, enhancing shoulder mobility and flexibility.
- Overhead Triceps Stretch: Reach one arm overhead and bend it at the elbow, reaching down your back. Use your opposite hand to gently pull your elbow further down, stretching your triceps and shoulder muscles.
- Back Stretches:
- Bridges: Lie on your back with your knees bent and feet flat on the ground. Push up through your hips, lifting your torso off the ground and arching your back. Bridges improve spinal flexibility and strengthen the back muscles.
- Cat-Cow Stretch: Start on your hands and knees, with your back in a neutral position. Alternate between arching your back like a cat (cat pose) and dropping your belly towards the floor (cow pose). This dynamic stretch improves spinal mobility and flexibility.
- Wrist Stretches:
- Prayer Stretch: Bring your palms together in front of your chest, with your fingers pointing upwards. Gently press your palms together, feeling a stretch in your wrists and forearms.
- Wrist Flexor Stretch: Extend one arm in front of you, palm facing up. Use your opposite hand to gently pull your fingers back towards your body, stretching the flexor muscles in your wrist.
3.3. Strength Training Drills
Incorporating strength training drills into your back handspring prep workout is essential for building the necessary muscle strength and power to perform the skill effectively. Focus on exercises that target the key muscle groups involved in the back handspring:
- Leg Exercises:
- Squats: Stand with your feet shoulder-width apart, and lower your hips as if sitting in a chair. Keep your back straight and your knees behind your toes. Squats strengthen the quadriceps, hamstrings, and glutes, providing the power needed for the initial push-off.
- Squat Jumps: Perform a regular squat, but as you stand up, jump explosively into the air. Squat jumps add a plyometric element, improving explosive power and vertical jump height.
- Sumo Squats: Stand with your legs wider than shoulder-width apart, and your toes pointed outwards. Lower your hips as if sitting in a chair, keeping your back straight and your knees behind your toes. Sumo squats target the inner thighs and glutes, enhancing leg strength and stability.
- Core Exercises:
- High Plank Hold: Assume a push-up position, with your body forming a straight line from head to heels. Engage your core muscles to prevent your hips from sagging. High plank holds improve core stability and endurance.
- Elbow Plank Hold: Similar to the high plank hold, but rest on your forearms instead of your hands. Elbow plank holds further challenge core stability and endurance.
- Lying Leg Raises: Lie on your back with your legs straight and arms above your head. Raise your legs up to a 90-degree angle, keeping your lower back pressed against the floor. Lying leg raises strengthen the lower abdominal muscles and improve core stability.
- Upper Body Exercises:
- Gravity Assisted Floor Angels: Lie face down on the floor with your arms extended to the sides. Slowly raise your arms towards the ceiling, squeezing your shoulder blades together. Gravity-assisted floor angels strengthen the upper back and shoulder muscles.
- Gravity Resisted Floor Angels: Lie face down on the floor with your arms extended to the sides. Lift your arms off the floor, keeping them straight, and slowly lower them back down. Gravity-resisted floor angels further challenge the upper back and shoulder muscles.
- U’s with Light Weights: Lie on the edge of a bed or couch, with one arm hanging off the side. Hold a light weight in your hand and slowly raise your arm towards the ceiling, keeping your elbow straight. U’s with light weights strengthen the shoulder muscles and improve stability.
- Gymnastics Specific Exercises:
- Spider-Man Handstands: Position your hands on the floor against a wall, with your fingers pointing forward. Walk your feet up the wall, one step at a time, until your body is in a vertical position. Keep your legs together, arms and legs straight and toes pointed. Spider-Man handstands improve balance, stability, and body awareness.
- Bridges: Lie on your back with your knees bent and feet flat on the ground. Push up through your hips, lifting your torso off the ground and arching your back. Bridges improve spinal flexibility and strengthen the back muscles.
3.4. Sample Workout Schedule
To maximize the benefits of your back handspring prep workout, consider implementing the following schedule:
| Day | Focus | Exercises | Sets/Reps |
|---|---|---|---|
| Monday | Leg Strength | Squats, Squat Jumps, Sumo Squats | 3 sets of 10 reps each |
| Tuesday | Core Strength | High Plank Hold, Elbow Plank Hold, Lying Leg Raises | 3 sets of 30 seconds hold each, 3 sets of 15 reps |
| Wednesday | Rest or Active Recovery | Light stretching, foam rolling | |
| Thursday | Upper Body Strength | Gravity Assisted Floor Angels, Gravity Resisted Floor Angels, U’s with Light Weights | 3 sets of 12 reps each, 2 sets of 10 reps each arm |
| Friday | Flexibility | Shoulder Stretches, Back Stretches, Wrist Stretches | Hold each stretch for 30 seconds, repeat 3 times |
| Saturday | Gymnastics Specific | Spider-Man Handstands, Bridges | 2 sets of 30 seconds hold each, 2 sets of 10 seconds hold each |
| Sunday | Rest | Complete Rest |

Remember to listen to your body and adjust the intensity and volume of your workouts as needed.
3.5. Importance of Gradual Progression
As you progress through your back handspring prep workout, it’s essential to prioritize gradual progression to prevent injuries and optimize your training gains. Start with lighter weights and fewer repetitions, gradually increasing the intensity and volume as your strength and flexibility improve.
4. Top Drills for Learning a Back Handspring
Mastering the back handspring involves more than just physical strength and flexibility; it requires honing specific motor skills and movement patterns through targeted drills.
4.1. Gymnastics Gym Drills
These drills should be performed under the guidance of a trained gymnastics instructor, as they involve specialized equipment and spotting techniques.
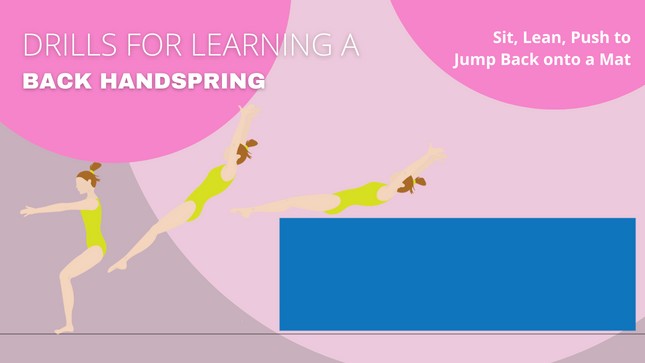
- Sit, Fall, Push onto Mat Stack:
- Purpose: This drill is designed to familiarize you with the feeling of sitting and leaning back, as well as developing the ability to push hard through your legs.
- Execution: Sit with your legs bent at a 90-degree angle, facing a stack of mats. Lean backward while simultaneously pushing off the ground with your legs, aiming to land in a tight body position on the mat stack.
- Back Handspring Over the Barrel:
- Purpose: This drill helps you learn the mechanics of the back handspring by practicing the steps of sitting, leaning, pushing back through the legs, and snapping down to a stand.
- Execution: Position yourself in front of a barrel or a similar rounded surface. Perform a back handspring over the barrel, focusing on maintaining proper body alignment and technique throughout the movement.
- Back Handspring on the Trampoline:
- Purpose: The trampoline provides a safe and controlled environment to practice the back handspring in a tight body position before attempting it on the floor.
- Execution: Perform back handsprings on the trampoline, focusing on maintaining a tight body position, proper arm placement, and controlled landings.
- Progression: Once you can consistently perform back handsprings on the trampoline with good form, you can gradually transition to performing them on a more stable surface, such as a spring floor.
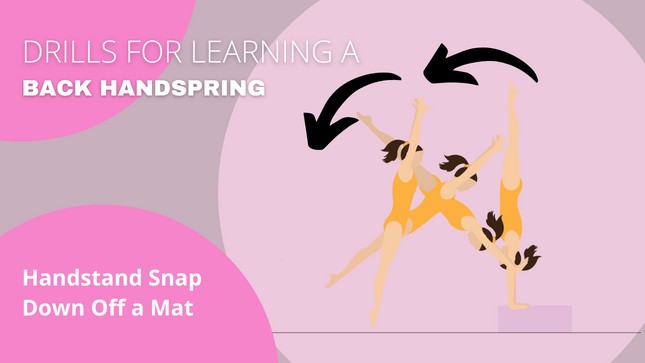
- Handstand Snap-Down on Mat:
- Purpose: This drill is designed to improve the snapping down motion required for the landing phase of the back handspring.
- Execution: Perform a handstand on a mat, and then snap your legs down towards the ground, landing in a standing position. Focus on engaging your core muscles and maintaining a tight body position throughout the movement.
4.2. At-Home Drills
These drills can be practiced at home to supplement your training at the gym and reinforce the skills needed for the back handspring.
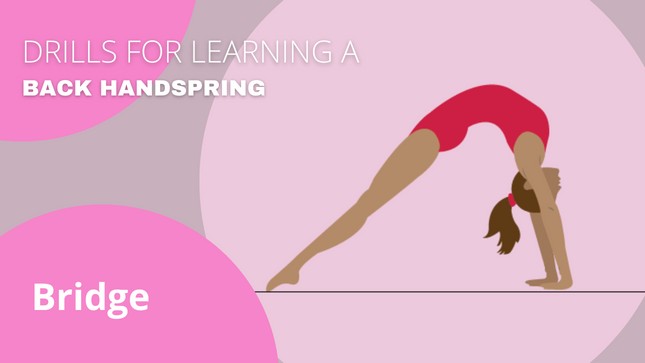
- Bridges:
- Purpose: Bridges improve spinal flexibility and strengthen the back muscles, both of which are essential for the back handspring.
- Execution: Lie on your back with your knees bent and feet flat on the ground. Push up through your hips, lifting your torso off the ground and arching your back.
- Progression: As you become more comfortable with the bridge, you can progress by attempting to get your shoulders over your hands and straightening your legs.
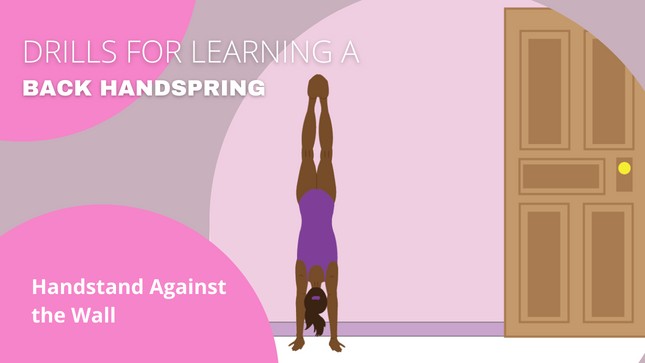
- Handstand Against Wall:
- Purpose: This drill helps you develop balance, stability, and body awareness, all of which are important for the handstand phase of the back handspring.
- Execution: Position your hands on the floor against a wall, with your fingers pointing forward. Walk your feet up the wall, one step at a time, until your body is in a vertical position. Hold the handstand position for as long as you can, focusing on maintaining proper alignment and balance.
4.3. Importance of Spotting
Spotting is crucial when learning the back handspring, as it provides a safety net and allows you to practice the skill with confidence. A qualified spotter can provide physical assistance and guidance, ensuring that you maintain proper form and technique throughout the movement.
5. Tools for Learning a Back Handspring
Investing in the right equipment can significantly enhance your learning experience and help you master the back handspring more effectively.
5.1. Essential Equipment
| Tool | Description | Price |
|---|---|---|
| Pull-Up Bar | Useful for strength exercises and some drills. | $9.98 Check Current Price Here |
| Barrel | Helps practice pushing off the ground in the roundoff. (Price shown for a 24″x24″x30″ barrel.) | $367.21 Check Current Price Here |
| Block | Used for the handstand snap-down drill. | $269.00 Check Current Price Here |
| Therabands | Exercise bands for strength exercises and drills. | $14.99 Check Current Price Here |
| Back Handspring How-To Video | Tutorial video by Olympic Gold medalist Dominique Moceanu. | FREE Check Current Price Here |
| Panel Mat | Folded up for the handstand snap-down drill. | $333.44 Check Current Price Here |
| 8 Inch Mat | Used in the video for back handspring drills. Learn new skills on mats before attempting them on the floor. | $499.00 Check Current Price Here |
5.2. Where to Find Quality Equipment
When shopping for gymnastics equipment, it’s important to prioritize quality and safety. Look for reputable brands and retailers that specialize in gymnastics equipment, and always inspect equipment carefully before use to ensure that it’s in good condition.
6. Back Handspring Progression: A Step-by-Step Approach
Mastering the back handspring requires a systematic approach, building upon foundational skills and gradually progressing to more complex movements.
6.1. Skill Progression Chart
| Step | Description |
|---|---|
| 1. Cartwheel | The cartwheel serves as a fundamental building block for the back handspring, as it develops the necessary coordination, balance, and body awareness. |
| 2. Backbend Kickover | The backbend kickover builds upon the cartwheel by introducing the backward element and further enhancing flexibility and spinal mobility. |
| 3. Handstand Fall to Bridge | The handstand fall to bridge helps you develop the upper body strength and stability needed for the handstand phase of the back handspring. |
| 4. Back Walkover | The back walkover combines the backbend kickover with the handstand, further enhancing flexibility, coordination, and body control. |
| 5. Standing Back Handspring | Once you have mastered the previous skills, you can begin working on the standing back handspring. |
| 6. Connected Back Handsprings | Once you can consistently perform standing back handsprings with good form, you can begin working on connecting them together. |
6.2. Tips for Safe Progression
When progressing through the back handspring progression, it’s essential to prioritize safety and listen to your body. Avoid rushing through the steps, and only progress to the next skill when you feel confident and comfortable with the current one.
7. Common Mistakes to Avoid When Learning a Back Handspring
Even with proper training and preparation, it’s common to encounter challenges and make mistakes when learning the back handspring. Recognizing and addressing these common mistakes can help you overcome obstacles and progress more effectively.
7.1. Common Mistakes to Avoid
- Not having the proper upper body strength: Insufficient upper body strength can lead to collapsing during the handstand phase of the back handspring. Focus on strengthening your shoulder and arm muscles to ensure that you can support your body weight effectively.
- Not having enough leg strength: Weak leg muscles can hinder your ability to generate the initial push off the ground, resulting in a lack of momentum and power. Incorporate leg-strengthening exercises into your training regimen to improve your leg strength and power.
- Skipping some of the progressions: Rushing through the back handspring progression can lead to improper technique and an increased risk of injury. Take the time to master each skill in the progression before moving on to the next one.
- Not learning with a proper adult spot: Practicing the back handspring without proper spotting can be dangerous and lead to serious injuries. Always seek guidance from a qualified gymnastics instructor and ensure that you have a spotter present when practicing the skill.
- Leaning too far forward: Leaning too far forward during the back handspring can disrupt your balance and make it difficult to maintain proper body alignment. Focus on maintaining a neutral spine and keeping your weight balanced over your center of gravity.
- Not keeping arms straight: Bending your arms during the handstand phase of the back handspring can reduce your stability and make it more difficult to block off the floor effectively. Keep your arms straight and locked out to maximize your stability and power.
- Not having the mental preparedness: The mental aspect of learning a back handspring is just as important as the physical. Make sure that you are mentally prepared and confident before attempting the skill.
8. Frequently Asked Questions (FAQs)
8.1. Common Questions About Back Handsprings
Q: What is a back handspring?
A: A back handspring is a gymnastics skill where a person jumps backward onto their hands, then pushes up off their hands to land on their feet. It’s a key skill for tumbling passes.
Q: Is a back handspring difficult to learn?
A: Learning a back handspring can be challenging, but with practice and guidance from a qualified coach, anyone can master this skill. The first step is getting upper body strength and core strength so you can complete the skill.
Q: How can I prepare my body for learning a back handspring?
A: Strengthening your core and arm muscles, improving black and shoulder flexibility, and practicing proper hand placement and body positioning are key to preparing your body for learning a back handspring.
Q: What are some common mistakes to avoid when attempting a back handspring?
A: Common mistakes to avoid when performing a back handspring include leaning too far forward, not keeping the arms straight, and not having the strength to complete the skill. It’s important to learn all of the progressions and have the strength you need in your arms, legs and shoulders before attempting a back handspring.
Q: How can I overcome my fear of attempting a back handspring?
A: Overcoming fear is a natural part of learning any new skill. By setting small, achievable goals, practicing with a spotter, and visualizing success, you can build confidence and conquer your fear of attempting a back handspring.
Q: How long does it take to learn a back handspring?
A: The time it takes to learn a back handspring varies depending on individual factors such as physical fitness, flexibility, and coordination. With consistent training and proper guidance, most people can learn the back handspring within a few weeks to a few months.
Q: What are some tips for improving my back handspring technique?
A: Some tips for improving your back handspring technique include maintaining a tight body position, pushing off the ground with your legs, blocking off the floor with your arms, and snapping your legs down quickly.
Q: What should I do if I’m struggling to learn a back handspring?
A: If you’re struggling to learn a back handspring, don’t get discouraged. Seek guidance from a qualified gymnastics instructor, focus on mastering the foundational skills, and practice consistently. With patience and perseverance, you’ll eventually achieve your goal.
Q: How important is mental preparation in learning a back handspring?
A: Mental preparation is crucial when learning a back handspring. Visualize yourself successfully performing the skill, stay positive and focused, and trust in your training and abilities.
Q: Can I learn a back handspring at home?
A: While some drills and exercises can be practiced at home, it’s essential to learn the back handspring under the guidance of a qualified gymnastics instructor in a safe and controlled environment.
9. Conclusion: Achieve Your Gymnastics Goals with Confidence
Learning the back handspring is an achievable goal with dedication, proper technique, and consistent practice. By following the steps outlined in this comprehensive guide, strengthening the necessary muscles, mastering essential drills, and avoiding common mistakes, you’ll be well on your way to executing the back handspring with confidence and grace.
Remember to prioritize safety, seek guidance from qualified instructors, and listen to your body throughout your training journey. With patience, perseverance, and a positive attitude, you’ll conquer the back handspring and unlock new possibilities in your gymnastics endeavors.
Ready to take your gymnastics skills to the next level? Visit learns.edu.vn today to discover a wealth of resources, including in-depth tutorials, expert tips, and personalized training plans, to help you achieve your gymnastics goals and reach your full potential. Contact us at 123 Education Way, Learnville, CA 90210, United States. Whatsapp: +1 555-555-1212.