Land navigation is a vital skill that has seen a decline in recent years due to advancements in technology such as GPS. But what if your life depended on your ability to navigate with a map and compass? LEARNS.EDU.VN is here to offer a better understanding of the Military Grid Reference System (MGRS), which is not only a better representation of our 3D world on a two-dimensional map but also simple and easy to use. Master the basics of wayfinding, improve spatial awareness, and achieve confidence in unfamiliar environments with our expert guidance.
1. Understanding the Fundamentals of Land Navigation
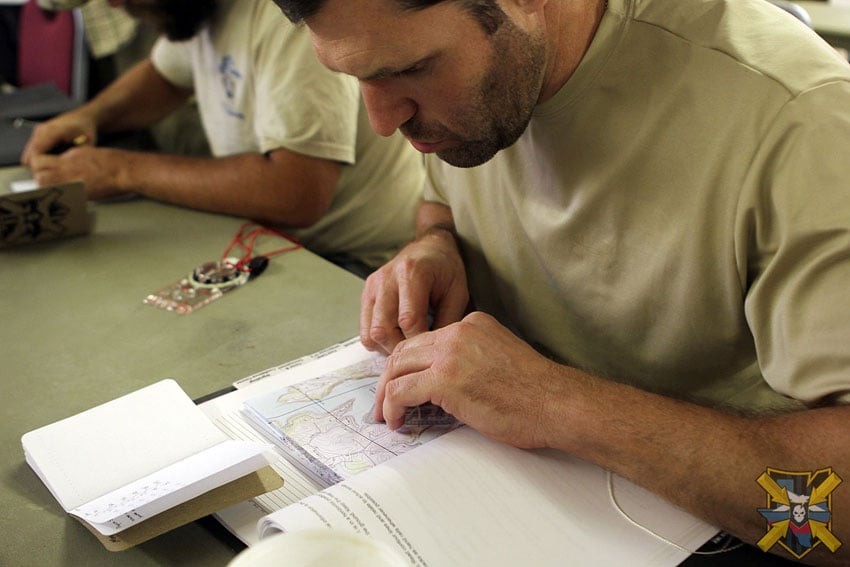
Before diving into MGRS, let’s refresh the basics of map and compass navigation. A solid grasp of these fundamentals is crucial for effective land navigation.
1.1 The Importance of Maps
Maps are the most critical resource to have when you’re away from civilization. Even on a simple fishing trip, a map can provide invaluable information.
1.1.1 Key Information on Maps
- Man-made objects: Railroad tracks, roads, and power lines can serve as “handrails,” guiding you back to civilization if lost.
- Natural landmarks: Lakes, rivers, streams, and degrees of incline are all visible on a map.
- Topographic maps: Resources like USGS.gov allow you to download and print topographic maps for free, or purchase printed versions.
Alt: Topographic map highlighting various terrain features and man-made structures.
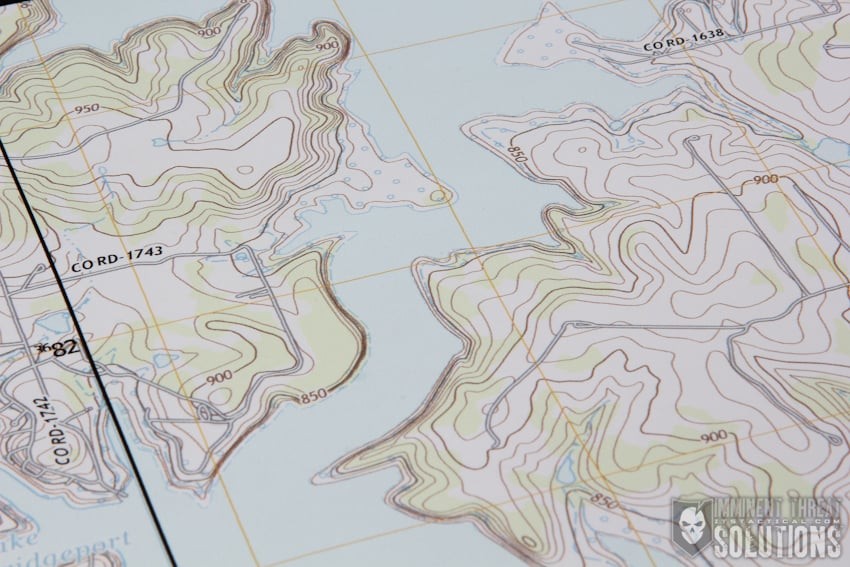
1.1.2 Deciphering Water Features
- Water is always shown in blue.
- Small blue circles indicate intermittent water lines, common in areas prone to drought or seasonal changes.
- Blue dashes represent large rapids.
Understanding these water features is essential for safe navigation. As shown in the movie “Into the Wild,” misjudging water levels can have dire consequences.
Alt: Texas lake map showing intermittent water lines and blue shading to denote water features.
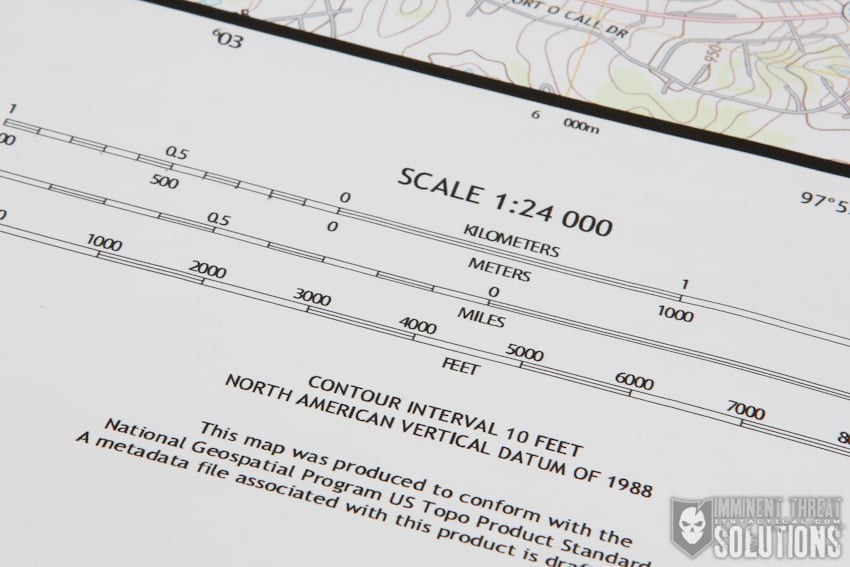
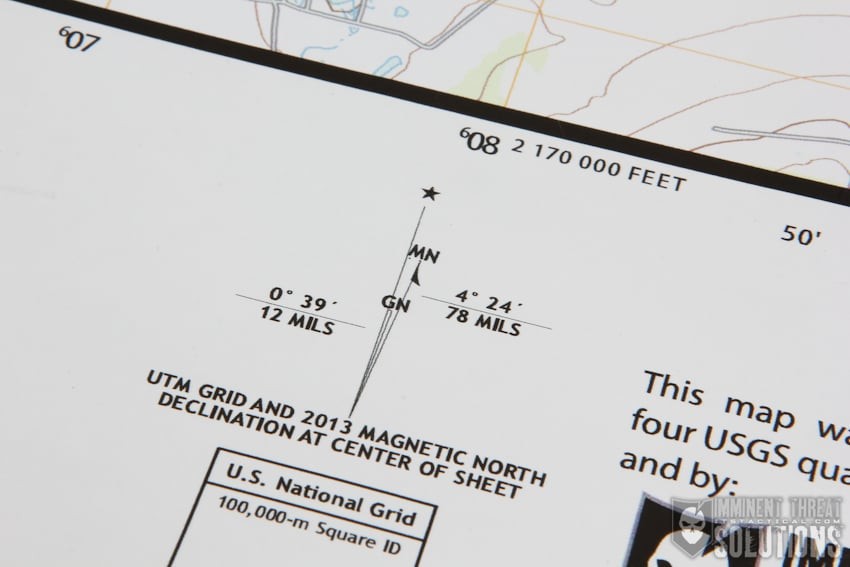
1.1.3 Marginal Information
Marginal information at the bottom of the map provides essential details.
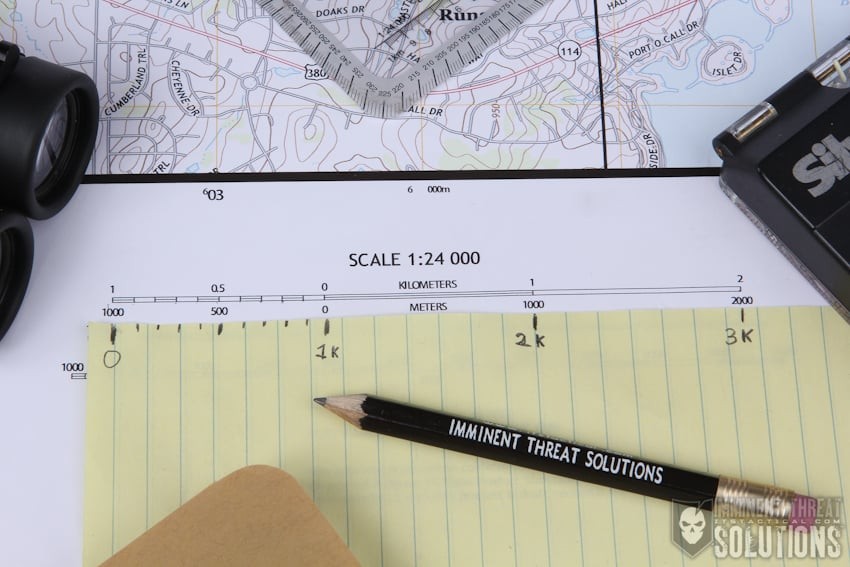
- Scale: Common scales are 1:24,000 and 1:50,000. A 1:24,000 map means one inch on the map equals 24,000 inches on the ground (2,000 feet).
- 7.5-minute quadrangles: 1:24,000 maps are also known as 7.5-minute quadrangles, representing an area 7.5 minutes of longitude wide by 7.5 minutes of latitude high.
- Distance scale: Includes scales for kilometers, miles, and feet. Kilometers are particularly useful for MGRS navigation.
Alt: Map scale example showing the relationship between map distance and real-world distance.
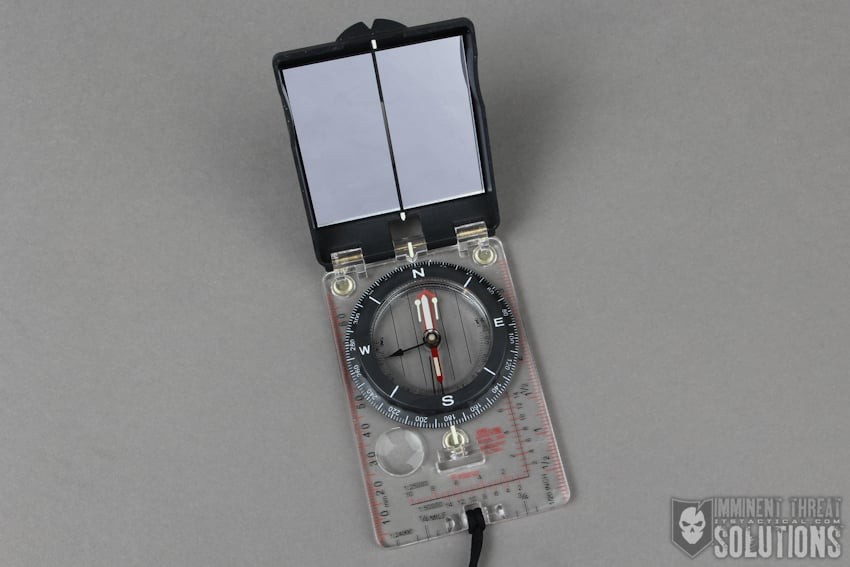
1.2 Choosing and Using a Compass
Selecting the right compass is crucial. A sighting mirror compass, such as the Silva Ranger or a sighting mirror compass with a global needle like the Suunto MC-2, is highly recommended.
Alt: Sighting mirror compass used for accurate bearing acquisition.
1.2.1 Benefits of a Sighting Mirror Compass
- Accurate reciprocal bearing: The mirror makes it easier to obtain accurate reciprocal bearings.
- Standoff aiming: Provides enough standoff to aim at a physical target while viewing your bearing.
- Global needle: A global needle compass functions anywhere on the planet.
- Declination adjustment: Allows for declination adjustments.
Alt: Compass declination adjustment for accurate navigation.
2. Military Grid Reference System (MGRS) Explained
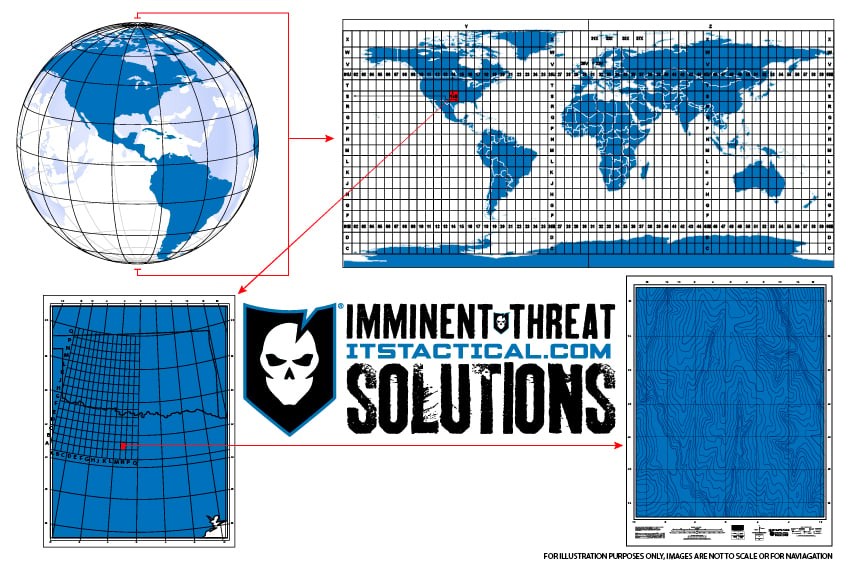
The Military Grid Reference System is a geographic coordinate system derived from the Universal Transverse Mercator (UTM) grid system. MGRS offers a simplified and efficient way to pinpoint locations on a map.
2.1 Why MGRS is Advantageous
One key advantage of MGRS is that it provides a scale small enough to create perfect kilometer-length grid lines by depicting a round world as flat.
2.2 Decoding the MGRS Grid Coordinate
An MGRS 8-digit grid coordinate is expressed as: 19TCG 3061 9196. This coordinate can pinpoint a location as small as a ten-meter square. A 10-digit grid, used in GPS, can identify a 1-meter location.
Alt: Diagram explaining the breakdown of an MGRS grid coordinate.
2.2.1 Grid Zone Designation
The first two numbers, 19, refer to the grid zone.
2.2.2 Grid Zone Designation Letter
The letter T indicates the Grid Zone Designation, a space measuring 6 degrees wide and 8 degrees high.
2.2.3 100,000-Meter Grid Square Identification
The two letters CG represent a 100,000-meter grid square within the grid zone designation 19T. The letters I and O are omitted to avoid confusion with the numbers 1 and 0.
2.2.4 10,000-Meter Square
In the coordinate 19TCG 3061 9196, the numbers 3 and 9 represent the 10,000-meter grid square.
2.2.5 1,000-Meter Square
The grid lines on a 1:24,000 map show the 1,000-meter square. Each grid line is separated by 1 kilometer. In the coordinate 19TCG 3061 9196, the numbers 30 and 91 represent the 1,000-meter square.
2.2.6 100-Meter and 10-Meter Identification
The last four digits dial in the location further. 19TCG 306 919 refers to the 100-meter identification, and 19TCG 3061 9196 refers to the 10-meter identification.
3. Step-by-Step Guide to Plotting an MGRS Coordinate
Plotting an MGRS coordinate accurately is crucial for effective land navigation. Here’s a step-by-step guide to help you get started.
3.1 Gathering Your Tools
Before you begin, gather the necessary tools.
- Protractor: A protractor with a scale that matches your map’s scale (1:24,000, 1:50,000, or 1:25,000 for military maps).
- Sharp pencil: Use a sharp pencil to ensure accurate plotting.
- Tape: Use tape to cover scales on your protractor that you won’t be using, preventing accidental errors.
Alt: Protractor and other essential tools for plotting MGRS coordinates on a map.
3.2 Finding the Grid Square
Use the first two numbers from each set of numbers to find the correct grid square. For example, in the coordinate 19TCG 3061 9196, you’ll be working with grid square 30/91.
3.2.1 Locating Grid Line 30
Start at the bottom left corner of your map and find grid line 30, moving from left to right.
3.2.2 Locating Grid Line 91
Move up within the grid square until you intersect grid line 91. The grid square you’ll be working with is above (north) of the line marked 91. Remember that all numbers in an MGRS grid read left to right, bottom to top.
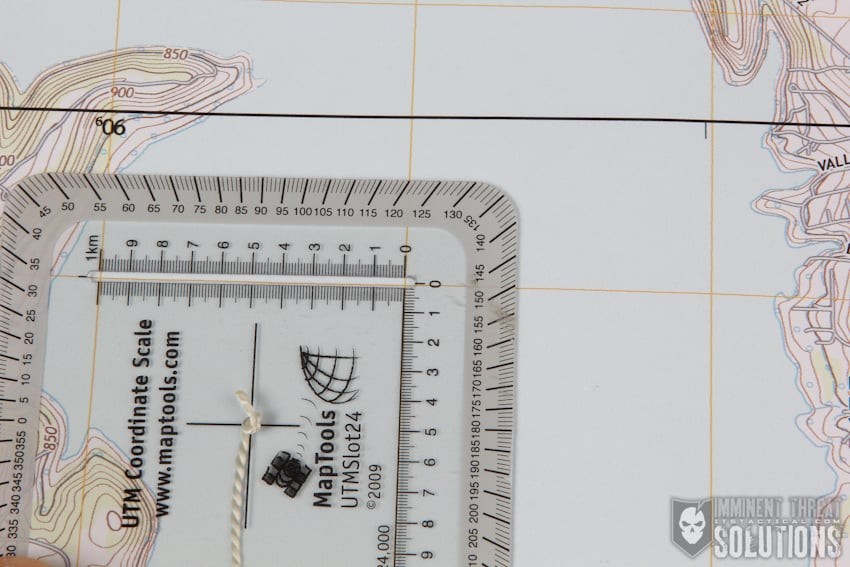
3.3 Plotting the Point
- Place the protractor on the grid square. Put the two zeroes that sit at the center of the right angle of your protractor’s scale on the bottom left corner of the grid square.
- Use the last two numbers of the grid to plot the point.
- Move the protractor to your right until the left grid line is directly under the tic marking 61.
- Move the protractor up until the tic mark of 96 is sitting over the bottom grid line of your square.
Alt: Using a protractor to accurately plot an MGRS coordinate on a topographic map.
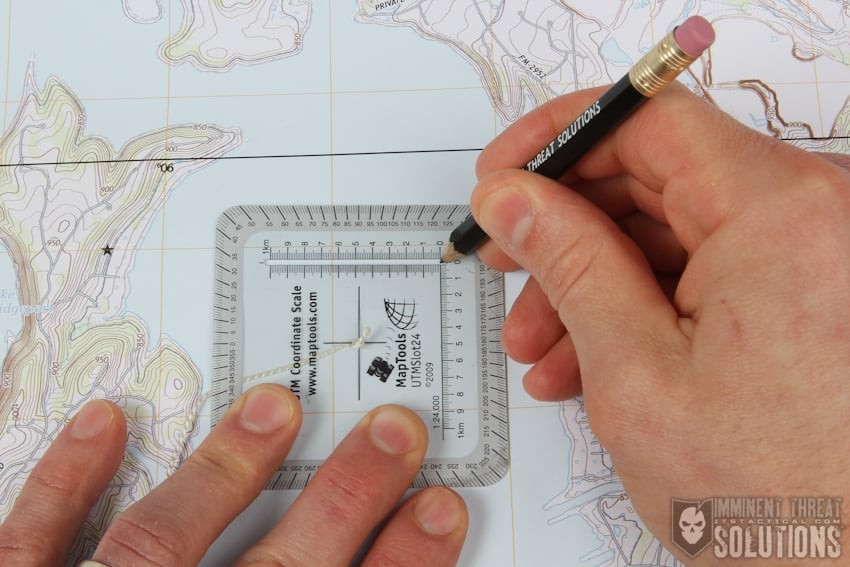
3.4 Marking the Point
Mark the point on the map with your sharp pencil. Practice plotting several points to become more comfortable with the process.
Alt: Marking a plotted point on a map with a sharp pencil for precision.
4. Measuring Distance and Bearing
Once you have plotted a couple of points, you’ll need to measure the distance and bearing between them.
4.1 Measuring Distance
If your protractor has a distance scale, use it to measure the distance between the two points. Make sure to mark the distance in kilometers, not miles.
4.1.1 Creating a Distance Scale
Take a piece of paper and make tic marks based on the distance scale in the bottom margin of your map. This allows you to mark distances beyond the protractor’s limit.
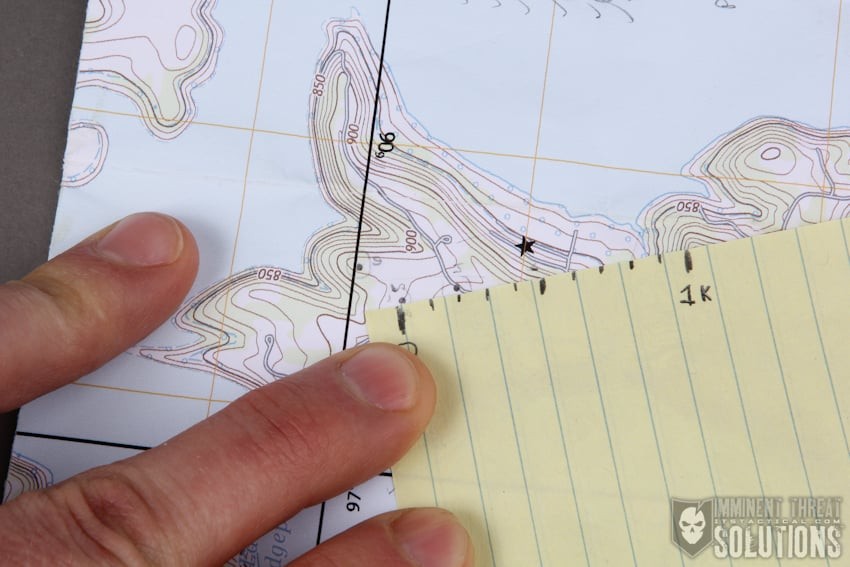
4.1.2 Marking and Logging Distance
Mark tic marks for every 100 meters on the first kilometer. Place the zero on your first point and mark where the second point is on your homemade scale. Log the distance in your notebook.
Alt: Measuring distance between two points on a map using a homemade distance scale.
Alt: Determining distance between two plotted locations on a map.
4.2 Determining Bearing
The bearing is the direction you’ll be walking. Here’s how to determine it using a protractor and cordage.
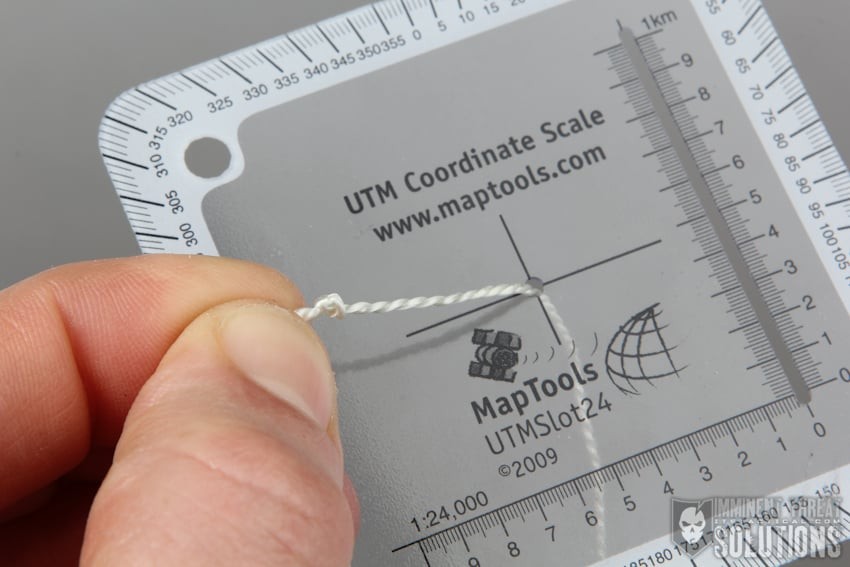
4.2.1 Preparing the Protractor
- Take a single gut from a piece of 550 cord and tie a 12-inch section onto the center hole of your protractor.
- Use a Figure-8 Knot for the knot.
- Ensure the knot is on the top of your protractor so it doesn’t interfere with movement.
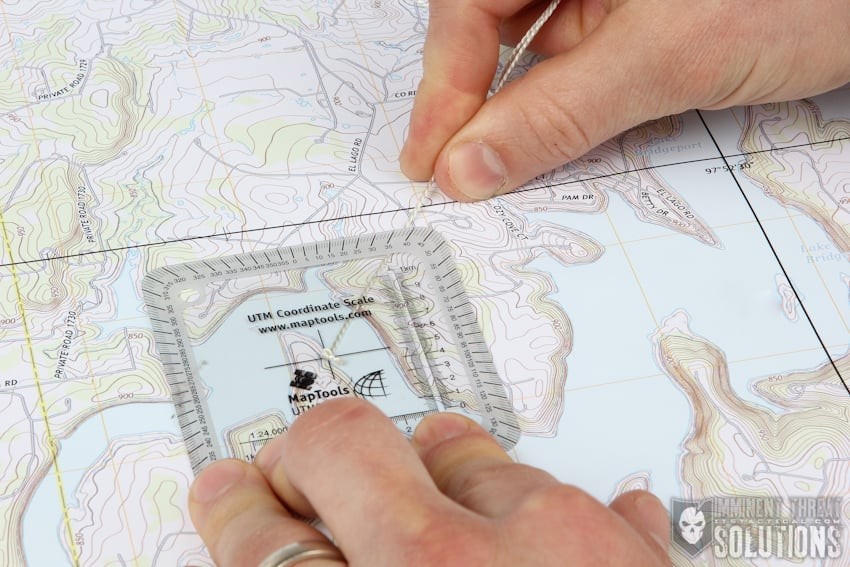
4.2.2 Taking the Bearing
- Place the center hole of the protractor on your first point.
- Line up the left and right edges as close to parallel with the grid lines on the map. This ensures the compass is oriented to grid north.
- Pull the cordage to the second point, ensuring there are no kinks in the line.
- The point where your cordage crosses the outer compass rose is your bearing from point 1 to point 2.
Alt: Protractor modified with paracord for accurate bearing measurement.
Alt: Measuring a bearing between two points on a map using a protractor and cord.
4.2.3 Logging Information
Log the origin point, bearing, and distance to the next point (as well as the second point itself) in both your notebook and on your map with pencil. This ensures redundancy and allows for double-checking in the field.
5. Navigating in the Field
Navigating in the field requires a combination of skills, including pace counting and bearing acquisition.
5.1 Pace Count
An accurate pace count is crucial for tracking distance traveled.
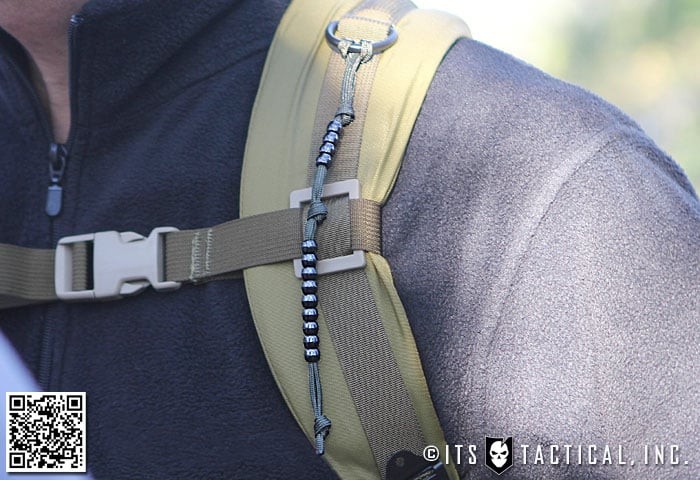
5.1.1 Creating Pace Count Beads
Build a set of pace count beads to help you track your distance.
5.1.2 Measuring Your Pace
- Measure out a 100-meter line and walk it several times to get an accurate pace count.
- Start a meter behind the beginning of the line to walk at your natural pace.
- Count each time your right or left foot hits the ground.
- Get a pace count on flat ground as well as uphill and downhill.
Alt: Handmade pace count beads used for accurate distance tracking during land navigation.
Alt: Measuring a 100-meter line for accurate pace count calculation.
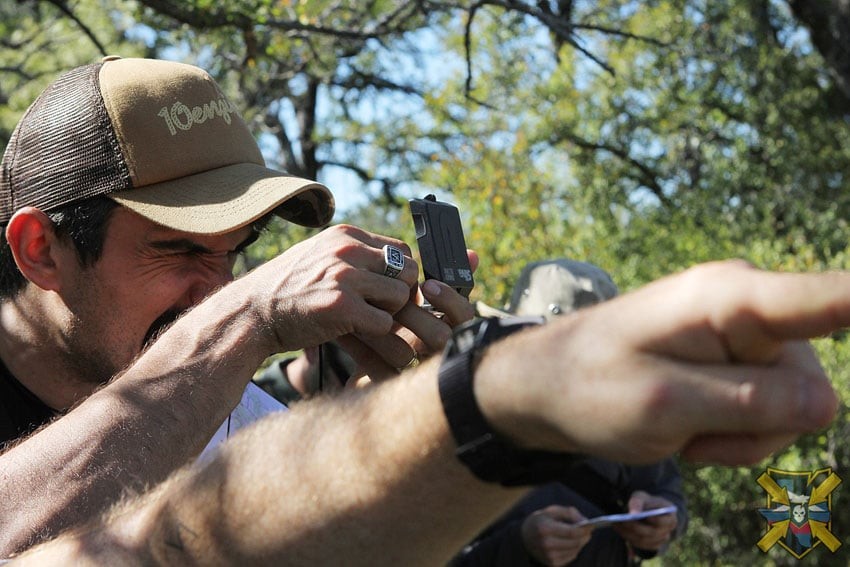
5.2 Shooting a Bearing in the Field
- Turn the bezel on your compass to the bearing you’ll be walking (e.g., 090˚).
- Align the bearing with the top indicator of your compass.
- Turn your body until “red is in the shed,” aligning the north-facing needle with the red arrow of the bezel.
- Hold your compass in front of your face, keeping your arms tight to your body.
- Look through the top sighting notch of your compass.
- Adjust the mirror to see that the red is still in the shed.
- Pick out an easily identifiable object as far away as possible and walk towards it.
Alt: Using a sighting mirror compass to acquire an accurate bearing in the field.
5.2.1 Maintaining Accuracy
Accuracy is key. Even a small degree of error can lead to significant deviations over long distances.
- A 1-degree error over 10 miles results in a 280-meter deviation.
- A 10-degree error results in a 2,795-meter deviation.
Alt: Walking a bearing in a straight line, maintaining focus and accuracy.
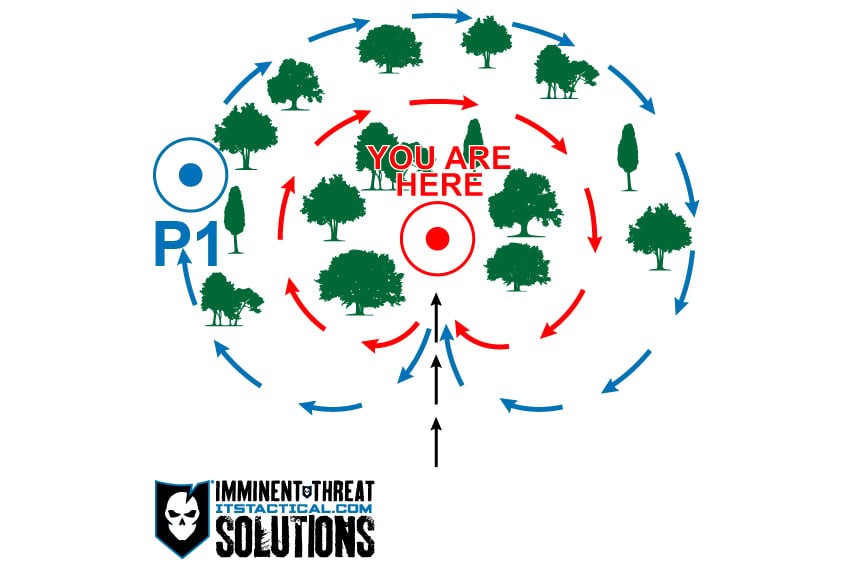
5.3 Circle Search Technique
If you reach your estimated location and cannot find your target, use a circle search technique.
- Begin with a small circle around your closest known point.
- Adjust the circle size based on the terrain and visibility.
- If you don’t find the target, expand the circle in concentric rings until you locate it.
Alt: Diagram illustrating a circle search pattern for locating a target in the field.
6. Advanced Navigation Techniques
6.1 Boxing
When encountering an obstacle, use the boxing technique to navigate around it while maintaining your course.
- Take a 90-degree turn to the right (or left).
- Keep a pace count for the distance needed to clear the obstacle.
- Take another 90-degree turn to your left, resuming your original pace count.
- When clear of the obstacle, turn 90 degrees to your left again.
- Travel back in the direction of your original line of travel for the same distance as your lateral pace count.
- Turn 90 degrees to your right and resume your original pace count towards the target.
Alt: Diagram showing the boxing technique for navigating around obstacles.
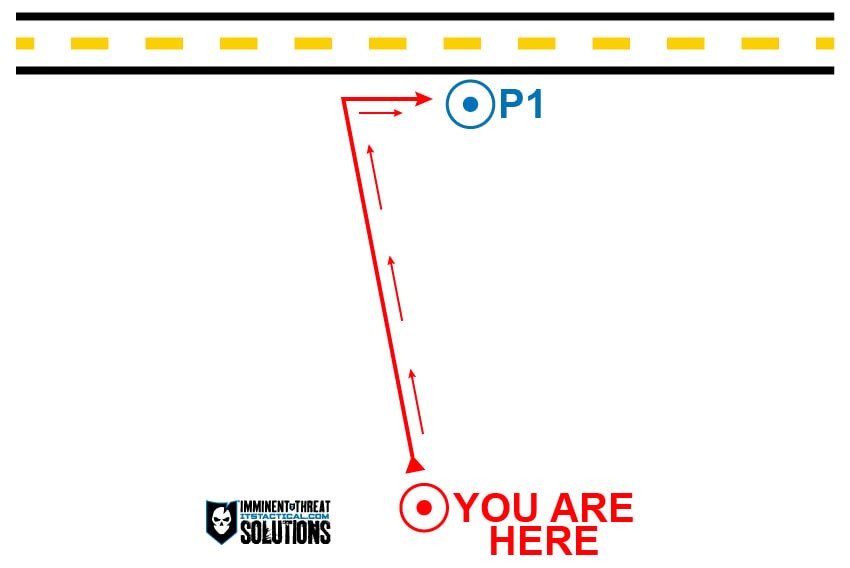
6.2 Offset Navigation
Offset navigation involves deliberately offsetting your course to intersect a linear feature, speeding up travel and reducing confusion.
- Set a course that will intersect a linear feature (road, river, power lines) to the left or right of your target.
- Skirt the linear feature until you find your point.
- This eliminates confusion and provides a backstop.
Alt: Diagram illustrating offset navigation to intercept a linear feature.
6.2.1 Benefits of Offset Navigation
- No Confusion: Eliminates uncertainty about which direction to turn upon reaching the linear feature.
- Backstop: Prevents overshooting the target by using the linear feature as a boundary.
7. Educational Statistics and Trends
| Statistic | Data | Source |
|---|---|---|
| Decline in Land Navigation Skills | Significant decrease in map and compass proficiency due to reliance on GPS. | Studies in outdoor education and military preparedness. |
| Increased Interest in Wilderness Skills | Growing interest in survival skills, including land navigation, among outdoor enthusiasts and preppers. | Online forums, survivalist communities, and outdoor gear retailers. |
| Value of Traditional Navigation Methods | Map and compass skills remain crucial in emergencies, GPS failures, and remote areas. | Emergency management agencies and wilderness survival experts. |
| MGRS Usage Among Veterans | Increasing popularity among veterans for its simplicity and effectiveness in navigation. | Veteran communities and military training resources. |
| Impact of Declination on Navigation | Ignoring declination can lead to significant errors over long distances. | U.S. Geological Survey (USGS) and National Oceanic and Atmospheric Administration (NOAA). |
| Importance of Accurate Pace Counting | Accurate pace counting is essential for precise distance estimation in land navigation. | Military field manuals and land navigation training courses. |
| Prevalence of Circle Search in Target Finding | Circle search is a standard method for locating targets when initial navigation is imprecise. | Search and rescue manuals and wilderness survival guides. |
| Effectiveness of Offset Navigation | Offset navigation reduces confusion and provides a reliable backstop in challenging terrain. | Land navigation training materials and experienced navigators. |
| Rising Demand for Online Navigation Courses | Growing interest in learning land navigation through online platforms, offering accessibility and flexibility. | Online education platforms and institutions. |
| Integration of Tech & Trad Navigation Skills | Increasing emphasis on combining traditional methods with modern technology for comprehensive navigation. | Outdoor education programs and navigation experts. |


8. LEARNS.EDU.VN: Your Partner in Mastering Land Navigation
At LEARNS.EDU.VN, we understand the challenges of learning new skills and accessing reliable educational resources. That’s why we provide comprehensive and easy-to-understand guides, like this one, to help you master land navigation. Our goal is to empower you with the knowledge and skills you need to confidently explore the world around you.
We encourage you to explore our website, LEARNS.EDU.VN, where you’ll find a wealth of articles, tutorials, and courses designed to enhance your learning experience. Whether you’re a beginner or an experienced navigator, we have something for everyone.
9. Frequently Asked Questions (FAQs) about Land Navigation
Q1: What is land navigation, and why is it important?
Land navigation is the art and science of determining and following a route across land using maps, compasses, and other tools. It’s crucial for outdoor enthusiasts, survivalists, and anyone who needs to find their way in unfamiliar environments.
Q2: What are the basic tools needed for land navigation?
The essential tools for land navigation include a topographic map, a compass, a protractor, and a pencil.
Q3: What is MGRS, and how does it differ from UTM?
MGRS (Military Grid Reference System) is a geographic coordinate system derived from the UTM (Universal Transverse Mercator) grid system. MGRS simplifies UTM by using letters instead of numbers for the 2-digit portion of the grid, making it easier to identify the grid type.
Q4: How do I read an MGRS grid coordinate?
An MGRS grid coordinate consists of several parts: the grid zone designation, the grid zone designation letter, the 100,000-meter square identification, and the numerical coordinates for easting and northing. Each part provides increasing precision in locating a point.
Q5: How do I plot an MGRS coordinate on a map?
To plot an MGRS coordinate, you’ll need a protractor and a sharp pencil. Locate the grid square using the first set of numbers, then use the protractor to measure the easting and northing within that square to pinpoint the exact location.
Q6: What is declination, and how do I adjust my compass for it?
Declination is the angle between true north and magnetic north. To adjust your compass for declination, consult a local declination map and adjust your compass accordingly.
Q7: How do I calculate my pace count?
Measure a 100-meter course and walk it several times, counting the number of steps you take. Divide the total number of steps by the number of repetitions to get an average pace count for 100 meters.
Q8: What is a bearing, and how do I shoot one with a compass?
A bearing is the direction from your current location to a destination, measured in degrees. To shoot a bearing, align your compass with the desired direction, rotate the bezel until the north needle aligns with the orienting arrow, and follow that direction.
Q9: What is offset navigation, and when should I use it?
Offset navigation involves deliberately setting a course to intersect a linear feature, such as a road or river, to the side of your target. This technique is useful for simplifying navigation and reducing the need for a circle search.
Q10: What should I do if I get lost while navigating?
If you get lost, stop and remain calm. Try to retrace your steps to your last known location. If that’s not possible, use your map and compass to determine your approximate location and plan a route to safety.
10. Conclusion: Embrace the Journey of Learning Land Navigation
Mastering land navigation is a rewarding journey that enhances your self-reliance and appreciation for the outdoors. With the right knowledge, tools, and practice, you can confidently navigate any terrain. Start exploring today and discover the world around you with newfound confidence.
For more in-depth information and courses on land navigation and other valuable skills, visit us at LEARNS.EDU.VN. We are here to support your learning journey every step of the way.
Contact Information:
Address: 123 Education Way, Learnville, CA 90210, United States
WhatsApp: +1 555-555-1212
Website: learns.edu.vn
We look forward to helping you achieve your learning goals.
Alt: Assorted topographic maps laid out for detailed land navigation planning.