Leatherworking is an engaging and rewarding craft. This comprehensive guide from LEARNS.EDU.VN breaks down How To Learn Leatherworking into manageable steps, covering essential tools, techniques, and projects. Whether you’re drawn to the history or fascinated by the creative possibilities, this guide will get you started in this satisfying craft. Dive in to explore the world of leathercrafting, leather crafting basics, leather projects, and the art of leather design.
1. What Are The Essential Leatherworking Tools For Beginners?
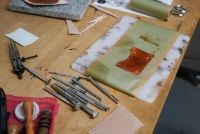
Essential leatherworking tools for beginners include an awl, beveler, burnisher, cutting tools, leather glue, maul, pricking iron and chisel, punch, skiver, stamp, sewing tools, and a cutting mat. Choosing the right tools will set you up for success in your leatherworking journey.
Here’s a breakdown of each tool and its purpose:
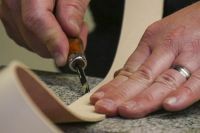
- Awl: Used for marking, piercing, punching, or sewing leather.
- Beveler: Removes the square corners from the edges of leather goods for a smoother finish.
- Burnisher: Smooths and hardens the edges of leather through friction and pressure, typically made of wood.
- Cutting Tools: Includes strap cutters for straight lines and rotary cutters for curves.
- Leather Glue: Specifically designed for leather and suede to ensure a strong bond.
- Maul: A striking tool similar to a hammer, used for stamping, tooling, and setting rivets.
- Pricking Iron and Chisel: Used for marking and creating evenly spaced holes in leather.
- Punch: A hole punch specifically for making holes in leather, ideal for setting rivets or making holes in belts and collars.
- Skiver: Removes and shaves thin layers of leather material off the surface to reduce bulk.
- Stamp: Made of metal and used to create designs on the leather’s surface.
- Sewing Tools: Includes needles, thread, and tools to hold leather while sewing.
- Cutting Mat: Protects your work surface when cutting leather with a utility blade or rotary cutter.
| Tool | Purpose |
|---|---|
| Awl | Marking, piercing, punching, or sewing leather |
| Beveler | Removing sharp corners from leather edges |
| Burnisher | Smoothing and hardening leather edges |
| Cutting Tools | Cutting leather (strap cutter for straight lines, rotary for curves) |
| Leather Glue | Bonding leather pieces together |
| Maul | Stamping, tooling, and setting rivets |
| Pricking Iron/Chisel | Marking and creating holes in leather |
| Punch | Making holes for rivets, belts, collars, etc. |
| Skiver | Thinning leather layers |
| Stamp | Creating designs on leather |
| Sewing Tools | Sewing leather pieces together |
| Cutting Mat | Protecting work surface during cutting |
2. What Are The Different Types Of Leather Used In Leatherworking?
Different types of leather used in leatherworking vary in tannage, weight, temper, and finish. The most common types are veg tan and chrome tan leather. Veg tan leather is tanned with tannin-rich vegetal oils, taking longer to create and considered higher quality. Chrome tan leather uses chemicals for tanning, making it faster and less costly but typically thinner and less durable.
Here’s a deeper look into the characteristics of each type:
- Veg Tan Leather: Tanned using natural tannins found in tree bark. This process is longer and more environmentally friendly. Veg tan leather is known for its durability, ability to be tooled and molded, and its natural color, which can be easily dyed. It’s ideal for projects like belts, wallets, and saddles.
- Chrome Tan Leather: Tanned using chromium sulfates. This process is much faster and cheaper than veg tanning. Chrome tan leather is softer, more pliable, and water-resistant, making it suitable for clothing, upholstery, and some types of bags.
- Oil Tanned Leather: Tanned with oils and waxes to create a supple, water-resistant leather. This type of leather is often used for work boots and outdoor gear.
- Latigo Leather: A combination tanned leather, first chrome tanned and then veg tanned, resulting in a strong, flexible leather that is often used for straps and equine gear.
- Deerskin Leather: Known for its softness and suppleness, deerskin is often used for gloves, clothing, and accessories.
| Leather Type | Tanning Process | Characteristics | Common Uses |
|---|---|---|---|
| Veg Tan | Natural tannins from tree bark | Durable, moldable, natural color | Belts, wallets, saddles |
| Chrome Tan | Chromium sulfates | Soft, pliable, water-resistant | Clothing, upholstery, some bags |
| Oil Tanned | Oils and waxes | Supple, water-resistant | Work boots, outdoor gear |
| Latigo | Combination of chrome and veg tan | Strong, flexible | Straps, equine gear |
| Deerskin | Various methods | Soft, supple | Gloves, clothing, accessories |
3. How Do I Prepare Leather For Leatherworking?
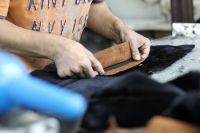
To prepare leather for leatherworking, start by laying it out on a table and examining the surface for any holes or uneven areas. Measure and mark the surface, avoiding imperfections. Use patterns as a guide and mark cut lines with a pencil or chalk.
Here’s a step-by-step process for preparing leather:
- Inspection: Lay the leather on a clean, flat surface and inspect it for any defects such as scars, holes, or thin spots. These areas should be avoided or worked around when planning your project.
- Planning: Use a pattern or template to determine the layout of your project on the leather. Arrange the pattern pieces to minimize waste and avoid any defects.
- Marking: Use a pencil, chalk, or leather scribe to mark the cutting lines on the leather. Ensure your marks are accurate and easy to see.
- Cutting: Choose the appropriate cutting tool for the type and thickness of the leather. Use scissors or shears for thinner leather and a utility knife or rotary cutter for thicker leather. A strap cutter is ideal for cutting straight lines for belts or straps.
- Skiving (if necessary): If your project requires thin edges for folding or overlapping, use a skiver to reduce the thickness of the leather in those areas.
- Casing (for veg-tan leather): If you plan to tool or stamp the leather, casing is necessary. This involves wetting the leather to soften the fibers and make it more pliable.
| Step | Description | Tools Needed |
|---|---|---|
| Inspect | Examine leather for defects | N/A |
| Plan | Lay out pattern to minimize waste | Pattern or template |
| Mark | Mark cutting lines accurately | Pencil, chalk, or leather scribe |
| Cut | Cut leather using appropriate tools | Scissors, shears, utility knife, strap cutter |
| Skive | Thin edges for folding or overlapping (if needed) | Skiver |
| Case | Wet veg-tan leather to soften fibers (if tooling or stamping) | Water, sponge |
4. What Are Some Basic Leatherworking Skills And Techniques?
Basic leatherworking skills and techniques include gluing, casing, saddle stitching, dyeing, burnishing, and skiving leather. Mastering these techniques will enable you to create a wide range of leather projects.
Let’s explore each of these techniques in detail:
- Gluing: This is a straightforward process to fuse multiple leather pieces together using glue specifically designed for leather and suede. Make sure to work in a well-ventilated area and rough up the surfaces for better adhesion.
- Casing: The process of adding water to veg-tanned leather to soften the fibers, making it easier to stamp, mold, and shape.
- Saddle Stitching: A strong hand-sewing technique used to join two pieces of leather together. It requires a length of waxed thread and two harness needles.
- Dyeing: Allows you to color the leather using spirit-based, acetone-based, or water-based dyes. The choice of dye depends on the desired look and the type of leather.
- Burnishing: The method of polishing rough edges to create a smooth, glossy finish. It involves beveling the edge and using a slicking wheel or rod.
- Skiving: Reduces the thickness of the leather to make folds, bends, and seams easier to manage.
| Technique | Description | Tools Needed |
|---|---|---|
| Gluing | Fusing leather pieces together using leather-specific glue | Leather glue, brush or applicator |
| Casing | Adding water to veg-tanned leather to soften fibers for tooling | Water, sponge |
| Saddle Stitching | Hand-sewing technique to join two pieces of leather using waxed thread and two needles | Waxed thread, harness needles, pricking iron or chisel, stitching awl |
| Dyeing | Coloring leather using spirit-based, acetone-based, or water-based dyes | Leather dye, applicator (sheep wool, sponge, cloth), gloves |
| Burnishing | Polishing rough edges to create a smooth, glossy finish | Beveler, water, slicking wheel or rod, burnishing compound |
| Skiving | Reducing the thickness of leather to make folds, bends, and seams easier to manage | Skiver |
5. What Are The Steps Involved In Gluing Leather Together?
The steps involved in gluing leather together include preparing the surfaces, applying the glue, and joining the pieces with firm pressure. Always use glue specifically designed for leather and suede for the best results.
Here’s a detailed breakdown:
- Prepare the Surfaces: Ensure the leather surfaces are clean, dry, and free of any debris. You may want to rough up the surfaces slightly with sandpaper or a skiving tool to improve adhesion.
- Apply the Glue: Use a brush or applicator to apply a thin, even layer of leather glue to both surfaces that will be joined. Avoid applying too much glue, as this can weaken the bond.
- Allow to Tack: Let the glue sit for a few minutes until it becomes tacky. This allows the solvents to evaporate and the glue to become more sticky.
- Join the Pieces: Carefully align the two pieces of leather and press them firmly together. Use a roller or mallet to apply even pressure across the entire surface.
- Cure Time: Allow the glue to cure for the recommended time, usually at least three hours, before putting any stress on the joint.
| Step | Description | Tips |
|---|---|---|
| Prepare | Clean, dry, and rough up surfaces | Use sandpaper or skiving tool to improve adhesion |
| Apply Glue | Apply a thin, even layer of leather glue to both surfaces | Avoid applying too much glue |
| Allow to Tack | Let the glue sit for a few minutes until it becomes tacky | Follow the glue manufacturer’s instructions for tack time |
| Join Pieces | Align and press the pieces firmly together | Use a roller or mallet to apply even pressure |
| Cure Time | Allow the glue to cure for the recommended time before applying stress | Check the glue manufacturer’s instructions for cure time |
6. Why Is Casing Important In Leatherworking And How Is It Done?
Casing is important in leatherworking because it softens the fibers of veg-tanned leather, making it easier to stamp, tool, and shape. To case leather, add water to the leather to moisten the fibers.
Here’s a detailed guide on how to case leather:
- Prepare the Leather: Ensure the veg-tanned leather is clean and free of any finishes or coatings.
- Apply Water: Use a sponge or spray bottle to apply water evenly to the grain side (smooth side) of the leather. The goal is to moisten the leather without soaking it.
- Wait for Absorption: Allow the water to absorb into the leather. The leather should darken slightly and feel cool to the touch.
- Check for Uniformity: Ensure the moisture is evenly distributed throughout the leather. If some areas are drier than others, apply more water to those areas.
- Wrap (Optional): For larger pieces of leather, you can wrap the leather in plastic wrap or a damp cloth to help retain moisture and ensure even distribution.
- Wait for Tempering: Allow the leather to temper for several hours or overnight. The leather should return to its original color and feel slightly damp but not wet.
- Test the Leather: Press your thumb into the leather. If the leather is properly cased, your thumbprint should remain visible for a few seconds.
| Step | Description | Tips |
|---|---|---|
| Prepare | Ensure the veg-tanned leather is clean and free of finishes | Use a clean cloth to wipe down the leather |
| Apply Water | Use a sponge or spray bottle to apply water evenly to the grain side | Avoid soaking the leather; the goal is to moisten it |
| Absorb | Allow the water to absorb into the leather until it darkens and feels cool | This may take several minutes, depending on the thickness of the leather |
| Uniformity | Ensure the moisture is evenly distributed | Apply more water to drier areas |
| Wrap (Optional) | Wrap the leather in plastic wrap or a damp cloth to retain moisture and ensure even distribution | This is useful for larger pieces of leather |
| Temper | Allow the leather to temper for several hours or overnight until it returns to its original color and feels damp | This allows the moisture to distribute evenly throughout the leather fibers |
| Test | Press your thumb into the leather to check for proper casing | Your thumbprint should remain visible for a few seconds if the leather is properly cased |
7. What Is Saddle Stitching And How Is It Done Properly?
Saddle stitching is a strong hand-sewing technique used to join two pieces of leather together. It involves using a length of waxed thread and two harness needles to create a durable and aesthetically pleasing stitch.
Here’s a step-by-step guide on how to saddle stitch properly:
- Prepare the Leather: Align the two pieces of leather and clamp them together. Use a pricking iron or chisel to mark and create evenly spaced holes along the seam line.
- Thread the Needles: Cut a length of waxed thread that is about four times the length of the seam. Thread one needle onto each end of the thread.
- Start Stitching: Insert one needle through the first hole from the top side. Pull the thread through until the middle of the thread is in the hole.
- Create the Stitch: Insert one needle through the next hole from the top side. Pull the thread all the way through. Then, insert the other needle through the same hole from the bottom side.
- Tighten the Stitch: Pull both needles tight, ensuring the stitch is snug and even.
- Continue Stitching: Repeat steps 4 and 5 for each hole along the seam line.
- Secure the Ends: When you reach the end of the seam, create a backstitch by passing each needle back through the last two holes.
- Trim the Thread: Trim the excess thread close to the leather. You can use a lighter to melt the ends slightly to prevent fraying.
| Step | Description | Tips |
|---|---|---|
| Prepare | Align the leather pieces and mark/create evenly spaced holes | Use a pricking iron or chisel to ensure consistent hole spacing |
| Thread Needles | Cut a length of waxed thread and thread one needle onto each end | The thread should be about four times the length of the seam |
| Start Stitching | Insert one needle through the first hole from the top side and pull the thread through until the middle is in the hole | This creates the starting point for the saddle stitch |
| Create Stitch | Insert one needle through the next hole from the top side, then insert the other needle through the same hole from the bottom side | This creates the interlocking stitch that is characteristic of saddle stitching |
| Tighten | Pull both needles tight to ensure the stitch is snug and even | Avoid pulling too tight, as this can distort the leather |
| Continue | Repeat the stitching process for each hole along the seam line | Maintain consistent tension and spacing for a professional-looking stitch |
| Secure Ends | Create a backstitch by passing each needle back through the last two holes | This secures the ends of the seam and prevents unraveling |
| Trim Thread | Trim the excess thread close to the leather | Use a lighter to melt the ends slightly to prevent fraying |
8. What Are The Different Types Of Leather Dyes And How Do You Apply Them?
Leather can be dyed any color using different types of dyes, including spirit-based, acetone-based, and water-based dyes. The choice of dye depends on the desired look and the type of leather.
Here’s a breakdown of each type of dye and how to apply them:
- Spirit-Based Dyes: These dyes penetrate deeply into the leather and are great for achieving uneven, rustic looks. However, they are not easily available in all regions.
- Acetone-Based Dyes: A California-friendly alternative to spirit-based dyes. They work reasonably well but evaporate quickly, so you need to work fast and seal the bottles tightly.
- Water-Based Dyes: These dyes rest on the surface of the leather with minimal penetration. They come in a wide array of colors and are ideal for projects that don’t see much bending or folding and are rarely exposed to the elements.
Application Process:
- Prepare the Leather: Ensure the leather is clean and free of any finishes or coatings. Lightly dampen the leather with a sponge to help the dye penetrate evenly.
- Apply the Dye: Use a sheep wool applicator, sponge, or cloth to apply the dye to the leather. Apply multiple light coats for even coverage or a few heavy coats for a textured look.
- Allow to Dry: Let the dye dry completely. This may take several hours, depending on the type of dye and the humidity.
- Seal the Dye: Apply a leather sealant to protect the dye and prevent it from rubbing off.
| Dye Type | Characteristics | Application |
|---|---|---|
| Spirit-Based | Deep penetration, rustic looks, not easily available in all regions | Apply with sheep wool, multiple light coats for even coverage or heavy coats for a textured look |
| Acetone-Based | California-friendly alternative, evaporates quickly | Work fast and seal bottles tightly, apply with sheep wool, multiple light coats for even coverage or heavy coats for a textured look |
| Water-Based | Rests on the surface, wide array of colors, ideal for projects that don’t see much bending or folding | Apply with sheep wool, multiple light coats for even coverage or heavy coats for a textured look |
9. What Is Leather Burnishing And How Do You Achieve A Polished Edge?
Leather burnishing is the method of polishing rough edges to create a smooth, glossy finish. It can be a time-consuming process but results in excellent, clean results.
Here’s a step-by-step guide on how to burnish leather edges:
- Bevel the Edge: Use a beveler to remove the sharp corners from the edge of the leather. This creates a rounded edge that is easier to burnish.
- Dampen the Edge: Use a damp cloth or sponge to lightly moisten the edge of the leather.
- Apply Burnishing Compound: Apply a burnishing compound (such as gum tragacanth or beeswax) to the edge of the leather.
- Burnish the Edge: Use a slicking wheel or rod to rub the edge of the leather back and forth. Apply firm pressure and continue until the edge becomes smooth and glossy.
- Repeat as Necessary: Repeat steps 2-4 until you achieve the desired level of polish.
| Step | Description | Tips |
|---|---|---|
| Bevel Edge | Use a beveler to remove sharp corners from the edge | This creates a rounded edge that is easier to burnish |
| Dampen Edge | Use a damp cloth or sponge to lightly moisten the edge | Avoid soaking the leather; the goal is to moisten it |
| Apply Compound | Apply a burnishing compound (gum tragacanth or beeswax) to the edge | This helps to lubricate the edge and create a smooth, glossy finish |
| Burnish Edge | Use a slicking wheel or rod to rub the edge back and forth with firm pressure | Continue until the edge becomes smooth and glossy |
| Repeat as Necessary | Repeat steps 2-4 until the desired level of polish is achieved | This may take several passes, depending on the type of leather and the desired finish |
10. What Is Skiving Leather And Why Is It Important?
Skiving leather reduces the thickness of the leather so that you can easily make folds, bends, and hide seams. It generally improves the overall quality and appearance of the leather project.
Here’s why skiving is important and how to do it:
- Reduces Bulk: Skiving reduces the thickness of the leather in specific areas, making it easier to fold, bend, and create seams without adding excessive bulk.
- Improves Appearance: Skiving creates a smoother, more professional look by eliminating thick, uneven edges.
- Facilitates Folding and Bending: Skiving makes it easier to fold and bend the leather, allowing you to create intricate designs and shapes.
- Hides Seams: Skiving allows you to create hidden seams by thinning the edges of the leather before joining them.
How to Skive Leather:
- Prepare the Leather: Ensure the leather is clean and dry.
- Use a Skiving Tool: Use a leather skiver to remove thin layers of leather from the surface. There are different types of skiving tools available, including hand skivers and machine skivers.
- Adjust the Angle: Adjust the angle of the skiving tool to control the amount of leather being removed.
- Apply Even Pressure: Apply even pressure and maintain a consistent angle to create a smooth, even skive.
- Check the Thickness: Check the thickness of the skived area to ensure it is the desired thickness.
| Aspect | Description | Tips |
|---|---|---|
| Purpose | Reduces thickness for easier folding, bending, and hiding seams | Improves overall quality and appearance of leather projects |
| Tools | Leather skiver (hand skiver or machine skiver) | Choose the right skiving tool for the type of leather and the desired skive |
| Technique | Adjust the angle of the skiving tool and apply even pressure | Practice on scrap leather to get a feel for the tool and the amount of pressure needed |
| Checking Thickness | Check the thickness of the skived area to ensure it meets the requirements | Use calipers to measure the thickness of the skived area |
11. What Kind Of Projects Can I Make Once I Have Mastered Basic Leatherworking Skills?
Once you’ve mastered basic leatherworking skills, the possibilities are limitless. You can start with simple projects like a card wallet or keychain and then move on to more complicated pieces like bags, purses, and even bike seats.
Here are some project ideas to inspire you:
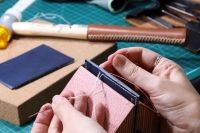
- Card Wallet: A simple project that teaches basic skills like cutting, casing, dyeing, stitching, beveling, and burnishing.
- Keychain: A quick and easy project that allows you to practice cutting, stamping, and setting hardware.
- Belt: A classic leather project that teaches you how to cut straight lines, punch holes, and attach a buckle.
- Pet Collar: A fun and functional project that allows you to customize the size, color, and design.
- Bag or Purse: A more advanced project that requires you to combine multiple techniques, such as skiving, gluing, stitching, and setting hardware.
- Bike Seat: A challenging project that requires you to mold and shape the leather to fit the seat.
| Project | Skills Practiced | Complexity |
|---|---|---|
| Card Wallet | Cutting, casing, dyeing, stitching, beveling, burnishing | Beginner |
| Keychain | Cutting, stamping, setting hardware | Beginner |
| Belt | Cutting straight lines, punching holes, attaching a buckle | Beginner |
| Pet Collar | Customizing size, color, and design | Beginner |
| Bag/Purse | Skiving, gluing, stitching, setting hardware | Advanced |
| Bike Seat | Molding and shaping leather | Advanced |
12. Where Can I Learn Leather Crafting, Either Online Or In Person?
You can learn leather crafting through various resources, including online tutorials, in-person classes, and books. LEARNS.EDU.VN offers many resources for learning new skills.
Here are some options to consider:
- Online Tutorials: Websites like YouTube and Skillshare offer a wide range of leatherworking tutorials for all skill levels.
- In-Person Classes: Local craft stores, community centers, and art schools often offer leatherworking classes.
- Books: There are many books available on leatherworking that cover everything from basic techniques to advanced projects.
- The Crucible’s Leather, Textiles, and Fine Art Department: This department offers leatherworking classes for all levels, including 3-Hour Tasters and intensive Leather Working classes. Check them out at The Crucible.
| Learning Method | Resources | Benefits |
|---|---|---|
| Online Tutorials | YouTube, Skillshare, Udemy | Convenient, affordable, wide range of topics |
| In-Person Classes | Local craft stores, community centers, art schools | Hands-on instruction, immediate feedback, social interaction |
| Books | Leatherworking books by reputable authors | Comprehensive information, detailed instructions, visual aids |
| Workshops | The Crucible, specialized leatherworking schools | Intensive training, expert instruction, access to specialized equipment |
13. Is Leatherworking Hard To Learn And What Makes It Easier?
It is relatively easy to get started leatherworking. Setup costs are low, and the basic skills are easily translatable to many different projects. You can easily make a simple wallet in just a few hours or spend weeks on a more complicated project.
Here are some tips to make learning leatherworking easier:
- Start with Simple Projects: Begin with small, manageable projects like a card wallet or keychain to build your skills and confidence.
- Invest in Quality Tools: Invest in a few essential, high-quality tools to make the learning process smoother and more enjoyable.
- Practice Regularly: Practice your skills regularly to improve your technique and develop muscle memory.
- Join a Community: Join a local leatherworking group or online forum to connect with other crafters, share tips, and get feedback on your work.
- Take a Class: Consider taking a class from an experienced leatherworker to learn the basics and get hands-on instruction.
| Tip | Description | Benefits |
|---|---|---|
| Start Simple | Begin with small, manageable projects | Builds skills and confidence, avoids frustration |
| Invest in Quality Tools | Purchase essential, high-quality tools | Makes the learning process smoother and more enjoyable, improves the quality of your work |
| Practice Regularly | Practice your skills regularly | Improves technique, develops muscle memory, accelerates learning |
| Join a Community | Connect with other crafters in a local group or online forum | Shares tips, gets feedback, provides motivation and support |
| Take a Class | Learn from an experienced leatherworker | Provides hands-on instruction, teaches the basics, accelerates learning |
14. What Are Some Good Beginner Projects For Leatherworking?
Good beginner projects for leatherworking include a simple card wallet, pet collar, keychain, and belt. These projects teach the basic skills of preparing, cutting, casing, dyeing, stitching, beveling, and burnishing leather.
Here’s why these projects are ideal for beginners:
- Simple Card Wallet: Teaches the basic skills of preparing, cutting, casing, dyeing, stitching, beveling, and burnishing leather.
- Pet Collar: Allows you to customize the size, color, and design while practicing cutting, punching holes, and attaching hardware.
- Keychain: A quick and easy project that allows you to practice cutting, stamping, and setting hardware.
- Belt: A classic leather project that teaches you how to cut straight lines, punch holes, and attach a buckle.
| Project | Skills Learned | Why It’s Good for Beginners |
|---|---|---|
| Card Wallet | Preparing, cutting, casing, dyeing, stitching, beveling, burnishing | Teaches a wide range of basic skills in a small, manageable project |
| Pet Collar | Cutting, punching holes, attaching hardware, customizing design | Allows for creativity and customization while practicing essential techniques |
| Keychain | Cutting, stamping, setting hardware | Quick and easy project that introduces stamping and hardware setting |
| Belt | Cutting straight lines, punching holes, attaching a buckle | Classic leather project that teaches fundamental skills |
As you scale up to make larger projects, leatherworking techniques tend to build upon each other.
15. Are There Any Safety Precautions I Should Take While Leatherworking?
Yes, there are several safety precautions you should take while leatherworking to protect yourself from injury.
Here are some essential safety tips:
- Wear Safety Glasses: Protect your eyes from flying debris when cutting, punching, or stamping leather.
- Use a Cutting Mat: Always use a cutting mat to protect your work surface and prevent your knife from slipping.
- Use Sharp Tools: Sharp tools are safer than dull tools because they require less force and are less likely to slip.
- Be Careful When Cutting: Keep your fingers out of the path of the blade when cutting leather.
- Use Proper Ventilation: Work in a well-ventilated area when using dyes, glues, and other chemicals.
- Wear Gloves: Wear gloves to protect your hands from chemicals and sharp tools.
- Store Tools Safely: Store your tools in a safe place where they will not be damaged or cause injury.
| Safety Precaution | Description | Why It’s Important |
|---|---|---|
| Safety Glasses | Protect your eyes from flying debris | Prevents eye injuries from sharp objects or chemicals |
| Cutting Mat | Protect your work surface and prevent knife slippage | Prevents damage to your work surface and reduces the risk of cutting yourself |
| Sharp Tools | Use sharp tools instead of dull tools | Requires less force, reduces the risk of slippage and injury |
| Careful Cutting | Keep fingers out of the path of the blade | Prevents accidental cuts and injuries |
| Ventilation | Work in a well-ventilated area when using chemicals | Reduces exposure to harmful fumes and vapors |
| Gloves | Protect your hands from chemicals and sharp tools | Prevents skin irritation, chemical burns, and cuts |
| Safe Tool Storage | Store tools in a safe place | Prevents damage to tools and reduces the risk of injury |
By following these safety precautions, you can enjoy leatherworking while minimizing the risk of injury.
Are you ready to delve deeper into the world of leatherworking? Visit LEARNS.EDU.VN to discover a treasure trove of detailed guides, expert tips, and comprehensive courses designed to elevate your skills. Whether you’re seeking to refine your techniques or explore new creative avenues, learns.edu.vn is your go-to resource for mastering the art of leatherworking. Contact us at 123 Education Way, Learnville, CA 90210, United States or Whatsapp: +1 555-555-1212.
FAQ: How to Learn Leatherworking
1. What is the first step in learning leatherworking?
The first step in learning leatherworking is to gather essential tools and materials, such as an awl, cutting tools, leather glue, and leather scraps.
2. What type of leather is best for beginners?
Veg tan leather is often recommended for beginners due to its durability and ability to be tooled and molded easily.
3. How can I practice basic leatherworking skills without investing too much money?
You can practice basic leatherworking skills by using inexpensive leather scraps and focusing on fundamental techniques like cutting, gluing, and stitching.
4. What is the most important skill to master in leatherworking?
Mastering saddle stitching is crucial in leatherworking as it creates strong and durable seams essential for many projects.
5. How do I properly condition leather to prevent it from drying out?
To condition leather, apply a leather conditioner or balm regularly to keep it moisturized and prevent cracking.