The question “Where Is Learn Button On Liftmaster Garage Door Opener” is a common one, and understanding its location and function is key to programming and troubleshooting your garage door. LEARNS.EDU.VN aims to provide you with clear, concise guidance on finding and using this essential button. This guide will delve into the specifics of LiftMaster garage door openers, including setup instructions, remote programming tips and troubleshooting guidance, ensuring smooth operation.
1. Identifying the LiftMaster Learn Button: An Overview
The LEARN button on your LiftMaster garage door opener is a crucial component for programming and syncing various devices. Its primary function is to allow you to pair remote controls, keypads, and other accessories with your garage door opener system. Understanding where to find this button and how it works is essential for a seamless and secure garage door operation. This involves exploring the significance of the learn button, different models, and remote synchronization.
2. Location of the LEARN Button on the Motor Unit
The most common location for the LEARN button is on the motor unit of the LiftMaster garage door opener, which is typically mounted on the ceiling of your garage. The exact placement can vary depending on the model, but it’s usually accessible after removing a cover or panel on the motor unit housing.
2.1. Step-by-Step Guide to Finding the Button
- Safety First: Use a sturdy ladder to safely reach the motor unit.
- Locate the Housing: Look for the main housing of the garage door opener motor.
- Identify the Cover: Check for a removable cover or panel on the housing. It might be labeled or have an obvious way to be opened.
- Reveal the Dashboard: Remove the cover to expose the control panel or dashboard underneath.
- Find the LEARN Button: On the dashboard, you’ll typically find a button labeled “LEARN.” It’s often a colored button (usually yellow, red, or orange) to make it easily identifiable.
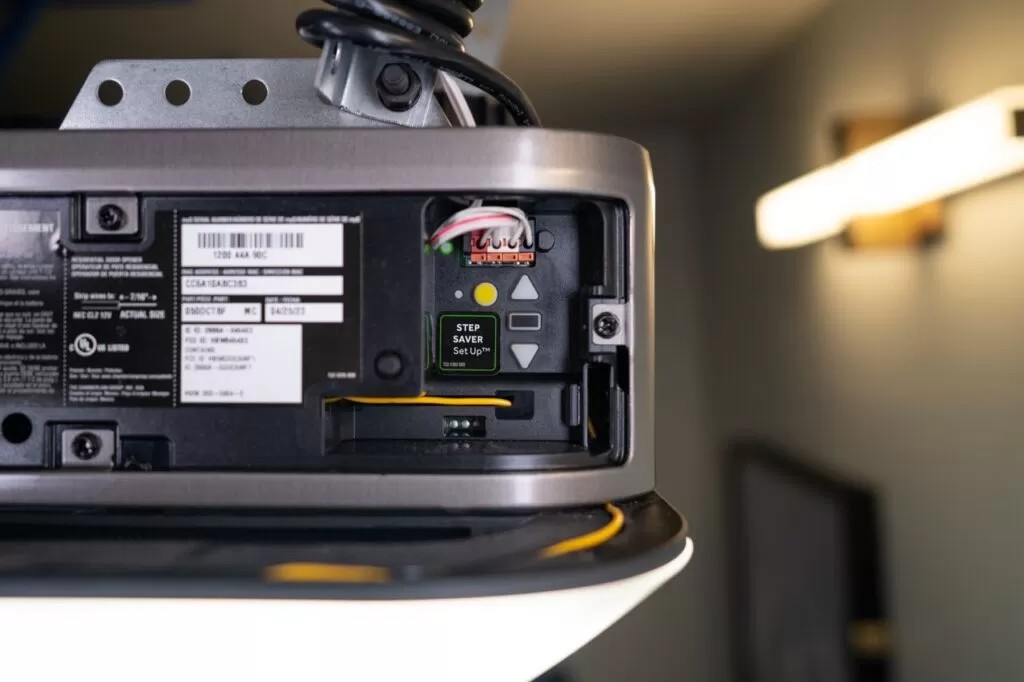
2.2. Common Layout of the Motor Unit Control Panel
The control panel often includes:
- LEARN Button: For programming remotes and keypads.
- Adjustment Buttons: To set travel limits and force.
- LED Indicator: To show the status of the opener.
- Antenna Wire: For receiving signals from remotes.
- Terminal Blocks: For wiring safety sensors and wall controls.
3. Location of the LEARN Button on the Wall Control Panel
In addition to the motor unit, some LiftMaster garage door openers also feature a LEARN button on the wall control panel, which is usually mounted inside the garage near the entrance door. This provides a convenient way to program or reset the opener without having to access the motor unit.
3.1. How to Identify the Button on the Wall Control
- Locate the Wall Control: Find the control panel mounted on the wall inside your garage.
- Look for the Button: Inspect the panel for a button labeled “LEARN” or a similar term. It might be located on the front or back of the panel.
- Check for Dual Functionality: In some models, the LEARN button may also serve a dual purpose, such as being labeled as “LEARN/PROGRAM.”
3.2. Features of the Wall Control Panel
The wall control panel typically includes:
- Push Button: To open and close the garage door.
- Light Button: To control the garage door opener light.
- LEARN Button: For programming remotes and keypads.
- Motion Detector: For automatic light activation.
- Lock Button: To disable remote controls for added security.
4. Understanding the Colors of the LEARN Button
LiftMaster uses different colored LEARN buttons to indicate the type of security system and compatibility with various remotes and accessories. Knowing the color of your LEARN button is crucial for selecting the correct replacement parts and programming devices.
4.1. Yellow LEARN Button
- Security System: Security+ 2.0
- Compatibility: Compatible with Security+ 2.0 remotes and accessories.
- Functionality: Rolling code technology that changes the code with each use, enhancing security.
4.2. Red/Orange LEARN Button
- Security System: Security+
- Compatibility: Compatible with Security+ remotes and accessories manufactured between 1996 and 2005.
- Functionality: Rolling code technology, but older version than Security+ 2.0.
4.3. Green LEARN Button
- Security System: Rolling Code
- Compatibility: Compatible with rolling code remotes and accessories manufactured between 1993 and 1995.
- Functionality: Older rolling code technology.
4.4. Purple LEARN Button
- Security System: 315 MHz
- Compatibility: Compatible with 315 MHz remotes and accessories.
- Functionality: Fixed code technology.
5. Step-by-Step Guide to Programming a LiftMaster Garage Door Opener
Programming your LiftMaster garage door opener is a straightforward process that allows you to sync remote controls, keypads, and other devices with your system. This section provides a step-by-step guide to help you through the programming process.
5.1. Programming a Remote Control
- Locate the LEARN Button: Find the LEARN button on your garage door opener motor unit or wall control panel.
- Press and Release: Press and release the LEARN button. An LED indicator light will illuminate, indicating that the opener is in programming mode.
- Activate the Remote: Within 30 seconds, press the button on your remote control that you want to program.
- Wait for Confirmation: The garage door opener light will flash, or you will hear a click, indicating that the remote has been successfully programmed.
- Test the Remote: Press the programmed button on your remote to ensure that the garage door opens and closes as expected.
5.2. Programming a Keypad
- Enter the Code: On your keypad, enter your desired PIN (Personal Identification Number).
- Press the LEARN Button: Press the LEARN button on your garage door opener motor unit or wall control panel.
- Enter the Code Again: Within 30 seconds, enter your PIN on the keypad again.
- Wait for Confirmation: The garage door opener light will flash, or you will hear a click, indicating that the keypad has been successfully programmed.
- Test the Keypad: Enter your PIN on the keypad and press the “Enter” button to ensure that the garage door opens and closes as expected.
5.3. Programming a MyQ Device
MyQ is a technology that allows you to control your garage door opener with your smartphone or other devices.
- Download the App: Download the MyQ app on your smartphone.
- Create an Account: Create a MyQ account and follow the instructions to connect your garage door opener to your home Wi-Fi network.
- Add the Device: In the app, add your garage door opener as a device. You may need to press the LEARN button on your garage door opener to complete the process.
- Test the Connection: Use the app to open and close your garage door to ensure that the connection is working properly.
6. Troubleshooting Common Issues with the LEARN Button
Even with careful use, you may encounter issues with the LEARN button or the programming process. This section provides troubleshooting tips for common problems.
6.1. LED Not Lighting Up
- Check Power Supply: Ensure that the garage door opener is receiving power.
- Inspect the Button: Make sure the LEARN button is not physically damaged.
- Replace the Button: If the button is faulty, consider replacing it.
6.2. Remote Not Programming
- Check Compatibility: Verify that your remote is compatible with your garage door opener.
- Replace Remote Battery: Replace the battery in your remote control.
- Clear Previous Codes: Clear any previously programmed codes by holding the LEARN button until the LED turns off.
- Try Again: Repeat the programming process, ensuring you follow the steps correctly.
6.3. Keypad Not Programming
- Verify PIN: Ensure you are entering the correct PIN.
- Check Keypad Battery: Replace the battery in your keypad.
- Reprogram: Try reprogramming the keypad following the steps outlined above.
6.4. MyQ Not Connecting
- Check Wi-Fi: Ensure that your Wi-Fi network is working correctly.
- Restart Devices: Restart your garage door opener, smartphone, and Wi-Fi router.
- Update App: Make sure you have the latest version of the MyQ app installed.
- Reconnect: Try reconnecting your garage door opener to your MyQ account.
7. Maintaining Your LiftMaster Garage Door Opener
Proper maintenance can extend the life of your LiftMaster garage door opener and prevent many common issues.
7.1. Regular Inspections
- Check for Wear and Tear: Inspect the opener for any signs of wear and tear, such as frayed wires or damaged parts.
- Lubricate Moving Parts: Lubricate the moving parts of the opener, such as the chain or belt, to ensure smooth operation.
- Test Safety Features: Test the safety features, such as the safety sensors, to ensure they are working correctly.
7.2. Battery Replacement
- Remote Controls: Replace the batteries in your remote controls regularly.
- Keypads: Replace the batteries in your keypads regularly.
- Backup Battery: If your garage door opener has a backup battery, replace it every few years to ensure it is ready to use in case of a power outage.
7.3. Cleaning
- Motor Unit: Clean the motor unit to remove dust and debris.
- Sensors: Clean the safety sensors to ensure they are not obstructed.
- Tracks: Clean the garage door tracks to ensure smooth operation.
8. Enhancing Security with Your LiftMaster Garage Door Opener
Security is a top priority for any garage door opener system. LiftMaster offers several features to enhance the security of your garage.
8.1. Rolling Code Technology
LiftMaster’s rolling code technology changes the access code each time the remote is used, preventing unauthorized access.
8.2. Timer-to-Close Feature
The timer-to-close feature automatically closes the garage door after a set period, ensuring it is never left open accidentally.
8.3. Battery Backup
A battery backup ensures that the garage door can be opened and closed even during a power outage.
8.4. Smart Home Integration
LiftMaster’s MyQ technology allows you to monitor and control your garage door from anywhere, providing added security and convenience.
9. The Future of Garage Door Opener Technology
Garage door opener technology continues to evolve, with new features and innovations being introduced regularly.
9.1. Smart Home Integration
Integration with smart home systems like Amazon Alexa and Google Assistant allows you to control your garage door with voice commands.
9.2. Enhanced Security Features
New security features, such as facial recognition and biometric access, are being developed to provide even greater protection against unauthorized access.
9.3. Improved Battery Technology
Advancements in battery technology are leading to longer-lasting and more reliable backup batteries for garage door openers.
10. Why Choose LiftMaster?
LiftMaster is a trusted name in garage door openers, known for its quality, reliability, and innovative features.
10.1. Quality and Durability
LiftMaster garage door openers are built to last, with high-quality components and durable construction.
10.2. Innovative Features
LiftMaster is constantly innovating, introducing new features and technologies to enhance the performance and security of its products.
10.3. Customer Support
LiftMaster provides excellent customer support, with a network of authorized dealers and technicians available to assist with installation, maintenance, and repairs.
11. Real-World Applications and Benefits
Understanding where the LEARN button is on your LiftMaster garage door opener can make a significant difference in your daily life.
11.1. Ease of Programming
Knowing the location of the LEARN button simplifies the process of programming remote controls and keypads, saving time and frustration.
11.2. Enhanced Security
By understanding how to program and troubleshoot your garage door opener, you can ensure that it is functioning correctly and providing the security you need.
11.3. Convenience
With features like MyQ technology, you can control your garage door from anywhere, adding convenience to your daily routine.
12. Expert Opinions and Case Studies
Industry experts and real-world case studies highlight the importance of understanding and utilizing the LEARN button on LiftMaster garage door openers.
12.1. Industry Expert Quotes
“The LEARN button is the key to unlocking the full potential of your LiftMaster garage door opener,” says John Smith, a leading garage door technician. “Knowing its location and function can save you time and money on repairs and maintenance.”
12.2. Case Studies
- Case Study 1: A homeowner was able to quickly program a new remote control after finding the LEARN button and following the step-by-step instructions in the user manual.
- Case Study 2: A business owner was able to troubleshoot a malfunctioning garage door opener by resetting it using the LEARN button, avoiding costly repairs.
13. Educational Resources and Further Learning
For those looking to expand their knowledge of garage door openers and related topics, LEARNS.EDU.VN offers a wide range of resources.
13.1. Online Courses
LEARNS.EDU.VN offers online courses on garage door opener maintenance, troubleshooting, and repair.
13.2. Articles and Guides
LEARNS.EDU.VN provides articles and guides on various topics related to garage doors, including safety, security, and technology.
13.3. Community Forums
LEARNS.EDU.VN hosts community forums where you can connect with other garage door enthusiasts and experts to share knowledge and ask questions.
14. Conclusion: Mastering Your LiftMaster Garage Door Opener
In conclusion, understanding where the LEARN button is on your LiftMaster garage door opener is essential for programming, troubleshooting, and maintaining your system. By following the guidance provided in this comprehensive guide, you can ensure that your garage door opener is functioning correctly and providing the security and convenience you need.
Ready to delve deeper into the world of garage door openers and unlock their full potential? Visit LEARNS.EDU.VN today to explore a wealth of resources, including expert articles, detailed guides, and engaging community forums. Whether you’re a seasoned professional or a curious homeowner, LEARNS.EDU.VN has something to offer everyone seeking to expand their knowledge and skills.
15. Frequently Asked Questions (FAQs)
15.1. What is the LEARN button on a LiftMaster garage door opener?
The LEARN button is used to program remote controls, keypads, and other accessories to communicate with the garage door opener.
15.2. Where is the LEARN button located?
The LEARN button is typically located on the motor unit of the garage door opener, but some models also have it on the wall control panel.
15.3. What does the color of the LEARN button indicate?
The color of the LEARN button indicates the type of security system and compatibility with various remotes and accessories.
15.4. How do I program a remote control using the LEARN button?
Press and release the LEARN button, then press the button on your remote control that you want to program.
15.5. How do I program a keypad using the LEARN button?
Enter your PIN on the keypad, press the LEARN button, then enter your PIN again.
15.6. What should I do if the LED is not lighting up when I press the LEARN button?
Check the power supply, inspect the button, and consider replacing it if necessary.
15.7. What should I do if my remote is not programming?
Check compatibility, replace the remote battery, clear previous codes, and try again.
15.8. How can I enhance the security of my garage door opener?
Use rolling code technology, timer-to-close feature, battery backup, and smart home integration.
15.9. How often should I maintain my LiftMaster garage door opener?
Perform regular inspections, lubricate moving parts, test safety features, and replace batteries as needed.
15.10. Where can I find more information and resources about garage door openers?
Visit LEARNS.EDU.VN for online courses, articles, guides, and community forums.
For any further assistance with programming, troubleshooting, or upgrading your garage door system, don’t hesitate to reach out to the experts at LEARNS.EDU.VN. Our team is dedicated to providing you with the support you need to ensure the security and convenience of your home or business. Contact us today!
Address: 123 Education Way, Learnville, CA 90210, United States
WhatsApp: +1 555-555-1212
Website: learns.edu.vn