Are you ready to dive into the wonderful world of crochet? It’s a fantastic craft that’s not only relaxing and enjoyable but also incredibly rewarding. Imagine creating your own cozy blankets, stylish scarves, or adorable toys – all with just a hook and some yarn! Many beginners think crochet is complicated, but with a little patience and the right guidance, you’ll find it’s surprisingly easy and incredibly fun. This guide is designed for absolute beginners, taking you through the very first steps of Learning How To Crochet, from holding your hook to mastering your first stitch.
In your crochet journey, you might find yourself watching online tutorials and admiring intricate designs. It’s natural to want your first projects to look perfect right away. Remember, everyone starts somewhere! The key is practice. Creating simple practice swatches will help you get comfortable with holding the hook and yarn and understanding yarn tension. Don’t worry about making mistakes; every crocheter does! Those practice squares? They can become part of a beautiful patchwork blanket later on – a testament to your learning progress!
This tutorial will break down the essential basics to get you started. We’ll cover everything from how to properly hold your crochet hook and yarn, to creating a slip knot, crocheting a chain, mastering the single crochet stitch, and finally, how to finish off your work neatly. Let’s get started and unlock your creative potential with crochet!
Gathering Your Supplies: What You’ll Need to Start
Before you begin your crochet adventure, you’ll need to gather a few essential supplies. Luckily, getting started with crochet is quite affordable, and the necessary tools are readily available at craft stores or online. Here’s what you’ll need:
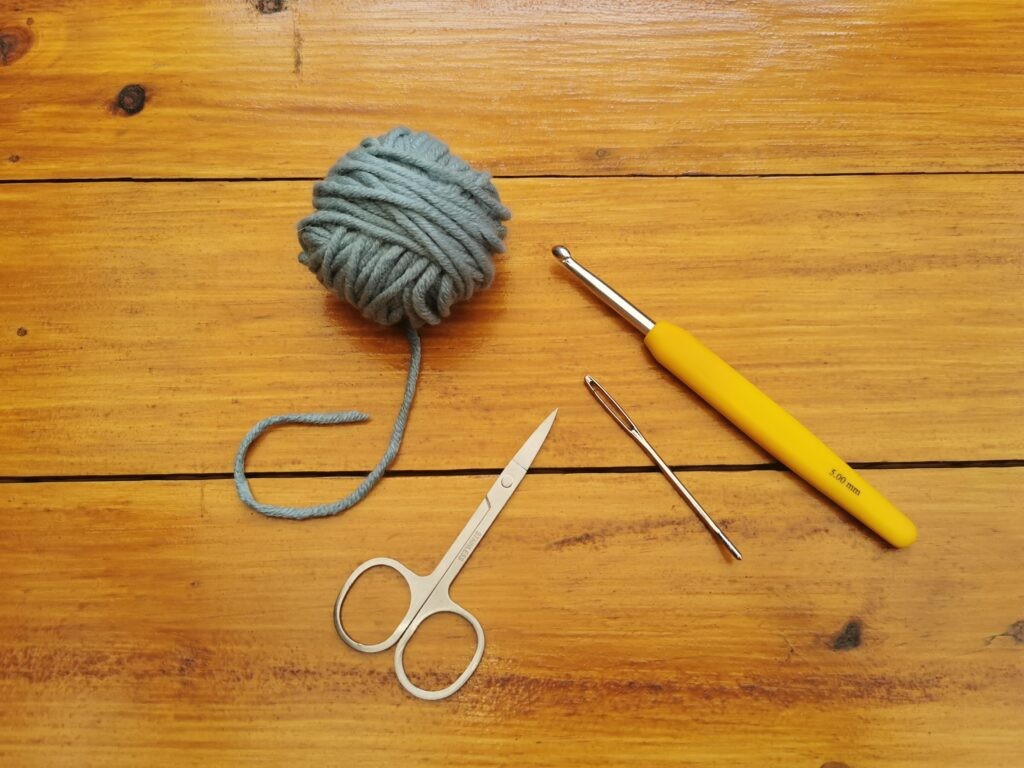
Essential Crochet Tools
-
Yarn: This is the foundation of your crochet projects! For beginners, it’s best to start with a thicker, smooth yarn in a light color. Worsted weight yarn (size 4) is a great choice. Light colors make it easier to see your stitches as you learn.
-
Crochet Hook: The size of your crochet hook is crucial and should match your yarn weight. The yarn label will usually recommend a hook size. For worsted weight yarn, a 5.5mm (US size I-9) hook is often recommended. Ergonomic hooks with comfortable handles can be a great investment, especially if you plan to crochet for longer periods.
-
Scissors: You’ll need a pair of sharp scissors to cut your yarn.
-
Yarn Needle (or Darning Needle): This needle, often made of plastic or metal with a large eye, is used to weave in the yarn ends neatly at the end of your project, giving your work a polished finish.
Understanding Yarn Labels
When you’re choosing yarn, the label is your best friend! It contains vital information to help you select the right yarn and hook for your project. Here’s what to look for:
-
Yarn Weight: This is indicated by a number, usually from 0 (Lace) to 7 (Jumbo). For beginners, look for size 4 (Worsted/Medium) or higher. The higher the number, the thicker the yarn.
-
Recommended Hook Size: The label will suggest a crochet hook size that works best with that particular yarn weight. This is usually given in millimeters and US sizes. Following these recommendations will help you achieve the right gauge and fabric drape in your projects.
For your first project, focusing on a size 4 or larger yarn and the recommended hook size will make the learning process smoother and more enjoyable.
Getting Started: Mastering Basic Crochet Techniques
Now that you have your supplies, let’s get to the exciting part – actually crocheting! We’ll start with the fundamental techniques you need to know before making your first stitch.
Holding the Crochet Hook: Knife Hold vs. Pencil Hold
There’s no single “right” way to hold a crochet hook. Comfort is key, and different crocheters find different grips more natural. The two most common holds are the knife hold and the pencil hold. Experiment with both to see which feels best for you.
- Knife Hold: Hold the hook much like you would hold a dinner knife. Your thumb rests on the flat part of the hook, and your fingers curl around the handle for control. Many find this grip provides good leverage and is comfortable for extended crocheting.
- Pencil Hold: Hold the hook as you would a pencil. Your thumb and index finger guide the hook closer to the hook end, while the hook handle rests against your middle finger. This hold can offer more precision for some crocheters.
Try both holds, practice making a few simple movements with each, and choose the one that feels most comfortable and allows you to control the hook easily. You can always switch grips later as you become more experienced.
Creating a Slip Knot: The Foundation of Crochet
The slip knot is the first loop on your hook and the starting point for almost every crochet project. Here’s how to make one:
-
Yarn Position: Measure out about 3-4 inches of yarn tail. Hold the yarn in your non-dominant hand, letting the tail drape over your palm.
-
Form a Loop: With your dominant hand, bring the working yarn (the yarn attached to the ball) over the tail, forming a loop on your index finger.
-
Second Loop: Wrap the working yarn around your index finger again, creating a second loop. You should now have two loops on your finger.
- Pull Through: Use your hook or fingers to pull the back loop over the front loop and off your index finger.
- Tighten: Gently pull both the yarn tail and the working yarn to tighten the knot. It should be snug but still able to slide easily on your hook.
- Place on Hook: Insert your crochet hook into the loop and tighten the slip knot by pulling the working yarn. The knot should move freely on the hook.
Congratulations, you’ve made your first slip knot! This simple knot is the gateway to all your crochet projects.
Holding the Yarn: Achieving Consistent Tension
Holding the yarn correctly is crucial for maintaining even tension in your crochet work. Tension refers to how tightly or loosely you pull the yarn as you crochet. Consistent tension leads to neat, even stitches and a fabric that drapes nicely. Again, there’s no single right way, but here’s a common method to try:
-
Yarn Placement: With the slip knot on your hook and the hook in your dominant hand, hold the yarn in your non-dominant hand. Drape the yarn over your index finger and then under your middle and ring fingers.
-
Controlling Tension: Gently wrap the yarn around your pinky finger to add a little friction. The yarn should flow smoothly from the ball, over your index finger, and to the hook. Your index finger will act as a guide, and the slight tension from your other fingers will help control the yarn flow.
Experiment with wrapping the yarn differently around your fingers to find a tension that feels comfortable and produces even stitches. Too tight tension will make your stitches stiff and difficult to work into, while too loose tension will result in a floppy, uneven fabric.
Crocheting a Chain: The Foundation Row
The chain stitch (ch) is one of the most basic crochet stitches and is often used to create the foundation row of a project. It’s also used in patterns for various purposes. Let’s learn how to make a chain:
-
Hold Slip Knot: Hold the slip knot close to the hook with your thumb and middle finger of your non-dominant hand.
-
Yarn Over (YO): Bring the yarn over the hook from back to front. This is called a yarn over.
- Pull Through: Use your hook to pull the yarn through the loop on your hook. This creates a new loop on your hook, and you have made your first chain stitch.
- Repeat: Repeat steps 2 and 3 to make more chains. For practice, try making 21 chains. Remember, the loop currently on your hook does not count as a chain stitch.
Practice making chains until you feel comfortable with the motion and can create even, consistent chains. If your chains are too tight, try loosening your tension or using a slightly larger hook. You should be able to see small spaces between the chain stitches.
Understanding Your Chain: Counting Stitches
Take a closer look at your chain. You’ll notice that each chain stitch looks like a small “v”. When you start working stitches into your chain, you’ll be working into these “v” shapes.
To count your chain stitches, simply count each “v”. It’s important to count accurately, especially when following patterns.
Your First Stitch: The Single Crochet (sc)
Now that you’ve mastered the chain, you’re ready to learn your first actual crochet stitch – the single crochet (sc). The single crochet is a basic, versatile stitch used in countless crochet projects.
Step-by-Step Single Crochet
Let’s practice the single crochet stitch on the chain you just made.
-
Skip First Chain: Skip the first chain stitch from the hook. This skipped chain doesn’t get a stitch worked into it and acts as a turning chain in later rows.
-
Insert Hook: Insert your hook into the center of the second chain from the hook (which is the first chain you’re working into).
-
Yarn Over (YO): Yarn over (bring the yarn over the hook from back to front).
-
Pull Up a Loop: Pull the yarn through the chain stitch and up onto the hook. You should now have two loops on your hook.
-
Yarn Over Again: Yarn over again.
-
Pull Through Two Loops: Pull the yarn through both loops on your hook. Only one loop should remain on your hook. You’ve just completed your first single crochet stitch!
- Repeat: Continue making single crochet stitches in each chain stitch across the row. If you started with 21 chains, you should have 20 single crochet stitches in your first row (remember, you skipped the first chain).
Moving to the Next Row: Building Your Crochet Fabric
To continue crocheting beyond the first row and create fabric, you need to turn your work and start a new row. Here’s how:
- Chain 1 (Turning Chain): After completing the last single crochet stitch of the row, chain 1. This chain 1 is called the turning chain and brings your yarn up to the height needed for the next row of single crochet.
- Turn Your Work: Turn your work to the wrong side. Always turn your work in the same direction (either clockwise or counter-clockwise) at the end of each row to keep the edges of your work straight.
- Insert Hook into First Stitch: Insert your hook into the first stitch of the previous row. This is the first single crochet stitch right next to the turning chain.
- Continue Single Crochet: Continue making single crochet stitches across the row, working into each stitch of the previous row. Remember to insert your hook under both loops of the “v” shape of each stitch from the previous row unless a pattern specifies otherwise.
Repeat steps 1-4 to continue practicing single crochet rows and build your crochet square. Practice makes perfect, so keep crocheting rows until you feel comfortable with the stitch and your tension becomes more consistent.
Finishing Off and Weaving in Ends: Completing Your Work
Once you’ve practiced your single crochet and are ready to finish your practice swatch (or a project!), you need to know how to finish off and weave in the yarn ends. This ensures your work is secure and looks neat.
Finishing Off (Fastening Off)
Finishing off secures the last stitch so your work doesn’t unravel.
- Yarn Over and Pull Up a Loop: At the end of your last row, yarn over as if you were making a chain stitch, and pull up a loop, extending it a bit longer than usual (about an inch).
- Cut Yarn: Cut the yarn, leaving a tail of about 6 inches for weaving in.
- Pull Yarn Through Loop: Pull the yarn tail completely through the loop on your hook and pull it snug to tighten the knot. This secures the last stitch.
Weaving in the Ends
Weaving in the ends hides the yarn tails and prevents them from unraveling.
- Thread Yarn Needle: Thread the yarn tail onto your yarn needle.
- Weave Through Stitches: Insert the needle under several stitches on the wrong side of your work, following the direction of the stitches. Avoid pulling too tightly, which can distort your work.
- Change Direction: Change direction and weave the needle under a few more stitches in the opposite direction to further secure the end.
- Trim Excess Yarn: Trim the yarn tail close to your work. The woven-in end should now be hidden and secure.
Repeat the weaving-in process for any other yarn tails, such as the starting tail from your slip knot.
Keep Practicing and Explore Further!
Congratulations! You’ve learned the very basics of crochet: making a slip knot, crocheting a chain, and mastering the single crochet stitch. You now have the foundation to start creating simple crochet projects.
The best way to improve is to practice regularly. Continue making single crochet squares to refine your technique and tension. These squares can be joined together to make larger projects like blankets or scarves.
As you become more comfortable, explore other basic crochet stitches like double crochet and half double crochet. There are countless free patterns available online for beginner-friendly projects that will help you expand your skills.
Crochet is a wonderfully versatile and rewarding craft. Enjoy the process of learning, be patient with yourself, and most importantly, have fun creating!