LiftMaster garage door openers are known for their convenience and advanced features, especially when it comes to remote operation. The LiftMaster 8500, a wall-mounted opener, takes this convenience a step further with its uniquely positioned LEARN button. If you’re looking to program your remote controls, keypads, or myQ devices with this model, understanding the LEARN button is key.
But what exactly is the Liftmaster 8500 Learn Button, and how does it simplify the programming process? This guide will walk you through everything you need to know to effectively use the LEARN button on your LiftMaster 8500 garage door opener.
What is the LiftMaster 8500 Learn Button?
Traditionally, garage door opener LEARN buttons are located directly on the motor unit itself. The LiftMaster 8500 innovatively changes this by integrating the LEARN button into the door control panel, often a myQ control panel. This design enhancement streamlines the process of programming and managing your garage door accessories.
This strategic placement means you no longer need to access the garage door opener motor, which is often mounted on the ceiling. Instead, you can manage all your programming needs conveniently from the wall-mounted control panel, right within your garage.
Locating the Learn Button on the LiftMaster 8500
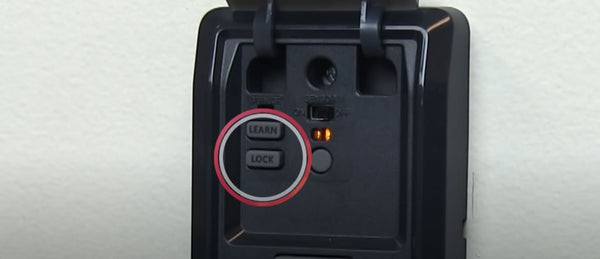
Finding the LEARN button on the LiftMaster 8500 is straightforward. It’s located on the door control panel, which is typically installed on the inside wall of your garage, near the access door to your house.
Look for a button clearly labeled “LEARN” on the control panel. This button is distinct and easily identifiable. Unlike some older models where LEARN buttons might be color-coded to indicate frequency, the LiftMaster 8500 simplifies this with a labeled button directly on the control panel.
Why is the LiftMaster 8500 Learn Button Different?
The primary difference and advantage of the LiftMaster 8500 LEARN button is its accessibility. Traditional garage door openers require you to locate a small, often awkwardly placed button on the motor unit itself. This might involve getting a ladder and reaching up to the ceiling.
By placing the LEARN button on the door control panel, LiftMaster significantly improves user convenience. Programming remotes, keypads, and myQ devices becomes a task you can accomplish quickly and safely from within your garage, without needing to climb or access the motor unit directly. This is especially beneficial for users who frequently add or reprogram devices.
Step-by-Step Guide: Using the LiftMaster 8500 Learn Button
The LiftMaster 8500 LEARN button is used for a variety of programming functions, including adding new remote controls, keyless entry systems, and integrating with myQ devices. Here’s a detailed guide on how to use it for different purposes:
Programming Remote Controls and Keyless Entry
This process allows you to pair new remote controls or wireless keypads with your LiftMaster 8500 garage door opener.
- Activate Learn Mode: Press the “LEARN” button on the door control panel twice (do not hold). The small red LED indicator next to the LEARN button will light up, indicating that the opener is in learn mode.
- Prepare Your Device: Take the remote control or keyless entry keypad you wish to program.
- Initiate Programming on Your Device:
- For Remote Controls: Press and hold the button on the remote control that you want to use to operate the garage door.
- For Keyless Entry: Enter your desired 4-digit PIN on the keypad, followed by pressing the “ENTER” button.
- Confirmation: Once the device is successfully programmed, the garage door opener light bulb will flash once (or you may hear two clicks from the motor unit). This confirms that the device is now paired with your LiftMaster 8500.
Programming myQ Devices
To connect myQ accessories like remote light controls, garage door monitors, or smart light switches, follow these steps:
- Enter myQ Learn Mode: Press the “LEARN” button on the door control panel twice until the red LED light illuminates.
- Activate myQ Device Learn Button: Immediately press the “LEARN” button on your myQ accessory (e.g., 825LM remote light control, 829LM monitor, or 823LM light switch). Refer to the specific myQ device manual for the exact location of its LEARN button.
- Synchronization: The myQ device will now communicate with the garage door opener and synchronize operations. Refer to your myQ device instructions for confirmation of successful pairing.
Connecting to the myQ Internet Gateway
Linking your myQ control panel to the LiftMaster Internet Gateway enables you to control your garage door remotely via smartphone or computer.
- Set up myQ Account: Register and log in at myliftmaster.com.
- Add New Device: On the myLiftMaster website, navigate to “Manage Places” > “Add New Device” > “Garage Door Opener.” Follow the on-screen instructions to begin adding your device.
- Activate Learn Mode: Within three minutes of initiating the device addition on the website, press the “LEARN” button on your door control panel twice until the red LED turns on.
- Completion: The LED light will turn off once programming is complete, and your control panel name should appear on your myLiftMaster account. You can now control your garage door remotely through the myQ app.
Erasing Programmed Devices (Resetting)
For security purposes, you may need to erase programmed devices, especially if you lose a remote or want to remove access for old devices. The LEARN button also functions as a reset button.
- Erase Remote Controls and Keyless Entries: Press and hold the “LEARN” button on the control panel until the LED light turns off. This action clears the memory of all remote controls and keyless entry devices. You will need to reprogram any devices you still want to use.
- Erase myQ Devices: Press and hold the “LEARN” button twice in succession (press, hold until light goes off, release, then press and hold again). When the LED light turns off after the second hold, it indicates that all myQ devices have been successfully removed from the system’s memory.
Tips for Troubleshooting and FAQs
Q: What if the LEARN button LED doesn’t light up?
A: Ensure the door control panel is properly powered. Check the wiring connections and power supply to the garage door opener.
Q: Can I program multiple remotes at once?
A: No, you need to program each remote or device individually, following the steps for each.
Q: What if my remote or keypad still doesn’t work after programming?
A: Double-check the batteries in your remote or keypad. Ensure you followed the programming steps correctly. If issues persist, consult the LiftMaster 8500 manual or contact customer support.
Q: Does the yellow button inside the LiftMaster 8500 motor unit do anything for programming?
A: On the LiftMaster 8500, the yellow button on the motor unit is primarily for setting travel limits and force adjustments, not for device programming. Device programming is done exclusively through the LEARN button on the door control panel.
Conclusion
The LiftMaster 8500 LEARN button, conveniently located on the door control panel, offers a user-friendly approach to managing and programming your garage door opener accessories. Its accessible placement simplifies adding remotes, keypads, and integrating with myQ technology, enhancing the overall convenience and security of your garage access.
For a wide range of compatible accessories and further assistance with your LiftMaster 8500, visit All Security Equipment. Contact our customer service today for expert support in optimizing your garage door system.