Are you on the hunt for every Machine Learning collectible in Astro Bot? This guide is your definitive walkthrough to finding all the hidden treasures within the Machine Learning level, located in the Feather Cluster. As part of our broader Astro Bot guide series, this Machine Learning collectibles walkthrough will pinpoint the exact locations of all Bots and Puzzle Pieces scattered throughout the stage, ensuring you achieve 100% completion.
Discover All Machine Learning Collectibles in Astro Bot
Below is a detailed walkthrough for the Machine Learning level in Astro Bot, designed to guide you to every collectible. The items are listed in the order you’ll naturally encounter them as you progress through the level.
Puzzle Piece #1
Image: Push Square
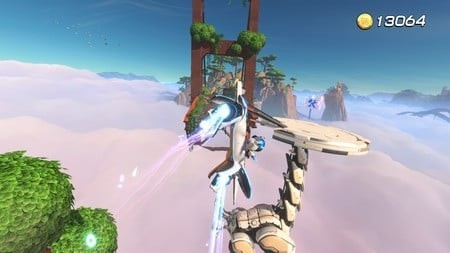
As you begin your flight into the level, keep your eyes peeled upwards! The first Puzzle Piece is floating above a Tallneck enemy that gracefully strides across your path. Utilize your controller triggers to boost your speed and skillfully grab this easily missed Puzzle Piece as you fly by. Quick reflexes are key!
Bot #1: Erend
After navigating through the initial log door and entering the subsequent area, your gaze should immediately be drawn to a girder directly ahead. You’ll notice a conspicuous target emblazoned upon it. Take aim and shoot the target to extend a pathway of trampolines. Bounce across these to reach a platform swarming with enemies. Dispatch these foes and rescue the Bot trapped there – it’s Erend, the Loyal Oseram, waiting for your help!
Bot #2: Watcher
Image: Push Square
Upon reaching the area characterized by a serene pond and hopping frog enemies, shift your attention to the right side. You’ll spot a collection of discarded technology and scrap. Look closely, and you’ll see Bot #2, the Watcher Security Scouter, gently hovering above this tech pile, suspended by a balloon. A well-aimed shot at the balloon will bring the Bot down, allowing you to add it to your collection.
Puzzle Piece #2
Progress through the level until you encounter an area crisscrossed with vibrant pink electrical tripwires. After skillfully defeating the patrolling enemies in this zone, venture beyond the left tripwire. This path leads to a hidden garden area. Scan the distance within this garden, and you’ll notice a box. Shoot this box to unveil your second Puzzle Piece. Exploration and sharp eyes are rewarded!
Bot #3: Rost
Image: Push Square
Shortly after navigating a brief underwater segment, make a 180-degree turn. You’ll immediately spot Bot #3, Rost the Paternal Outcast, clinging to a shimmering crystal formation. Shoot the crystal to shatter it and free Rost. This Bot is easily missed if you don’t look back!
Puzzle Piece #3
Once you emerge back into the open air after the underwater section, head to the left side of the area. You’ll see a cluster of rocks partially concealing a cave entrance. Examine the rocks closely and locate a crack on the right-hand side. Peeking through this crack, you’ll spot a green barrel inside the cave. Shoot the barrel to trigger an explosion, opening up the cave and revealing Puzzle Piece #3.
Bot #4: Grazer
Image: Push Square
In the area dominated by another Tallneck enemy, proceed to the far end of the space. Here, you’ll find Bot #4, the Grazer Grass Guzzler, unfortunately ensnared within a tripwire trap. Carefully approach and disarm the trap to rescue the Bot.
Bot #5: Sylens
Image: Push Square
After launching yourself from a satellite dish, you’ll enter an indoor area. Ropes will be directly in front of you. Grab onto the very first rope and begin to slide downwards. As you slide, keep an eye on the platform behind you – Bot #5, Sylens the Cherished Wanderer, is perched there, waiting to be collected. Don’t miss this one as you descend!
We hope this Machine Learning walkthrough for Astro Bot has been invaluable in your quest to collect everything! Explore our comprehensive Astro Bot guide for even more detailed walkthroughs and collectible locations across all levels. Happy gaming!