Learning how to crochet for beginners can be a delightful and rewarding experience, and at LEARNS.EDU.VN, we are committed to providing you with easy-to-follow instructions. This guide simplifies the basics, ensuring you quickly grasp the foundational skills needed to start your crochet journey. Discover the joy of crocheting with our expert advice, from selecting the right materials to mastering essential stitches, and enhance your crafting abilities.
1. Understanding the Basics: What is Crochet?
Crochet is a versatile and engaging craft that involves creating fabric by interlocking loops of yarn, thread, or other materials using a crochet hook. Unlike knitting, which uses two needles, crochet relies on a single hook to pull the loops directly through other loops. This method forms knots, making crochet projects less likely to unravel than knitted ones. According to a study by the Craft Yarn Council, crochet is increasingly popular among younger generations due to its accessibility and the wide range of creative projects it offers.
1.1. Historical Context and Evolution
The origins of crochet are somewhat debated, but it is generally believed to have evolved from earlier forms of needlework during the 19th century. The term “crochet” comes from the French word “croc,” meaning hook. Initially, crochet was often used to create lace and decorative edgings as a cheaper alternative to handmade lace. Over time, it has evolved into a craft used for creating a wide variety of items, from clothing and accessories to home decor and toys. Historical records indicate that crochet gained popularity in Europe and the United States during the Victorian era, with patterns being widely circulated through publications.
1.2. Crochet vs. Knitting: Key Differences
While both crochet and knitting involve creating fabric from yarn, there are several key differences between the two crafts:
- Tools: Crochet uses a single hook, whereas knitting uses two needles.
- Technique: Crochet involves pulling loops of yarn through other loops, creating knots that secure the fabric. Knitting involves creating rows of interlocking loops that are held on the needles.
- Fabric Structure: Crochet creates a denser, more textured fabric compared to knitting. Knitted fabric is generally more elastic and drapey.
- Learning Curve: Many beginners find crochet easier to learn than knitting because it involves managing only one loop at a time.
These differences make crochet a distinct and appealing craft, offering a unique set of possibilities for creating various projects. Whether you’re interested in making a cozy blanket, a stylish hat, or a cute amigurumi toy, crochet provides the tools and techniques to bring your creative vision to life.
1.3. Why Choose Crochet? Benefits and Advantages
Crochet offers numerous benefits and advantages, making it an appealing hobby for many people:
- Stress Relief: The repetitive motion of crocheting can be meditative and calming, helping to reduce stress and anxiety. Studies have shown that engaging in creative activities like crochet can lower cortisol levels and promote relaxation.
- Creativity and Self-Expression: Crochet allows you to express your creativity by choosing different colors, textures, and patterns. You can create unique, personalized items that reflect your individual style.
- Practical Skill: Learning to crochet provides you with a practical skill that can be used to make gifts, clothing, and home decor items. It’s a rewarding way to create functional and beautiful objects.
- Community and Social Connection: Crochet is a social activity, with many opportunities to join local groups, attend workshops, and connect with other crocheters online. Sharing your projects and learning from others can enhance your enjoyment of the craft.
- Accessibility: Crochet is a relatively inexpensive hobby to start. The basic materials—a hook and some yarn—are affordable, and there are countless free patterns and tutorials available online.
- Cognitive Benefits: Crocheting involves problem-solving, hand-eye coordination, and memory, which can help to keep your mind sharp and improve cognitive function. According to research from Harvard University, engaging in fine motor skills activities like crochet can enhance neural connections in the brain.
1.4. Exploring the World of Crochet: Project Ideas for Beginners
For beginners, starting with simple projects is a great way to build confidence and develop your skills. Here are a few project ideas that are perfect for beginners:
| Project Idea | Description | Skills Learned |
|---|---|---|
| Simple Scarf | A basic scarf is an excellent first project. Use a single crochet or half-double crochet stitch to create a long, rectangular piece of fabric. | Basic stitches, maintaining tension, finishing techniques. |
| Washcloth/Dishcloth | Small, square cloths are quick and easy to make. Use cotton yarn, which is absorbent and durable. | Practicing consistent stitch size, working in rows. |
| Coasters | Crochet coasters using a simple circle or square pattern. Experiment with different colors and textures of yarn. | Working in the round or square, color changes. |
| Granny Squares | These classic squares can be joined together to make blankets, bags, or other items. Each square is a small, manageable project. | Basic stitches, working in rounds, joining squares. |
| Headbands | Crochet a simple headband using a stretchy stitch pattern like single crochet ribbing. Add buttons or other embellishments for a personal touch. | Working in rows, creating texture, adding embellishments. |
| Amigurumi Basics | Start with a simple amigurumi project like a small ball or cube. These projects introduce you to working in the round and shaping with increases/decreases. | Working in the round, increasing and decreasing stitches, stuffing and finishing techniques. |
| Bookmarks | Crochet a thin, decorative bookmark using lightweight yarn and a simple stitch pattern. Add tassels or beads for extra flair. | Working with lightweight yarn, creating delicate designs, adding embellishments. |
| Mug Cozy | A cozy that wraps around a mug is a practical and quick project. Use a stitch pattern that provides good insulation. | Measuring and fitting, working with different stitch patterns. |
| Simple Pouch | Create a small pouch or bag using basic stitches and a drawstring closure. This project is great for practicing shaping and finishing techniques. | Shaping fabric, creating a drawstring, finishing techniques. |
| Baby Booties | Crochet a pair of simple baby booties using soft yarn. This project is a bit more challenging but introduces you to shaping and working with small pieces. | Working with small pieces, shaping, creating a pair of matching items. |
These projects provide a solid foundation for learning crochet and will help you develop the skills and confidence to tackle more complex patterns in the future. Remember to take your time, practice regularly, and don’t be afraid to experiment and have fun.
2. Gathering Your Supplies: Essential Tools and Materials
Before you start your crochet journey, it’s essential to gather the right supplies. Having the appropriate tools and materials will make the learning process smoother and more enjoyable. Here’s a comprehensive guide to the essential items you’ll need:
2.1. Types of Crochet Hooks: Sizes and Materials
Crochet hooks come in various sizes and materials, each suited for different types of yarn and projects. Understanding the different types of hooks will help you choose the right one for your needs:
- Sizes: Crochet hook sizes are typically measured in millimeters (mm) or using an alphabetical/numerical system. The size of the hook determines the size of the stitches you create. Smaller hooks (e.g., 2.0 mm to 3.5 mm) are used for fine yarns and delicate projects, while larger hooks (e.g., 5.0 mm to 10.0 mm or larger) are used for thicker yarns and bulkier projects.
- Materials: Crochet hooks are made from a variety of materials, each with its own advantages and disadvantages:
- Aluminum: Aluminum hooks are lightweight, durable, and inexpensive, making them a popular choice for beginners. They have a smooth surface that allows yarn to glide easily.
- Steel: Steel hooks are used for fine crochet work with thread or very thin yarn. They are strong and precise, allowing for intricate stitch work.
- Plastic: Plastic hooks are lightweight and inexpensive, but they may not be as durable as metal hooks. They can also have more friction, which can make it harder for the yarn to glide smoothly.
- Bamboo: Bamboo hooks are lightweight, warm to the touch, and have a natural feel. They are a good option for people with allergies to metal. However, they may not be as durable as metal hooks.
- Wood: Wooden hooks are similar to bamboo hooks but may be made from different types of wood. They offer a comfortable grip and a smooth surface.
- Ergonomic: Ergonomic hooks have a shaped handle designed to reduce hand fatigue and discomfort. They are a good option for people who crochet for long periods or have arthritis or other hand issues.
2.2. Understanding Yarn Fibers: Natural vs. Synthetic
Yarn is the basic material of crochet, and it comes in a wide variety of fibers, each with its own properties and characteristics. Understanding the different types of yarn fibers will help you choose the right yarn for your projects:
- Natural Fibers: Natural fibers are derived from plants or animals. They are generally more breathable and absorbent than synthetic fibers.
- Cotton: Cotton yarn is soft, absorbent, and easy to care for. It’s a good choice for warm-weather clothing, dishcloths, and baby items.
- Wool: Wool yarn is warm, durable, and has good elasticity. It’s a good choice for sweaters, hats, and blankets.
- Silk: Silk yarn is luxurious, smooth, and has a beautiful drape. It’s a good choice for scarves, shawls, and other elegant projects.
- Linen: Linen yarn is strong, absorbent, and has a crisp texture. It’s a good choice for summer clothing and home decor items.
- Bamboo: Bamboo yarn is soft, lightweight, and has a silky texture. It’s a sustainable and eco-friendly option.
- Synthetic Fibers: Synthetic fibers are man-made and often more affordable than natural fibers. They are generally more durable and resistant to fading and shrinking.
- Acrylic: Acrylic yarn is inexpensive, easy to care for, and comes in a wide variety of colors. It’s a good choice for beginner projects, blankets, and toys.
- Polyester: Polyester yarn is strong, durable, and resistant to wrinkles and stretching. It’s a good choice for outdoor items, bags, and home decor.
- Nylon: Nylon yarn is strong, elastic, and resistant to abrasion. It’s a good choice for socks, swimwear, and other items that require durability and stretch.
2.3. Additional Notions: Scissors, Yarn Needles, Stitch Markers
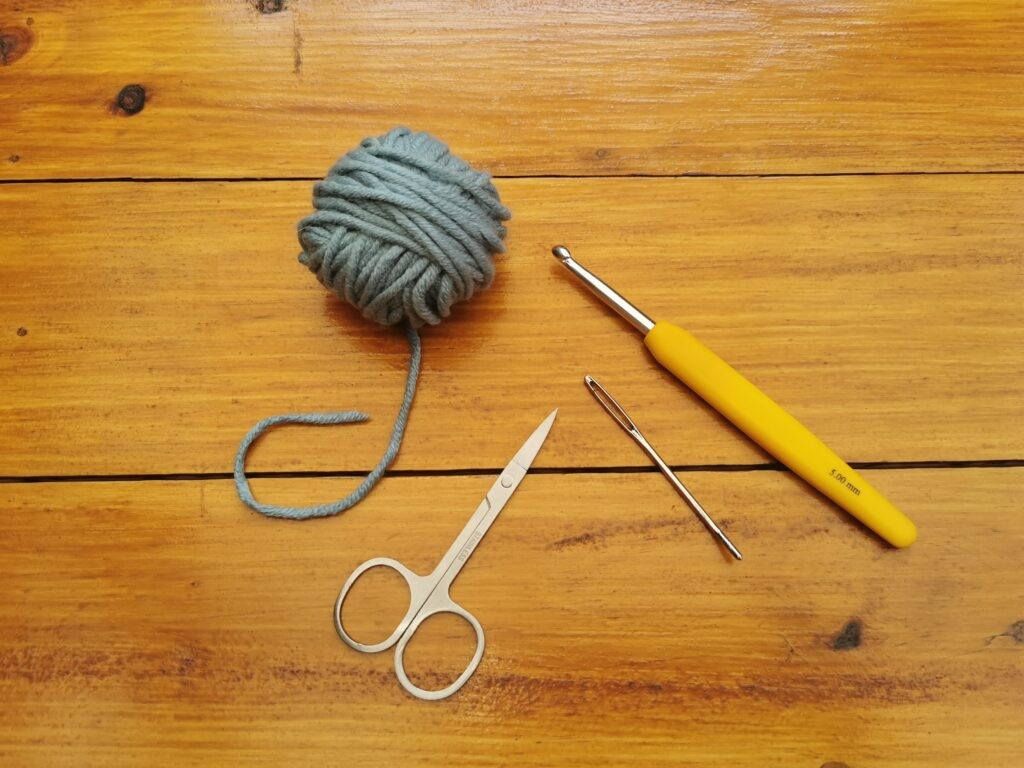
In addition to crochet hooks and yarn, there are a few other essential notions that you’ll need for your crochet projects:
- Scissors: A pair of sharp scissors is essential for cutting yarn ends and trimming your work.
- Yarn Needles (also called Tapestry Needles): Yarn needles have a large eye and a blunt tip, making them ideal for weaving in yarn ends and joining pieces of crochet together.
- Stitch Markers: Stitch markers are small rings or clips that are used to mark specific stitches in your work. They are helpful for keeping track of pattern repeats, increases, decreases, and other important points.
- Measuring Tape: A flexible measuring tape is useful for checking the size of your work and ensuring that it matches the pattern specifications.
- Row Counter: A row counter is a small device that helps you keep track of the number of rows you’ve crocheted. This can be especially helpful for complex patterns.
2.4. Where to Buy Your Supplies: Online and Local Options
You can purchase crochet supplies from a variety of sources, both online and locally:
- Online Retailers:
- Amazon: Offers a wide selection of crochet hooks, yarn, and notions at competitive prices.
- Etsy: A great place to find unique, handmade crochet hooks and yarn from independent sellers.
- LoveCrafts: Specializes in knitting and crochet supplies, with a wide selection of yarn and patterns.
- WEBS – America’s Yarn Store: A large online yarn store with a wide selection of yarns and tools.
- Local Yarn Stores (LYS):
- Benefits: Knowledgeable staff, hands-on experience, support local businesses.
- Considerations: Prices may be higher than online retailers.
- Craft Stores:
- Examples: Michael’s, Joann Fabric and Crafts.
- Benefits: Convenient, wide selection, frequent sales and coupons.
- Considerations: Yarn quality may vary.
- Discount Stores:
- Examples: Walmart, Target.
- Benefits: Affordable, convenient.
- Considerations: Limited selection, yarn quality may be lower.
When choosing where to buy your supplies, consider your budget, the quality of the materials, and the level of customer service you need. Local yarn stores can provide valuable advice and support, while online retailers offer a wider selection and competitive prices.
3. Getting Started: Basic Crochet Techniques
Now that you’ve gathered your supplies, it’s time to learn the basic crochet techniques. These techniques will form the foundation of your crochet skills and allow you to create a wide variety of projects.
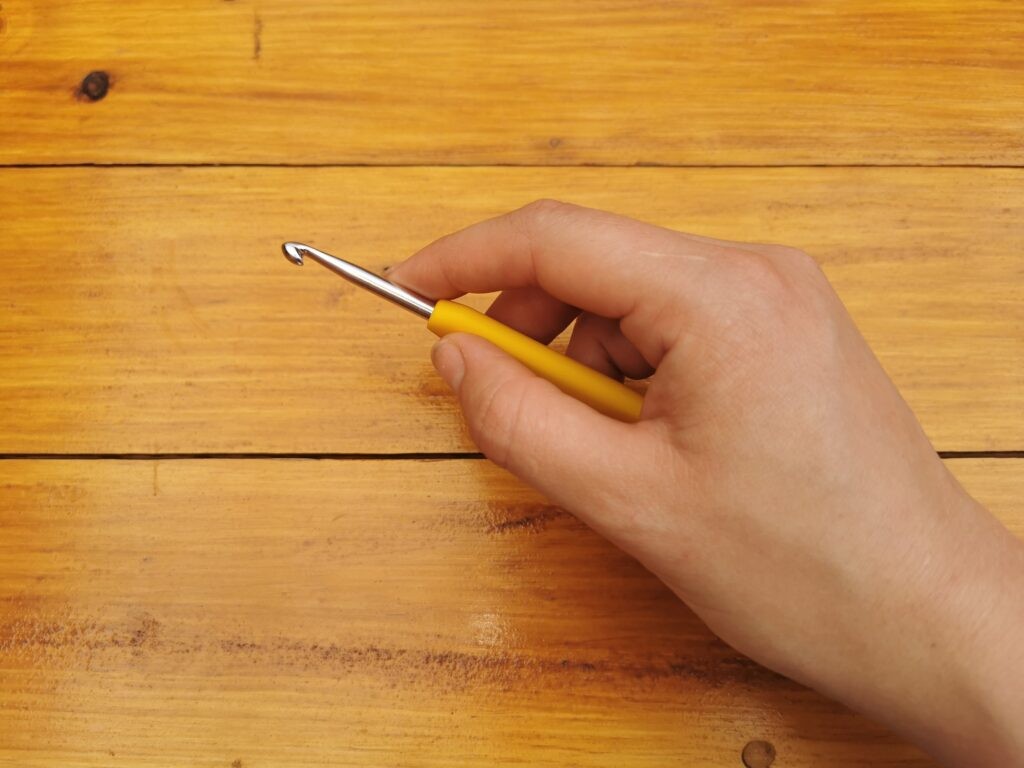
3.1. Holding the Hook and Yarn: Finding Your Grip
The way you hold your crochet hook and yarn is a matter of personal preference. There is no right or wrong way to hold them, as long as you are comfortable and can maintain consistent tension. Here are two common ways to hold the hook:
- Knife Hold: Hold the hook like you would hold a knife, with your thumb and index finger near the hook’s handle.
- Pencil Hold: Hold the hook like you would hold a pencil, with your thumb, index finger, and middle finger near the hook’s handle.
As for holding the yarn, here’s a common technique:
- Wrap the yarn around your fingers to create tension. Some people wrap the yarn around their pinky and index finger, while others use different combinations. Experiment to find what works best for you.
3.2. Creating a Slip Knot: The First Step
The slip knot is the first step in most crochet projects. It creates a loop on your hook that you can then use to make stitches. Here’s how to make a slip knot:
- Hold the yarn a few inches from the end.
- Form a loop with the yarn, crossing the working yarn (the yarn coming from the ball) over the tail end.
- Insert your hook into the loop, catch the working yarn, and pull it through the loop.
- Tighten the knot by pulling on the tail end of the yarn.
3.3. Making a Chain: The Foundation Row
The chain stitch is the foundation of most crochet projects. It creates a row of loops that you can then work into to create fabric. Here’s how to make a chain stitch:
- Hold the hook with the slip knot on it in your dominant hand.
- Wrap the yarn over the hook from back to front (this is called “yarn over”).
- Pull the yarn through the loop on the hook.
- Repeat steps 2 and 3 to create a chain of the desired length.
3.4. Understanding Tension: Achieving Consistent Stitches
Tension refers to the tightness or looseness of your stitches. Consistent tension is essential for creating even and professional-looking crochet projects. Here are a few tips for achieving consistent tension:
- Practice: The more you crochet, the more consistent your tension will become.
- Relax: Try to relax your hands and arms while crocheting. Tension in your body can translate to tension in your stitches.
- Yarn Over: Make sure you are yarning over consistently, either from back to front or front to back.
- Hook Size: If your stitches are too tight, try using a larger hook. If your stitches are too loose, try using a smaller hook.
3.5. Essential Stitches: Single Crochet, Double Crochet, and More
Once you’ve mastered the chain stitch, you can start learning other essential crochet stitches. Here are a few of the most common stitches:
- Single Crochet (sc): Insert the hook into the stitch, yarn over, pull through the stitch (two loops on hook), yarn over, pull through both loops.
- Double Crochet (dc): Yarn over, insert the hook into the stitch, yarn over, pull through the stitch (three loops on hook), yarn over, pull through two loops (two loops on hook), yarn over, pull through both loops.
- Half Double Crochet (hdc): Yarn over, insert the hook into the stitch, yarn over, pull through the stitch (three loops on hook), yarn over, pull through all three loops.
- Treble Crochet (tr): Yarn over twice, insert the hook into the stitch, yarn over, pull through the stitch (four loops on hook), yarn over, pull through two loops (three loops on hook), yarn over, pull through two loops (two loops on hook), yarn over, pull through both loops.
- Slip Stitch (sl st): Insert the hook into the stitch, yarn over, pull through the stitch and the loop on the hook.
3.6. Tips and Tricks for Mastering Basic Techniques
- Practice Regularly: Consistent practice is key to mastering basic crochet techniques. Set aside time each day or week to work on your skills.
- Watch Tutorials: Video tutorials can be incredibly helpful for visualizing techniques and understanding the nuances of each stitch. LEARNS.EDU.VN offers a variety of video tutorials to guide you through each step.
- Start Simple: Begin with small, manageable projects that allow you to focus on mastering one or two techniques at a time.
- Use Stitch Markers: Stitch markers can help you keep track of your place in a pattern and ensure that your stitches are even.
- Count Your Stitches: Regularly counting your stitches can help you avoid mistakes and maintain the correct size and shape of your project.
- Join a Crochet Community: Connecting with other crocheters can provide support, inspiration, and valuable tips and tricks.
By mastering these basic techniques and practicing regularly, you’ll be well on your way to creating beautiful and intricate crochet projects.
4. Reading Crochet Patterns: A Beginner’s Guide
Crochet patterns provide instructions for creating specific projects, including the materials needed, the stitches to use, and the steps to follow. Understanding how to read crochet patterns is essential for successfully completing a wide variety of projects.
4.1. Common Abbreviations and Symbols
Crochet patterns use a variety of abbreviations and symbols to save space and make the instructions easier to read. Here are some of the most common abbreviations and symbols:
| Abbreviation/Symbol | Meaning |
|---|---|
| ch | Chain |
| sc | Single Crochet |
| hdc | Half Double Crochet |
| dc | Double Crochet |
| tr | Treble Crochet |
| sl st | Slip Stitch |
| st(s) | Stitch(es) |
| rep | Repeat |
| inc | Increase |
| dec | Decrease |
| beg | Beginning |
| rem | Remaining |
| * | Repeat instructions after * |
| ( ) | Work instructions in ( ) as a set |
| [ ] | Work instructions in [ ] as many times as indicated |
4.2. Understanding Stitch Counts and Pattern Repeats
Crochet patterns often include stitch counts to help you keep track of your work. The stitch count is the number of stitches you should have at the end of each row or round. Pattern repeats are sections of the pattern that you need to repeat multiple times. Understanding stitch counts and pattern repeats is essential for avoiding mistakes and ensuring that your project turns out correctly.
4.3. Different Types of Patterns: Written, Charts, and Video Tutorials
Crochet patterns come in a variety of formats, including written patterns, charts, and video tutorials.
- Written Patterns: Written patterns provide detailed instructions in text form. They are the most common type of crochet pattern.
- Charts: Crochet charts use symbols to represent stitches. They are a visual way to represent the pattern and can be easier to follow for some people.
- Video Tutorials: Video tutorials provide step-by-step instructions in video form. They can be especially helpful for visual learners and for learning new techniques.
4.4. Tips for Following Patterns Successfully
Here are a few tips for following crochet patterns successfully:
- Read the Pattern Carefully: Before you start, read the entire pattern carefully to make sure you understand the instructions and have all the necessary materials.
- Highlight or Mark Important Information: Use a highlighter or pen to mark important information in the pattern, such as stitch counts, pattern repeats, and special instructions.
- Count Your Stitches Regularly: Count your stitches at the end of each row or round to make sure you have the correct number.
- Use Stitch Markers: Use stitch markers to mark important points in the pattern, such as the beginning of a round or the location of increases or decreases.
- Don’t Be Afraid to Ask for Help: If you get stuck on a pattern, don’t be afraid to ask for help from other crocheters or from the pattern designer.
5. Common Mistakes and How to Avoid Them
Even experienced crocheters make mistakes from time to time. Here are a few of the most common mistakes and how to avoid them:
5.1. Uneven Tension: Causes and Solutions
Uneven tension can cause your crochet projects to look sloppy and unprofessional. Here are a few common causes of uneven tension and how to fix them:
- Cause: Holding the yarn too tightly or too loosely.
- Solution: Practice maintaining consistent tension by relaxing your hands and arms.
- Cause: Using different hook sizes within the same project.
- Solution: Use the same hook size throughout the entire project, unless the pattern specifically calls for a different size.
- Cause: Switching between different types of yarn within the same project.
- Solution: Use the same type of yarn throughout the entire project, or be aware that different yarns may have different tension requirements.
5.2. Counting Errors: Tips for Accuracy
Counting errors can lead to mistakes in your crochet projects. Here are a few tips for avoiding counting errors:
- Count Your Stitches Regularly: Count your stitches at the end of each row or round to make sure you have the correct number.
- Use Stitch Markers: Use stitch markers to mark the beginning of each row or round, or to mark important points in the pattern.
- Pay Attention to the Pattern: Read the pattern carefully and pay attention to the stitch counts and pattern repeats.
- Use a Row Counter: A row counter can help you keep track of the number of rows you’ve crocheted.
5.3. Incorrect Stitch Placement: Identifying and Correcting
Incorrect stitch placement can cause your crochet projects to look uneven or distorted. Here are a few tips for identifying and correcting incorrect stitch placement:
- Pay Attention to the Pattern: Read the pattern carefully and pay attention to where each stitch should be placed.
- Look at the Fabric: Examine your crochet fabric closely to see if the stitches are aligned correctly.
- Use Stitch Markers: Use stitch markers to mark the correct stitch placement, especially in complex patterns.
- Frog It: If you make a mistake, don’t be afraid to “frog it” (rip it out) and start over.
5.4. Tangled Yarn: Prevention and Untangling Techniques
Tangled yarn can be frustrating and time-consuming. Here are a few tips for preventing tangled yarn and for untangling it when it happens:
- Use a Yarn Bowl or Bag: A yarn bowl or bag can help keep your yarn from rolling around and tangling.
- Wind Your Yarn into a Ball or Cake: Winding your yarn into a ball or cake can help prevent tangles.
- Don’t Pull Too Hard: When pulling yarn from the ball or cake, don’t pull too hard, as this can cause the yarn to tangle.
- Be Patient: If your yarn does get tangled, be patient and try to untangle it slowly and carefully.
6. Advancing Your Skills: Next Steps and Resources
Once you’ve mastered the basics of crochet, you can start exploring more advanced techniques and projects. Here are a few suggestions for advancing your skills:
6.1. Exploring Different Stitch Patterns: Textures and Designs
There are countless stitch patterns you can use to create different textures and designs in your crochet projects. Here are a few popular stitch patterns to try:
- Shell Stitch: Creates a decorative, shell-like pattern.
- Bobble Stitch: Creates a bumpy, textured pattern.
- Cable Stitch: Creates a twisted, cable-like pattern.
- Lace Stitch: Creates a delicate, openwork pattern.
6.2. Colorwork Techniques: Stripes, Intarsia, and Fair Isle
Colorwork techniques allow you to incorporate multiple colors into your crochet projects. Here are a few common colorwork techniques:
- Stripes: Simple alternating rows or rounds of different colors.
- Intarsia: Creating blocks of color within a project.
- Fair Isle: Using multiple colors in the same row or round to create intricate patterns.
6.3. Shaping and Construction: Garments, Amigurumi, and More
Shaping and construction techniques allow you to create three-dimensional objects with crochet. Here are a few common shaping and construction techniques:
- Increasing and Decreasing: Adding or subtracting stitches to shape your project.
- Working in the Round: Creating seamless tubes or spheres.
- Joining Pieces: Attaching separate pieces of crochet together to create a larger object.
6.4. Online Communities and Resources: Connecting with Fellow Crocheters
Connecting with other crocheters can provide support, inspiration, and valuable tips and tricks. Here are a few online communities and resources to check out:
- Ravelry: A website and online community for knitters and crocheters.
- Crochet Blogs and Websites: Many crochet bloggers and websites offer free patterns, tutorials, and advice.
- Social Media Groups: Facebook groups, Instagram, and other social media platforms can be great places to connect with other crocheters.
6.5. Learning Resources Available at LEARNS.EDU.VN
LEARNS.EDU.VN offers a wealth of resources to help you continue your crochet journey. Our website provides:
- Detailed Tutorials: Step-by-step guides on advanced crochet techniques.
- Pattern Library: A wide variety of patterns for different skill levels and project types.
- Community Forum: A platform to connect with other learners, share your projects, and ask questions.
- Expert Advice: Tips and tricks from experienced crochet instructors.
7. Caring for Your Crochet: Maintenance and Longevity
Proper care is essential to maintain the beauty and longevity of your crochet projects. Here’s how to care for your crocheted items:
7.1. Washing Instructions: Handwashing vs. Machine Washing
The best way to wash your crochet projects depends on the type of yarn used. Always check the yarn label for specific washing instructions. Here are some general guidelines:
- Handwashing: Handwashing is the gentlest way to clean crochet projects. Use cool water and a mild detergent. Gently squeeze the item to remove excess water, and then lay it flat to dry.
- Machine Washing: Some yarns can be machine washed on a gentle cycle. Place the item in a mesh laundry bag to protect it from damage. Use cool water and a mild detergent. Tumble dry on low or lay flat to dry.
7.2. Drying Techniques: Laying Flat vs. Tumble Drying
Proper drying techniques are essential for preventing stretching or shrinking of your crochet projects. Here are some guidelines:
- Laying Flat: Laying flat is the best way to dry most crochet projects. Gently reshape the item and lay it on a clean, dry towel. Turn the item over periodically to ensure even drying.
- Tumble Drying: Some yarns can be tumble dried on low heat. Check the yarn label for specific instructions. Remove the item promptly to prevent over-drying.
7.3. Storage Tips: Preventing Damage and Stretching
Proper storage can help prevent damage and stretching of your crochet projects. Here are some tips:
- Fold Items Neatly: Fold your crochet projects neatly to prevent wrinkles and creases.
- Store in a Cool, Dry Place: Store your crochet projects in a cool, dry place away from direct sunlight.
- Use Acid-Free Tissue Paper: Wrap delicate items in acid-free tissue paper to protect them from damage.
- Avoid Hanging: Avoid hanging crochet projects, as this can cause them to stretch out of shape.
7.4. Repairing Damaged Crochet: Basic Mending Techniques
Even with proper care, crochet projects can sometimes become damaged. Here are a few basic mending techniques:
- Weaving in Ends: If a yarn end comes loose, weave it back into the fabric using a yarn needle.
- Repairing Holes: Use a yarn needle and matching yarn to stitch up small holes.
- Replacing Stitches: If a stitch comes undone, use a crochet hook to recreate the stitch and secure it in place.
8. Personalizing Your Crochet: Adding Unique Touches
One of the best things about crochet is the ability to personalize your projects and add unique touches. Here are a few ways to personalize your crochet:
8.1. Choosing Unique Color Combinations
Experiment with different color combinations to create unique and eye-catching crochet projects. Here are a few tips for choosing color combinations:
- Use a Color Wheel: A color wheel can help you choose colors that complement each other.
- Look to Nature: Nature is a great source of inspiration for color combinations.
- Experiment: Don’t be afraid to experiment with different color combinations to see what you like.
8.2. Adding Embellishments: Beads, Buttons, and Appliqués
Embellishments can add a special touch to your crochet projects. Here are a few common embellishments:
- Beads: Sew beads onto your crochet projects to add sparkle and texture.
- Buttons: Use buttons to add a functional and decorative element.
- Appliqués: Crochet or felt appliqués can be sewn onto your projects to add a whimsical touch.
8.3. Modifying Patterns: Adjusting Size and Design
Once you’re comfortable with the basics of crochet, you can start modifying patterns to suit your own preferences. Here are a few ways to modify patterns:
- Adjust the Size: Add or subtract rows or rounds to adjust the size of your project.
- Change the Stitch Pattern: Substitute one stitch pattern for another to create a different texture or design.
- Add Your Own Details: Add your own unique details to the pattern, such as embellishments or colorwork.
8.4. Creating Your Own Designs: From Idea to Finished Product
Creating your own crochet designs can be a rewarding and creative experience. Here are a few tips for creating your own designs:
- Start with an Idea: Begin with an idea for a project.
- Sketch Your Design: Sketch out your design on paper.
- Choose Your Materials: Choose the yarn and hook that you want to use.
- Experiment with Stitches: Experiment with different stitches to see what works best for your design.
- Write Down Your Pattern: Write down the pattern as you go, so you can recreate it later.
9. The Crochet Community: Finding Support and Inspiration
Being part of a crochet community can provide support, inspiration, and valuable tips and tricks. Here are some ways to connect with other crocheters:
9.1. Local Crochet Groups and Clubs
Local crochet groups and clubs offer opportunities to meet other crocheters in person, share your projects, and learn new techniques. Check your local community center, yarn store, or library for information on local crochet groups.
9.2. Online Forums and Social Media Groups
Online forums and social media groups provide opportunities to connect with crocheters from all over the world. Share your projects, ask questions, and participate in discussions.
9.3. Crochet Events and Workshops
Crochet events and workshops offer opportunities to learn new techniques from experienced instructors and connect with other crocheters. Check your local yarn store or online for information on upcoming events and workshops.
9.4. Sharing Your Creations: Showcasing Your Work Online and Offline
Sharing your creations can be a rewarding experience. Here are a few ways to showcase your work:
- Online: Share your projects on social media, Ravelry, or your own blog or website.
- Offline: Enter your projects in local craft fairs or exhibitions.
10. Staying Motivated: Setting Goals and Celebrating Successes
Staying motivated is essential for continuing to improve your crochet skills. Here are a few tips for staying motivated:
10.1. Setting Achievable Goals
Set achievable goals for yourself. Start with small, manageable projects and gradually work your way up to more complex projects.
10.2. Tracking Progress and Celebrating Milestones
Track your progress and celebrate your milestones. Keep a journal of your projects and note the skills you’ve learned along the way.
10.3. Finding Inspiration from Others
Find inspiration from other crocheters. Look at their projects, read their blogs, and follow them on social media.
10.4. Rewarding Yourself for Accomplishments
Reward yourself for your accomplishments. Treat yourself to new yarn, a new hook, or a relaxing afternoon of crocheting.
FAQ: Your Questions Answered About Learning Crochet
1. Is crochet difficult to learn for beginners?
Not at all! Crochet is quite accessible, especially with resources like learns.edu.vn offering step-by-step guidance. Start with basic stitches and simple projects to build confidence.
2. What are the best yarn and hook sizes to start with?
Begin with a medium-weight yarn (size 4) and a corresponding hook size (around 5.0 mm or H-8). This combination is easier to handle for beginners.
3. How long does it take to learn basic crochet stitches?
Most people can learn basic crochet stitches like single crochet and double crochet in just a few hours with practice. Consistency is key!
4. Can left-handed people learn crochet easily?
Yes! Left-handed individuals can absolutely learn crochet. Many tutorials and resources are available specifically for left-handed crocheters.
5. What are some easy crochet projects for absolute beginners?
Simple projects like scarves, washcloths, and coasters are excellent starting points. They allow you to practice basic stitches without overwhelming complexity.
6. How do I prevent my crochet from curling?
Curling often occurs due to uneven tension. Ensure you maintain consistent tension throughout your project, and consider blocking your finished piece to help it lay flat.
7. What is the best way to read a crochet pattern?
Start by familiarizing yourself with common abbreviations and symbols. Read the pattern carefully before beginning, and use stitch markers to keep track of your progress.
8. How do I fix mistakes in my crochet project?
Don’t be afraid to “frog it” (rip out your stitches) back to the mistake. Crochet is forgiving, and it’s better to correct errors early than to continue with flawed work.