Embroidery is an accessible and rewarding craft, and understanding How To Learn Embroidery opens up a world of creative expression. At LEARNS.EDU.VN, we provide a structured approach to mastering embroidery, making it easy for beginners to pick up the necessary skills and start creating beautiful designs. This comprehensive guide covers everything from essential supplies to advanced techniques, ensuring you gain confidence and proficiency in your embroidery journey. Discover detailed tutorials and expert tips that make learning enjoyable and effective. With LEARNS.EDU.VN, you’ll find everything you need to kickstart your crafting adventure and boost your creative confidence.
1. What Is Embroidery And Why Learn It?
Embroidery is the art of decorating fabric or other materials with needle and thread or yarn. It’s a craft with a rich history, dating back thousands of years, and it continues to be a popular and versatile form of artistic expression today.
1.1. A Brief History of Embroidery
Embroidery has been practiced across cultures and throughout history. Archaeological finds have revealed examples of embroidery in ancient civilizations, including China, Egypt, and the Middle East. These early forms of embroidery were often used to adorn clothing, religious objects, and household textiles.
- Ancient Civilizations: Evidence of embroidery dates back to the Shang Dynasty in China (16th-11th centuries BC). Ancient Egyptians also used embroidery to decorate clothing and textiles, with examples found in tombs dating back to 3000 BC.
- Medieval Europe: Embroidery flourished during the Middle Ages in Europe, often used in ecclesiastical settings to create elaborate vestments and altar cloths. The Bayeux Tapestry, a 230-foot-long embroidered cloth depicting the Norman Conquest of England in 1066, is a famous example of medieval embroidery.
- Renaissance and Beyond: The Renaissance saw embroidery become more refined, with intricate designs and the use of luxurious materials like silk and gold thread. During the 18th and 19th centuries, embroidery became a popular pastime for women, with samplers and embroidered household items becoming common.
- Modern Embroidery: Today, embroidery continues to evolve, with contemporary artists pushing the boundaries of the craft. From traditional hand embroidery to machine embroidery, the possibilities are endless.
1.2. Benefits of Learning Embroidery
Learning embroidery offers numerous benefits, both practical and personal. Here are some key advantages:
- Creative Expression: Embroidery allows you to express your creativity and personalize your belongings. You can create unique designs, add embellishments to clothing, and make personalized gifts.
- Relaxation and Mindfulness: The repetitive motions of embroidery can be very relaxing and meditative. It provides a break from the stresses of daily life and allows you to focus on the present moment. A study published in the “Journal of Occupational Therapy” found that engaging in crafts like embroidery can reduce stress and improve mental well-being.
- Skill Development: Embroidery helps develop fine motor skills, hand-eye coordination, and attention to detail. These skills can be beneficial in other areas of life, such as writing, drawing, and problem-solving.
- Customization and Personalization: With embroidery, you can customize clothing, accessories, and home decor items to reflect your personal style. Adding embroidered details can transform ordinary items into unique pieces.
- Sustainable Crafting: Embroidery is a sustainable craft that encourages the reuse and repurposing of materials. You can use scraps of fabric and thread to create beautiful designs, reducing waste and promoting eco-friendly practices.
- Community and Connection: Embroidery can be a social activity, whether you join a local embroidery group or connect with other enthusiasts online. Sharing your work and learning from others can be a rewarding experience.
- Potential Income: If you become skilled at embroidery, you can potentially earn income by selling your creations at craft fairs, online marketplaces, or through custom orders.
1.3. Types of Embroidery
Embroidery encompasses a wide range of techniques and styles. Here are some of the most common types:
- Hand Embroidery: This involves using a needle and thread to create designs by hand. It includes various stitches and techniques, such as cross-stitch, satin stitch, and French knots.
- Needlepoint: A type of canvas work where yarn is stitched through a stiff canvas to create a dense, textured design.
- Cross-Stitch: A simple and popular form of embroidery where X-shaped stitches are used to create patterns on a gridded fabric.
- Crewel Embroidery: Uses wool thread to create textured designs on a tightly woven fabric, often featuring floral and natural motifs.
- Ribbon Embroidery: Involves using silk or satin ribbons to create three-dimensional designs, often incorporating flowers, leaves, and other decorative elements.
- Machine Embroidery: Uses a computerized sewing machine to create embroidered designs. This method is often used for mass production and customization of clothing and textiles.
- Whitework Embroidery: Employs white thread on white fabric to create delicate and intricate designs, often featuring cutwork and drawn thread techniques.
Understanding the different types of embroidery can help you choose the techniques that best suit your interests and creative goals.
2. Setting Up Your Embroidery Workspace
Creating a comfortable and well-organized workspace is essential for successful embroidery. A dedicated area can help you stay focused and efficient, making the process more enjoyable.
2.1. Essential Tools and Materials
Before you start embroidering, gather the necessary tools and materials. Here’s a list of essential items:
- Embroidery Needles: These come in various sizes, with sharp points and large eyes to accommodate embroidery floss. Size 7 or 9 are good general-purpose needles for beginners.
- Embroidery Floss: Also known as stranded cotton, embroidery floss is available in a wide range of colors. Brands like DMC and Anchor are popular choices for their quality and color selection.
- Fabric: Choose a fabric that is easy to work with, such as cotton, linen, or muslin. Tightly woven fabrics are ideal for preventing the stitches from distorting the fabric.
- Embroidery Hoop: This tool holds the fabric taut while you stitch, making it easier to create neat and even embroidery. Hoops come in various sizes and materials, such as wood or plastic.
- Scissors: Small, sharp scissors are essential for trimming threads and fabric. Embroidery scissors with curved blades are particularly useful for close work.
- Tracing Supplies: You’ll need a way to transfer your design onto the fabric. Options include:
- Water-soluble pens: These pens allow you to draw your design directly onto the fabric and wash it away with water after you finish stitching.
- Transfer paper: This paper allows you to trace your design onto the fabric using a pencil or stylus.
- Stabilizer: This material provides extra support to the fabric during embroidery, preventing it from puckering or stretching. It is especially useful for delicate or stretchy fabrics.
- Light Source: Good lighting is crucial for seeing the details of your work and preventing eye strain. A desk lamp or natural light near a window is ideal.
- Thread Organizer: Keeping your embroidery floss organized will save you time and frustration. Options include thread boxes, floss bobbins, and thread organizers.
- Needle Threader: A needle threader can be helpful for threading needles, especially for those with poor eyesight or working with fine threads.
2.2. Choosing the Right Fabric
The choice of fabric can significantly impact the outcome of your embroidery project. Here are some popular fabric options:
| Fabric | Description | Pros | Cons | Best For |
|---|---|---|---|---|
| Cotton | A natural fiber that is soft, durable, and easy to work with. | Affordable, readily available, easy to stitch, holds stitches well. | Can shrink, wrinkles easily. | Samplers, beginner projects, clothing. |
| Linen | A strong and absorbent natural fiber with a distinctive texture. | Durable, absorbent, gets softer with each wash, classic look. | More expensive, can be challenging for beginners due to its looser weave. | Heirloom projects, home décor. |
| Muslin | A lightweight, loosely woven cotton fabric that is often used for practice or as a backing for other fabrics. | Inexpensive, good for practice, lightweight. | Can fray easily, not as durable as other fabrics. | Practice projects, backing fabric. |
| Aida Cloth | A fabric with a grid pattern that is specifically designed for cross-stitch. | Easy to count stitches, consistent hole spacing. | Limited to cross-stitch, not as versatile for other embroidery techniques. | Cross-stitch projects. |
| Felt | A non-woven fabric that is made from compressed fibers. | Does not fray, easy to cut and shape, available in many colors. | Can stretch out of shape, not ideal for intricate designs. | Appliqués, small projects, decorative items. |
| Silk | A luxurious natural fiber with a smooth, lustrous texture. | Beautiful sheen, drapes well, lightweight. | Expensive, can be slippery and difficult to work with. | Special occasion projects, heirloom pieces. |
| Quilting Cotton | A tightly woven cotton fabric that is specifically designed for quilting but can also be used for embroidery. | Wide range of colors and patterns, easy to work with, holds stitches well. | Can be prone to shrinking. | Quilts, decorative items, clothing. |
| Denim | A sturdy cotton twill fabric that is commonly used for jeans and other durable clothing items. | Durable, casual look, can be easily embellished. | Can be difficult to stitch through, requires strong needles. | Denim jackets, bags, accessories. |
| Burlap | A coarse, loosely woven fabric made from jute or hemp fibers. | Rustic look, affordable. | Can be difficult to stitch through, frays easily. | Home décor, rustic-themed projects. |
| Canvas | A strong, heavy fabric that is often used for painting or upholstery but can also be used for embroidery. | Very durable, can hold heavy embellishments. | Can be difficult to stitch through, requires strong needles. | Bags, wall hangings, upholstery. |
| Velvet | A soft, luxurious fabric with a dense pile. | Rich texture, elegant look. | Can be challenging to embroider due to the pile, requires careful handling. | Decorative items, special occasion projects. |
| Terry Cloth | A looped fabric usually made of cotton, known for its absorbency and soft texture. | Absorbent, soft texture. | Loops can make stitching challenging, requires careful planning. | Towels, bathrobes, baby items. |
| Knitted Fabric | A fabric made by interlocking loops of yarn, which gives it a stretchy quality. | Stretchy and comfortable. | Requires special techniques to prevent distortion, can be difficult for beginners. | Clothing, accessories. |
| Synthetic | Fabrics like polyester or rayon, often blended with natural fibers for added durability or wrinkle resistance. | Often wrinkle-resistant, can be more affordable. | May not breathe as well as natural fibers, can be less comfortable in some climates. | Linings, durable items. |
| Cheesecloth | A loosely woven cotton fabric used in cooking and crafts. | Lightweight and inexpensive. | Very delicate and can tear easily. | Underlay for delicate embroidery, practice fabric. |
| Osnaburg | A coarse, plain-woven fabric similar to muslin but heavier. | Durable and inexpensive. | Can be rough and may require pre-washing to soften. | Practice and utility purposes. |
| Monk’s Cloth | A heavy, loosely woven cotton fabric with a distinctive basketweave pattern. | Durable and has a unique texture. | Can be prone to snagging. | Home décor projects. |
| Evenweave | Fabrics like linen or cotton that have a consistent thread count in both directions, making them ideal for counted thread embroidery. | Consistent weave makes it easy to count stitches. | Can be more expensive than other options. | Counted thread projects, samplers. |
| Canvaswork | A stiff canvas used as the base for needlepoint and other canvaswork embroidery techniques. | Provides a stable base for heavy stitching. | Limited to canvaswork techniques. | Needlepoint, canvaswork projects. |
| Huck Fabric | A textured fabric with raised floats, used primarily for huck embroidery (also known as Swedish weaving). | Easy to create textured patterns. | Limited to huck embroidery. | Huck embroidery projects. |

2.3. Setting Up Your Physical Space
- Choose a Comfortable Chair: Ensure your chair provides good back support to prevent discomfort during long stitching sessions.
- Optimize Lighting: Position your light source to minimize shadows and glare on your work surface.
- Arrange Your Supplies: Keep your tools and materials within easy reach. Use containers, drawers, or shelves to organize your supplies.
- Consider a Lap Desk: If you prefer to embroider on the couch or in bed, a lap desk can provide a stable and comfortable surface.
By setting up an organized and comfortable embroidery workspace, you’ll be better equipped to focus on your projects and enjoy the process of creating beautiful hand-embroidered designs.
3. Mastering Basic Embroidery Stitches
Embroidery stitches are the building blocks of any embroidery project. Mastering a few basic stitches will allow you to create a wide variety of designs and textures.
3.1. Essential Stitches for Beginners
Here are some essential embroidery stitches that every beginner should learn:
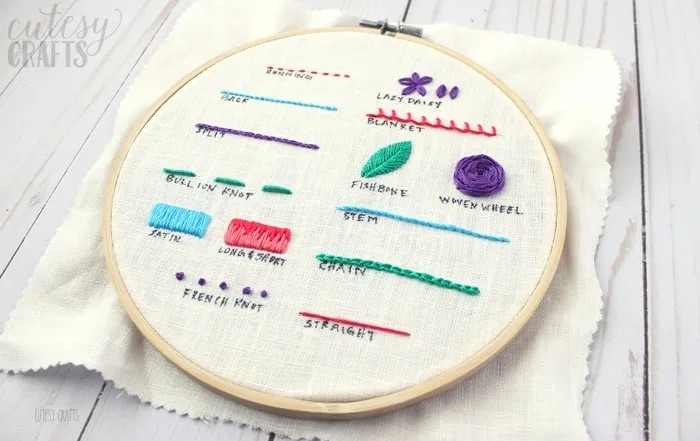
- Running Stitch: A simple stitch that creates a dashed line. It’s used for outlining, filling, and creating decorative details.
- Back Stitch: Creates a solid line and is often used for outlining and lettering.
- Split Stitch: Produces a textured line that resembles a chain. It’s often used for outlining and filling.
- Stem Stitch: Creates a slightly raised line that is ideal for outlining stems and curved shapes.
- Satin Stitch: Used to fill in shapes with smooth, solid areas of color.
- French Knot: Creates a small, textured dot that can be used for adding detail or filling in small areas.
3.2. Step-by-Step Tutorials
Each stitch involves a specific set of steps to ensure accuracy and neatness.
3.2.1. Running Stitch
- Bring the needle up through the fabric at point A.
- Insert the needle back down through the fabric at point B, a short distance away from A.
- Bring the needle up again at point C, a short distance away from B.
- Continue this process, creating a series of evenly spaced stitches.
3.2.2. Back Stitch
- Bring the needle up through the fabric at point A.
- Insert the needle back down through the fabric at point B, a short distance away from A.
- Bring the needle up again at point C, a short distance away from A.
- Insert the needle back down into the hole at point A.
- Continue this process, creating a solid line of stitches.
3.2.3. Split Stitch
- Bring the needle up through the fabric at point A.
- Insert the needle back down through the fabric at point B, a short distance away from A.
- Bring the needle up again, splitting the previous stitch in the middle.
- Continue this process, creating a textured line.
3.2.4. Stem Stitch
- Bring the needle up through the fabric at point A.
- Insert the needle back down through the fabric at point B, a short distance away from A.
- Bring the needle up again at point C, halfway between A and B, slightly to the side of the previous stitch.
- Continue this process, keeping the thread to the same side of the needle as you stitch.
3.2.5. Satin Stitch
- Bring the needle up through the fabric at point A.
- Insert the needle back down through the fabric at point B, directly across from A.
- Bring the needle up again at point C, right next to point A.
- Continue this process, filling the shape with smooth, parallel stitches.
3.2.6. French Knot
- Bring the needle up through the fabric at point A.
- Wrap the thread around the needle once or twice.
- Insert the needle back down through the fabric very close to point A.
- Gently pull the thread taut as you push the needle through the fabric, creating a small knot.
3.3. Tips for Practicing Stitches
- Start Simple: Begin with the easiest stitches, such as the running stitch and back stitch, before moving on to more complex techniques.
- Use a Sampler: Create a sampler with rows of different stitches to practice and compare your work.
- Maintain Tension: Keep the thread tension consistent to create even and neat stitches.
- Practice Regularly: The more you practice, the more comfortable and confident you’ll become with each stitch.
- Watch Tutorials: Refer to video tutorials and online resources for visual guidance and tips. LEARNS.EDU.VN offers a range of tutorials to support your learning.
4. Transferring Embroidery Patterns
Transferring a design onto fabric is a crucial step in the embroidery process. There are several methods you can use, each with its own advantages and disadvantages.
4.1. Methods for Transferring Patterns
- Tracing: This involves tracing the design onto the fabric using a light source and a pencil or water-soluble pen.
- Transfer Paper: This method uses special paper coated with a pigment that transfers onto the fabric when you trace over the design.
- Stick-and-Rinse Stabilizer: This stabilizer has an adhesive backing that sticks to the fabric, allowing you to stitch directly through it. After you finish stitching, you can rinse away the stabilizer with water.
- Iron-On Transfer Pencils: Draw or print your design onto paper, then iron it onto your fabric using a hot iron.
4.2. Step-by-Step Guides
4.2.1. Tracing Method
- Print or draw your design onto paper.
- Place the fabric over the design, ensuring it is centered and aligned correctly.
- Position the fabric and design against a light source, such as a window or light box.
- Use a water-soluble pen or pencil to trace the design onto the fabric.
- Remove the fabric and check that the design is clearly visible.
4.2.2. Transfer Paper Method
- Print or draw your design onto paper.
- Place the transfer paper between the design and the fabric, with the coated side facing the fabric.
- Use a pencil or stylus to trace the design onto the transfer paper, applying firm pressure.
- Remove the transfer paper and check that the design has transferred onto the fabric.
4.2.3. Stick-and-Rinse Stabilizer Method
- Print or draw your design onto paper.
- Peel off the backing from the stick-and-rinse stabilizer.
- Place the stabilizer over the fabric, smoothing out any wrinkles or bubbles.
- Trace the design onto the stabilizer using a pen or pencil.
- Stitch through the stabilizer and fabric as usual.
- After you finish stitching, rinse away the stabilizer with water.
4.2.4. Iron-On Transfer Pencils
- Draw or print your design onto paper using a special iron-on transfer pencil.
- Place the design face down on the fabric.
- Use a hot iron to press the design onto the fabric, following the manufacturer’s instructions.
- Peel off the paper and check that the design has transferred onto the fabric.
4.3. Tips for Accurate Transfers
- Use a Light Source: A light source will make it easier to see the design through the fabric, ensuring a more accurate transfer.
- Secure the Fabric: Use masking tape or pins to secure the fabric and design in place, preventing them from shifting during the transfer process.
- Apply Even Pressure: When tracing the design, apply even pressure to ensure that all the lines are transferred clearly.
- Test Your Pen: Before using a water-soluble pen on your fabric, test it on a scrap piece to ensure that it washes away completely.
- Read Instructions: Always read and follow the manufacturer’s instructions for transfer paper and stabilizers.
5. Embroidery Project Ideas for Beginners
Once you’ve mastered the basic stitches and transfer methods, you can start working on simple embroidery projects. These projects are designed to help you build your skills and confidence while creating beautiful and functional items.
5.1. Simple Starter Projects
- Embroidered Sampler: Create a sampler with rows of different stitches to practice and showcase your skills.
- Monogrammed Handkerchief: Add a personal touch to a plain handkerchief by embroidering your initials or a simple design.
- Embroidered Tote Bag: Embellish a plain tote bag with an embroidered design, such as flowers, animals, or geometric patterns.
- Embroidered Coasters: Create a set of embroidered coasters to protect your furniture and add a decorative touch to your home.
- Embroidered Patches: Design and create your own embroidered patches to customize clothing, bags, or accessories.
5.2. Step-by-Step Project Guides
5.2.1. Embroidered Sampler
- Choose a piece of fabric, such as cotton or linen.
- Divide the fabric into rows using a ruler and pencil.
- Select a variety of embroidery stitches to practice.
- Stitch each row with a different stitch, labeling each row with the name of the stitch.
- Frame the sampler or display it as a reference guide.
5.2.2. Monogrammed Handkerchief
- Choose a plain handkerchief.
- Select a monogram design or create your own.
- Transfer the design onto the handkerchief using your preferred method.
- Embroider the design using back stitch or satin stitch.
- Press the handkerchief to remove any wrinkles.
5.2.3. Embroidered Tote Bag
- Choose a plain tote bag.
- Select an embroidery design or create your own.
- Transfer the design onto the tote bag using your preferred method.
- Embroider the design using a variety of stitches.
- Reinforce the stitches on the inside of the bag to prevent them from unraveling.
5.2.4. Embroidered Coasters
- Cut out circles of fabric to the desired size for your coasters.
- Select an embroidery design or create your own.
- Transfer the design onto each coaster.
- Embroider the design using a variety of stitches.
- Add a backing to each coaster using felt or cork.
5.2.5. Embroidered Patches
- Choose a piece of fabric for your patch.
- Select an embroidery design or create your own.
- Transfer the design onto the fabric.
- Embroider the design using a variety of stitches.
- Cut out the patch, leaving a small border around the design.
- Finish the edges of the patch with a satin stitch or zigzag stitch.
- Attach the patch to clothing, bags, or accessories using iron-on adhesive or by sewing it on.
5.3. Tips for Successful Projects
- Choose Simple Designs: Start with simple designs that feature basic shapes and stitches.
- Use Contrasting Colors: Choose thread colors that contrast with the fabric to make the design stand out.
- Maintain Tension: Keep the thread tension consistent to create even and neat stitches.
- Take Your Time: Embroidery is a slow and methodical process, so take your time and enjoy the process.
- Don’t Be Afraid to Experiment: Try different stitches, colors, and designs to find your own unique style.
6. Advanced Embroidery Techniques
Once you’ve mastered the basics, you can explore more advanced embroidery techniques to add depth and complexity to your projects.
6.1. Intermediate to Advanced Stitches
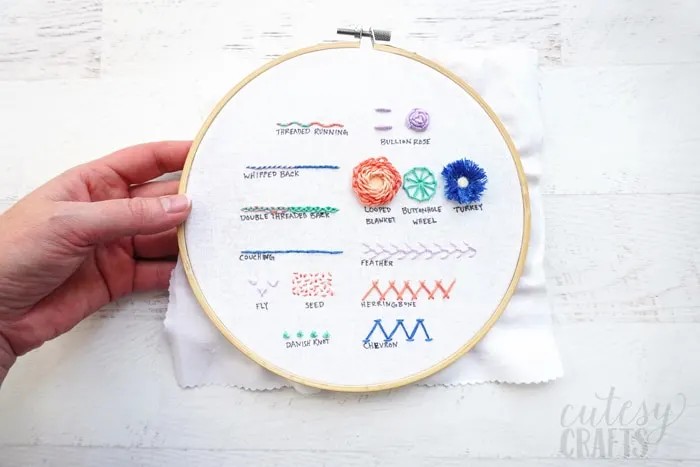
- Long and Short Stitch: Creates a shaded effect by varying the length of the stitches.
- Seed Stitch: Fills in areas with small, scattered stitches to create a textured effect.
- Couching Stitch: Secures a thicker thread or cord to the fabric using small stitches.
- Turkey Work Stitch: Creates a looped pile that can be trimmed to create a textured surface.
- Cast-On Stitch: Forms a three-dimensional loop that can be used to create petals, leaves, and other decorative elements.
6.2. Incorporating Different Materials
- Beads and Sequins: Add sparkle and texture to your embroidery by incorporating beads and sequins into your designs.
- Ribbon Embroidery: Use silk or satin ribbons to create three-dimensional designs, often incorporating flowers, leaves, and other decorative elements.
- Yarn Embroidery: Use yarn instead of thread to create bold and textured designs.
- Mixed Media: Combine embroidery with other materials, such as fabric scraps, paper, and found objects, to create unique and multi-dimensional artworks.
6.3. Creating Texture and Dimension
- Padding: Add padding underneath your stitches to create a raised effect.
- Layering: Layer different stitches and materials to create depth and dimension.
- Shading: Use different colors and stitch lengths to create shaded effects.
- Stumpwork: Create three-dimensional elements that stand out from the fabric using wire, padding, and embroidery.
7. Caring For Your Embroidery
Proper care will ensure that your embroidery projects last for years to come. Here are some tips for washing, drying, and storing your embroidered items.
7.1. Washing and Drying
- Hand Wash: Hand washing is the gentlest way to clean your embroidery. Use cold water and a mild detergent.
- Machine Wash: If you choose to machine wash your embroidery, use a gentle cycle and place the item in a mesh laundry bag to protect it from damage.
- Avoid Bleach: Do not use bleach or harsh chemicals, as they can damage the fabric and fade the colors.
- Line Dry: Line drying is the best way to dry your embroidery. Avoid using a dryer, as the heat can cause the fabric to shrink and the stitches to distort.
- Ironing: Iron your embroidery on the reverse side, using a low heat setting and a pressing cloth to protect the stitches.
7.2. Storing Your Embroidery
- Clean and Dry: Make sure your embroidery is clean and completely dry before storing it.
- Acid-Free Materials: Use acid-free tissue paper or muslin to wrap your embroidery and prevent it from yellowing or deteriorating over time.
- Avoid Direct Sunlight: Store your embroidery in a cool, dark place away from direct sunlight, which can fade the colors.
- Flat Storage: Store your embroidery flat to prevent creases and wrinkles.
- Framing: Framing your embroidery can protect it from dust and damage while also displaying it beautifully.
7.3. Repairing Damaged Embroidery
- Loose Threads: Secure any loose threads by re-stitching them or tying them off on the back of the embroidery.
- Torn Fabric: Repair torn fabric by patching it with a similar fabric and stitching around the edges of the patch.
- Stained Embroidery: Treat stains as soon as possible using a mild detergent and a soft cloth. Avoid rubbing the stain, as this can damage the fabric and stitches.
8. Finding Inspiration and Resources
Embroidery is a craft that is constantly evolving, with new techniques, materials, and designs emerging all the time. Here are some resources to help you stay inspired and connected to the embroidery community:
8.1. Online Communities and Forums
- Online Embroidery Groups: Join online embroidery groups on social media platforms like Facebook, Instagram, and Reddit to connect with other enthusiasts, share your work, and ask for advice.
- Embroidery Forums: Participate in online embroidery forums to discuss techniques, patterns, and materials with other embroiderers.
- LEARNS.EDU.VN Community: Engage with the LEARNS.EDU.VN community to share your projects, ask questions, and learn from other members.
8.2. Books and Magazines
- Embroidery Technique Books: Look for books that provide detailed instructions and illustrations for a wide range of embroidery stitches and techniques.
- Embroidery Pattern Books: Find books that feature a variety of embroidery patterns for different skill levels and styles.
- Embroidery Magazines: Subscribe to embroidery magazines to stay up-to-date on the latest trends, techniques, and patterns.
8.3. Online Tutorials and Courses
- YouTube Channels: Follow embroidery tutorials on YouTube to learn new stitches, techniques, and projects.
- Online Embroidery Courses: Enroll in online embroidery courses to receive structured instruction and personalized feedback from experienced instructors.
- LEARNS.EDU.VN Courses: Explore the embroidery courses offered by LEARNS.EDU.VN to enhance your skills and knowledge.
9. Selling Your Embroidery
If you enjoy embroidery and want to turn your hobby into a business, there are several ways to sell your creations.
9.1. Setting Up an Online Shop
- Etsy: Etsy is a popular online marketplace for handmade and vintage items. Setting up an Etsy shop is relatively easy, and it provides access to a large customer base.
- Shopify: Shopify is a platform that allows you to create your own online store. It offers more customization options than Etsy, but it also requires more effort to set up and maintain.
- Social Media: Use social media platforms like Instagram and Facebook to showcase your work and sell directly to your followers.
9.2. Participating in Craft Fairs
- Local Craft Fairs: Participate in local craft fairs and markets to sell your embroidery in person. This is a great way to connect with customers and get feedback on your work.
- Regional Craft Fairs: Consider participating in larger regional craft fairs to reach a wider audience.
9.3. Pricing Your Embroidery
- Materials: Calculate the cost of all the materials used in your embroidery, including fabric, thread, beads, and other embellishments.
- Labor: Estimate the number of hours you spent working on the embroidery and multiply it by your desired hourly rate.
- Overhead: Factor in any overhead costs, such as rent, utilities, and marketing expenses.
- Profit: Add a percentage to cover your profit margin.
- Research: Research the prices of similar items sold by other embroiderers to ensure that your prices are competitive.
10. Frequently Asked Questions (FAQs) About Learning Embroidery
Here are some frequently asked questions about learning embroidery, along with detailed answers to help you on your journey.
10.1. Is Embroidery Difficult to Learn?
Embroidery is not difficult to learn, especially if you start with the basics. With a little practice, anyone can master the basic stitches and techniques.
10.2. What Are the Most Important Embroidery Supplies to Start With?
The most important embroidery supplies to start with are embroidery needles, embroidery floss, fabric, an embroidery hoop, and scissors.
10.3. How Do I Transfer a Pattern onto Fabric?
You can transfer a pattern onto fabric using several methods, including tracing, transfer paper, stick-and-rinse stabilizer, and iron-on transfer pencils.
10.4. What Is the Easiest Embroidery Stitch to Learn?
The easiest embroidery stitch to learn is the running stitch, followed by the back stitch.
10.5. How Do I Prevent My Fabric from Puckering While Embroidering?
To prevent your fabric from puckering while embroidering, use an embroidery hoop to keep the fabric taut, and maintain consistent thread tension.
10.6. How Do I Finish the Back of My Embroidery?
To finish the back of your embroidery, secure any loose threads by re-stitching them or tying them off. You can also cover the back of the embroidery with a piece of felt or fabric to protect the stitches.
10.7. How Do I Choose the Right Fabric for Embroidery?
Choose a fabric that is easy to work with, such as cotton, linen, or muslin. Tightly woven fabrics are ideal for preventing the stitches from distorting the fabric.
10.8. How Do I Wash My Embroidered Items?
Hand wash your embroidered items in cold water with a mild detergent. Avoid using bleach or harsh chemicals, and line dry the items to prevent shrinking or distortion.
10.9. How Can I Improve My Embroidery Skills?
Practice regularly, experiment with different stitches and techniques, and seek inspiration from online communities, books, and tutorials.
10.10. Where Can I Find Free Embroidery Patterns?
You can find free embroidery patterns online from various sources, including blogs, websites, and social media groups. LEARNS.EDU.VN also offers a selection of free patterns for our community members.
Embroidery is a rewarding craft that offers endless opportunities for creativity and self-expression. By following the tips and techniques outlined in this guide, you can master the basics, explore advanced techniques, and create beautiful and unique embroidery projects. Remember to practice regularly, stay inspired, and connect with the embroidery community to enhance your skills and knowledge.
Ready to start your embroidery journey? Visit LEARNS.EDU.VN today to discover a wide range of tutorials, patterns, and courses that will help you unlock your creative potential. Whether you’re a beginner or an experienced embroiderer, you’ll find valuable resources and inspiration to take your skills to the next level. Contact us at 123 Education Way, Learnville, CA 90210, United States or Whatsapp: +1 555-555-1212. Let learns.edu.vn be your guide to mastering the art of embroidery. Join our community and start creating beautiful hand-embroidered designs today!